
Popular categories
Looking for a yarn?


Comments / Questions (20)
![]() Debora wrote:
Debora wrote:
Buongiorno, vorrei un chiarimento sulle misure finali del golf. Ho lavorato fino alla divisione degli scalfi =26 cm. Poi ho diviso e continuato x 18 cm sul corpo prima di fare 6 cm di bordo. Il totale fa 50 non 54 come da schema finale... Forse sono compresi nel totale anche i 4 cm del bordo collo? Comunque non mi tornano i conti nemmeno con le asole, vengono 5 e non 6,sto lavorando la TG S Grazie mille
03.07.2021 - 12:00DROPS Design answered:
Buonasera Debora, se guarda lo schema delle misure, può vedere che il collo non è compreso nei 54 cm. Per le asole, ha lavorato la prima sul collo? Buon lavoro!
04.07.2021 - 20:54
![]() Irene wrote:
Irene wrote:
Er det mulig å bytte garnet til å strikke med air og kid silk ?
28.05.2021 - 07:58DROPS Design answered:
Hej Irene, Ja det kan du gøre, garn fra garngruppe A+C = D :)
28.05.2021 - 13:38
![]() Regina wrote:
Regina wrote:
KAARROKKEEN LISÄYKSET: Kun olen tehnyt ensimmäiset lisäykset, niin teenkö seuraavalla oikealla kerroksella siten, että lisäys, 2 s oikein, lisäys? ja sitten seur oikealla krs:lla lisäys, 4 s o, lisäys?? Ohje on epäselvä. VAI lisätäänkö aina silmukat vierekkäin. LISÄKSI: eikö hihoihin tule lainkaan pitsineuletta. Kuvasta ei saa selvää kuvion osalta.
15.05.2021 - 15:11
![]() Nicole wrote:
Nicole wrote:
For the saddle shoulder part, does the number of stitches stay the same when worked? or do we increase for the shoulder part too? On the wrong side do we increase? Do we increase on the same stitch we increased on for the right side? Also what do you mean by "I.e. increase on EVERY row, and increase differently from right and wrong side, so that stitches are placed nicely." Does it mean we always increase next to the markers placed?
09.05.2021 - 20:56DROPS Design answered:
Dear Nicole, the pattern tells you that first you set up the yoke, then increase to shape the saddle shoulder. Yes, the increases are done in the same stitch, only done differently from the right and wrong side, so each increase would lean the same way afterwards. It always heps to make sense of the patterns to read them through, sometimes even several time, and make notes, so you can understand even when a couple of things happen at once. Happy Knitting!
09.05.2021 - 22:15
![]() Elly wrote:
Elly wrote:
Goede middag, Ik vind het voor de groter maten niet duidelijk. Ik houd dus meer steken over bij het tweede tour fantasie breien. Logisch want ik heb er voor maat large ook 4 meer opgezet. Moet ik nu over deze steken geen patroon meert breien onder de mouwen? Vriendelijke groet Elly
04.05.2021 - 13:17
![]() Nicole wrote:
Nicole wrote:
If we increase after the second stitch, I have 26 stitches instead of 25. Do I just knit the extra stitch then do A.2? This is for the back increase.
23.04.2021 - 20:06DROPS Design answered:
Dear Nicole, when increasing for saddle shoulders, you will increase before 1st marker = left front piece; After 2nd Marker + before 3rd marker = back piece and after 4th marker = right front piece. This means you increase 1 stitch on each front piece and 2 sts on back piece, after 1st increase for saddle shoulder you should have 27 sts for back piece between stitches with a marker. Happy knitting!
26.04.2021 - 07:15
![]() Nicole wrote:
Nicole wrote:
If we increase after the second stitch, I have 26 stitches instead of 25. Do I just knit the extra stitch then do A.2?
23.04.2021 - 19:19DROPS Design answered:
Dear Nicole, Can you tell us, which increase it is? Happy Knitting!
23.04.2021 - 19:55
![]() Marioli wrote:
Marioli wrote:
Alegría de pimavera
07.01.2021 - 22:52
![]() Anna Nieminen wrote:
Anna Nieminen wrote:
Sunflower whisper
07.01.2021 - 18:46
![]() Helena wrote:
Helena wrote:
Sunshine
07.01.2021 - 15:53
|
|||||||||||||||||||||||||
Sunshine Impressions#sunshineimpressionscardigan |
|||||||||||||||||||||||||
 |
 |
||||||||||||||||||||||||
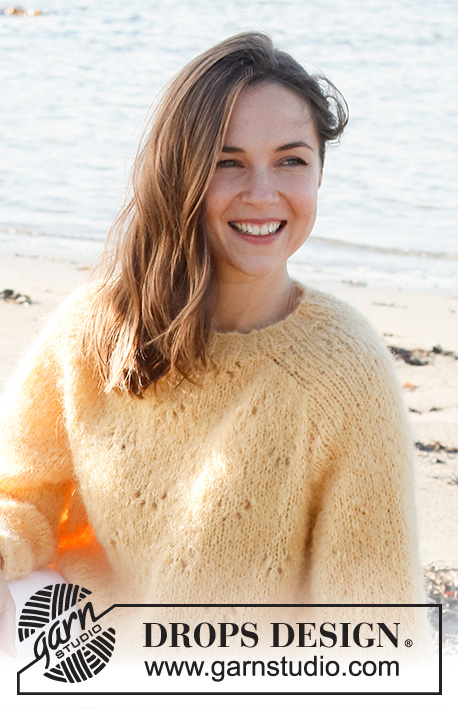
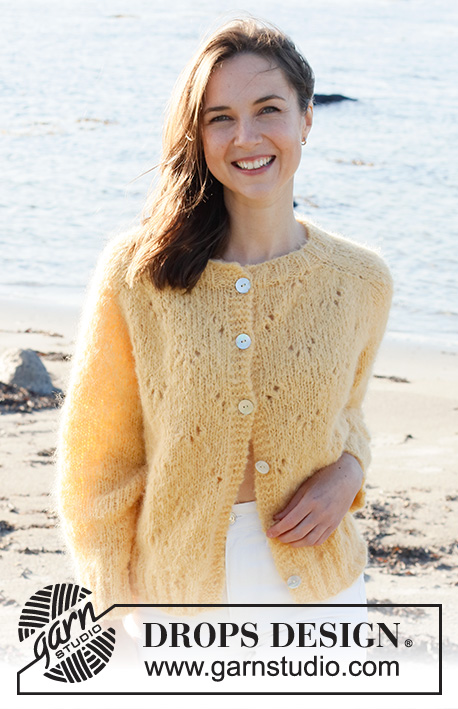
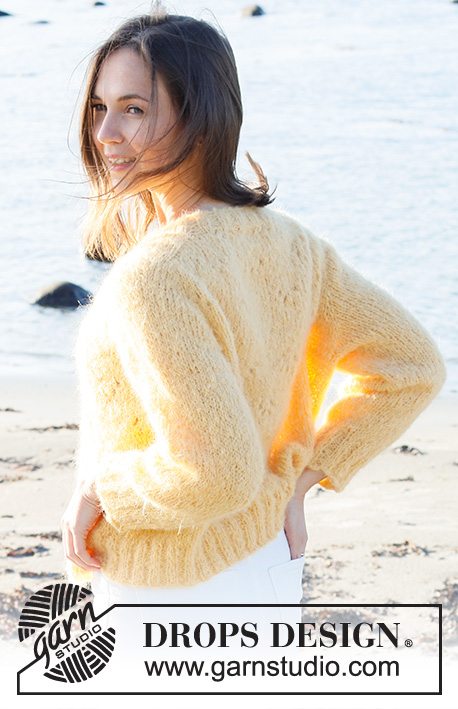
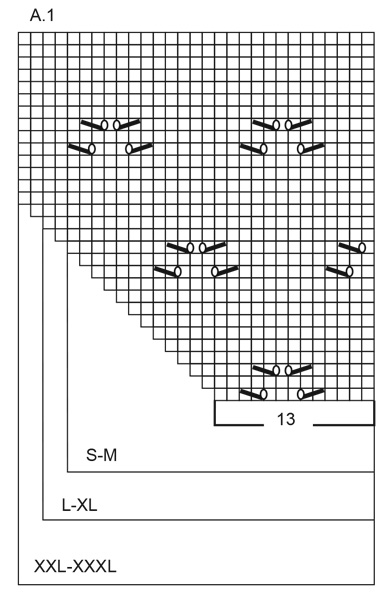
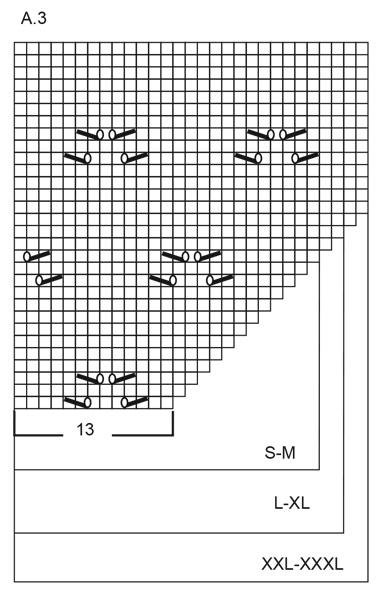
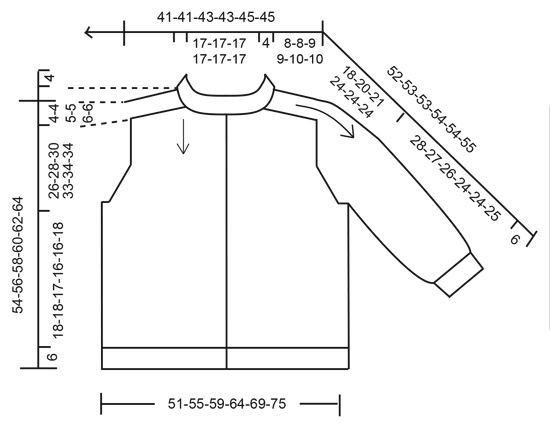
Knitted jacket in DROPS Melody. Piece is knitted top down with lace pattern and saddle shoulders. Size: S - XXXL
DROPS 221-31 |
|||||||||||||||||||||||||
|
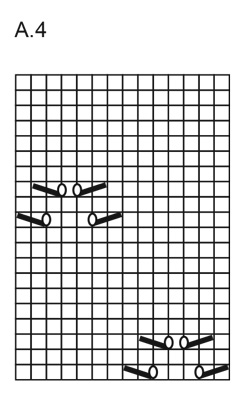
------------------------------------------------------- EXPLANATION FOR THE PATTERN: ------------------------------------------------------- PATTERN: See diagrams A.1, A.2, A.3 and A.4. Diagrams show all rows in pattern seen from the right side. RIDGE/GARTER STITCH (worked back and forth): Knit all rows. 1 ridge in height = Knit 2 rows. INCREASE TIP-1 (evenly): To calculate how to increase evenly, use the total number of stitches on row (e.g. 76 stitches) minus bands (e.g. 10 stitches) and divide the remaining stitches by number of increases to be done (e.g. 6) = 11. In this example increase by making 1 yarn over after every 11th stitch, and do not increase over bands. On next row work yarn overs twisted to avoid holes INCREASE TIP-2 (from right side): BEFORE MARKER: The stitch is twisted towards the right. Use left needle to pick up thread between 2 stitches from row below, pick up thread from behind and knit stitch in front loop. AFTER MARKER: The stitch is twisted towards the left. Use left needle to pick up thread between 2 stitches from row below, pick up thread from front and knit stitch in back loop. INCREASE TIP-3 (from wrong side): BEFORE MARKER: The stitch is twisted towards the right. Use left needle to pick up thread between 2 stitches from row below, pick up thread from front and purl stitch in back loop. AFTER MARKER: The stitch is twisted towards the left. Use left needle to pick up thread between 2 stitches from row below, pick up thread from behind and purl stitch in front loop. BUTTONHOLES: Decrease for buttonholes on right band (when garment is worn). Decrease from right side when 3 stitches remain on row as follows: Make 1 yarn over, knit the next 2 stitches together, knit last stitch. On next row (wrong side) knit the yarn over to make a hole. Decrease first buttonhole when rib in neck measures approx. 3-4 cm = 1⅛"-1½". Then decrease the next 5-5-6-6-6-6 buttonholes, approx. 9-9½-8½-8½-9-9 cm = 3½"-3⅝"-3¼"-3¼"-3½"-3½" apart. DECREASE TIP (applies to mid under sleeves): Decrease 1 stitch on each side of marker thread as follows: Work until 3 stitches remain before marker thread, knit 2 together, knit 2 (marker thread is in the middle of these stitches), knit 2 twisted together (= 2 stitches decreased). BIND-OFF TIP: To avoid a tight bind-off edge you may use a larger needle size. If this also is too tight make 1 yarn over after approx. every 4th stitch while binding off (bind off yarn overs as regular stitches). ------------------------------------------------------- START THE PIECE HERE: ------------------------------------------------------- JACKET - SHORT OVERVIEW OF THE PIECE: Piece is worked back and forth, top down. On yoke increase stitches out for shoulder, then increase stitches out for sleeve and finally increase stitches for yoke. Now divide yoke for body and sleeves. Work body back and forth, top down. Work sleeves in the round on double pointed needles, top down. NECK EDGE: Cast on 76-76-80-80-84-84 stitches (including 5 band stitches in each side) on circular needle size 5 MM = US 8 with Melody. Purl 1 row from wrong side. Work next row as follows from right side: 5 stitches in GARTER STITCH – read description above, * knit 2, purl 2 *, work from *-* until 7 stitches remain, knit 2 and 5 stitches in garter stitch. Decrease for BUTTONHOLES on right band - read explanation above. Continue rib back and forth for 4 cm = 1½", on last row increase 9 stitches evenly - read INCREASE TIP-1 = 85-85-89-89-93-93 stitches. Switch to circular needle size 6 MM = US 10. YOKE: Insert a marker at beginning of row – MEASURE PIECE FROM HERE. In addition insert 4 new markers in piece as explained below - this is done without working the stitches, and insert each of this 4 markers between 2 stitches. Use markers when increasing for saddle shoulder, and should be in another color than marker in the neck to separate them. 1st marker: Count 18-18-18-18-18-18 stitches (= front piece), insert 1st marker before next stitch. 2nd marker: Count 12-12-14-14-16-16 stitches from 1st marker (= shoulder stitches), insert 2nd marker before next stitch. 3rd marker: Count 25-25-25-25-25-25 stitches from 2nd marker (= back piece), insert 3rd marker before next stitch. 4th marker: Count 12-12-14-14-16-16 stitches from 3rd marker (= shoulder stitches), insert 4th marker before next stitch. 18-18-18-18-18-18 stitches remain on front piece after 4th marker. Move these 4 markers upwards when working; increase at each of these markers. SADDLE SHOULDER INCREASE: Read all of the following section before working! Now work piece with A.1 over stitches on left front piece, A.2 over stitches on back piece and A.3 over stitches on right front piece (see diagram for your size). Work stitches on saddle shoulder/sleeve in stockinette stitch. Work the 5 band stitches in each side towards mid front in garter stitch. AT THE SAME TIME on first row from right side increase 4 stitches for saddle shoulder as follows: Increase BEFORE 1st and 3rd marker and increase AFTER 2nd and 4th marker – read INCREASE TIP-2. Increase only on front pieces and back piece, and number of shoulder stitches remains the same. On next row from wrong side increase 4 stitches for saddle shoulder as follows: Increase BEFORE 4th and 2nd marker and increase AFTER 3rd and 1st marker – read INCREASE TIP-3. I.e. increase on EVERY row, and increase differently from right and wrong side, so that stitches are placed nicely. Continue the pattern like this, and increase the same way on every row (i.e. every row from right side and from wrong side) 12-12-14-14-16-16 times in total = 133-133-145-145-157-157 stitches (work the increased stitches in diagram A.1, A.2 and A.3). REMEMBER THE KNITTING GAUGE! After last increase piece measures approx. 8-8-9-9-10-10 cm = 3⅛"-3⅛"-3½"-3½"-4"-4" from marker by the neck. Then increase for sleeves as explained below. SLEEVE INCREASE: NOTE! Do not increase in size XXXL, move on to yoke increase in this size. SIZE S-M-L-XL-XXL: Work in stockinette stitch on sleeves, and continue pattern the same way as before on body. When A.1, A.2 and A.3 have been worked vertically, continue pattern upwards as before (A.4 shows 1 repetition of pattern), make sure that A.4 fits over stitches from A.1 to A.3. AT THE SAME TIME on next row increase 4 stitches for sleeves as follows: Increase AFTER 1st and 3rd marker and increase BEFORE 2nd and 4th marker – remember INCREASE TIP -2 and -3. Now increase only on sleeve, and number of stitches on front pieces and back piece stays the same. Work the increased stitches in stockinette stitch. Increase like this on every other row (= every row from right side) 5-4-5-4-3 times in total = 153-149-165-161-169 stitches. Piece measures approx. 14-12-15-13-13 cm = 5½"-4¾"-6"-5⅛"-5⅛" from marker at the neck. Then increase for yoke as explained below. ALL SIZES: YOKE INCREASE: Move the 4 marker from sleeve increase so that each of the 4 markers is in the outermost stitch in each side on each sleeve. There are 22-20-24-22-22-16 stitches between stitches with markers on each sleeve. On next row increase 8 stitches for yoke by increasing both before and after each of the 4 stitches with markers - remember INCREASE TIP-2. Increase stitches on front pieces, back piece and on both sleeves, and work the increased stitches in A.4 on body and stockinette stitch on sleeves. Increase like this on every other row (= every other row from right side) 9-12-12-15-16-19 times in total = 225-245-261-281-297-309 stitches. When all increases are done, the piece measures approx. 26-28-30-33-34-34 cm = 10¼"-11"-11¾"-13"-13⅜"-13⅜" from marker at the neck. If the piece is shorter than this, work as before without increases until correct measurements. On next row from right side divide piece for body and sleeves as follows: Work the first 39-42-44-47-50-53 stitches (= left front piece), slip the next 40-44-48-52-54-54 stitches on a stitch holder for sleeve, cast on 4-4-6-6-8-10 stitches under sleeve, work 67-73-77-83-89-95 stitches (= back piece), slip the next 40-44-48-52-54-54 stitches on a stitch holder for sleeve, cast on 4-4-6-6-8-10 stitches under sleeve, work the last 39-42-44-47-50-53 stitches (= right front piece). Then finish body and sleeves separately. BODY: = 153-165-177-189-205-221 stitches. Continue with 5 band stitches in garter stitch and pattern as before, work stitches that do not fit the pattern in each side in stockinette stitch. When piece measures 18-18-17-16-16-18 cm = 7"-7"-6¾"-6¼"-6¼"-7" from division, knit 1 row from right side while decreasing 1 stitch = 152-164-176-188-204-220 stitches. Switch to circular needle size 5 MM = US 8. Work next row as follows from wrong side: 5 band stitches in garter stitch, * purl 2, knit 2 *, repeat from *-* until 7 stitches remain on needle, purl 2 and finish with 5 band stitches in garter stitch. Continue rib like this for 6 cm = 2⅜". Loosely bind off with knit over knit and purl over purl, read BIND-OFF TIP. Jacket measures approx. 54-56-58-60-62-64 cm = 21¼"-22"-22¾"-23⅝"-24⅜"-25¼" from shoulder. SLEEVES: Slip the 40-44-48-52-54-54 stitches from stitch holder in one side on a short circular needle/double pointed needles size 6 MM = US 10. Pick in addition up 1 stitch in each of the 4-4-6-6-8-10 new stitches under sleeve = 44-48-54-58-62-64 stitches. Insert 1 marker in the middle of the new stitches under the sleeve. Decrease on each side of this marker later. Work in stockinette stitch in the round. When piece measures 3 cm = 1⅛" from division, decrease 1 stitch on each side of marker - read DECREASE TIP. Repeat the decrease every 5-4-2½-2-2-2 cm = 2"-1½"-1"-¾"-¾"-¾" 5-6-9-10-11-11 times in total = 34-36-36-38-40-42 stitches. Continue in stockinette stitch until piece measures 28-27-26-24-24-25 cm = 11"-10⅝"-10¼"-9½"-9½"-9¾" from division. Knit 1 round while increasing 10-8-12-10-12-10 stitches evenly = 44-44-48-48-52-52 stitches. Switch to double pointed needles size 5 MM = US 8. Work rib (knit 2/purl 2) in the round for 6 cm = 2⅜". Bind off with knit over knit and purl over purl - remember BIND-OFF TIP. Work the other sleeve the same way. ASSEMBLY: Sew the buttons on to the left band. |
|||||||||||||||||||||||||
Diagram explanations |
|||||||||||||||||||||||||
|
|||||||||||||||||||||||||
 |
|||||||||||||||||||||||||
 |
|||||||||||||||||||||||||
 |
|||||||||||||||||||||||||
 |
|||||||||||||||||||||||||
 |
|||||||||||||||||||||||||
 |
|||||||||||||||||||||||||
Have you finished this pattern?Tag your pictures with #dropspattern #sunshineimpressionscardigan or submit them to the #dropsfan gallery. Do you need help with this pattern?You'll find 31 tutorial videos, a Comments/Questions area and more by visiting the pattern on garnstudio.com. © 1982-2026 DROPS Design A/S. We reserve all rights. This document, including all its sub-sections, has copyrights. Read more about what you can do with our patterns at the bottom of each pattern on our site. |
|||||||||||||||||||||||||


With over 40 years in knitting and crochet design, DROPS Design offers one of the most extensive collections of free patterns on the internet - translated to 17 languages. As of today we count 325 catalogs and 12298 patterns - 12288 of which are translated into English (US/in).
We work hard to bring you the best knitting and crochet have to offer, inspiration and advice as well as great quality yarns at incredible prices! Would you like to use our patterns for other than personal use? You can read what you are allowed to do in the Copyright text at the bottom of all our patterns. Happy crafting!
Post a comment to pattern DROPS 221-31
We would love to hear what you have to say about this pattern!
If you want to leave a question, please make sure you select the correct category in the form below, to speed up the answering process. Required fields are marked *.