
Popular categories
Looking for a yarn?


Comments / Questions (30)
![]() Ulrika wrote:
Ulrika wrote:
Det är dags att öka vid sidorna nu men jag får inte kläm på hur jag ska göra. Finns det nån video som visar hur jag ska göra med tanke på mönstret?
04.03.2026 - 13:58DROPS Design answered:
Hei Ulrika. Har dessverre ingen video, men de økte maskene strikkes fortløpende inn i A.1, dvs de 2 første maskene strikkes i glattstrikk, de 2 neste i rille, de 2 neste i glattstrikk osv. Om du ikke har nok masker til f.eks 2 glattstrikk, strikkes det 1 glattstrikk/1 rett slik at de nye maskene tilpasset mønstret. mvh DROPDS Design
23.03.2026 - 10:42
![]() Dagny wrote:
Dagny wrote:
Jeg ser en der spørger ang opsamling af masker i midterstkket jeg kan også kun finde 27 m
30.01.2026 - 09:33DROPS Design answered:
Hei Dagny. Tenker du på midtpartiet når arbeidet måler 14-16 cm og det skal plukkes opp 33-37 masker i hver side? Da må du tilpasse det slik at man greier å plukke opp det antall masker i den str. du strikker som det står i oppskriften. mvh DROPS Design
30.01.2026 - 14:02
![]() Grubin wrote:
Grubin wrote:
Bonjour, j’ai bien lu la partie « augmentations » mais je ne comprend tout de même pas comment faire. A 7 mailles du bord si je fais une augmentation ensuite le motif est decalé.
06.01.2025 - 19:10DROPS Design answered:
Bonjour Mme Grubin, effectivement, le motif sera décalé, mais ce n'est pas grave, quand toutes les augmentations seront faites, le point tombera de nouveau juste, jusque là, tricotez les augmentations comme indiqué sous AUGMENTATIONS. Bon tricot!
07.01.2025 - 09:28
![]() Grubin wrote:
Grubin wrote:
Bonjour, Je suis au moment des augmentations et je ne comprend pas comment augmenter sans que le motif se décale sur tout l’ouvrage? Merci de vos explications
05.01.2025 - 21:27DROPS Design answered:
Bonjour Mme Grubin, augmentez comme indiqué sous AUGMENTATIONS au début des explications pour que le point fantaisie soit plus large mais sans le décaler. Bon tricot!
06.01.2025 - 10:58
![]() Stefanie wrote:
Stefanie wrote:
Ich habe Schwierigkeiten bei dem Verständnis der Zunahmen. Wenn ich auf beiden Seiten eine Masche zunehme und dann diese Masche in der Rückreihe mitstricke und ich laut Anleitung in A 1 weiterstricke, verschiebt sich das Muster (um je 1 Masche versetzt). Wo ist mein Fehler? Vielen Dank vorab für eine Rückmeldung.
05.01.2025 - 18:13DROPS Design answered:
Liebe Stefanie, das Muster soll nicht verschoben werden, die neuen Maschen stricken Sie im Muster - siehe ZUNAHMETIPP am Anfang der Anleitung; das Muster wird sich so erbreitern. Viel Spaß beim Stricken!
06.01.2025 - 10:45
![]() Ty wrote:
Ty wrote:
When it says first 2 sts in stocking then next 2 in garter, does this mean the first row of increased stitches will always be stocking then the next 2 will always be garter? Or The first two rows of increases will be stocking and the next two rows will be garter then the next two rows will be stocking and the last two rows of increases will be garter?
18.12.2024 - 14:47DROPS Design answered:
Hi Ty, After the first purled row from the wrong side, you work 1 stitch in garter stitch (knitted on all rows) at both ends of the row and this garter stitch is continued throughout. In between you work A.1 (starting from the right side), which is knit 1 row, then rib (knit 2, purl 2) from wrong side), knit 1 row and rib (knit 2, purl 2) from the wrong side) on the 4th row. This is repeated onwards. Happy Christmas!
19.12.2024 - 07:06
![]() Ty wrote:
Ty wrote:
I'm confused by " The increased stitches are worked into A.1, i.e. the first 2 stitches are worked in stocking stitch, the next 2 in garter stitch." How are the odd number of increases worked in? For example, the first time through WS after increasing - K edge then pattern would be K2, P2, K2, then you're at edge stitch, which you purl (for stocking). Do you purl 2 more to align with what you've already knit (3 total)? Or do you purl only 1 to continue the pattern?
10.12.2024 - 19:37DROPS Design answered:
Dear Ty, if you increase 1 stitch after the garter stitch the next stitch is worked in stocking stitch (regardless that the next 2 stitches are also in stocking stitch). Later on the pattern will adjust itself as you continue increasing. When you finish the neck you will see that the pattern is aligned. Happy knitting!
15.12.2024 - 18:43
![]() Sylwia wrote:
Sylwia wrote:
Gdy dodam oczka za pierwszym razem, to w kolejnym rzędzie cały wzór przesuwa się najpierw o jedno oczko, a pod koniec rzędu o dwa. Na zdjęciu nie widać, aby cały rząd uległ przesunięciu. Czy tak powinno być?
11.11.2024 - 11:13DROPS Design answered:
Witaj Sylwio, dodawane oczka są stopniowo przerabiane wg schematu A.1, tzn. nie przesuwasz oczek, dalej przerabiasz poprzednie oczka tak samo, a nowe dostosowujesz do tego wzoru. Pozdrawiamy!
12.11.2024 - 08:31
![]() Ellen Pfeiffer wrote:
Ellen Pfeiffer wrote:
Jeg er lidt i tvivl om, jeg har gjort noget forkert, da jeg har lavet det midterste parti som er 16 cm langt, men jeg kan ikke få 37 masker på siden til at passe - jeg kan nemlig kun få omkring 27 masker på rundt i kanten i kant maskerne
04.10.2024 - 19:37
![]() Sharon Sutphin wrote:
Sharon Sutphin wrote:
I read the below instruction to incorporate the increases/decreases into the pattern which would be mean the pattern would become skewed. It looks like in the pictures that the rib pattern remains in tact. What am I missing. Thanks! ***************** The increased stitches are worked into A.1, i.e. the first 2 stitches are worked in stocking stitch, the next 2 in garter stitch, the next 2 in stocking stitch, etc..
14.05.2024 - 15:15DROPS Design answered:
Dear Mrs Sutphin, this is the way the increases are worked to keep pattern A.1 (= 2 sts stocking stitch, 2 stitches garter stitch), so the first 2 sts increased will be worked in stocking sts (knit from RS and purl from WS), and the next 2 sts increased will be worked in garter stitch (knit from both RS and WS). Repeat one more time to increase 8 sts, and keep pattern continuing. Happy knitting!
14.05.2024 - 15:59
|
|||||||
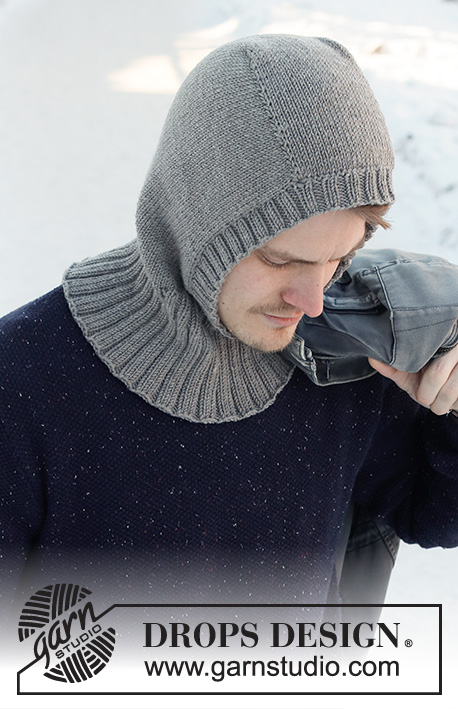
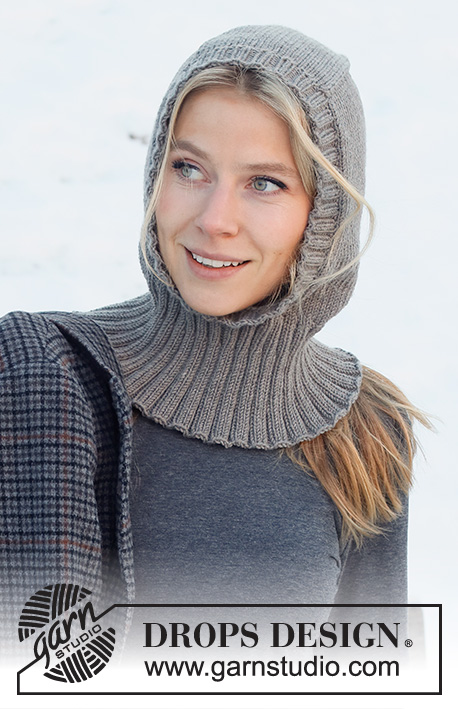
Northern Spirit#northernspiritbalaclava |
|||||||
 |
 |
||||||
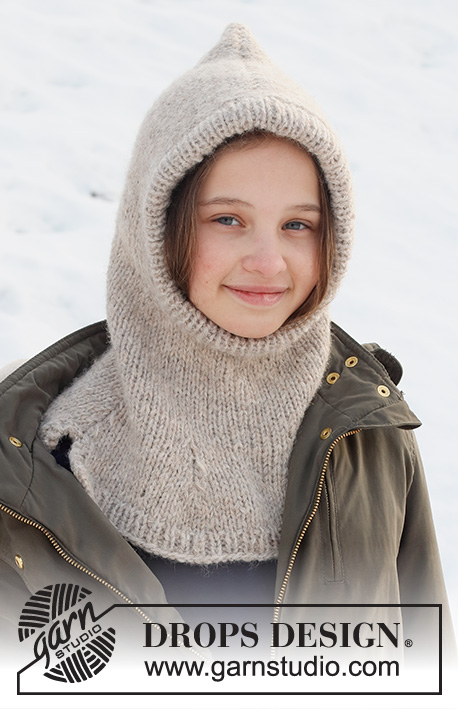
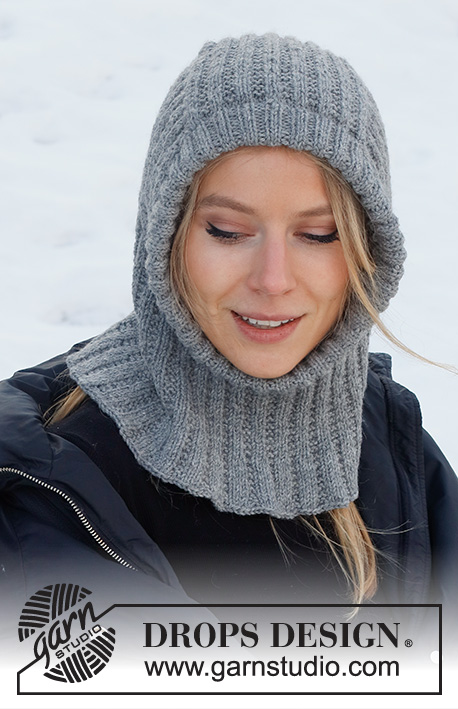
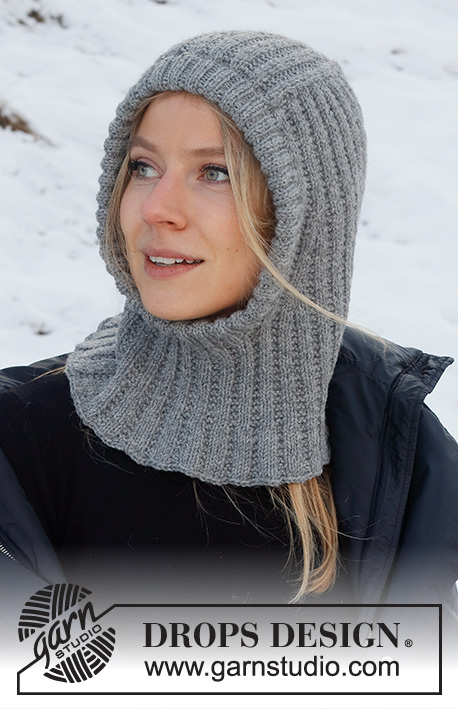
Knitted hat / balaclava in DROPS Lima. The piece is worked with textured pattern and ribbed edging.
DROPS 214-70 |
|||||||
|
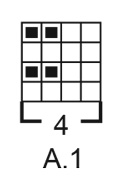
------------------------------------------------------- EXPLANATIONS FOR THE PATTERN: ------------------------------------------------------- RIDGE/GARTER STITCH (worked back and forth): Knit all rows. 1 ridge in height = Knit 2 rows. PATTERN: See diagram A.1. The diagram shows all rows in the pattern from the right side. INCREASE TIP (for sides of face-opening): Increase on the inside of the outermost 7 stitches on each side. All increases are worked from the right side! Increase 1 stitch by making 1 yarn over. On the next row (wrong side) work the yarn overs twisted to avoid holes. The increased stitches are worked into A.1, i.e. the first 2 stitches are worked in stockinette stitch, the next 2 in garter stitch, the next 2 in stockinette stitch, etc.. DECREASE TIP (mid-back): All decreases are worked from the right side! Start 4 stitches before the marker thread mid-back, knit 2 together, knit 4 (marker thread sits between these 4 stitches), slip 1 stitch as if to knit, knit 1 and pass the slipped stitch over the knitted stitch (= 2 stitches decreased). BINDING-OFF TIP: To avoid the bind-off edge being tight you can bind off with a larger size needle. If the edge is still tight, make 1 yarn over after approx. each 8th stitch at the same time as binding off; the yarn overs are bind off as normal stitches. ------------------------------------------------------- START THE PIECE HERE: ------------------------------------------------------- BALACLAVA – SHORT OVERVIEW OF THE PIECE: The middle section is worked back and forth with circular needle, from mid front and backwards. Stitches are knitted up on each side of this section. The piece is continued back and forth before stitches are cast on for the neck mid-front. The rest of the balaclava is finished in the round with circular needle. A ribbed edge is worked around the face-opening to finish. MID-SECTION: Cast on 32-32 stitches (including 1 edge stitch on each side) with circular needle size 3.5 MM = US 4 and Lima. Purl 1 row from the wrong side. The next row is worked as follows from the right side: 1 edge stitch in GARTER STITCH – read description above, work A.1 until there are 3 stitches left, work the first 2 stitches in A.1 (so the pattern begins and finishes in the same way) and finish with 1 edge stitch in garter stitch. Continue this pattern. REMEMBER THE KNITTING GAUGE! When the piece measures 14-16 cm = 5½"-6¼", bind off the 1 edge stitch on each side = 30-30 stitches. Cut the strand. Then work the hood as described below. HOOD: Now knit up stitches on each side of the middle section on the next row from the right side as follows: Knit up 33-37 along the side of the mid-section inside the 1 edge stitch, continue A.1 as before over the 30-30 stitches on the needle and knit up 33-37 stitches along the other side of the mid-section inside the 1 edge stitch = 96-104 stitches. Insert 1 marker thread in the middle of the row (= mid-back). Allow the thread to follow your work onwards; it is used later when decreasing mid-back. THE PIECE IS NOW MEASURED FROM WHERE THE MARKER THREAD WAS INSERTED! Continue A.1 back and forth with 1 edge stitch in garter stitch on each side towards mid-front – the pattern should match the pattern on the middle section. Then increase on each side towards mid front and decrease mid-back as described below – read the sections on increasing and decreasing before continuing! INCREASES ON EACH SIDE TOWARDS MID FRONT: When the piece measures 10-12 cm = 4"-4¾" from where the marker thread was first inserted, increase 1 stitch on each side towards mid front – read INCREASE TIP (= 2 stitches increased). Increase like this every 4th row (i.e. every 2nd row from the right side) a total of 8 times on each side. DECREASING MID-BACK: AT THE SAME TIME when you are about to increase for the 5th time, decrease 2 stitches mid-back – read DECREASE TIP. Decrease like this every 4th row a total of 4 times (the increases and decreases finish at the same time). After all the increases and decreases there are 104-112 stitches. When the piece measures 21-23 cm = 8¼"-9" from where the marker thread was first inserted, cast on stitches mid-front for the neck; you can try the balaclava on and work to the desired length. Cast on 16-20 stitches at the end of the next row from the right side = 120-132 stitches. Remove the marker thread and insert 1 marker on the row. THE PIECE IS NOW MEASURED FROM THIS MARKER. Work the neck as described below. NECK: Continue working in the round with A.1 over all stitches – make sure the pattern matches the whole way round. When the piece measures 9-10 cm = 3½"-4" from the marker on the neck, increase all knit 2 sections to knit 3 by making 1 yarn over after each knit 2 (the yarn overs are knitted twisted on the next round) = 150-165 stitches. Continue working until the piece measures 12-13 cm = 4¾"-5⅛" from the marker. Now increase all 2 garter stitches to 3 garter stitches by making 1 yarn over after all 2 garter stitches = 180-198 stitches. Work 1 round with knit 3, 3 garter stitches (the yarn overs are worked twisted to avoid holes). Then bind off loosely with knit – read BINDING-OFF TIP. The piece measures approx. 41-44 cm = 16⅛"-17¼" from the middle of the mid-section and down. EDGE AROUND FACE-OPENING: Start from the right side at the bottom, where stitches were cast on for the neck, and knit up 160 TO 180 stitches around the opening, inside the 1 edge stitch using short circular needle size 3 MM = US 2.5 and Lima. The number of stitches should be divisible by 4. Work rib in the round (knit 2, purl 2) for 6-6 cm = 2⅜"-2⅜" – make sure the rib matches the stitches on the mid-section and on the cast-on stitches on the neck. Loosely bind off with knit over knit and purl over purl – read BINDING-OFF TIP. Fold the rib double to the inside and sew down. To avoid the edge being tight and rolling outwards, it is important the seam is elastic. |
|||||||
Diagram explanations |
|||||||
|
|||||||
 |
|||||||
Have you finished this pattern?Tag your pictures with #dropspattern #northernspiritbalaclava or submit them to the #dropsfan gallery. Do you need help with this pattern?You'll find 22 tutorial videos, a Comments/Questions area and more by visiting the pattern on garnstudio.com. © 1982-2026 DROPS Design A/S. We reserve all rights. This document, including all its sub-sections, has copyrights. Read more about what you can do with our patterns at the bottom of each pattern on our site. |
|||||||


With over 40 years in knitting and crochet design, DROPS Design offers one of the most extensive collections of free patterns on the internet - translated to 17 languages. As of today we count 324 catalogs and 12290 patterns - 12280 of which are translated into English (US/in).
We work hard to bring you the best knitting and crochet have to offer, inspiration and advice as well as great quality yarns at incredible prices! Would you like to use our patterns for other than personal use? You can read what you are allowed to do in the Copyright text at the bottom of all our patterns. Happy crafting!
Post a comment to pattern DROPS 214-70
We would love to hear what you have to say about this pattern!
If you want to leave a question, please make sure you select the correct category in the form below, to speed up the answering process. Required fields are marked *.