
Popular categories
Looking for a yarn?


Comments / Questions (23)
![]() Elsa B wrote:
Elsa B wrote:
Dag, ik begrijp niet waar het meerderen en minderen moet. Midden of zijkanten?
23.03.2025 - 19:56DROPS Design answered:
Dag Elsa,
Nadat je het eerst stuk hebt gebreid en aan beide zijkanten daarvan steken hebt opgenomen, minder je midden achter, dus dit minderen zit in het midden aan de achterkant van het hoofd. Daarnaast meerder je aan beide uiteinden en dit is dus aan de voorkant, waar op het einde een rand rondom het gezicht komt.
02.04.2025 - 12:06
![]() Aija Määttä wrote:
Aija Määttä wrote:
En ymmärrä miten keskikappaleen reunasta voi poimia 28 silmukkaa? Tein ohuemmilla puikoilla pituudeksi 13,5cm ja paksummilla toisen kerran 15cm. Mielestäni kerroksia pitäisi olla 56, jotta 28 silmukkaa saa poimittua. Kappaleesta tulee liian pitkä. Saan max 24 silmukkaa näistä. Mitä teen väärin? Miksei ohjeessa puhuta kerroksista senttimetrien lisäksi? Olen aloittelija.
20.01.2025 - 22:29DROPS Design answered:
Oletko tarkistanut neuletiheytesi? Kun neulot 13 cm, kerroksia tulee noin 40. Voit tarvittaessa poimia yhden silmukan jokaisesta neulotusta kerroksesta.
31.01.2025 - 18:46
![]() Sara wrote:
Sara wrote:
Me ha gustado mucho como queda. Lo he hecho algo más corto, pero las explicaciones me han servido mucho. Muchas gracias por compartirlo!!!
20.01.2025 - 12:36
![]() Brigitte Allard wrote:
Brigitte Allard wrote:
Bonjour, je ne trouve plus l'endroit pour imprimer les modèles. Est ce normal.
12.01.2025 - 16:28DROPS Design answered:
Bonjour Mme Allard, le bouton pour imprime se trouve désormais en haut à droite de la page. Bon tricot!
13.01.2025 - 11:09
![]() Leila Vanhala wrote:
Leila Vanhala wrote:
Kun neulotaan "Kavennus keskellä takana: Samanaikaisesti jne., niin tehdäänkö koko ajan oikealla puolella sekä lisäyksiä reunoissa että kavennuksia takana? Näiden LISÄKSI siis joka 4. kerros reunaan silmukat ja kavennetaan kolmannen lisäyskerroksen jälkeen 2 silmukkaa 1 sijaan? Muilla kerroksilla vain 1 silmukka.
17.10.2024 - 10:47DROPS Design answered:
Reunojen lisäykset ja takaosan kavennukset tehdään aina samalla oikean puolen kerroksella (kavennukset alkavat reunojen kolmannella lisäyskerroksella). Eli lisää 2 silmukkaa ja kavenna 2 silmukkaa joka toisella oikean puolen kerroksella.
18.10.2024 - 18:25
![]() Anita wrote:
Anita wrote:
Mam pytanie o dodawanie oczek na środku z przodu. " Dodawać tak samo w sumie 6 razy z każdej strony co 4 rzędy (co 2 rzędy na prawej stronie robótki)". Nie rozumiem czy mam dodawać oczka co 4 czy co 2 rzędy.
01.10.2024 - 13:46DROPS Design answered:
Witaj Anito, dodajesz oczka w sumie co 4 rzędy, a oznacza to to samo co dodawać oczka co 2 rzędy na prawej stronie robótki. Pozdrawiamy!
01.10.2024 - 15:49
![]() Sarah wrote:
Sarah wrote:
Bonjour, Pour le modèle S/M, pourriez-vous me dire combien de pelotes de laine vous avez utilisé ? Merci
29.01.2024 - 09:59DROPS Design answered:
Bonjour Sarah, vous trouverez les quantités requises pour chaque taille, au poids, dans l'en-tête, autrement dit, Il faut ici en taille S/M 150 g DROPS Merino Extra Fine / 50 g la pelote = 3 pelotes. Bon tricot!
30.01.2024 - 07:22
![]() Erika wrote:
Erika wrote:
Hej! Hur maskar jag av första och sista maskan (kantmaskorna) i slutet av mittpartiet?
26.12.2023 - 00:33DROPS Design answered:
Hej Erika, dem maskar du bara av som vanligt :)
02.01.2024 - 10:19
![]() Edward wrote:
Edward wrote:
Hi, I am wondering how many stitches along from the edge I am supposed to increase from as it isn’t clear to me in the pattern instructions? From looking at the photo I can see the increase stitches are not at the beginning. From what I am understand these increases are created from the second stitch marker from ‘the beginning of the row’. Thanks for your time!
28.08.2023 - 18:18DROPS Design answered:
Dear Edward, the increases on each side (towards face-opening) are worked inside 5 sts on each side, see INCREASE TIP (for sides of face-opening):, this means you increase after the first 5 sts on a right side row and before the last 5 sts on the same right side row. You will increase that way on every 4th row a total of 6 times (-= 6 new stitches on each side). That applies to INCREASES MID-FRONT:, if I misunderstood your question, please feel free to let us now which increases you were thinking of. Happy knitting!
29.08.2023 - 09:03
![]() Jen wrote:
Jen wrote:
Hi, at the start of the mid section where it says: Cast on 28-28 stitches (including 1 edge stitch on each side) what does it mean by edge stitch? are the edge stitches included in the 28 stitch count? are they knitted differently to the rest of the piece? thanks
22.02.2023 - 10:57DROPS Design answered:
Dear Jen, the edge stitches are used when picking up stitches (inside this edge stitch) and will be worked in garter stitch (knit from right as well as from wrong side); and they are included in the number of stitches to cast on, this means you don't have to cast them extra. Happy knitting!
22.02.2023 - 13:26
|
|
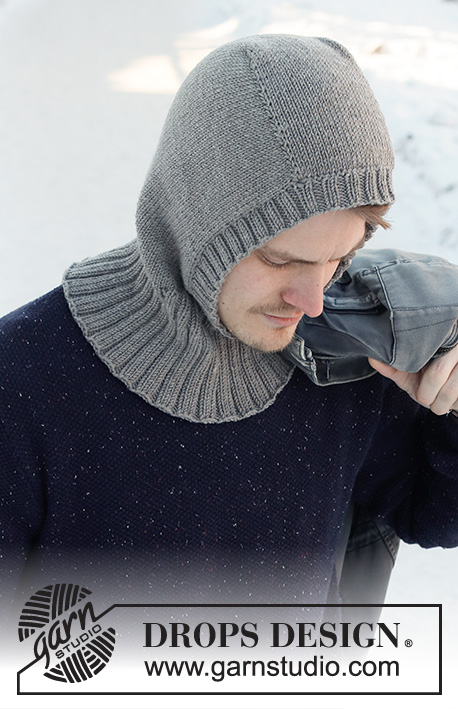
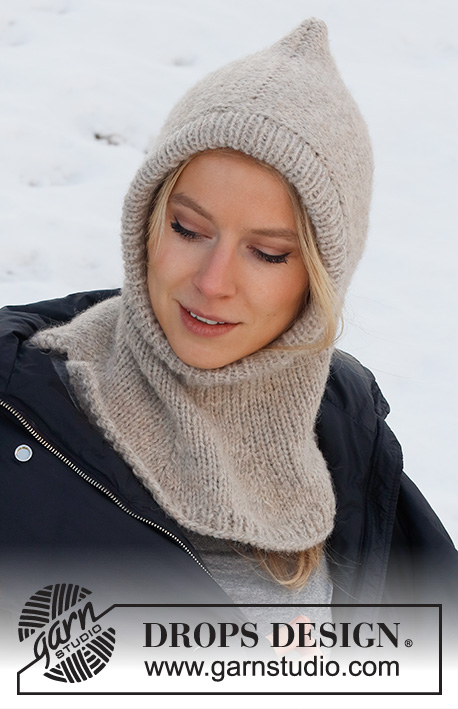
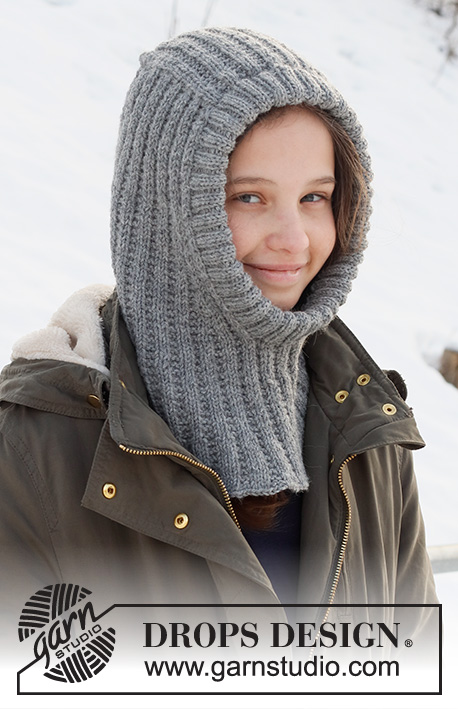
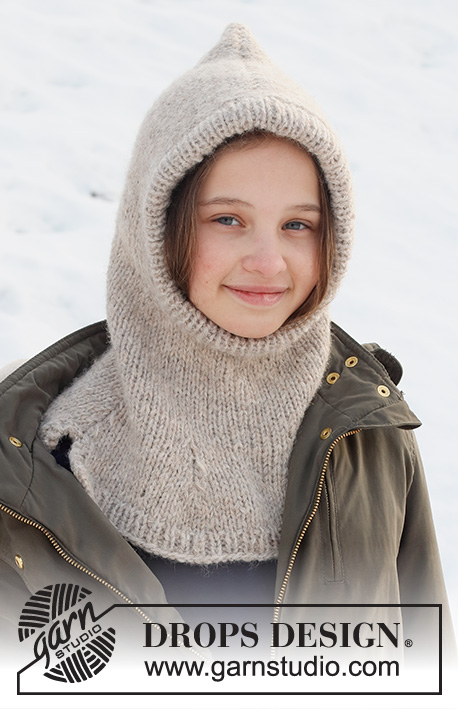
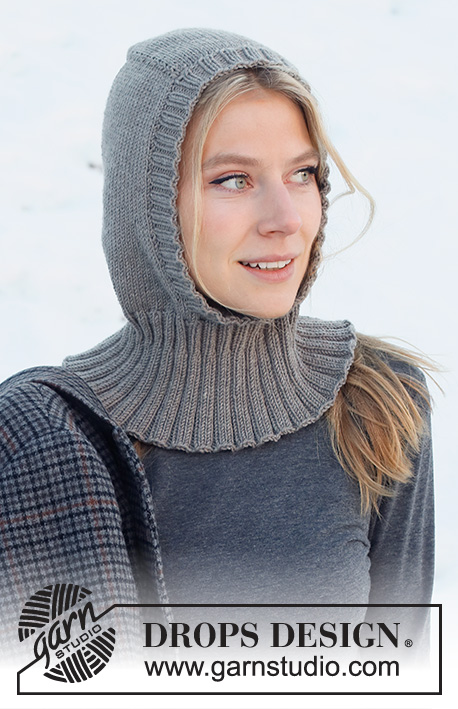
Uncharted Territory#unchartedterritorybalaclava |
|
 |
 |
Knitted hat / balaclava in DROPS Merino Extra Fine. The piece is worked top down with stockinette stitch and ribbed edging.
DROPS 214-72 |
|
|
------------------------------------------------------- EXPLANATIONS FOR THE PATTERN: ------------------------------------------------------- RIDGE/GARTER STITCH (worked back and forth): Knit all rows. 1 ridge in height = Knit 2 rows. INCREASE TIP (for sides of face-opening): Increase on the inside of the 5 stitches on each side. All increases are worked from the right side! Increase 1 stitch by making 1 yarn over. On the next row (wrong side) purl the yarn over twisted to avoid a hole. Then work the new stitches in stockinette stitch. INCREASE TIP-2 (evenly spaced): To work out how to increase evenly, count the total number of stitches on the needle (e.g. 102 stitches) and divide by the number of increases to be made (e.g. 22) = 4.6. In this example, increase by making 1 yarn over after alternately each 4th and 5th stitch. On the next round work the yarn overs twisted to avoid holes. DECREASE TIP (mid-back): All decreases are worked from the right side! Start 5 stitches before the marker thread mid-back, knit 2 together, knit 6 (the marker sits between these 6 stitches), slip 1 stitch as if to knit, knit 1 and pass the slipped stitch over the knitted stitch (= 2 stitches decreased). BINDING-OFF TIP: To avoid the bind-off edge being tight you can bind off with a larger size needle. If the edge is still tight, make 1 yarn over after approx. each 4th stitch at the same time as binding off; the yarn overs are bind off as normal stitches. ------------------------------------------------------- START THE PIECE HERE: ------------------------------------------------------- BALACLAVA – SHORT OVERVIEW OF THE PIECE: The mid-section is worked back and forth with circular needle from mid-front and backwards. Stitches are knitted up on each side of the mid-section and the piece continued back and forth before stitches are cast on for the neck. The piece finished in the round. A ribbed edge is worked around the face-opening to finish. MID-SECTION: Cast on 28-28 stitches (including 1 edge stitch on each side) with circular needle size 3.5 MM = US 4 and Merino Extra Fine. Purl 1 row from the wrong side. Then continue back and forth with stockinette stitch and 1 edge stitch in GARTER STITCH on each side – read description above . REMEMBER THE KNITTING GAUGE! When the piece measures 13-14 cm = 5⅛"-5½", bind off the edge stitches on each side = 26-26 stitches. Cut the strand, then work the hood as described below. HOOD: Knit up stitches on each side of the mid-section from the right side as follows: Knit up 28-32 stitches along the one side inside the 1 edge stitch, work stockinette stitch over the 26-26 stitches on the needle and knit up 28-32 stitches along the other side inside the 1 edge stitch = 82-90 stitches. Insert 1 marker thread in the middle of the row (= mid-back). Allow the thread to follow your work onwards, it is used when decreasing mid-back. In addition, insert 1 marker at the beginning of the row. THE PIECE IS NOW MEASURED FROM THIS MARKER! Work stockinette stitch back and forth with 1 edge stitch in garter stitch on each side towards mid-front. Then increase each side towards mid-front and decrease mid-back as follows – read the whole section on increasing and decreasing before continuing! INCREASES MID-FRONT: When the piece measures 13-15 cm = 5⅛"-6" from the marker, increase 1 stitch on each side towards mid-front – read INCREASE TIP-1 (= 2 stitches increased). Increase like this every 4th row (every 2nd row from the right side) a total of 6 times on each side. DECREASES MID-BACK: AT THE SAME TIME the 3rd time you increase, decrease 2 stitches mid-back – read DECREASE TIP. Decrease like this every 4th row a total of 4 times (increases and decreases are finished at the same time). After all the increases and decreases there are 86-94 stitches. When the piece measures 20-22 cm = 8"-8¾" from the marker, cast on stitches for the neck (try the hat on and work to desired length before casting on). Cast on 16-16 stitches at the end of the next row from the right side = 102-110 stitches. Continue working in the round as described below. NECK: Work 5 rounds of stockinette stitch over all stitches. On the first round increase 22-22 stitches evenly spaced – read INCREASE TIP-2 = 124-132 stitches. Change to circular needle size 3 MM = US 2.5 and work rib in the round (knit 2, purl 2) for 3 cm = 1⅛". Now increase all knit 2 to knit 3 by making 1 yarn over after each knitted section (the yarn overs are knitted twisted on the next row to avoid holes) = 155-165 stitches. Continue in the round with knit 3, purl 2 until the rib measures 11-12 cm = 4⅜"-4¾". Loosely bind off with knit over knit and purl over purl – read BINDING-OFF TIP. The piece measures approx. 39-42 cm = 15¼"-16½" from the middle of the mid-section down the side. EDGE AROUND FACE-OPENING: Start from the right side at the bottom of the opening, where stitches were cast on for the neck. Knit up 140 to 152 stitches around the opening, inside the 1 edge stitch using short circular needle size 3 MM = US 2.5 and Merino Extra Fine. The number of stitches should be divisible by 4. Work rib in the round (knit 2, purl 2) for 3-3 cm = 1⅛"-1⅛". Loosely bind off with knit over knit and purl over purl – remember BINDING-OFF TIP. |
|
Have you finished this pattern?Tag your pictures with #dropspattern #unchartedterritorybalaclava or submit them to the #dropsfan gallery. Do you need help with this pattern?You'll find 23 tutorial videos, a Comments/Questions area and more by visiting the pattern on garnstudio.com. © 1982-2025 DROPS Design A/S. We reserve all rights. This document, including all its sub-sections, has copyrights. Read more about what you can do with our patterns at the bottom of each pattern on our site. |
|


With over 40 years in knitting and crochet design, DROPS Design offers one of the most extensive collections of free patterns on the internet - translated to 17 languages. As of today we count 314 catalogs and 11822 patterns - 11812 of which are translated into English (US/in).
We work hard to bring you the best knitting and crochet have to offer, inspiration and advice as well as great quality yarns at incredible prices! Would you like to use our patterns for other than personal use? You can read what you are allowed to do in the Copyright text at the bottom of all our patterns. Happy crafting!
Post a comment to pattern DROPS 214-72
We would love to hear what you have to say about this pattern!
If you want to leave a question, please make sure you select the correct category in the form below, to speed up the answering process. Required fields are marked *.