
Popular categories
Looking for a yarn?


Comments / Questions (24)
![]() Merituuli wrote:
Merituuli wrote:
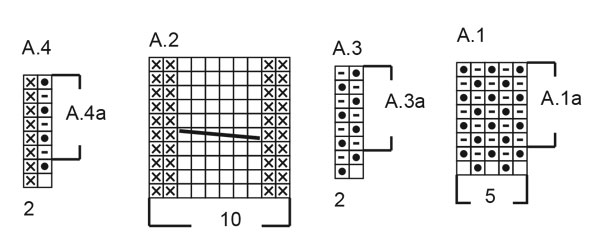
Kuinka monta kerrosta on palmikkoneuleen mallikerta. Piirroksesta puuttuu kerrosmäärä, mutta oletan, että mallikertaan kuuluu piirretty määrä.
07.12.2020 - 15:59DROPS Design answered:
Hei, mallikertaan kuuluu piirroksen 10 kerrosta.
07.12.2020 - 18:18
![]() Catherine wrote:
Catherine wrote:
Ce gilet aura donc une version personnelle ! Dentelle au lieu de côtes anglaises 😆
07.09.2020 - 10:13
![]() Catherine wrote:
Catherine wrote:
Bonjour, j'aime beaucoup ce modèle, que je tricote en nepal. Je me pose des questions concernant l'ouverture des boutonnières, en effet de motif sur la bande de boutonage comporte déjà des jetés... est ce que ça ne risque pas de faire de gros trous ? MercI de vos conseils.
06.09.2020 - 20:53DROPS Design answered:
Bonjour Catherine la bordure des devants se tricote en suivant le diagramme A.1 autrement dit en côtes anglaises (avec jetés) - cette vidéo montre comment les tricoter, on ne doit pas avoir de trou dans ces côtes anglaises, pensez à toujours bien vérifier votre tension. Bon tricot!
07.09.2020 - 09:33
![]() Julie wrote:
Julie wrote:
Est-ce que dans le patron 218-16 grandeur medium on doit faire un A1 avant de faire A3 sur 23 mailles? Est- ce la même chose pour la fin du rang...on devrait lire faire A3 sur 23 mailles puis A1? Sinon comment on peut arriver au nombre de mailles requis? Merci
30.08.2020 - 21:17DROPS Design answered:
Bonjour Julie, en taille M tricotez ainsi: 1 m lisière, (A.1, A.2)x3 (= (5+10)x3 = 45 mailles), 23 m en A.3, (A.2, A.1) x 4 (= (10+5) x4=60 m), A.2 (=10 m), 23 m en A.1 (A.2, A.1) x 3 (= (10+5)x3=45 m), 1 m lis = 1+45+23+60+10+23+45+1= 208 m. Bon tricot!
31.08.2020 - 10:03
|
||||||||||||||||
Rippling Roses Jacket#ripplingrosesjacket |
||||||||||||||||
 |
 |
|||||||||||||||
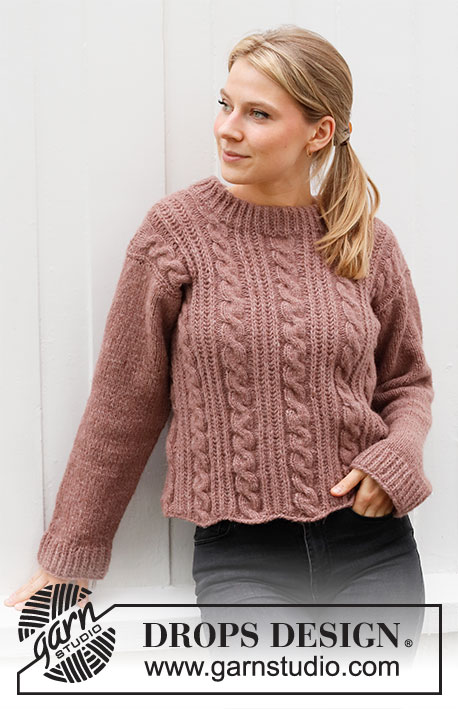
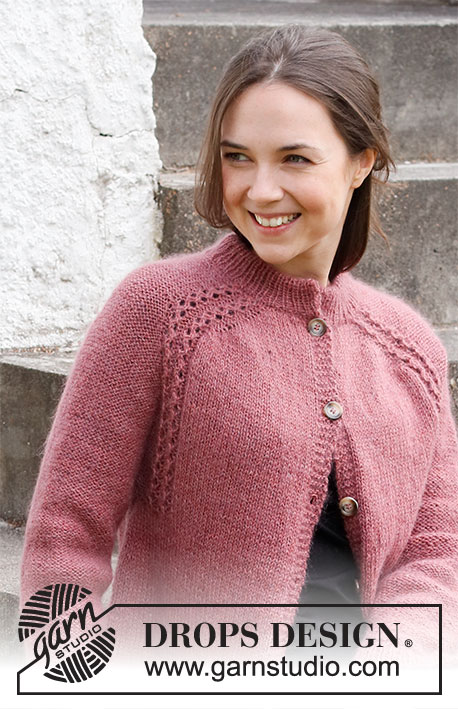
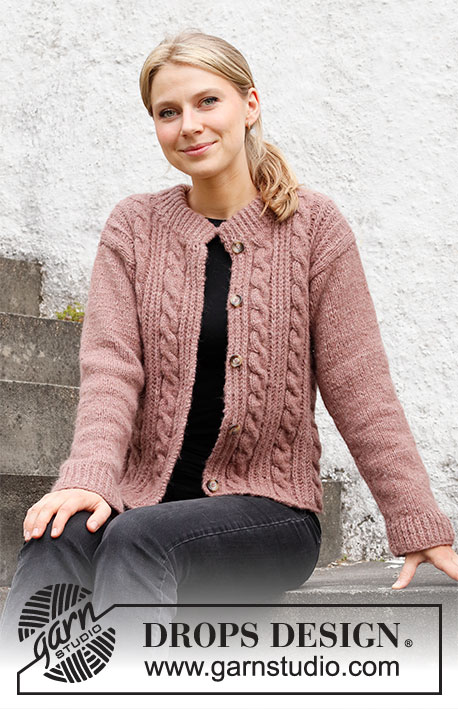
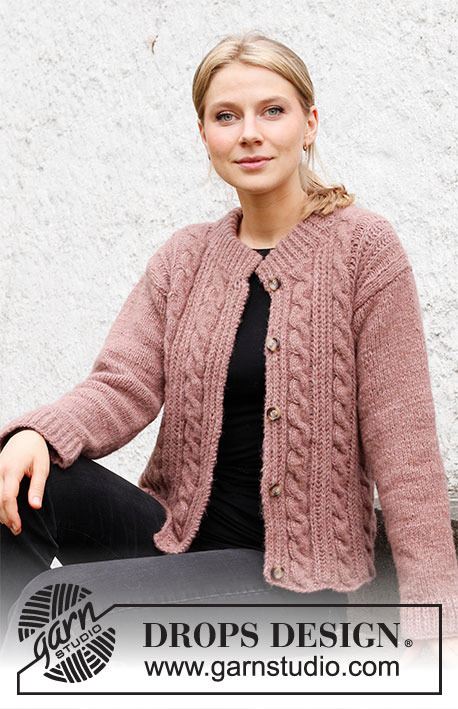
Knitted jacket with cables and English rib stitches in DROPS Air. Sizes S – XXXL.
DROPS 218-16 |
||||||||||||||||
|
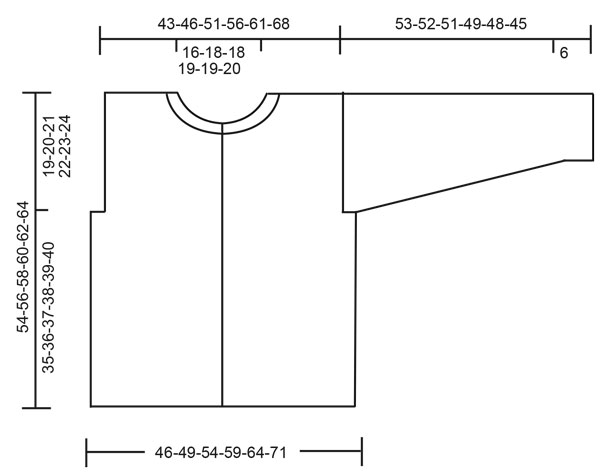
------------------------------------------------------- EXPLANATIONS FOR THE PATTERN: ------------------------------------------------------- RIDGE/GARTER STITCH (worked back and forth): Knit all rows. 1 ridge in height = Knit 2 rows. PATTERN: See diagrams A.1 to A.4. BUTTONHOLES: Work buttonholes on right band. 1 BUTTONHOLE = Knit together the second and third stitch from the edge and make 1 yarn over. On the next row knit the yarn over = hole. Work buttonholes when the piece measures: S: 3, 13, 23, 34, 45 cm = 1⅛", 5⅛", 9", 13¾", 17¾" M: 3, 14, 25, 36, 47 cm = 1⅛", 5½", 9¾", 14¼", 18½" L: 3, 12, 21, 30, 39, 49 cm = 1⅛", 4¾", 8¼", 11¾", 15¼", 19¼" XL: 3, 12, 21, 31, 41, 51 cm = 1⅛", 4¾", 8¼", 12¼", 16⅛", 20" XXL: 3, 13, 23, 33, 43, 53 cm = 1⅛", 5⅛", 9", 13", 17", 21" XXXL: 3, 13, 23, 33, 44, 55 cm = 1⅛", 5⅛", 9", 13", 17¼", 21⅝" INCREASE TIP (for sleeves): Increase 1 stitch on each side of the marker thread as follows: Work until there is 1 stitch left before the marker thread, 1 yarn over, work 2 stitches as before (marker thread sits between these 2 stitches), 1 yarn over. On the next round work the yarn overs twisted to avoid holes. ------------------------------------------------------- START THE PIECE HERE: ------------------------------------------------------- JACKET – SHORT OVERVIEW OF THE PIECE: The jacket is worked back and forth with circular needle from mid front and bottom up as far as the armholes, the piece is then divided and each section finished separately. The sleeves are worked in the round with short circular needle/double pointed needles. The neck is worked to finish. BODY: Cast on 200-208-224-252-268-304 stitches with circular needle size 5.5 mm = US 9 and Air. Purl 1 row from the wrong side. Then work pattern from the right side as follows: 1 edge stitch in GARTER STITCH, * A.1 (= 5 stitches), A.2 (= 10 stitches) *, work from *-* 3-3-3-4-4-5 times, work A.3 over the next 19-23-31-15-23-11 stitches, * A.2, A.1 *, work from *-* 4-4-4-6-6-8 times, A.2, work A.3 over the next 19-23-31-15-23-11 stitches, * A.2, A.1*, work from *-* 3-3-3-4-4-5 times and finish with 1 edge stitch in garter stitch. Continue this pattern; when the first 2 rows in A.1 and A.3 have been worked, repeat A.1a and A.3a onwards. Work BUTTONHOLES on the right band – read description above. Work until the piece measures 35-36-37-38-39-40 cm = 13¾"-14¼"-14½"-15"-15¼"-15¾" from the cast-on edge. REMEMBER THE KNITTING GAUGE! The next row is worked as follows from the right side: Work the first 53-55-59-66-70-79 stitches, bind off the next 5-5-5-5-5-5 stitches, work the next 84-88-96-110-118-136 stitches, bind off the next 5-5-5-5-5-5 stitches and work the last 53-55-59-66-70-79 stitches. Front and back pieces are finished separately. RIGHT FRONT PIECE: = 53-55-59-66-70-79 stitches. Work A.1, A.2 and A.3 as before, but with 1 edge stitch in garter stitch towards the armhole. When the piece measures 46-48-50-52-54-56 cm = 18"-19"-19¾"-20½"-21¼"-22", place the first 19-20-20-21-21-22 stitches on a thread for the neck (make sure stitches are worked from wrong side before placed on thread), then bind off for the neck on each row from the right side as follows: 2 stitches 1 time, 1 stitch 3 times = 29-30-34-40-44-52 stitches left on the shoulder. Bind off when the piece measures 54-56-58-60-62-64 cm = 21¼"-22"-22¾"-23⅝"-24⅜"-25¼" (19-20-21-22-23-24 cm = 7½"-8"-8¼"-8¾"-9"-9½" from the bottom of the armhole). LEFT FRONT PIECE: Work as the right front piece, but reversed; bind off stitches for the neck at the beginning of each row from the wrong side. BACK PIECE: = 84-88-96-110-118-136 stitches. Continue with A.1, A.2 and A.3 as before, but with 1 edge stitch in garter stitch on each side. Continue until the piece measures 52-54-56-58-60-62 cm = 20½"-21¼"-22"-22¾"-23⅝"-24⅜". Place the middle 24-26-26-28-28-30 stitches on a thread for the neck (make sure stitches are worked from wrong side before placed on thread) and finish each shoulder separately. On the next row bind off 1 stitch towards the neck = 29-30-34-40-44-52 stitches left on the shoulder. Bind off when the piece measures 54-56-58-60-62-64 cm = 21¼"-22"-22¾"-23⅝"-24⅜"-25¼" (= 19-20-21-22-23-24 cm = 7½"-8"-8¼"-8¾"-9"-9½" from the bottom of the armhole). SLEEVE: Cast on 50-52-54-56-58-60 stitches with double pointed needles size 4.5 mm = US 7. Knit 1 round, then work A.4 over all stitches. When the first 2 rounds in A.4 have been worked, repeat A.4a onwards. Continue this pattern until the piece measures 6 cm = 2⅜". Knit 1 round where you decrease 6 stitches evenly spaced = 44-46-48-50-52-54 stitches. Change to double pointed needles size 5.5 mm = US 9. Knit 1 round. Insert a marker thread at the beginning of the round (= mid under the sleeve). Work stockinette stitch. When the piece measures 8 cm = 3⅛" from the cast-on edge, begin to increase mid under the sleeve – read INCREASE TIP. Increase every 5½-5-4½-4-3½-3 cm = 2⅛"-2"-1¾"-1½"-1¼"-1⅛" a total of 8-9-10-10-11-12 times = 60-64-68-70-74-78 stitches. Continue working until the sleeve measures 53-52-51-49-48-45 cm = 21"-20½"-20"-19¼"-19"-17¾". Bind off. Work the other sleeve in the same way. ASSEMBLY: Sew the shoulder seams. NECK: Using circular needle size 4.5 mm = US 7 pick up 65 to 85 stitches around the neck (including the stitches from the threads). Make sure the number of stitches is divisible by 2 + 1. Start from right side and work pattern as follows: Work 1 edge stitch in garter stitch, A.4a until there is 1 stitch left (on first round the picked-up stitches are worked without yarn overs) and 1 edge stitch in garter stitch, AT THE SAME TIME decrease 1 stitch in cable in A.2 from thread by knitting 3rd and 4th stitch from cable together. NOTE! A.4a should match the stitches from the threads so the English rib pattern continues up the neck. If necessary adjust the number of stitches between the threads! Continue this pattern until the neck measures 10 cm = 4". Bind off with knit from the right side. ASSEMBLY: Fold the neck double to the wrong side and sew the bind-off edge to the row with the knitted up stitches; the neck is now approx. 5 cm = 2". Sew the neck edge together on both sides. Sew in the sleeves, inside the 1 edge stitch on the front/back pieces. Sew the buttons onto the left band. |
||||||||||||||||
Diagram explanations |
||||||||||||||||
|
||||||||||||||||
 |
||||||||||||||||
 |
||||||||||||||||
Have you finished this pattern?Tag your pictures with #dropspattern #ripplingrosesjacket or submit them to the #dropsfan gallery. Do you need help with this pattern?You'll find 32 tutorial videos, a Comments/Questions area and more by visiting the pattern on garnstudio.com. © 1982-2026 DROPS Design A/S. We reserve all rights. This document, including all its sub-sections, has copyrights. Read more about what you can do with our patterns at the bottom of each pattern on our site. |
||||||||||||||||


With over 40 years in knitting and crochet design, DROPS Design offers one of the most extensive collections of free patterns on the internet - translated to 17 languages. As of today we count 324 catalogs and 12290 patterns - 12280 of which are translated into English (US/in).
We work hard to bring you the best knitting and crochet have to offer, inspiration and advice as well as great quality yarns at incredible prices! Would you like to use our patterns for other than personal use? You can read what you are allowed to do in the Copyright text at the bottom of all our patterns. Happy crafting!
Post a comment to pattern DROPS 218-16
We would love to hear what you have to say about this pattern!
If you want to leave a question, please make sure you select the correct category in the form below, to speed up the answering process. Required fields are marked *.