
Popular categories
Looking for a yarn?


Comments / Questions (20)
![]() Judith Flack wrote:
Judith Flack wrote:
I am making the 4th size and I would like to clarify the correct number of stitches for the shoulders. When the markers are placed there are 18 stitches set aside for each shoulder and increases are made on the body sides, front and back. However, when the shoulder stitches are worked from the thread the pattern indicates that 14 stitches should be worked. Which figure is correct? Thank you for your response and clarification.
21.04.2025 - 14:47DROPS Design answered:
Dear Mrs Flack, when all increases are done, the first 2 stitches on shoulder (the 18 sts) and the last 2 of these stitches are now belonging to front and back piece, reason why there are only 14 sts left for each shoulder (and 4 sts more on front/back piece). Happy knitting!
22.04.2025 - 16:09
![]() SALAÜN FLORENCE wrote:
SALAÜN FLORENCE wrote:
Bonjour, Peut-on tricoter ce modèle qu'avec la laine DROPS SKY ? Si oui, est-il possible d'avoir les explications correspondantes ? Merci pour votre retour, Cordialement
24.08.2024 - 15:44DROPS Design answered:
Bonjour Mme Salaün, vous risquez de ne pas avoir la même tension que si vous tricotez avec 1 fil Sky et 1 fil Kid-Silk, il vous faudrait alors entièrement recalculer les explications pour correspondre à votre tension, utilisez le convertisseur pour voir quelle autre alternative à Kid-Silk vous pouvez tricoter. Bon tricot!
26.08.2024 - 07:51
![]() Paulina wrote:
Paulina wrote:
Hej! Går det att sticka runt kroppen på rundsticka, istället för separat fram och tillbaka efter man satt maskor för ärmar på tråd? Hur gör jag då?
17.01.2023 - 22:39DROPS Design answered:
Hej Paulina, ja du kan sætte arbejdet sammen når du er kommet ned til ærmegabet :)
19.01.2023 - 08:17
![]() Païa wrote:
Païa wrote:
Bonjour, N’est -il plus possible d’avoir des explications en mode classique cad de bas en haut? Les coutures maintiennent le tricot en forme, l’encolure est mieux finie et le travail plus relaxant en tout point. J’adore ce modèle mais ne pourrai le réaliser qu’avec des explications down/up . Je suis tout à fait d’accord de les payer, bien entendu. Merci pour votre réponse Cordialement Païa
15.09.2022 - 11:02DROPS Design answered:
Bonjour Païa, tout est question de préférence et de modèles, mais vous pouvez retrouver ici une sélection de nos modèles de pulls tricotés de bas en haut - vous pouvez filtrer de la même façon les pulls & gilets sans manches, tops, gilets & vestes etc... Bon tricot!
15.09.2022 - 13:15
![]() Fiorenza wrote:
Fiorenza wrote:
Buongiorno. Vorrei realizzare questo modello con vostro filato PUNA che ho già, quindi con ferri del 4. Ovviamente provo a fare un campione ma é la prima volta che faccio una modifica così. Avete qualche suggerimento per aiutarmi. Ho già visto la sezione per la conversione dei filati ma questo è un caso diverso. Grazie molte!
30.12.2021 - 09:00DROPS Design answered:
Buonasera Fiorenza, deve utilizzare la misura di ferri che le permette di ottenere il campione indicato. Buon lavoro!
30.12.2021 - 22:47
![]() Renée wrote:
Renée wrote:
Au début du col, il est inscrit « tricoter ensuite en A.1 ». C’est quoi exactement « A.1 ». De plus à l section POINT FANTAISIE il est inscrit voir diagramme A.1. Et il n’est pas dans les explications. Je vous remercie
21.10.2021 - 17:51DROPS Design answered:
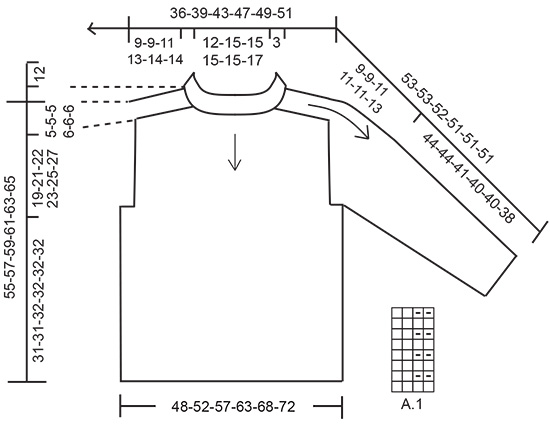
Bonjour Renée, A.1 correspond effectivement au diagramme du point fantaisie (= 2 m point mousse, 2 mailles jersey endroit) que vous trouverez à droite du schéma des mesures, juste sous la manche. Bon tricot!
22.10.2021 - 07:12
![]() Mia wrote:
Mia wrote:
Hei! Saisinko ohjeen, millainen on työssä käytettävä mallineule? Ohjeessa viitataan ruutupiirrokseen A.1 mutta ohjeessa ei näy mitään tällaista piirrosta (otsikon "Piirros" alla vain tyhjää).
28.09.2021 - 15:39DROPS Design answered:
Hei, nyt piirros löytyy.
05.10.2021 - 17:14
![]() Paloma wrote:
Paloma wrote:
Hola, no soy exactamente principiante pero siempre he tejido bufandas gorros y calcetines y los hombros y las sisas me están volviendo majara. Cuando empiezo a aumentar para los hombros unas veces coincide sobre un punto del derecho y otras sobre punto del revés ¿el aumento es siempre del derecho? y al aumentar luego me encuentro con que tengo 3 del derecho o 3 del revés. ¿Tengo que adaptarme a esa nueva cantidad de puntos? Muchísimas gracias
06.09.2021 - 17:04DROPS Design answered:
Hola Paloma, los puntos se aumentan siempre de derecho, pero después se trabajan según el patrón, por lo que no deberías tener 3 derechos o reveses seguidos.
06.10.2021 - 22:43
![]() Marcela wrote:
Marcela wrote:
Hola soy Marcela. Cuando empecé a tejer la delantera de ida vuelta, los puntos se ven feos, desordenados, que puedo hacer?, cuando tejí en redondo se veían mucho mejor.
26.07.2021 - 04:59DROPS Design answered:
Hola Marcela, esto pasa a menudo porque los puntos de revés se trabajan más flojos que los de derecho y, de ida y vuelta, se trabajan más puntos de revés, que en redondo. Esta puede ser la causa de que queden tan desordenados.
31.07.2021 - 17:54
![]() Sandra wrote:
Sandra wrote:
Cual es el método que recomiendas para montar puntos en este patrón? Es la primera vez que comienzo desde el cuello, gracias!
21.03.2021 - 15:50DROPS Design answered:
Hola Sandra, para montar los puntos usamos el método continental. Tienes un vídeo explicativo debajo del patrón: https://www.garnstudio.com/video.php?id=2&lang=es
21.03.2021 - 19:33
|
||||||||||
Sunday Vibes#sundayvibessweater |
||||||||||
 |
 |
|||||||||
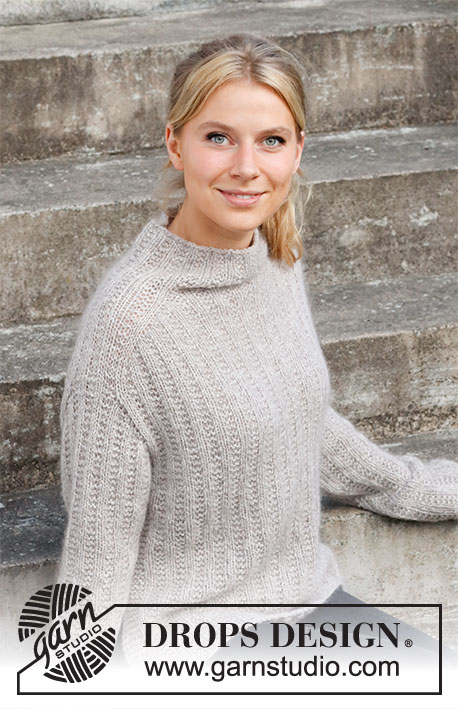
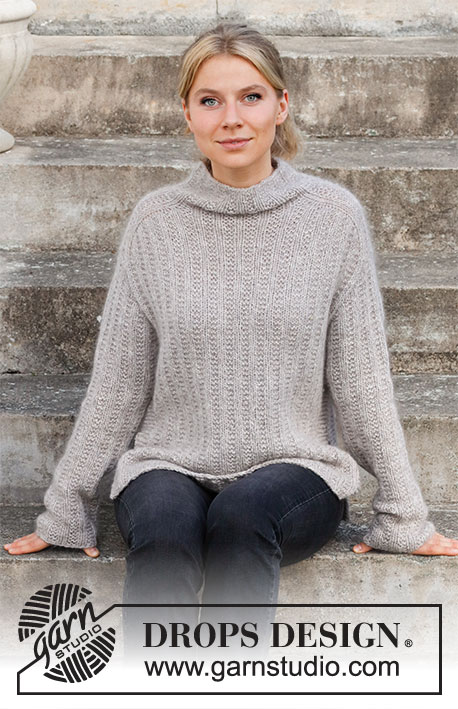
Knitted sweater in DROPS Sky and DROPS Kid-Silk. The piece is worked top down, with textured pattern and saddle shoulders. Sizes S - XXXL.
DROPS 218-7 |
||||||||||
|
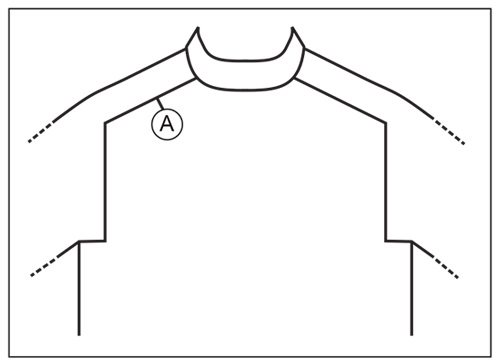
------------------------------------------------------- EXPLANATIONS FOR THE PATTERN: ------------------------------------------------------- RIDGE/GARTER STITCH (worked back and forth): Knit all rows. 1 ridge in height = Knit 2 rows. PATTERN: See diagram A.1. The diagram shows all rows in the pattern from the right side. INCREASE TIP (for saddle shoulder increase): BEFORE MARKER: The new stitch will be twisted, leaning towards the right. Use left needle to pick up strand between 2 stitches from the round below, pick up strand from behind and knit stitch in front loop. AFTER MARKER: The new stitch will be twisted, leaning towards the left. Use left needle to pick up strand between 2 stitches from the round below, pick up strand from the front and knit stitch in back loop. DECREASE TIP (for sleeves): All decreases are worked from the right side! Decrease 1 stitch inside the 1 edge stitch on each side as follows: Work 1 edge stitch in garter stitch, slip 1 stitch as if to knit, knit 1 and pass the slipped stitch over the knitted stitch (= 1 stitch decreased), work until there are 3 stitches left, knit 2 together (= 1 stitch decreased) and 1 edge stitch in garter stitch. BINDING-OFF TIP: To avoid the bind-off edge being tight you can bind off with a larger size needle. If the edge is still tight, make 1 yarn over after approx. each 4th stitch at the same time as binding off; the yarn overs are bind off as normal stitches. ------------------------------------------------------- START THE PIECE HERE: ------------------------------------------------------- SWEATER – SHORT OVERVIEW OF THE PIECE: The neck and yoke are worked in the round with circular needle, top down, until the increases for saddle shoulders are finished. The shoulder stitches are placed on threads and the front and back piece finished back and forth, separately. The sleeves are worked back and forth with circular needle, top down. NECK: Cast on 64-72-72-80-80-88 stitches with circular needle size 6 mm = US 10, 1 strand Sky and 1 strand Kid-silk (= 2 strands). Knit 1 round, then work pattern A.1 in the round for 12 cm = 4¾". REMEMBER THE KNITTING GAUGE! Insert 1 marker at the beginning of the round (= approx. mid-back), the piece is measured from the first marker! Insert 4 more markers as follows: Insert 1st marker after 8-12-12-12-12-16 stitches (= half back piece), count 14-14-14-18-18-18 stitches (= shoulder), insert 2nd marker here, count 18-22-22-22-22-26 stitches (= front piece), insert 3rd marker here, count 14-14-14-18-18-18 stitches (= shoulder), insert 4th marker here, there are 10-10-10-10-10-10 stitches left on the round (= half back piece). SADDLE SHOULDER INCREASE: Continue with the pattern as before, and increase 4 stitches on round: Increase BEFORE 1st and 3rd marker, and AFTER 2nd and 4th marker – read INCREASE TIP. Increases are only on front piece and back piece and number of shoulder stitches remains the same. Increase like this every round 18-18-22-26-30-30 times in total, and then every 2nd round 2-2-2-2-2-2 times = 144-152-168-192-208-216 stitches. When all the increases are finished, the piece measures approx. 9-9-11-13-14-14 cm = 3½"-3½"-4⅜"-5⅛"-5½"-5½" from the marker mid-back. Now divide for the front and back pieces (the 2 knitted stitches on each side of both shoulders are worked into the back and front pieces) as follows: Work the first 30-34-38-42-46-50 stitches (= half back piece), work the next 10-10-10-14-14-14 stitches before placing them on a thread (= shoulder), work the next 62-66-74-82-90-94 stitches (= front piece), work the next 10-10-10-14-14-14 stitches before placing them on a thread (= shoulder) and work the last 32-32-36-40-44-44 stitches (= half back piece). Cut the strand, place the back-piece on a thread and work the front piece. FRONT PIECE: = 62-66-74-82-90-94 stitches. Work back and forth with pattern as before and cast on 1 stitch at the end of the first 2 rows (= 1 edge stitch on each side) = 64-68-76-84-92-96 stitches. The new stitches are worked in GARTER STITCH – read description above. When the piece measures 19-21-22-23-25-27 cm = 7½"-8¼"-8¾"-9"-9¾"-10⅝" from the marker, cast on 4-5-5-5-5-6 stitches at the end of the next 2 rows for the armholes = 72-78-86-94-102-108 stitches. The piece is now measured from here. The new stitches are worked in garter stitch (a total of 5-6-6-6-6-7 stitches in garter stitch on each side of the piece). Continue working until the piece measures 31-31-32-32-32-32 cm = 12¼"-12¼"-12½"-12½"-12½"-12½". Bind off with knit over knit and purl over garter stitch – read BINDING-OFF TIP. The sweater measures approx. 55-57-59-61-63-65 cm = 21⅝"-22½"-23¼"-24"-24¾"-25½" from the shoulder down. BACK PIECE: Work in the same way as the front piece. SLEEVE: The sleeve is worked back and forth, top down from the shoulder stitches. Insert a marker in the middle of the shoulder stitches. The sleeve is measured from this marker. With 1 strand of each quality and circular needle size 6 mm = US 10, knit up stitches from the right side inside the 1 edge stitch as follows: Start at the bottom-inside corner of the armhole and knit up 23-23-27-27-27-31 stitches as far as the shoulder stitches, work the 10-10-10-14-14-14 shoulder stitches in pattern as before, knit up 23-23-27-27-27-31 stitches down the other side of the armhole = 56-56-64-68-68-76 stitches. Work pattern (A.1) with short rows back and forth as follows: ROW 1 (= wrong side): 1 edge stitch in garter stitch, * purl 2, knit 2 (ridge) *, work from *-* as far as the shoulder stitches, work the 10-10-10-14-14-14 shoulder stitches in pattern as before, purl 2. Turn and tighten the strand to avoid a large hole. ROW 2: Work A.1 as before over the first 14-14-14-18-18-18 stitches, turn, tighten the strand to avoid a large hole. ROW 3: Work A.1 as before over the first 16-16-16-20-20-20 stitches, turn, tighten the strand to avoid a large hole. ROW 4: Work A.1 as before over the first 18-18-18-22-22-22 stitches, turn, tighten the strand to avoid a large hole. Continue back and forth like this, working 2 more stitches before turning on each row until there is 1 stitch left on each side; the short rows are now finished. The sleeve cap measures approx. 9-9-11-11-11-13 cm = 3½"-3½"-4⅜"-4⅜"-4⅜"-5⅛". Remove the marker and insert it in the middle of the row. THE PIECE IS NOW MEASURED FROM HERE. Work back and forth with textured pattern and 1 edge stitch in garter stitch on each side. When the sleeve measures 7-7-7-7-7-8 cm = 2¾"-2¾"-2¾"-2¾"-2¾"-3⅛" from the end of the short rows, decrease 1 stitch on each side – read DECREASE TIP. Decrease like this every 3-3-2-1½-1½-1 cm = 1⅛"-1⅛"-¾"-½"-½"-⅜" a total of 8-8-10-12-12-14 times = 40-40-44-44-44-48 stitches. Continue working until the sleeve measures 44-44-41-40-40-38 cm = 17¼"-17¼"-16⅛"-15¾"-15¾"-15" – or to desired length. Bind off with knit over knit and purl over garter stitch – remember BINDING-OFF TIP. Work the other sleeve in the same way. ASSEMBLY: Sew the sleeve seams inside the 1 edge stitch on each side and sew the sleeves to the 4-5-5-5-5-6 stitches cast on for the armholes. Sew the side seams from the armholes and down, leaving 17 cm = 6¾" for the split. |
||||||||||
Diagram explanations |
||||||||||
|
||||||||||
 |
||||||||||
 |
||||||||||
Have you finished this pattern?Tag your pictures with #dropspattern #sundayvibessweater or submit them to the #dropsfan gallery. Do you need help with this pattern?You'll find 24 tutorial videos, a Comments/Questions area and more by visiting the pattern on garnstudio.com. © 1982-2026 DROPS Design A/S. We reserve all rights. This document, including all its sub-sections, has copyrights. Read more about what you can do with our patterns at the bottom of each pattern on our site. |
||||||||||


With over 40 years in knitting and crochet design, DROPS Design offers one of the most extensive collections of free patterns on the internet - translated to 17 languages. As of today we count 324 catalogs and 12290 patterns - 12280 of which are translated into English (US/in).
We work hard to bring you the best knitting and crochet have to offer, inspiration and advice as well as great quality yarns at incredible prices! Would you like to use our patterns for other than personal use? You can read what you are allowed to do in the Copyright text at the bottom of all our patterns. Happy crafting!
Post a comment to pattern DROPS 218-7
We would love to hear what you have to say about this pattern!
If you want to leave a question, please make sure you select the correct category in the form below, to speed up the answering process. Required fields are marked *.