
Popular categories
Looking for a yarn?


Comments / Questions (71)
![]() Eva wrote:
Eva wrote:
Buongiorno Una precisazione nel ferro di aumento ai lati le due maglie vanno aumentate entrambe prima dei segnapunti e a un centimetro e mezzo alterni aumentando dopo ? Dal suggerimento non capisco se l' alternanza è nello stesso ferro o a ferri alterni
23.10.2025 - 12:10DROPS Design answered:
Buonasera Eva, l'alternanza è sullo stesso giro. Buon lavoro!
26.10.2025 - 01:11
![]() Steph wrote:
Steph wrote:
I don't understand how to do the knitting tension. Do we knit and knot pattern alternatively for first row and then purl and knot for second row? Please explain.
18.06.2025 - 14:35DROPS Design answered:
Hi Steph, You work the swatch according to diagram A.1 (choose diagram for your size) which includes the knots every 4th row. Regards, Drops team.
19.06.2025 - 06:49
![]() Teresa wrote:
Teresa wrote:
Hi, when should the waist increases be done? Under "INCREASE TIP-2" is written every 1½ cm, however under body instructions is written to increase every 2 cm. Could you please clarify this? Thank you.
20.05.2025 - 15:14DROPS Design answered:
Dear Teresa, you will increase every 2cm as stated for INCREASE TIP-1, while you will increase as in INCREASE TIP-2 every 1 1/2cm. So they aren't always worked in the same round. Happy knitting!
25.05.2025 - 15:49
![]() Mary wrote:
Mary wrote:
Ich habe für eine S nicht 650 g Wolle sondern 410 g benötigt.. also hätten 450 g als Angabe völlig ausgereicht! Obwohl ich alles wie in der Anleitung gemacht habe und die Maschenprobe stimmt
21.02.2025 - 17:44
![]() Wendy wrote:
Wendy wrote:
Can you help me with the amount of yarn needed to lengthen the sleeves to 45cm and main body to 105 cm for a M size dress. Is Muskat the best yarn to use. Will the back stretch after sitting down.
06.11.2024 - 17:28DROPS Design answered:
Dear Wendy, take inspiration from a similar pattern with long sleeves and same tension to get an idea on how much yarn extra you might need; remember your DROPS store can also help you even per mail or telephone. Happy knitting!
07.11.2024 - 08:33
![]() Ulla wrote:
Ulla wrote:
Jag skulle vilja sticka klänningen i Kid silk. Hur beräknar jag garnåtgång till storlek M? Mvh Ulla
27.09.2024 - 15:30DROPS Design answered:
Hej Ulla. DROPS Kid-Silk är ett tunnare garn så stickfastheten på det stämmer dessvärre inte med stickfastheten i detta mönster. Vill du sticka i Kid-Silk så måste du välja ett mönster med garn från Garngrupp A. Mvh DROPS Design
01.10.2024 - 09:06
![]() Vincent wrote:
Vincent wrote:
J'ai terminé de tricoter l'empiècement, séparé les mailles entre le corps et les manches et placé les marqueurs. Mon tricot est arrêté au milieu du dos. Il est indiqué de couper le fil pour reprendre sur un coté de la robe (sous une manche). Je ne comprends pas comment faire, Ne doit-on pas plutôt tricoter ces maille (le demi-dos) jusqu'au milieu de la manche ?
11.08.2024 - 08:08DROPS Design answered:
Bonjour Mme Vincent, vous pouvez tricoter jusqu'au marqueur d'un des côtés de l'ouvrage ou bien comme indiqué: coupez le fil et glissez simplement les mailles sur l'aiguille droite sans les tricoter jusqu'au début des tours (on doit placer le 1er fil marqueur avant la maille suivante (et non avant le marqueur suivant, typo corrigée)). Bon tricot!
12.08.2024 - 08:11
![]() Lorna wrote:
Lorna wrote:
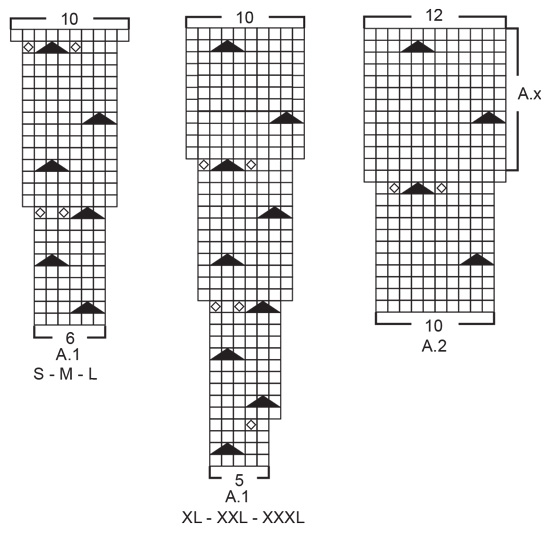
Continue in pattern until the correct measurement. How far on A2 should I go to do that? If I go to the last row,there would be too many stitches. the increase on A2 already gave the desired amount of stitches 324. Thanks for you help.
18.06.2024 - 18:46DROPS Design answered:
Dear Lorna, in 3rd size you will continue A.2 until yoke measures 21 cm from the marker after neck edge. Then continue in stocking stitch while dividing for body and sleeves. Happy knitting!
19.06.2024 - 07:38
![]() Michaela wrote:
Michaela wrote:
Wie geht das? Wie macht man die Zunahme, wie immDiagramm beschrieben? Siehe Text: symbols = 1 Masche zunehmen, indem 1 Masche rechts in die Masche der vorherigen Reihe gestrickt wird (d.h. in die Schlinge hinter der ersten Masche auf der linken Nadel), die Masche noch nicht von der linken Nadel gleiten lassen, die auf der linken Nadel liegende Masche (d.h. die Masche der aktuellen Reihe) rechts stricken und dann die Masche von der linken Nadel gleiten lassen
21.05.2024 - 11:51DROPS Design answered:
Liee Michaela, in diesem Video zeigen wir, wie man so eine Masche zunimmt. Viel Spaß beim Stricken!
21.05.2024 - 14:23
![]() Sofia Ch wrote:
Sofia Ch wrote:
Det står sticka A.x när man har delat upp fram, bakstycke och ärmar. Jag ser bara mönster A1 och A2
16.04.2024 - 18:14DROPS Design answered:
Hej Sofia, du finder A.x øverst i diagram A.2 :)
18.04.2024 - 11:46
|
||||||||||
Enchanted Evening#enchantedeveningdress |
||||||||||
 |
 |
|||||||||
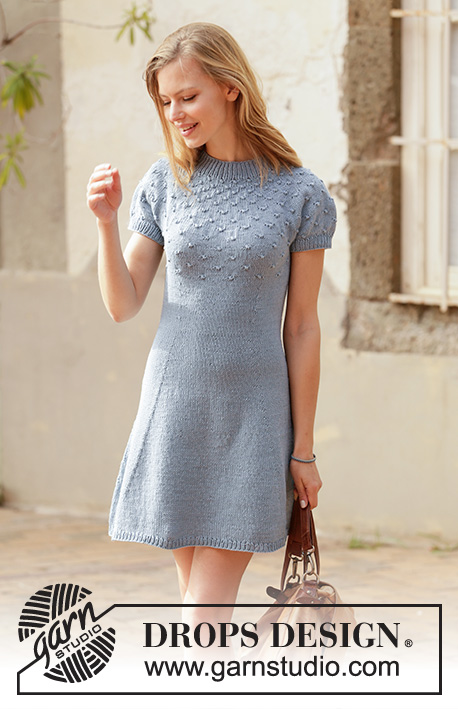
Knitted dress in DROPS Muskat. Piece is knitted top down with round yoke, knot pattern and short sleeves. Size: S - XXXL
DROPS 211-1 |
||||||||||
|
---------------------------------------------------------- EXPLANATION FOR THE PATTERN: ---------------------------------------------------------- PATTERN: See diagrams A.1 and A.2. Choose diagram for your size (applies to A.1). INCREASE/DECREASE TIP (evenly): To calculate how to increase/decrease evenly use the total number of stitches on row (e.g. 120 stitches) , and divide stitches by number of increases/decreases to be done (e.g. 18) = 6.7. In this example increase by making 1 yarn over after alternately approx. every 6th and 7th stitch. On next round knit yarn overs twisted to avoid holes. If decreasing knit in this example alternately approx. every 5th and 6th stitch and every 6th and 7th stitch together. INCREASE TIP-1 (applies to waist on body): Increase 1 stitch after 1st and 3rd marker thread and before 2nd and 4th marker thread as explained below. INCREASE AS FOLLOWS AFTER MARKER THREAD: Knit 1 stitch in loop around first stitch on left needle (i.e. In stitch from previous round). INCREASE AS FOLLOWS BEFORE MARKER THREAD: Work until marker thread, then knit 1 stitch around outermost stitch on right needle (i.e. in stitch from previous round). INCREASE TIP-2 (applies to sides of body): Increase the same way before and after marker as explained in INCREASE TIP-1, but increase alternately before and after marker. I.e. increase only 1 time in each side every 1½ cm = ½" and this happen alternately before and after marker (not on each side). DECREASE TIP (applies to waist of body): The first decreases will be at the same time as working pattern. Adjust to decrease on a round without knots, and note that there will be fewer stitches in stockinette stitch between 2 knots after a decrease. Decrease 1 stitch after 1st and 3rd marker thread and before 2nd and 4th marker thread as explained below. DECREASE AS FOLLOWS AFTER MARKER THREAD: Slip 1 stitch knitwise, knit 1, pass slipped stitch over stitch worked DECREASE AS FOLLOWS BEFORE MARKER THREAD: Work until 2 stitches remain before marker thread, knit 2 together. BIND-OFF TIP: To avoid a tight bind-off edge you may use a larger needle size. If this also is too tight, work a 1 yarn over after approx. every 8th stitch while binding off (bind off yarn overs as regular stitches). ---------------------------------------------------------- START THE PIECE HERE: ---------------------------------------------------------- DRESS - SHORT OVERVIEW OF THE PIECE: Work neck edge and yoke in the round on circular needle from mid back, top down. Divide yoke for body and sleeve edges. Body is worked in the round on circular needle, top down. Work sleeve edges in the round on double pointed needles, top down. NECK EDGE: Cast on 120-124-130-134-138-140 stitches on a short circular needle size 3 mm = US 2,5 with Muskat. Knit 1 round. Then work rib in the round (= knit 1/purl 1) for 4 cm = 1½". Knit 1 round while increasing 18-26-32-16-22-35 stitches evenly - read INCREASE/DECREASE TIP = 138-150-162-150-160-175 stitches. Knit 1 round where yarn overs are knitted twisted. Insert 1 marker in the middle of round (= mid front). Measure yoke from this marker! Then work yoke as explained below. YOKE: Switch to circular needle size 4 mm = US 6 and work A.1 in the round (= 23-25-27-30-32-35 repetitions of 6-6-6-5-5-5 stitches). Continue pattern like this , and increase as shown in A.1. REMEMBER THE KNITTING GAUGE! When A.1 has been worked, there are 230-250-270-300-320-350 stitches on needle. Then work A.2 in the round (= 23-25-27-30-32-35 repetitions of 10 stitches). Continue pattern like this and increase as shown in A.2. After last increase in A.2 there are 276-300-324-360-384-420 stitches on needle. Work until piece measures 17-19-21-23-25-27 cm = 6¾"-7½"-8¼"-9"-9¾"-10⅝" from marker at the neck - NOTE: Work A.2 as far as you can until correct measurements and in some sizes A.x must be repeated vertically until correct measurements (pattern should continue on body). Now divide yoke for body and sleeves, i.e. work next round as follows from mid back: Work 38-42-45-51-56-62 stitches as before (= ½ back piece), slip the next 62-66-72-78-80-86 stitches on 1 stitch holder for sleeve edge, cast on 6-6-8-8-10-10 new stitches on row (= in the side under sleeve), work 76-84-90-102-112-124 stitches as before (= front piece), slip the next 62-66-72-78-80-86 stitches on 1 stitch holder for sleeve edge, cast on 6-6-8-8-10-10 new stitches on row (= in the side under sleeve) and work the remaining 38-42-45-51-56-62 stitches as before (= ½ back piece). Cut the yarn. Finish body and sleeve edges separately. NOW MEASURE PIECE FROM HERE! BODY: = 164-180-196-220-244-268 stitches. Insert 1 marker in each side on body, in the middle of the 6-6-8-8-10-10 stitches cast on under each sleeve. Insert in addition 4 marker threads in the piece as follows: Count 21-24-27-32-37-42 stitches from marker in one side of piece, insert 1st marker thread before next marker, count 40-42-44-46-48-50 stitches, insert 2nd marker thread before next stitch, count 42-48-54-64-74-84 stitches (maker in the side is in the middle of these stitches), insert 3rd marker thread before next stitch, count 40-42-44-46-48-50 stitches, insert 4th marker thread before next stitch. 21-24-27-32-37-42 stitches remain on round after last marker thread. Move the marker threads upwards when working; they should be used for decrease and increase later. Now continue A.x while AT THE SAME TIME decreasing in the sides on body as explained below: Begin round at marker in one side of piece and work A.x in the round, but make sure to continue on correct row in diagram according to where piece was divided, and make sure to place knots correctly over knots on yoke. Work 6-6-8-8-10-10 stitches cast on under each sleeve in stockinette stitch. When piece measures 6 cm = 2⅜" from division in all sizes, finish A.x, but finish after 1 round with knots. Continue to work stockinette stitch in the round over all stitches. AT THE SAME TIME when piece measures approx. 3 cm = 1⅛" from division in all sizes, decrease 1 stitch after 1st and 3rd marker thread and before 2nd and 4th marker thread – read DECREASE TIP (= 4 stitches decreased). Decrease like this every 2½ cm = ⅞" 4 times in total vertically = 148-164-180-204-228-252 stitches. When piece measures 16 cm = 6¼" from division in all sizes, increase 1 stitch after 1st and 3rd marker thread and before 2nd and 4th marker thread – read INCREASE TIP-1. Increase in addition 1 stitch at marker in each side - read INCREASE TIP-2 (= 6 stitches increased in total on round). Increase like this every 2 cm = ¾" 21 times vertically in all sizes = 274-290-306-330-354-378 stitches. Work without increases until piece measures approx. 61-62-63-64-65-66 cm = 24"-24⅜"-24¾"-25½"-26" from division (approx. 2 cm = ¾" remain until finished measurements, try the dress on and work to desired length). Knit 1 round while increasing 20-22-24-26-26-28 stitches evenly = 294-312-330-356-380-406 stitches (increase a little to avoid the rib to be worked from contracting the edge). Switch to circular needle size 3 mm = US 2,5. Work rib in the round = knit 1/purl 1 for 2 cm = ¾". Bind off with knit over knit and purl over purl - read BIND-OFF TIP. Dress measures approx. 85-88-91-94-97-100 cm = 33½"-34⅝"-35¾"-37"-38½"-39⅜" from shoulder and down. SLEEVE EDGE: Slip the 62-66-72-78-80-86 stitches from stitch holder in one side of piece on double pointed needles size 4 mm = US 6 and pick in addition up 1 stitch in each of the 6-6-8-8-10-10 new stitches cast on under sleeve = 68-72-80-86-90-96 stitches. Begin round in the middle of the 6-6-8-8-10-10 stitches that were cast on under sleeve and work 3 rounds in stockinette stitch. AT THE SAME TIME on last round decrease 4-4-4-4-2-2 stitches evenly - remember INCREASE/DECREASE TIP = 64-68-76-82-88-94 stitches. Switch to double pointed needles size 3 mm = US 2,5. Work rib in the round = knit 1/purl 1 for 3 cm = 1⅛". Bind off with knit over knit and purl over purl - remember BIND-OFF TIP! Sleeve edge measures approx. 4 cm = 1½" from division. Work the other sleeve edge the same way. |
||||||||||
Diagram explanations |
||||||||||
|
||||||||||
 |
||||||||||
 |
||||||||||
Have you finished this pattern?Tag your pictures with #dropspattern #enchantedeveningdress or submit them to the #dropsfan gallery. Do you need help with this pattern?You'll find 26 tutorial videos, a Comments/Questions area and more by visiting the pattern on garnstudio.com. © 1982-2026 DROPS Design A/S. We reserve all rights. This document, including all its sub-sections, has copyrights. Read more about what you can do with our patterns at the bottom of each pattern on our site. |
||||||||||


With over 40 years in knitting and crochet design, DROPS Design offers one of the most extensive collections of free patterns on the internet - translated to 17 languages. As of today we count 324 catalogs and 12285 patterns - 12275 of which are translated into English (US/in).
We work hard to bring you the best knitting and crochet have to offer, inspiration and advice as well as great quality yarns at incredible prices! Would you like to use our patterns for other than personal use? You can read what you are allowed to do in the Copyright text at the bottom of all our patterns. Happy crafting!
Post a comment to pattern DROPS 211-1
We would love to hear what you have to say about this pattern!
If you want to leave a question, please make sure you select the correct category in the form below, to speed up the answering process. Required fields are marked *.