
Popular categories
Looking for a yarn?


Comments / Questions (25)
![]() Ulla-Britt Byström wrote:
Ulla-Britt Byström wrote:
Hej jag har stickat tröjan i Melody .Nu undrar jag om man ska blocka den när den är klar .Hoppas jag kan få svar snabbt tack/Ulla
07.12.2021 - 15:01DROPS Design answered:
Hej Ulla-Britt, nej du behöver inte blocka tröjan i Melody :)
08.12.2021 - 08:13
![]() Marianne wrote:
Marianne wrote:
Tack för hjälpen! Det är säkert flera som har funderat över raglanstickningen. 😉☺️
06.05.2021 - 17:15
![]() Marianne wrote:
Marianne wrote:
Angående raglanärmen. Jag förstår inte hur man ska ta två omtag efter varandra? Det står att man ska ta ett omtag på var sida om märktråden????
05.05.2021 - 17:32DROPS Design answered:
Hej Marianne, nu har vi rettet så du tager ud på hver side af 2 retmasker i hver raglan overgang. Tak for info :)
06.05.2021 - 14:42
![]() Joanne wrote:
Joanne wrote:
Je veux vous remercier pour votre aide. C’est clair et rapide. Un gros merci.
18.03.2021 - 16:33
![]() Joanne wrote:
Joanne wrote:
Bonjour, les augmentations du dos et devant se font juste avant de faire les côtes? Merci.
17.03.2021 - 16:21DROPS Design answered:
Bonjour Joanne, tout à fait, ainsi, les côtes ne vont pas resserrer le bas du pull. Bon tricot!
18.03.2021 - 08:22
![]() Joanne wrote:
Joanne wrote:
Bonjour, je fais le pull 213-28 Spring Fuzz et je suis rendue au dos et devant. On doit augmenter rendu à 26 cm (moi pour large, c’est 22 mailles). Le 26 cm, est-ce bien à partir du début du dos et devant et juste avant de faire les côtes? Merci de votre aide.
16.03.2021 - 15:52DROPS Design answered:
Bonjour Joanne, ces 26 cm sont mesurés à partir de la division de l'ouvrage (après les emmanchures), avec les 4 cm de côtes, cette partie fera 32 cm (+ l'empiècement + les épaules = 58 cm de hauteur totale). Bon tricot!
16.03.2021 - 15:59
![]() Daniela wrote:
Daniela wrote:
Sia la foto della maglia che il diagramma al fondo della descrizione mostrano che le diminuzioni al giro manica non siano con lo sprone, mentre le istruzioni parlano di uno sprone e poi separare per le maniche
07.12.2020 - 17:29DROPS Design answered:
Buonasera Daniela, non ci sono diminuzioni prima della divisione per le maniche, ci sono solo aumenti, le diminuzioni sono sulla parte delle maniche dopo la divisione. Buon lavoro!
07.12.2020 - 21:12
![]() Daniela wrote:
Daniela wrote:
Buongiorno, ho letto le spiegazioni e ho visto sia il diagramma che il modello stesso, ma sembra non combaciare perché le spiegazioni parlano di un raglan e di separare le maniche do 22 cm di lavoro, ma il modello ha le diminuzioni per le maniche da subito dopo il collo. Sbaglio io a comprendere? E la prima volta che trovò un incongruenza così. Grazie
07.12.2020 - 13:50DROPS Design answered:
Buongiorno Daniela, il maglione è lavorato dall'alto in basso, con gli aumenti dopo la lavorazione a coste sul collo, e poi gli aumenti per il raglan sullo sprone. Se ci spiega meglio il suo problema possiamo cercare di aiutarla a risolverlo. Buon lavoro!
07.12.2020 - 14:18
![]() Margaret Borg-Hansen wrote:
Margaret Borg-Hansen wrote:
I lived in Oslo for 25 years and all my knitting started at the border. Now Patterns seem to start from neck. Do you have a pattern for raglan sweater from bottom up, please?
02.10.2020 - 22:04DROPS Design answered:
Dear Margaret, yes, we do have a number of patterns knitted from the bottom up. here you can see what a quick search came up with. Certainly there are more of them in older catalogs, but the new ones always have a few of them as well. I hope you can find a project you like. Happy Knitting!
02.10.2020 - 23:05
![]() Maj wrote:
Maj wrote:
Jeg er ved at strikke denne og har samme problem som Kirsten..... Man kan da ikke slå om på hver side af en mærke tråd? Kan jeg følge Raglan instruktionerne for Spring Fuzz Jacket?
30.07.2020 - 12:47DROPS Design answered:
Hej Maj, ja det går helt fint :)
30.07.2020 - 13:48
|
|
Spring Fuzz#springfuzzsweater |
|
 |
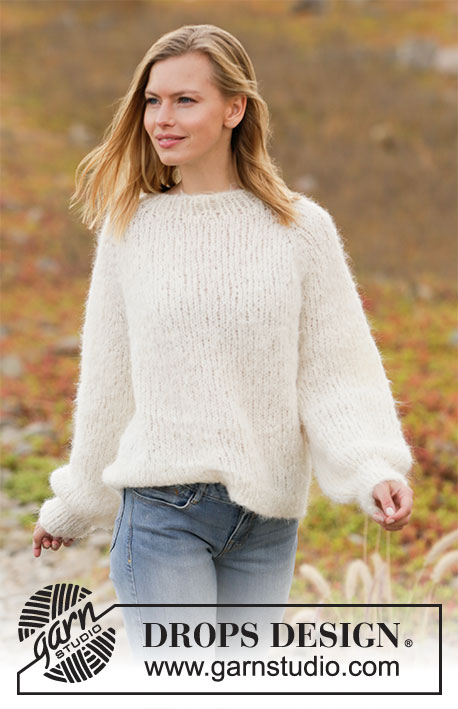 |
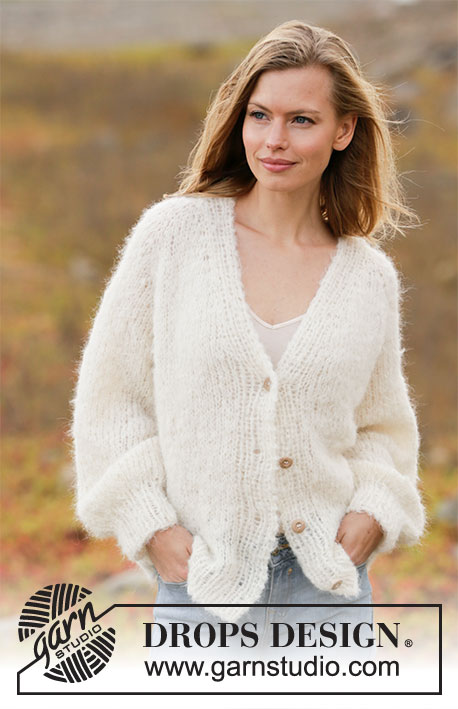
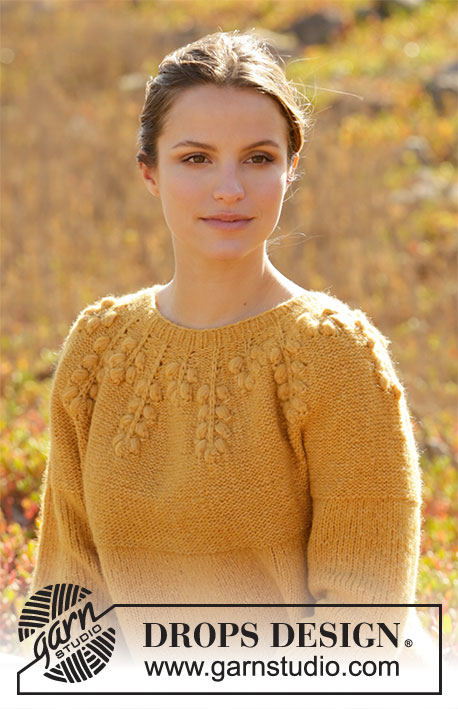
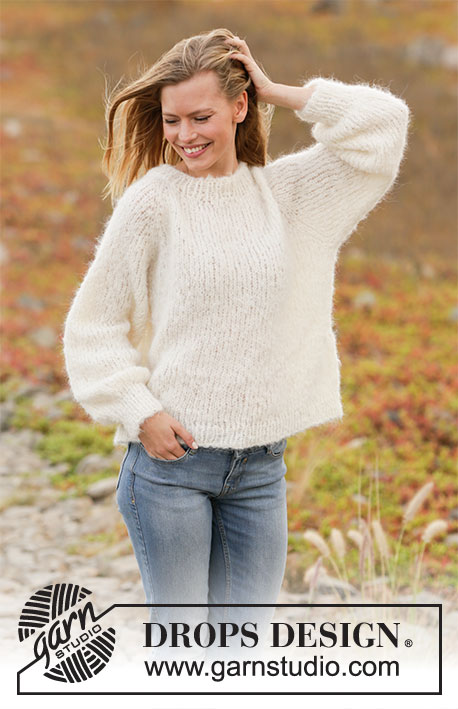
Knitted sweater with raglan in DROPS Melody. Worked top down. Size XS–XXL.
DROPS 213-28 |
|
|
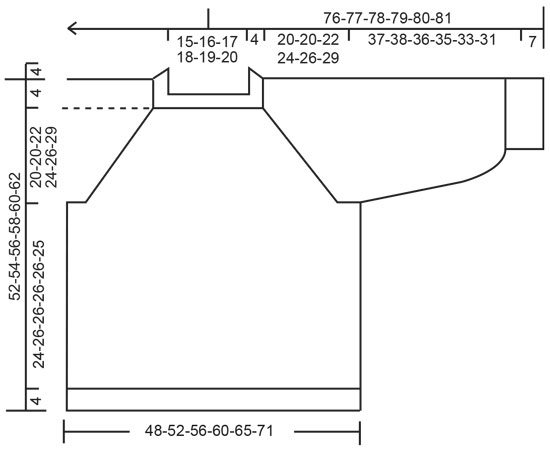
---------------------------------------------------------- EXPLANATION FOR THE PATTERN: ---------------------------------------------------------- INCREASE/DECREASE TIP (evenly): To calculate how to increase/decrease evenly, use the total number of stitches on row (e.g. 54 stitches) , and divide stitches by number of increases/decreases to be done (e.g. 2) = 27. In this example increase by making 1 yarn over after every 27th stitch. On next round knit yarn overs twisted to avoid holes. To decrease in this example knit every 26th and 27th stitch together. RAGLAN: Increase 1 stitch on each side of the 4 markers in each transition between body and sleeves as follows: Work until there is 1 stitch left before marker thread, 1 yarn over, knit 2 (marker sits between these 2 stitches), 1 yarn over (= 2 stitches increased). Repeat at all the markers. On the next row knit the yarn overs twisted to avoid holes. Then work the new stitches in stockinette stitch. DECREASE TIP (applies to sleeves): Decrease 1 stitch on each side of marker thread as follows: Work until 3 stitches remain before marker thread, knit 2 together, knit 2 (marker thread is between these stitches), slip 1 stitch knitwise, knit 1, pass slipped stitch over stitch worked (= 2 stitches decreased). BIND-OFF TIP: To avoid a tight bind-off edge you may use a larger needle. If this also is too tight, make 1 yarn over after approx. every 4th stitch and bind off these as regular stitches. ---------------------------------------------------------- START THE PIECE HERE: ---------------------------------------------------------- SWEATER - SHORT OVERVIEW OF THE PIECE: Work neck edge and yoke in the round on circular needle from mid back, top down. Now divide yoke for body and sleeves. Body is worked in the round on circular needle, top down. Work sleeves in the round on double pointed needles/short circular needle, top down. NECK EDGE: Cast on 54-58-60-62-64-68 stitches on circular needle size 6 mm = US 10 with Melody. Knit 1 round. Then work rib (= knit 1/purl 1) in the round for 4 cm = 1½". When rib is done, knit 1 round while increasing 2-10-14-14-16-18 stitches evenly - read DECREASE/INCREASE TIP = 56-68-74-76-80-86 stitches. Switch to circular needle size 8 mm = US 11. Insert 1 marker after rib at the beginning of round (= mid back), measure yoke from this marker! YOKE: Now insert 4 marker threads in the piece. Insert first marker thread after 9-12-13-14-15-16 stitches (= in transition between back piece and right sleeve), insert next marker thread after 10 stitches (= in transition between right sleeve and front piece), insert next marker thread after 18-24-27-28-30-33 stitches (= in transition between front piece and left sleeve), insert last marker thread after 10 stitches (= in transition between left sleeve and back piece). 9-12-14-14-15-17 stitches now remain on round after last marker thread. Work in stockinette stitch in the round, at the same time on first round begin increase for RAGLAN – read explanation above. Increase like this every other round 14-14-15-16-18-20 times in total = 168-180-194-204-224-246 stitches. REMEMBER THE KNITTING GAUGE! When all increases for raglan are done, continue with stockinette stitch until piece measures 20-20-22-24-26-29 cm = 8"-8"-8¾"-9¾"-10¼"-11⅜" from marker. Now divide piece for body and sleeves. On next round the transition between body and sleeve is displaced so that 2-1-1-1-1-1 stitches in each side of sleeves are on front piece and back piece. Work next round as follows: Work the first 25-27-29-31-34-37 stitches (= half back piece), slip the next 34-36-38-40-44-48 stitches on a stitch holder for sleeve, cast on 8-8-8-10-10-10 new stitches on needle (= in the side under sleeve), work the next 50-54-59-62-68-75 stitches (= front piece), slip the next 34-36-38-40-44-48 stitches on a stitch holder (= sleeve), cast on 8-8-8-10-10-10 new stitches on needle (= in the side under sleeve), work the last 25-27-30-31-34-38 stitches (= 50-54-59-62-68-75 stitches for back piece). Finish body and sleeves separately. NOW MEASURE PIECE FROM HERE! BODY: = 116-124-134-144-156-170 stitches. Work in stockinette stitch in the round. When piece measures 24-26-26-26-26-25 cm = 9½"-10¼"-10¼"-10¼"-10¼"-9¾", increase 20-20-20-22-24-26 stitches evenly = 136-144-154-166-180-196 stitches. Switch to circular needle size 6 mm = US 10. Work rib (= knit 1/purl 1) in the round for 4 cm = 1½". Bind off with knit over knit and purl over purl - read BIND-OFF TIP. Sweater measures approx. 52-54-56-58-60-62 cm = 21¼"-22"-22¾"-23⅝"-24⅜"-25¼" from shoulder and down. SLEEVES: Slip the 34-36-38-40-44-48 stitches from stitch holder in one side of piece back on a short circular needle/double pointed needles size 8 mm = US 11 and pick in addition up 1 stitch in each of the new 8-8-8-10-10-10 stitches cast on in the side under sleeve = 42-44-46-50-54-58 stitches. Work the different sizes as follows: Size XS, S and M: Work in stockinette stitch in the round until sleeve measures 37-38-36 cm = 14½"-15"-14¼". Then continue as explained below. Size L, XL and XXL: Insert a marker thread in the middle of the new 10-10-10 stitches under the sleeve. Move marker thread upwards when working. When piece measures 5 cm = 2", decrease 1 stitch on each side of marker thread - read DECREASE TIP. Repeat decrease when sleeve measures 12 cm = 4¾" = 46-50-54 stitches. Continue with stockinette stitch until sleeve measures 35-33-31 cm = 13¾"-13"-12¼". Then continue as explained below. All sizes: Knit 1 round while decreasing 14-14-14-14-14-16 stitches evenly = 28-30-32-32-36-38 stitches. Switch to double pointed needles size 6 mm = US 10. Work rib (= knit 1/purl 1) in the round for 7 cm = 2¾". Bind off with knit over knit and purl over purl - remember BIND-OFF TIP. Sleeve measures 44-45-43-42-40-38 cm = 17¼"-17¾"-17"-16½"-15¾"-15" (shorter sleeves in larger sizes because of longer yoke). |
|
 |
|
Have you finished this pattern?Tag your pictures with #dropspattern #springfuzzsweater or submit them to the #dropsfan gallery. Do you need help with this pattern?You'll find 25 tutorial videos, a Comments/Questions area and more by visiting the pattern on garnstudio.com. © 1982-2026 DROPS Design A/S. We reserve all rights. This document, including all its sub-sections, has copyrights. Read more about what you can do with our patterns at the bottom of each pattern on our site. |
|


With over 40 years in knitting and crochet design, DROPS Design offers one of the most extensive collections of free patterns on the internet - translated to 17 languages. As of today we count 324 catalogs and 12290 patterns - 12280 of which are translated into English (US/in).
We work hard to bring you the best knitting and crochet have to offer, inspiration and advice as well as great quality yarns at incredible prices! Would you like to use our patterns for other than personal use? You can read what you are allowed to do in the Copyright text at the bottom of all our patterns. Happy crafting!
Post a comment to pattern DROPS 213-28
We would love to hear what you have to say about this pattern!
If you want to leave a question, please make sure you select the correct category in the form below, to speed up the answering process. Required fields are marked *.