
Popular categories
Looking for a yarn?


Comments / Questions (15)
![]() JACQUELINE PEYRE wrote:
JACQUELINE PEYRE wrote:
POUR LE MODELE 205-50 JE VOUDRAIS SAVOIR A QUEMµL MOMENT ON TRICOTE LE DIAGRAMME A3 ? J'AI TERMINE LE RAGLAN ET JE NE COMPRENDS PAS OU ON PLACE LE A3 MERCI POUR VOS EXPLICATIONS
31.10.2022 - 08:25DROPS Design answered:
Bonjour Mme Peyre, le diagramme A.3 est cité sous le paragraphe ASTUCE TRICOT-2, autrement dit, on tricote A.3 le long des raglans lorsque les augmentations des raglans sont terminés mais que l'on veut prolonger les rangs ajourés le longs des raglans. Bon tricot!
31.10.2022 - 09:33
![]() Vu wrote:
Vu wrote:
Je souhaiterais faire ce modèle mais en tricotant de bas en haut. Comment faire pour adapter les explications données ? Merci pour votre réponse.
17.11.2021 - 14:51DROPS Design answered:
Bonjour Mme Vu, nous ne sommes malheureusement pas en mesure de pouvoir adapter chacun de nos modèles à chaque demande; merci de bien vouloir vous rapprocher de votre magasin DROPS ou d'un forum spécialisé pour toute assistance complémentaire. Merci pour votre compréhension, bon tricot!
17.11.2021 - 16:47
![]() Halina wrote:
Halina wrote:
Czy we wzorze nie na rzędów skróconych podnoszących karczek na plecach?
02.11.2021 - 20:09DROPS Design answered:
Witaj Halinko, w tym wzorze nie ma takiego podwyższenia na dekolt z tyłu, ale oczywiście jak tylko chcesz możesz je wykonać. Pozdrawiamy!
03.11.2021 - 09:32
![]() Kelly wrote:
Kelly wrote:
I’m making the XXL and the math isn’t working for me in the yoke. The number of stitches (112) and the math with stitches and additions is good but then when adding in markers that math is less than 112. Please advise.
04.04.2020 - 22:51DROPS Design answered:
Hi Kelly, The first marker is in stitch 2, the second in stitch 12, the third in stitch in stitch 58, the fourth in stitch 68. This leaves you with 44 stitches to the end of the round. Happy knitting!
06.04.2020 - 07:54
![]() Sabine wrote:
Sabine wrote:
Bonjour Vous avez beaucoup de modèles intéressants cependant je ne comprends pas pourquoi sur la majorité des modèles depuis un moment vous faites des emmanchures très larges, c'est désagréable car lorsque l'on lève le ou les bras tout le tricot remonte.
15.02.2020 - 18:41
![]() House wrote:
House wrote:
Bonjour. Je voudrais tricoter ce modèle avec le fil sky uniquement. Par conséquent je le tricoterai avec des aiguilles n°4. Pouvez-vous m'aider pour convertir le nombre de mailles, d'augmentations etc.. merci beaucoup d'avance.
21.10.2019 - 06:09DROPS Design answered:
Bonjour Mme House, nous ne sommes malheureusement pas en mesure de pouvoir adapter chacun de nos modèles à chaque demande. On tricote ici avec 1 fil Sky + 1 fil Kid-Silk, vous pouvez remplacer le fil Kid-Silk par un autre fil du groupe A si vous le souhaitez, tant que vous avez le même échantillon. Bon tricot!
21.10.2019 - 11:48
![]() Diana wrote:
Diana wrote:
Please delete my previous comment, I was reading the pattern wrong lol
20.10.2019 - 09:25
![]() Diana wrote:
Diana wrote:
Neck edge has 92 stitches for size s, but start of the yoke is 89... please advise.
20.10.2019 - 09:16DROPS Design answered:
Dear Diana, yoke starts with 92 sts: 1 stitch, 1 stitch with marker, 9 sts (sleeve), 1 stitch with marker, 35 sts (front piece), 1 stitch with marker, 9 sts (sleeve), 1 stith with marker, 34 sts (back piece) = 1+1+9+1+35+1+9+1+34= 92 sts. Happy knitting!
21.10.2019 - 12:49
![]() Anna Maria wrote:
Anna Maria wrote:
Come fare per lavorarlo dal basso verso l'alto
08.10.2019 - 19:25DROPS Design answered:
Buonasera Anna Maria, questo modello è stato disegnato per essere lavorato top down, cioè dall'alto in basso e non ci è possibile riscrivere le istruzioni per un'altra costruzione, ma nel nostro sito troverà sicuramente altri modelli con la costruzione che preferisce. Buon lavoro!
08.10.2019 - 19:30
![]() Claire wrote:
Claire wrote:
J'adore ce modèle ! Assez large et comfortable , et en même temps il est très élégant !
31.08.2019 - 17:39
|
||||||||||||||||||||||
Rise Up#riseupsweater |
||||||||||||||||||||||
 |
 |
|||||||||||||||||||||
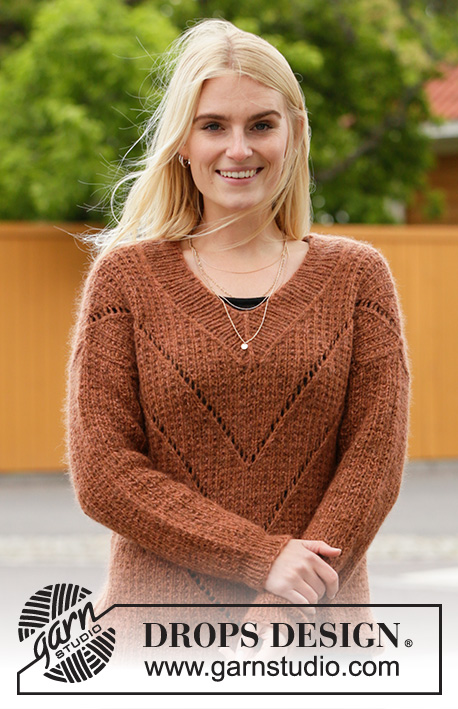
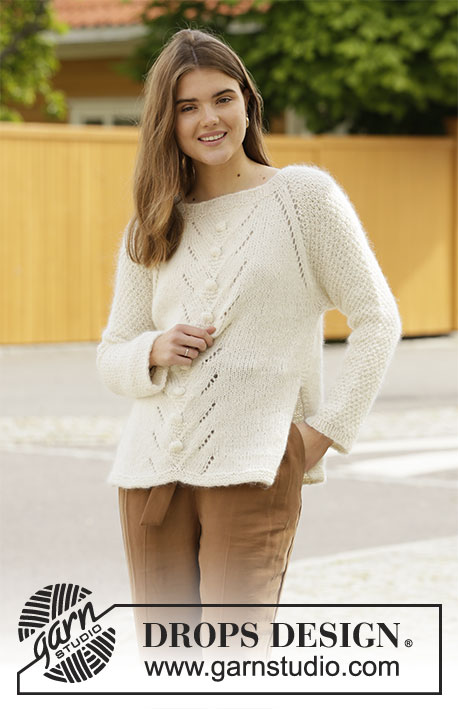
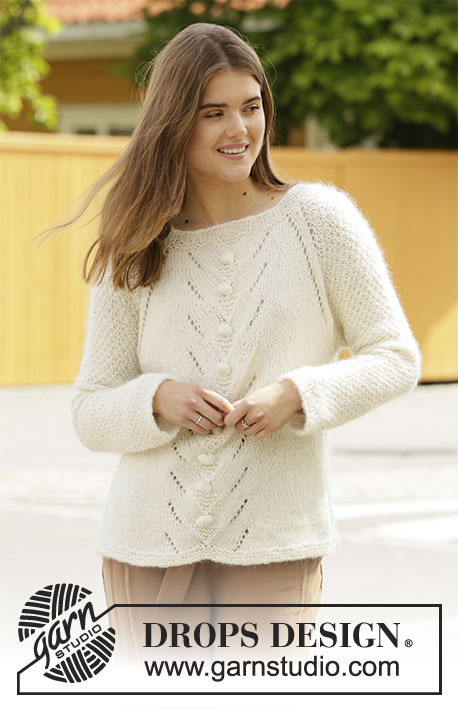
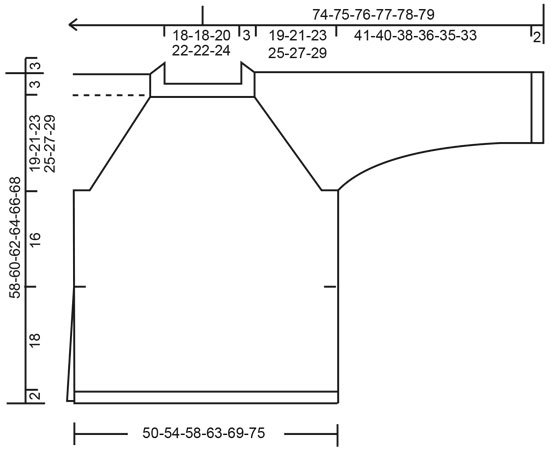
Knitted sweater in DROPS Sky and DROPS Kid-Silk. Piece is knitted top down with raglan, lace pattern, vents in the sides and double moss stitch on sleeves. Size: S - XXXL
DROPS 205-50 |
||||||||||||||||||||||
|
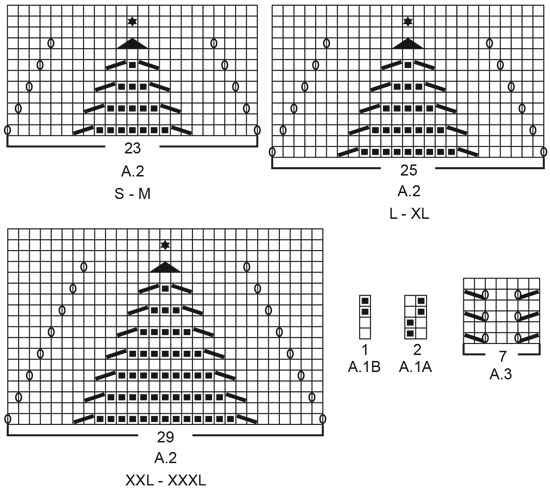
---------------------------------------------------------- EXPLANATION FOR THE PATTERN: ---------------------------------------------------------- GARTER STITCH (worked in the round): 1 ridge vertically = 2 rounds, i.e. knit 1 round and purl 1 round. GARTER STITCH (back and forth): Knit all rows. 1 ridge vertically = knit 2 rows. INCREASE TIP (evenly): To calculate how to increase evenly, use the total number of stitches on row (e.g. 72 stitches) and divide stitches by number of increases to be done (e.g. 20) = 3.6. In this example increase by making 1 yarn over after alternately approx. every 3rd and 4th stitch. On next round knit yarn overs twisted to avoid holes. PATTERN: See diagrams A.1 to A.3. Choose diagram for your size (applies to A.2). Diagrams show all rows in pattern seen from the right side. A.3 applies to KNITTING TIP-2. KNITTING TIP-1: If you do not want bobbles in lace pattern work the stitch with symbol for bobble in stockinette stitch. KNITTING TIP-2: On the model on photo the eyelet rows in raglan lines end when increases for raglan are done. If you want to continue the eyelet row along the entire raglan line (down to where yoke is divided into body and sleeves), work A.3 in every transition between body and sleeves when raglan increases are done (marker is in the middle stitch in A.3). RAGLAN: Increase for raglan in every transition between front/back piece and sleeves (i.e. Increase on each side of the 4 markers) as follows: Begin 1 stitch before stitch marker, make 1 yarn over, knit 3 (marker is in the middle of these 3 stitches), make 1 yarn over (= 2 stitches increased at every marker and 8 stitches increased in total on round.) On next round knit the yarn overs to make holes. Then work the new stitches in stockinette stitch on front and back piece and in double moss stitch (A.1) on sleeves. DECREASE TIP (applies to mid under sleeves): Decrease 1 stitch on each side of marker thread as follows: Begin 3 stitches before marker thread, knit 2 twisted together, work 2 in garter stitch (marker thread is between these 2 stitches), knit 2 together (= 2 stitches decreased). ---------------------------------------------------------- START THE PIECE HERE: ---------------------------------------------------------- SWEATER - SHORT OVERVIEW OF THE PIECE: Neck edge and yoke are worked in the round on circular needle, top down. Now divide yoke for body and sleeves. Work body in the round on circular needle until division for vent in each side. Then work front and back piece back and forth on circular needle separately. Work sleeves in the round on double pointed needles/short circular needle, top down. Work the entire garment with 1 strand of each quality (= 2 strands). NECK EDGE: Cast on 72-72-78-84-84-90 stitches on a short circular needle size 5 mm = US 8 with 1 strand Sky and 2 strands Kid-Silk (= 3 strands). Remove one strand with Kid-Silk and continue with 1 strand Sky and 1 strand Kid-Silk (= 2 strands). Work rib in the round = knit 3/purl 3 for 3 cm = 1⅛". Knit 1 round and purl 1 round. Then knit 1 round while increasing 20-28-30-28-28-30 stitches evenly - read INCREASE TIP = 92-100-108-112-112-120 stitches. Insert 1 marker on round. Work yoke as explained below - measure yoke from marker! YOKE: Read all of the following section on yoke before working! Switch to circular needle size 6 mm = US 10. Insert 4 markers in piece as follows (without working the stitches): Insert 1 marker in the second stitch on round, count 9 stitches (= sleeve), insert 1 marker in next stitch, count 35-39-43-45-45-49 stitches (= front piece), insert 1 marker in next stitch, count 9 stitches (= sleeve), insert 1 marker in next stitch. 34-38-42-44-44-48 stitches remain on round after last marker (= back piece). Use markers when increasing for raglan. Work first round as follows: Work 3 stitches in stockinette stitch (marker is in the middle of these 3 stitches), work A.1A over the 6 next stitches, work A.1B (= 1 stitch), work 3 stitches in stockinette stitch (marker is in the middle of these 3 stitches), work 5-7-8-9-7-9 stitches in stockinette stitch, work A.2 (= 23-23-25-25-29-29 stitches), work 5-7-8-9-7-9 stitches in stockinette stitch, work 3 stitches in stockinette stitch (marker is in the middle of these 3 stitches), work A.1A over the next 6 stitches, work A.1B (= 1 stitch), work 3 stitches in stockinette stitch (marker is in the middle of these 3 stitches), work 5-7-8-9-7-9 stitches in stockinette stitch, work A.2 (= 23-23-25-25-29-29 stitches), and finish with 5-7-8-9-7-9 stitches in stockinette stitch. Continue pattern like this - READ KNITTING TIP-1 AND REMEMBER THE KNITTING GAUGE! AT THE SAME TIME on first round increase for RAGLAN on each side of the 4 markers - read explanation above. Increase for raglan every other round 16-18-19-21-23-25 times in total. After last increase there are 220-244-260-280-296-320 stitches on needle. Read KNITTING TIP-2 and continue without increases until piece measures approx. 22-24-26-28-30-32 cm = 8¾"-9½"-10¼"-11"-11¾"-12½" from marker in the neck. Now divide yoke for body and sleeves, i.e. work last round as follows: SIZE S and XXL: Work as before to and with the first stitch with marker, slip the next 41-55 stitches on 1 stitch holder for sleeve, cast on 6-10 new stitches on needle (= in the side under sleeve), work as before over the next 69-93 stitches (= front piece), slip the next 41-55 stitches on 1 stitch holder for sleeve, cast on 6-10 new stitches on needle (= in the side under sleeve), and work as before the rest of the round (= back piece). Cut the yarn and remove the markers in raglan lines. SIZE M and XL: Work as before until the first stitch with marker, slip the next 47-53 stitches on 1 stitch holder for sleeve, cast on 6-8 new stitches on needle (= in the side under sleeve), work as before over the next 75-87 stitches (= front piece), slip the next 47-53 stitches on 1 stitch holder for sleeve, cast on 6-8 new stitches on needle (= in the side under sleeve), and work as before the rest of the round (= back piece). Cut the yarn and remove the markers in raglan lines. SIZE L: Slip the first 51 stitches on 1 stitch holder for sleeve, cast on 8 new stitches on needle (= in the side under sleeve), work as before over the next 79 stitches (= front piece), slip the next 51 stitches on 1 stitch holder for sleeve, cast on 8 new stitches on needle (= in the side under sleeve), and work as before the rest of the round (= back piece). Cut the yarn and remove the markers in raglan lines. SIZE XXXL: Work as before over the 3 stitches in raglan line (i.e. to and with stitch after stitch with marker), slip the next 57 stitches on 1 stitch holder for sleeve, cast on 10 new stitches on needle (= in the side under sleeve), work as before over the next 103 stitches (= front piece), slip the next 57 stitches on 1 stitch holder for sleeve, cast on 10 new stitches on the needle (= in the side under sleeve), and work as before the rest of the round (= back piece). Cut the yarn and remove the markers in raglan lines. ALL SIZES: Finish body and sleeves separately. NOW MEASURE THE PIECE FROM HERE! BODY: = 150-162-174-190-206-226 stitches. Insert 1 marker thread in the middle of the 6-6-8-8-10-10 stitches cast on under sleeve in each side (= 75-81-87-95-103-113 stitches on front piece and 75-81-87-95-103-113 stitches on back piece). Begin round at one of the marker threads and work next round as follows: Work 3 stitches in GARTER STITCH – read explanation above, work 23-26-28-32-34-39 stitches in stockinette stitch, continue A.2 as before, work 23-26-28-32-34-39 stitches in stockinette stitch, work 6 stitches in garter stitch (marker thread is in the middle of these 6 stitches), work 23-26-28-32-34-39 stitches in stockinette stitch, continue A.2 as before, work 23-26-28-32-34-39 stitches in stockinette stitch and finish with 3 stitches in garter stitch. Continue the pattern like this until piece measures 16 cm = 6¼" from division under sleeves (approx. 20 cm = 8" remain until finished measurements, try the sweater on and work to desired length). Now divide the piece at the marker threads in the sides, i.e. work front and back piece back and forth on circular needle separately until finished measurements (make sure to divide the piece after working 1 round with pattern to avoid the pattern getting on the wrong side). FRONT PIECE: = 75-81-87-95-103-113 stitches. Continue pattern as before, i.e. work first row as follows from wrong side: Work 3 edge stitches in garter stitch, work 23-26-28-32-34-39 stitches in stockinette stitch, continue A.2 as before, work 23-26-28-32-34-39 stitches in stockinette stitch and finish with 3 edge stitches in garter stitch. Work until piece measures 34 cm = 13⅜" from division (or desired length, approx. 2 cm = ¾" remain until finished measurements). Switch to circular needle size 5 mm = US 8. Work 3 ridges in garter stitch back and forth over all stitches (work 1st row from right side). Loosely bind off by knitting from right side but to avoid a tight bind-off edge bind off with 1 strand Sky and 2 strands Kid-Silk (= 3 strands). Sweater measures approx. 58-60-62-64-66-68 cm = 22¾"-23⅝"-24⅜"-25¼"-26"-26¾" from shoulder and down. BACK PIECE: = 75-81-87-95-103-113 stitches. Continue pattern as before, i.e. work first row as follows from wrong side: Work 3 edge stitches in garter stitch, work 23-26-28-32-34-39 stitches in stockinette stitch, continue A.2 as before, work 23-26-28-32-34-39 stitches in stockinette stitch and finish with 3 edge stitches in garter stitch. Work until piece measures approx. 34 cm = 13⅜" from division (adjust according to front piece). Switch to circular needle size 5 mm = US 8. Work 3 ridges in garter stitch back and forth over all stitches (work 1st row from right side). Loosely bind off by knitting from right side the same way as on front piece. SLEEVE: Slip the 41-47-51-53-55-57 stitches from stitch holder in one side of piece on double pointed needles or a short circular needle size 6 mm = US 10 and pick in addition up 1 stitch in each of the 6-6-8-8-10-10 new stitches cast on under sleeve = 47-53-59-61-65-67 stitches. Insert 1 marker thread in the middle of the 6-6-8-8-10-10 stitches under sleeve and move the marker thread upwards when working. Use marker thread later when decreasing under sleeve. Begin round at the marker thread and work as follows: Work 1 stitch in garter stitch, continue A.1A in the round until 2 stitches remain on round (make sure that pattern continue correctly according to yoke), work A.1B (= 1 stitch) and finish with 1 stitch in garter stitch. Continue pattern like this. AT THE SAME TIME when piece measures 3-3-3-3-2-2 cm = 1⅛"-1⅛"-1⅛"-1⅛"-¾"-¾" from division, decrease 2 stitches mid under sleeve - read DECREASE TIP. Decrease like this every 3-2-1½-1½-1½-1½ cm = 1⅛"-¾"-½"-½"-½"-½" 5-7-9-9-10-10 times in total = 37-39-41-43-45-47 stitches. Work until piece measures approx. 41-40-38-36-35-33 cm = 16⅛"-15¾"-15"-14¼"-13¾"-13" from division (approx. 2 cm = ¾" remain until finished measurements, try the sweater on and work to desired length). NOTE! Shorter measurements in the larger sizes because of wider neck and longer yoke. Switch to double pointed needles size 5 mm = US 8. Work 4 rounds rib (= knit 1/purl 1) but adjust rib so that first round is worked purl over knit and knit over purl in A.1. After 4 rounds with rib loosely bind off with knit over knit and purl over purl but to avoid a tight bind-off edge bind off with 1 strand Sky and 2 strands Kid-Silk (= 3 strands). Sleeve measures approx. 43-42-40-38-37-35 cm = 17"-16½"-15¾"-15"-14½"-13 3 /4" from division under sleeve. Work the other sleeve the same way. |
||||||||||||||||||||||
Diagram explanations |
||||||||||||||||||||||
|
||||||||||||||||||||||
 |
||||||||||||||||||||||
 |
||||||||||||||||||||||
Have you finished this pattern?Tag your pictures with #dropspattern #riseupsweater or submit them to the #dropsfan gallery. Do you need help with this pattern?You'll find 32 tutorial videos, a Comments/Questions area and more by visiting the pattern on garnstudio.com. © 1982-2026 DROPS Design A/S. We reserve all rights. This document, including all its sub-sections, has copyrights. Read more about what you can do with our patterns at the bottom of each pattern on our site. |
||||||||||||||||||||||


With over 40 years in knitting and crochet design, DROPS Design offers one of the most extensive collections of free patterns on the internet - translated to 17 languages. As of today we count 324 catalogs and 12290 patterns - 12280 of which are translated into English (US/in).
We work hard to bring you the best knitting and crochet have to offer, inspiration and advice as well as great quality yarns at incredible prices! Would you like to use our patterns for other than personal use? You can read what you are allowed to do in the Copyright text at the bottom of all our patterns. Happy crafting!
Post a comment to pattern DROPS 205-50
We would love to hear what you have to say about this pattern!
If you want to leave a question, please make sure you select the correct category in the form below, to speed up the answering process. Required fields are marked *.