
Popular categories
Looking for a yarn?




























Comments / Questions (92)
 Hanna wrote:
Hoe begin je de een na laatste ronde van A.4? Volgens het patroon start ik met een ketting van 2 lossen, maar waar moet ik die halen? Als ik die direct haak na het sluiten van de vorige toer (met een halve vaste) ontstaat er niet het gat wat er moet komen te zitten. Start om eerst met een ketting van 3 lossen om ze daar aan toe te voegen, heb ik aan het einde van de toer een stokje te veel...
20.06.2026 - 11:30DROPS Design answered:
Dag Hanna,
Dat sluit inderdaad niet goed aan bij die toer en ik denk dat je niet ontkomt aan 3 lossen waardoor een extra stokje ontstaat. Dit extra stokje kun je bij de volgende toer gewoon negeren. (Het is ook alleen maar aan het begin van de toer, voor de rest kun je gewoon doorhaken.
21.06.2026 - 20:08
 Milena wrote:
Bardzo fajny kapelusz mi wyszedł z tego wzoru, ale nie wiem jakiej grubości drucika użyć? Pozdrawiam
10.06.2026 - 22:32DROPS Design answered:
Witaj Mileno, odpowiedni będzie drucik o grubości 0,7 - 1 mm. Pozdrawiamy!
11.06.2026 - 09:30
Hanna wrote:
Hoi, daar ben ik weer maar dit keer met een vraag. Ik heb A.2 toer 8 afgerond door een halve vaste te maken in de ketting van 3 lossen op toer 7. Vervolgens moet ik nu twee halve vasten maken in de stokjes daaronder? En daarna moet ik 2 stokjes in de 2 lossen ruimte daaronder maken, waarvan het eerste stokje een ketting van 3 lossen moet zijn? Als ik dat doe is de ketting niet hoog genoeg om het einde van de toer (2 lossen) er mooi op aan te laten sluiten. Hoe moet ik dit aanpakken?
04.06.2026 - 19:36
Hanna wrote:
Verder is dit patroon inconsequent in het aangeven van het eerste stokje = 3 lossen principe . In de tekst staat helder dat élke toer start (na de halve vaste) met een ketting van 3 lossen = 1e stokje, maar het diagram laat dit alleen zien in (A.2) toer 2 t/m 8. Hopeloos verwarrend.
04.06.2026 - 15:19
Hanna wrote:
In het NL staat bij de steekuitleg vd 'v' niet aangegeven dat je alleen twee halve vaste haakt aan het begin van de (9e) ronde. Pas na veel zoeken ontdekte ik dat dit bv in de EN versie wél staat aangegeven.
04.06.2026 - 15:19
Roelie wrote:
Wat een draak van een patroon. Ik heb de nodige patronen gelezen en soms een 2e keer opnieuw moet starten. Na de 6e keer geef ik het op…
29.05.2026 - 12:17
 Charlotte wrote:
Spliting the section A instructions into A1 and A2 has made this unnecessarily difficult to understand. I'm usually very good with crochet diagram but I've had to hunt through Ravelry for pictures of this hat to understand that row 2 is just "ch3 (counts as first treble), tr in same space, 2tr in each stitch around", for 24 sts. You've already stated that the first treble is replaced with chain stitches which removes the need for section A2.
16.05.2026 - 18:04
 Veronika wrote:
Wie soll man bei 4 Luftmaschen zu Beginn die Musterfolge A2,A1 (= 2 Stäbchen) 6x in der ersten Runde häkeln?
28.08.2025 - 14:48DROPS Design answered:
Liebe Veronika, bei der 1. Runde wird man nur die 2 Stäbchen A.1 6 Mal wiederholen; bei der 2. Runde beginnt A.2: (A.2 häkeln, dann A.1) und so weiterhäkeln, dh: (3 Luftmaschen = A.2, 1 Stäbchen in die nächste Masche, 2 Stäbchen in die nächste Masche = A.1); dann (1 Stäbchen in die nächste Masche = A.2; 1 Stäbchen in die selbe Masche + 2 Stäbchen in die nächste Masche = A.1), und so weiterhäkeln. Viel Spaß beim Häkeln!
29.08.2025 - 07:55
 R C wrote:
Hej Er det rigtig forstået at fra anden omgang (a2+a1) hækles a2= 3 luftmaske + a1 =3 stangmasker, igen a2= 3 luftmasker +a1 3 stangmasker gentag helevejen rundt? og hvor mange masker skal der så være? MVH R C
22.08.2025 - 13:42DROPS Design answered:
Hei R C. Det stemmer. Du hekler A.2 + A.1 totalt 6 ganger i bredden. Så på 2. omgang vil man ha 3 luftmasker x 6 (A.2) og 3 staver x 6 (A.1). Og f.eks på 5. omgang vil man ha 3 luftmasker + 3 staver x 6 (A.2) og 6 staver x 6 (A.1). mvh DROPS Design
15.09.2025 - 14:07
 Loren wrote:
Bonjour Pouvez-Vous m’aider ? Je n’arrive pas à comprendre le 6ème rang. Lorsqu’on fait les 2 mailles en l’air il faut toujours sauter une bride du rang précédent ? Merci
20.07.2025 - 16:44DROPS Design answered:
Bonjour Loren, de quel diagramme parlez-vous?
21.07.2025 - 13:05
|
||||||||||||||||||||||||||||
Always Bright#alwaysbrighthat |
||||||||||||||||||||||||||||
 |
 |
|||||||||||||||||||||||||||
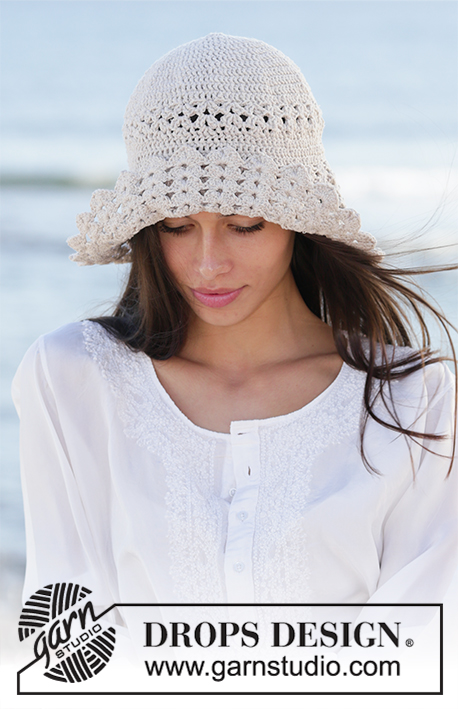
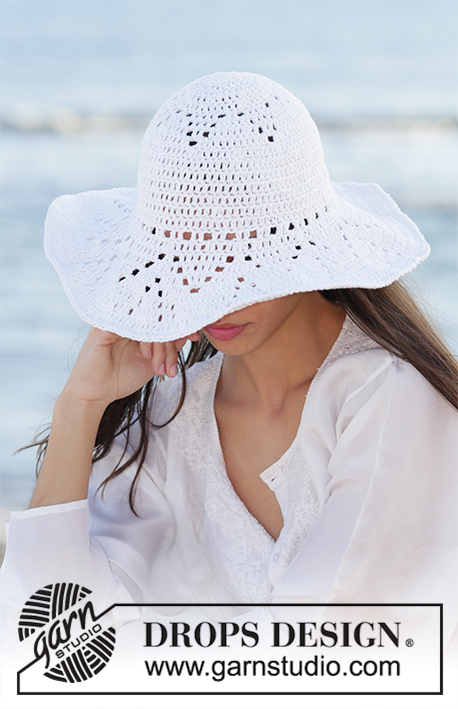
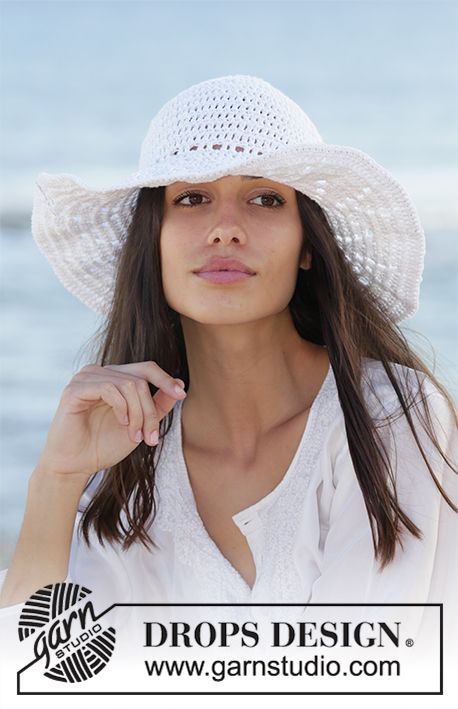
Crocheted hat in DROPS Bomull-Lin or DROPS Paris. Piece is crocheted top down with double crochets and lace pattern.
DROPS 199-14 |
||||||||||||||||||||||||||||
|
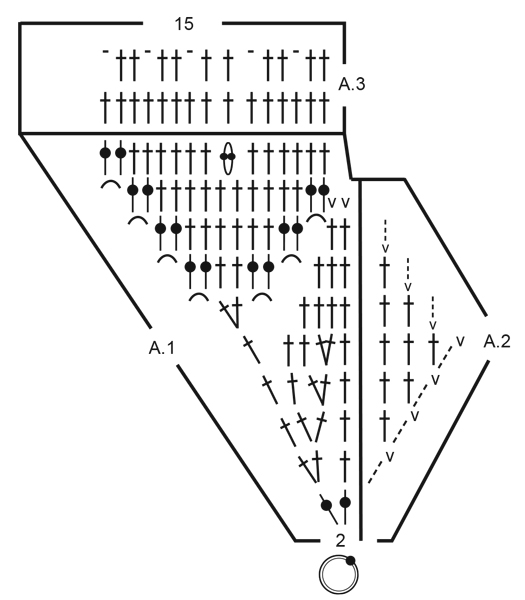
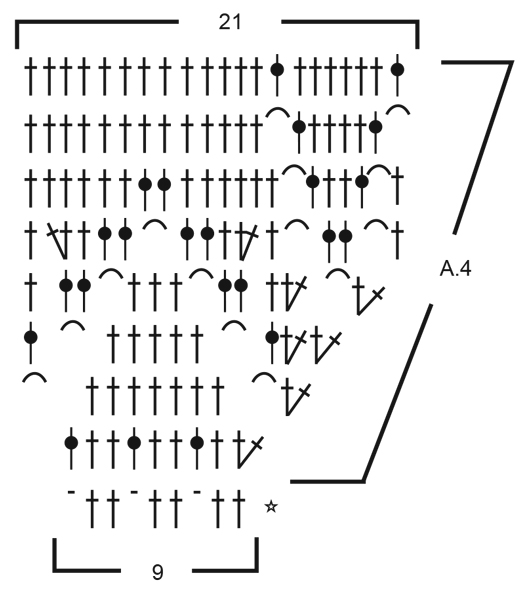
---------------------------------------------------------- EXPLANATION FOR THE PATTERN: ---------------------------------------------------------- PATTERN: See diagrams A.1 to A.4. CROCHET INFORMATION: Replace first double crochet on round with 3 chain stitches. Finish round with 1 slip stitch in third chain stitch from beginning of round. When A.2 is repeated, work the 3 chain stitches as 1 double crochet. DECREASE TIP: Decrease 1 double crochet by working the next 2 double crochets together as follows: Work 1 double crochet but wait with last pull through (= 2 loops on hook), then work next double but now pull last yarn over through all 3 loops on hook. INCREASE TIP: Increase 1 double crochet by working 2 double crochets in same double crochet. ---------------------------------------------------------- START THE PIECE HERE: ---------------------------------------------------------- HAT - SHORT OVERVIEW OF THE PIECE: Work in the round top down. HAT: Work 4 chain stitches on hook size 3.5 mm = US E/4 with Bomull-Lin or Paris and form a ring with 1 slip stitch in first chain stitch. Read CROCHET INFO! Work * A.2, A.1 *, work from *-* 6 times in total in width (there are no stitches in A.2 on first round). REMEMBER THE CROCHET GAUGE! When A.1 and A.2 have been worked vertically, there are 90 double crochets on round. Work 1st round in A.3 and repeat this round until piece measures approx. 16 cm = 6¼" from the top and down. Work last round in A.3 (= eyelet row). Then work brim as explained below: BRIM: Work A.4 in the round (= 10 repetitions of 9 stitches). When A.4 has been worked vertically, there are 210 stitches on round. Place a thin steel wire along the edge of brim. Work 1 single crochet in every treble crochet the entire round while AT THE SAME TIME working around steel wire. This is done to make the hat more stiff along the edge. Adjust the length on wire according to desired measurements on brim. Twine the steel wire ends together and hide them in the stitches. Cut and fasten the yarn. |
||||||||||||||||||||||||||||
Diagram explanations |
||||||||||||||||||||||||||||
|
||||||||||||||||||||||||||||
 |
||||||||||||||||||||||||||||
 |
||||||||||||||||||||||||||||
Have you finished this pattern?Tag your pictures with #dropspattern #alwaysbrighthat or submit them to the #dropsfan gallery. Do you need help with this pattern?You'll find 13 tutorial videos, a Comments/Questions area and more by visiting the pattern on garnstudio.com. © 1982-2026 DROPS Design A/S. We reserve all rights. This document, including all its sub-sections, has copyrights. Read more about what you can do with our patterns at the bottom of each pattern on our site. |
||||||||||||||||||||||||||||






With over 40 years in knitting and crochet design, DROPS Design offers one of the most extensive collections of free patterns on the internet - translated to 17 languages. As of today we count 333 catalogs and 12525 patterns - 12515 of which are translated into English (US/in).
We work hard to bring you the best knitting and crochet have to offer, inspiration and advice as well as great quality yarns at incredible prices! Would you like to use our patterns for other than personal use? You can read what you are allowed to do in the Copyright text at the bottom of all our patterns. Happy crafting!
Post a comment to pattern DROPS 199-14
We would love to hear what you have to say about this pattern!
If you want to leave a question, please make sure you select the correct category in the form below, to speed up the answering process. Required fields are marked *.