Comments / Questions (37)
![]() Patricia wrote:
Patricia wrote:
Bonjour, Quel diamètre d'aiguilles pour l'échantillon jersey que vous indiquez ?
04.01.2026 - 23:49DROPS Design answered:
Bonjour Patricia, l'échantillon se tricote en jersey avec les aiguilles 5,5. Bon tricot!
05.01.2026 - 11:11
![]() Justyna wrote:
Justyna wrote:
Witam mam problem ponieważ w opisie przy odpowiednim rozmiarze u mnie to xxxl mam 78 oczek na rękaw a w opisie powinno być 62 oczka jak mam to rozumieć?
29.12.2025 - 12:56DROPS Design answered:
Witaj Justyno, czy zgadza Ci się ogólna liczba oczek na drucie?
30.12.2025 - 08:14
![]() Ann wrote:
Ann wrote:
Greetings, For the NECK EDGE, Cast on 88-92-96-100-104-108 stitches . Knit 1 row from right side while increasing 8 stitches evenly in all, therefore 96-100-104-108-112-116. Why is 97-101-105-109-113-117 stitches instead? Thanks!!
25.06.2024 - 04:51DROPS Design answered:
Hi Ann, You increase 9 stitches (not 8) evenly on the row after the rib in all sizes. Happy knitting!
25.06.2024 - 06:36
![]() Blais wrote:
Blais wrote:
Bonjour, Je voulais savoir si des le début de l’empiètement, les augmentations se font tous les deux rangs pour les raglans de manches et tous les qu’âtres rangs pour les motifs? Merci bien. Stéphanie
05.11.2023 - 18:01DROPS Design answered:
Bonjour Mme Blais, on doit augmenter pour le raglan tous les rangs sur l'endroit, autrement dit tous les 2 rangs, et ce à chaque raglan, on va donc augmenter 8 mailles tous les 2 rangs: 1 pour chaque devant et 2 pour chaque manche et le dos. Bon tricot!
06.11.2023 - 08:48
![]() Michelle wrote:
Michelle wrote:
Love this pattern but have two questions: Chart A.13 says to begin the medium size 7 rows up. Is this also the same row to begin chart A.12 or just begin at the bottom? In the Body directions when repeating A.9a to A.13a vertically, the pattern goes on to state “adjust to finish after a whole repetition vertically”—how would one adjust? Thank you for your help!
17.03.2023 - 16:16DROPS Design answered:
Dear Michelle, the arrows are only applied to both, so start both charts at the same arrow. About adjusting, it means that when the piece measures approx. 5cm (for M size) it may measure a bit less or a bit more than 5cm (a few mm) but the important thing is that the last row worked is the last row of the charts, so that the pattern will fit for the next rows. Happy knitting!
19.03.2023 - 23:42
![]() Viviana wrote:
Viviana wrote:
Buongiorno, non riesco a capire quando devo cominciare ad usare A10b, A11b, A12b sul corpo
10.05.2022 - 07:34DROPS Design answered:
Buongiorno Viviana, deve lavorare i diagrammi A.9a - A.13a una volta e poi procede con A.9b - A.13b. Buon lavoro!
10.05.2022 - 12:51
![]() Viviana wrote:
Viviana wrote:
Mi riferivo ai raglan ma lavorando ho capito, grazie!
10.05.2022 - 07:29
![]() Viviana wrote:
Viviana wrote:
Buongiorno, non riesco a capire se i gettati prima e dopo i ragazzi devono essere "chiusi" o se deve rimanere il buco. Dalla foto mi sembra rimanga il buchetto, grazie.
12.04.2022 - 07:57DROPS Design answered:
Buonasera Viviana, a quale parte del modello sta facendo riferimento? Buon lavoro!
01.05.2022 - 23:37
![]() Namrata wrote:
Namrata wrote:
Hi, I am a bit confused on following the row for the sleeves (small size) where we start increasing - is it two stitches every eight row until we have 70 stitches starting from 50. Or is it increasing ten stitches every eight row two times over so that we have 70stitches, Please advise. Thank you Namrata
04.06.2021 - 21:26DROPS Design answered:
Dear Namrata, you decrease 2 stitches at EACH repeat of the the A.14 pattern (in size S twice). So there is a decrease of 10 stitches in the 3d and in the 11th round. Happy Knitting!
07.06.2021 - 03:31
![]() Donna Jensen wrote:
Donna Jensen wrote:
Does the 88 beginning stitches already include the edges or do you need to add 10 more for the edges
22.04.2021 - 22:39DROPS Design answered:
Dear Donna, the 88 stitches already include the edge / band stitches, you don't need to add them. Happy Knitting,
23.04.2021 - 01:36
Berry Diamond Cardigan#berrydiamondcardigan |
|||||||||||||||||||||||||
 |
 |
||||||||||||||||||||||||
Knitted jacket with raglan and balloon sleeves in DROPS Air. Piece is knitted top down with lace pattern. Size: S - XXXL
DROPS 202-17 |
|||||||||||||||||||||||||
|
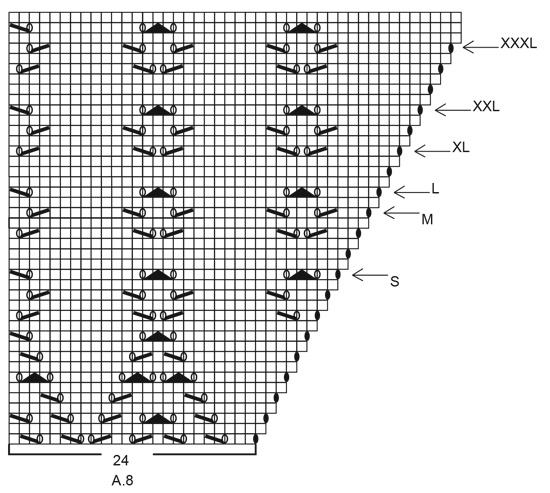
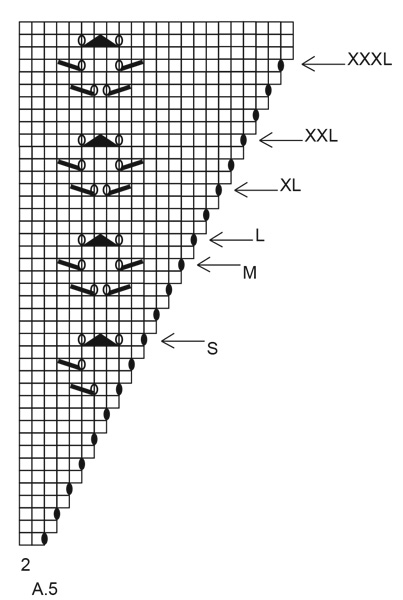
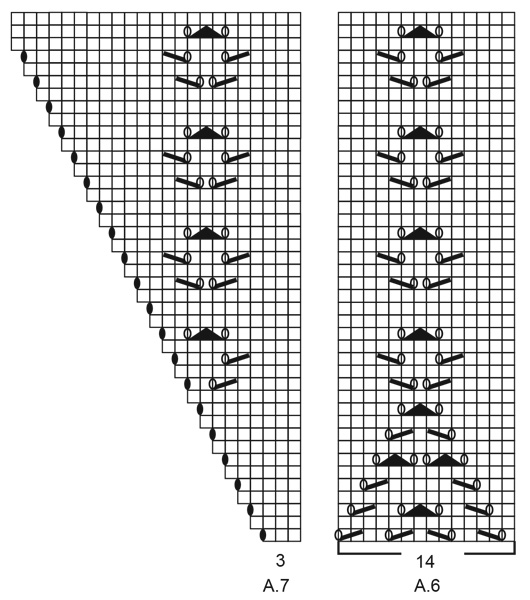
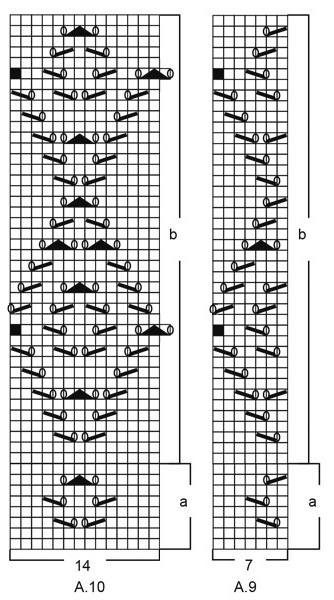
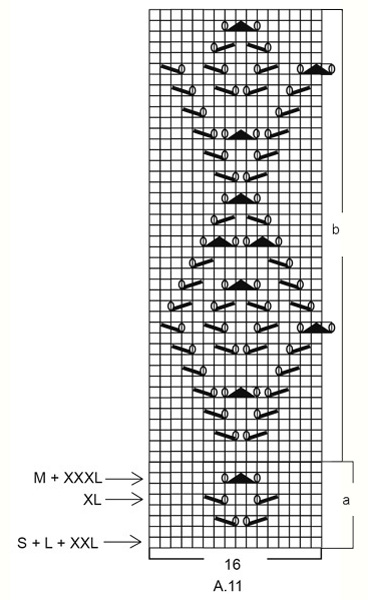
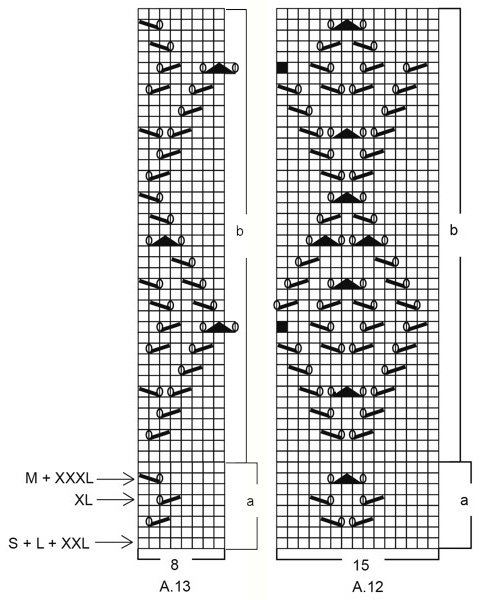
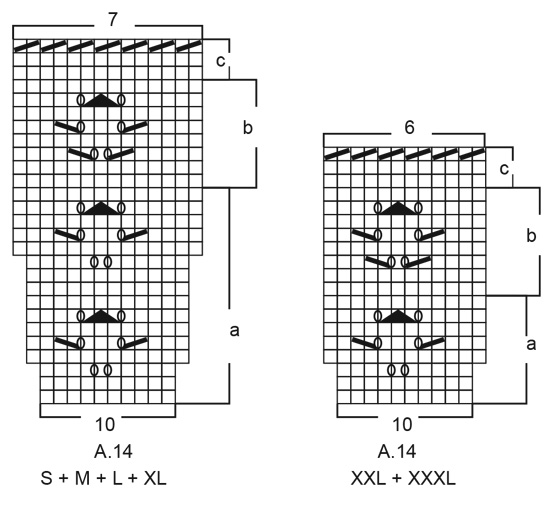
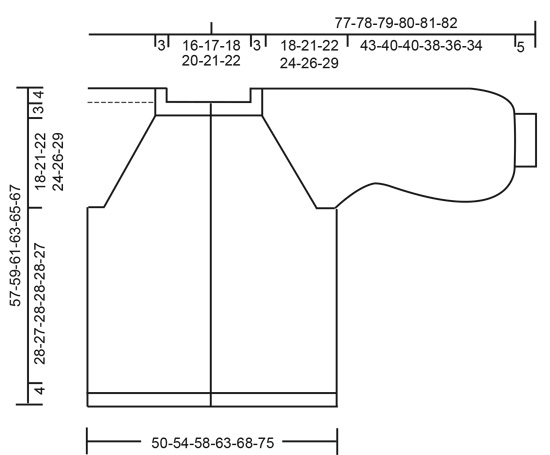
---------------------------------------------------------- EXPLANATION FOR THE PATTERN: ---------------------------------------------------------- GARTER STITCH (back and forth): K all rows. 1 ridge vertically = knit 2 rows. INCREASE/DECREASE TIP (evenly): To calculate how to increase/decrease evenly, use the total number of stitches on row (e.g. 88 stitches), minus bands (e.g. 10 stitches) and divide the remaining stitches by number of increases/decreases to be done (e.g. 9) = 8.7. In this example increase by making 1 yarn over after approx. every 9th stitch. On next row (wrong side) purl yarn overs twisted to avoid holes. Do not increase over bands. To decrease evenly in this example knit every 8th and 9th stitch together. PATTERN: See diagrams A.1 to A.14. Choose diagram for your size (applies to A.14). Diagrams show all rows in pattern seen from the right side. BUTTONHOLES: Decrease for buttonholes on right band (when garment is worn). Decrease from right side when 3 stitches remain on row as follows: Make 1 yarn over, knit the next 2 stitches together, knit last stitch. On next row knit yarn over to make holes. Decrease first buttonhole when rib in neck measures approx. 1½-2 cm = ½"-¾". Then decrease the next 4-4-4-5-5-5 buttonholes, approx. 9½-10-10-9-9½-10 cm = 9¾"-4"-4"-3½"-3¾" between each. DECREASE TIP (applies to sleeves): Decrease 1 stitch on each side of marker thread as follows: Work until 3 stitches remain before marker thread and knit 2 together, knit 2 (marker thread is between these stitches), slip 1 stitch knitwise, knit 1, pass slipped stitch over stitch worked. ---------------------------------------------------------- START THE PIECE HERE: ---------------------------------------------------------- JACKET - SHORT OVERVIEW OF THE PIECE: Work neck edge, yoke and body back and forth on circular needle from mid front, work top down. Work sleeves in the round on double pointed needles/a short circular needle, top down. NECK EDGE: Cast on 88-92-96-100-104-108 stitches (including 5 band stitches in each side towards mid front) on circular needle size 4.5 mm = US 7 with Air. Purl 1 row from wrong side. Then work as follows from right side: 5 band stitches in GARTER STITCH - see explanation above - * knit 2, purl 2 *, repeat from *-* until 7 stitches remain, knit 2 and finish with 5 band stitches in garter stitch. Work rib like this for 3 cm = 1⅛". Knit 1 row from right side while increasing 9 stitches evenly in all sizes - read INCREASE/DECREASE TIP = 97-101-105-109-113-117 stitches. Switch to circular needle size 5.5 mm = US 9. Purl 1 row from wrong side inside 5 band stitches in garter stitch in each side. Then work yoke as explained below. YOKE: Work first row as follows from right side: 5 band stitches in garter stitch, work A.1 (= 15 stitches), work 2 stitches in stockinette stitch (= raglan line), make 1 yarn over, work 10-12-14-16-18-20 stitches in stockinette stitch (= sleeve), make 1 yarn over, work 2 stitches in stockinette stitch (= raglan line), work A.2 (= 29 stitches), work 2 stitches in stockinette stitch (= raglan line), make 1 yarn over, work 10-12-14-16-18-20 stitches in stockinette stitch (= sleeve), make 1 yarn over, work 2 stitches in stockinette stitch (= raglan line), work A.3 (= 15 stitches) and finish with 5 band stitches in garter stitch. There are now 105-109-113-117-121-125 stitches on needle. Continue pattern like this. I.e. on front and back piece increase in each side as shown in A.1, A.2 and A.3. On sleeves increase in each side with yarn over on each side of stitches in stockinette stitch. Raglan line is always on 2 stitches in stockinette stitch. Increase like this on every other row (i.e. every row from right side). On next row (wrong side) purl yarn overs twisted to avoid holes. On sleeves work the increased stitches in stockinette stitch. On front and back piece work the increased stitches in pattern as shown in A.1, A.2 and A.3. REMEMBER THE KNITTING GAUGE and remember BUTTONHOLES on right band - see explanation above. When A.1, A.2 and A3 have been worked vertically, there are 169-173-177-181-185-189 stitches on needle. Continue increases on sleeves and front and back piece as before but now work pattern A.4 to A.8 over A.1 to A.3 as follows: Then work A.4 (= 24 stitches) over A.1. Over the 47 stitches in A.2 work as follows: Work A.5 (= 2 stitches), work A.6 over 42 stitches (= 3 repetitions of 14 stitches) and work A.7 (= 3 stitches). Work A.8 (= 24 stitches) over A.3. Work band stitches, raglan line and sleeves as before. When row marked with arrow for your size has been worked, you have increased a total of 18-21-22-24-26-29 times from beginning of yoke, and there are now 241-269-281-301-321-349 stitches on needle. Piece measures approx. 21-24-25-27-29-32 cm = 8¼"-9½"-9¾"-10⅝"-11⅜"-12½" from cast-on edge mid front. Work next row as follows from wrong side: Work 41-44-46-50-54-59 stitches as before (= front piece), slip the next 44-52-54-56-58-62 stitches on 1 stitch holder for sleeve, cast on 8-8-10-10-12-12 new stitches on row (= in the side under sleeve), work 71-77-81-89-97-107 stitches as before (= back piece), slip the next 44-52-54-56-58-62 stitches on 1 stitch holder for sleeve, cast on 8-8-10-10-12-12 new stitches on row (= in the side under sleeve) and work the 41-44-46-50-54-59 stitches as before (= front piece). Finish body and sleeves separately. NOW MEASURE THE PIECE FROM HERE! BODY: = 169-181-193-209-229-249 stitches. Insert 1 marker thread in each side, in the middle of the 8-8-10-10-12-12 stitches that were cast on under each sleeve. Move marker threads upwards when working, they mark the sides. Work first row as follows from right side (begin with row marked with arrow in your size to continue the pattern): 5 band stitches in garter stitch, work A.9a (= 7 stitches), work A.10a over the next 14-14-14-14-28-28 stitches (= 1-1-1-1-2-2 repetitions of 14 stitches), work A.11a (= 16 stitches), work 6-12-18-26-8-18 stitches in stockinette stitch (marker thread is in the middle of these stitches), work A.12a (= 15 stitches), work A.10a over the next 42-42-42-42-70-70 stitches (= 3-3-3-3-5-5 repetitions of 14 stitches), work A.11a (= 16 stitches), work 6-12-18-26-8-18 stitches in stockinette stitch (marker thread is in the middle of these stitches), work A.12a (= 15 stitches), work A.10a over the next 14-14-14-14-28-28 stitches (= 1-1-1-1-2-2 repetitions of 14 stitches), work A.13a (= 8 stitches) and finish with 5 band stitches in garter stitch. Repeat A.9a to A.13a vertically (work the remaining stitches as before) until piece measures approx. 4-5-4-6-4-4 cm = 1½"-2"-1½"-2⅜"-1½"-1½" from division – adjust to finish after a whole repetition vertically. Then continue on A.9b to A.13b, work the remaining stitches as before. Work until A.9b to A.13b have been worked 1 time vertically. then work in stockinette stitch with 5 band stitches in garter stitch towards each side towards mid front. When piece measures 28-27-28-28-28-27 cm = 11"-10⅝"-11"-11"-11"-10⅝" from division, knit 1 row from wrong side while increasing 31-35-39-39-43-51 stitches evenly = 200-216-232-248-272-300 stitches. Switch to circular needle size 4.5 mm = US 7. Work next row from right side as follows: 5 band stitches in garter stitch, * knit 2, purl 2 *, repeat from *-* until 7 stitches remain, knit 2 and finish with 5 band stitches in garter stitch. Continue rib like this for 4 cm = 1½". Bind off with knit over knit and purl over purl (to avoid a tight bind-off edge use circular needle size 5.5 mm = US 9). SLEEVE: Slip the 44-52-54-56-58-62 stitches from stitch holder in one side of piece on a short circular needle/double pointed needles size 5.5 mm = US 9 and pick in addition up 1 stitch in each of the 8-8-10-10-12-12 stitches cast on under sleeve = 52-60-64-66-70-74 stitches. Insert 1 marker thread in the middle of the 8-8-10-10-12-12 stitches under sleeve and move the marker thread upwards while working, this is later used for decreasing. Begin round at the marker thread and work stockinette stitch in the round. When piece measures 2 cm = ¾" from division, decrease 2 stitches mid under sleeve - read DECREASE TIP. Decrease like this every other round 1-5-2-3-0-2 times in total = 50-50-60-60-70-70 stitches. When piece measures 7-8-8-6-8-6 cm = 2¾"-3⅛"-3⅛"-2⅜"-3⅛"-2⅜", work pattern in the round as follows: Work A.14a over all stitches (= 5-5-6-6-7-7 repetitions of 10 stitches). When A.14a has been worked, there are 70-70-84-84-84-84 stitches on needle. Continue on A.14b. Repeat A.14b vertically until piece measures approx. 41-38-38-36-34-32 cm = 16⅛"-15"-15"-14¼"-13⅜"-12½" from division (shorter measurements in the larger sizes because of wider shoulders and longer sleeve cap) – adjust to finish after a whole repetition vertically. Continue on A.14c. When A.14c has been worked, there are 35-35-42-42-42-42 stitches on needle. Knit 1 round while decreasing 3-3-6-6-2-2 stitches evenly = 32-32-36-36-40-40 stitches. Switch to double pointed needles size 4.5 mm = US 7. Work rib = knit 2/purl 2 for 5 cm =2". Bind off with knit over knit and purl over purl (to avoid a tight bind-off edge use double pointed needles size 5.5 mm = US 9). Sleeve measures approx. 48-45-45-43-41-39 cm = 19"-17¾"-17¾"-17"-16⅛"-15¼" from division. Work the other sleeve the same way. ASSEMBLY: Sew the buttons on to the left band. |
|||||||||||||||||||||||||
Diagram explanations |
|||||||||||||||||||||||||
|
|||||||||||||||||||||||||
 |
|||||||||||||||||||||||||
 |
|||||||||||||||||||||||||
 |
|||||||||||||||||||||||||
 |
|||||||||||||||||||||||||
 |
|||||||||||||||||||||||||
 |
|||||||||||||||||||||||||
 |
|||||||||||||||||||||||||
 |
|||||||||||||||||||||||||
 |
|||||||||||||||||||||||||
 |
|||||||||||||||||||||||||
Have you finished this pattern?Tag your pictures with #dropspattern #berrydiamondcardigan or submit them to the #dropsfan gallery. Do you need help with this pattern?You'll find 23 tutorial videos, a Comments/Questions area and more by visiting the pattern on garnstudio.com. © 1982-2026 DROPS Design A/S. We reserve all rights. This document, including all its sub-sections, has copyrights. Read more about what you can do with our patterns at the bottom of each pattern on our site. |
|||||||||||||||||||||||||


Post a comment to pattern DROPS 202-17
We would love to hear what you have to say about this pattern!
If you want to leave a question, please make sure you select the correct category in the form below, to speed up the answering process. Required fields are marked *.