
Popular categories
Looking for a yarn?


Comments / Questions (44)
![]() Barbara Reynard wrote:
Barbara Reynard wrote:
How many balls of this yarn do I need for XL
30.06.2022 - 00:21DROPS Design answered:
Hi Barbara, you will need 10 balls of DROPS COTTON LIGHT. Happy knitting!
30.06.2022 - 08:46
![]() Zia wrote:
Zia wrote:
Thank you for the quick revert. So what I assume is while doing the 9 th row of A1 /A4 I would be doing 1st row of A2 /A3 ( 3rd round) .
21.09.2021 - 17:34DROPS Design answered:
Dear Zia, for the second repeat yes, but that would change with every repetition. Happy Stitching!
22.09.2021 - 03:32
![]() Zia wrote:
Zia wrote:
Pattern 199-46 , diagram A2,A3 has 4 rows with repetition of 1 in height which makes total of 8 rows in height whereas corresponding A1 and A4 diagrams have 10 rows with 1 repeat in height. So while working the pattern 1p,A1,A2,A1,A3,A4,A2,A4 the row count doesn’t seem to match. Please help me understand . Thanks
21.09.2021 - 15:54DROPS Design answered:
Dear Zia, all patterns are not worked over rhe same number of rows, ie when the diagram is worked in height repeat from first row on next round and continue working as before A.1/A.4, ie repeat A.2/A.3 over 4 rows and A.1/A.4 over 10 rows. Happy knitting!
21.09.2021 - 16:28
![]() Lea Jensen wrote:
Lea Jensen wrote:
Jeg strikker str. xl, dvs. jeg har 234 masker at arbejde med. Når jeg har strikket mønsteret 2 gange på 1. Pind (6+8+19+8+27+8+19+8)) har jeg brugt 206 masker, og har så 28 masker tilbage på pinden. Hvordan skal de strikkes?
30.07.2021 - 16:37DROPS Design answered:
Hej Lea, i din størrelse skal du kun have 206masker når du starter med mønsteret. :)
06.08.2021 - 14:14
![]() Ann-Christin wrote:
Ann-Christin wrote:
Diagram A3 finns inte med i beskrivningen. Hur ser det ut?
19.04.2021 - 09:46DROPS Design answered:
Hei Ann-Christin. Jo, diagram A.3 skal strikkes under KJOL og diagrammet finner du sammen med den andre diagrammene nederst på siden. mvh DROPS design
19.04.2021 - 10:08
![]() Margaret Emms wrote:
Margaret Emms wrote:
Thanks for your answer. I assume that it means I should be working the charts from the bottom up, not the top down, otherwise on the second row there are 3 stitches.
03.11.2020 - 20:20DROPS Design answered:
Dear Mrs Emms, correct, diagrams are read from bottom up - read more about diagrams here. Happy knitting!
04.11.2020 - 09:04
![]() Margaret Emms wrote:
Margaret Emms wrote:
Pattern no. 199-46 - diagram explanations Black square. I don't understand this at all. If it has no stitch what is it there for? How do I deal with a no stitch? Doesn't make any sense to me.
03.11.2020 - 13:59DROPS Design answered:
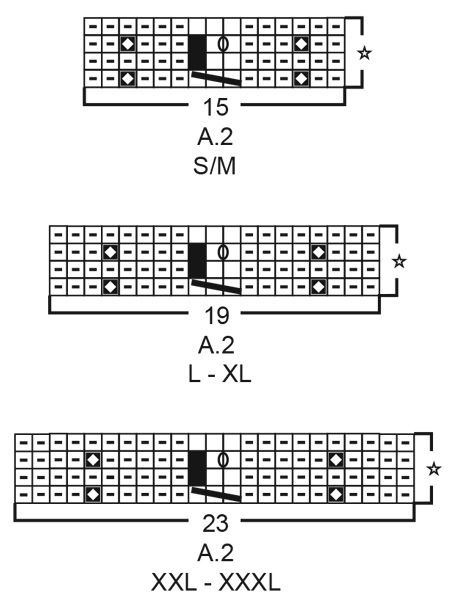
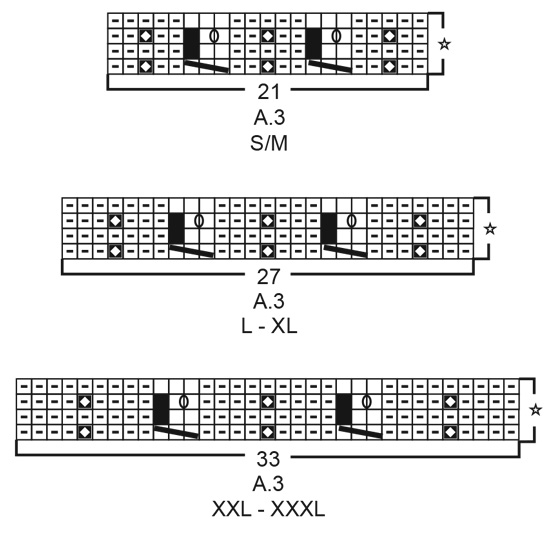
Dear Mrs Emms, on row before you decrease 1 stitch, this means on the next 2 rows, this stitch (= black square) doesn't exist = there are K2 on 2nd row - and on 3rd row you work K1, YO, K1 (A.2, A.3 all sizes). This video shows how to work this kind of cable. Happy knitting!
03.11.2020 - 15:32
![]() Mimi wrote:
Mimi wrote:
Bonjour Je tricote la jupe en S/M et j arrive aux augmentations 8 cm après la cassure. Je compte 14 sections envers sur un tour. Il faut faire selon les explications une augmentation dans une section sur deux soit 15 augmentations au total. Mais comment arrivez vous à ce chiffre puisque la moitié de 14 fait 7 Je ne comprends pas Merci de bien vouloir m'aider Michèle
24.05.2020 - 16:49DROPS Design answered:
Bonjour Mimi, vous devez avoir 15 sections en mailles envers: la 1ère de la série de *-* est 1 ou 6 m env, puis vous avez 4 sections envers dans chaque A.2 et 6 sections envers dans chaque A3 autrement dit, de *-* vous avez: 1 section env (= 1-6 m), 4 sections env (A.2), 6 sections env (A.3), 4 sections env (A.2) = 15 x 2 (tout le tour) = 30 soit 15 quand on augmente dans 1 section env sur 2. Bon tricot!
25.05.2020 - 10:01
![]() Marquardt Karin wrote:
Marquardt Karin wrote:
Hallo ich habe 206 Maschen auf genommen und mit dem Muster angefangen laut den Muster wenn ich es 2 mal stricke sind es lt ihrer Rechnung ist klar das ein Maschen mehr sind durch das eine Muster in den man in der voriger Reihe eine Masche ziehe aber ich habe 15 Maschen zum Schluss übrig .... da stimmt doch was nicht oder ??? Ich habe nochmal die 6 linke Maschen gestrickt von den Anfang und die restlichen nur rechts ………………\\\\r\\\\nBitte um eine schnell Antwort danke i
24.04.2020 - 09:58DROPS Design answered:
Liebe Frau Marquardt, bei der Größe XL stricken Sie die 206 Maschen wie folgt: * 6 Maschen links, A.1 (= 8 Maschen), A.2 (= 19 Maschen), A.1 (= 8 Maschen), A.3 (= 27 Maschen), A.4 (= 8 Maschen), A.2 (= 19 Maschen) und A.4 (= 8 Maschen) *, von *-* noch 1 x wiederholen = (6+8+19+8+27+8+19+8)x2=206 M. Hilft es Ihnen? Viel Spaß beim stricken!
24.04.2020 - 10:25
![]() Alessia wrote:
Alessia wrote:
Buongiorno, è possibile usare per questo modello il filato Belle anziché il Cotton Light? Con il Belle può cambiare il risultato finale (forma, consistenza) ed è quindi meglio usare il filato indicato Cotton Light? Grazie
18.04.2020 - 09:34DROPS Design answered:
Buongiorno Alessia. Può sostituire Cotton Light con Belle; appartengono allo stesso gruppo filati. Si ricordi di verificare di ottenere lo stesso campione indicato. Belle è più morbido rispetto a Cotton Light. Il suo rivenditore Drops di fiducia può darle ulteriori consigli e suggerimenti. Buon lavoro!
18.04.2020 - 11:01
|
||||||||||||||||||||||||||||||||||
Cable Waterfall#cablewaterfallskirt |
||||||||||||||||||||||||||||||||||
 |
 |
|||||||||||||||||||||||||||||||||
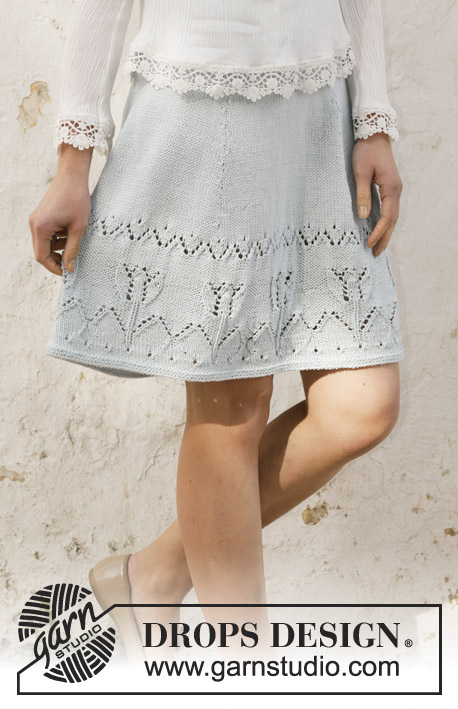
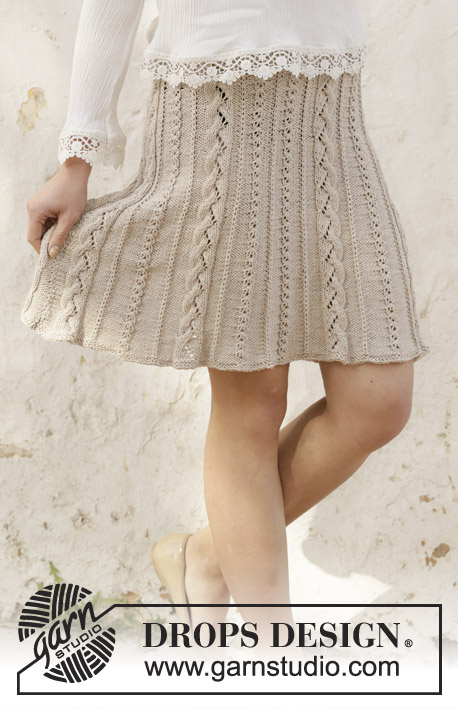
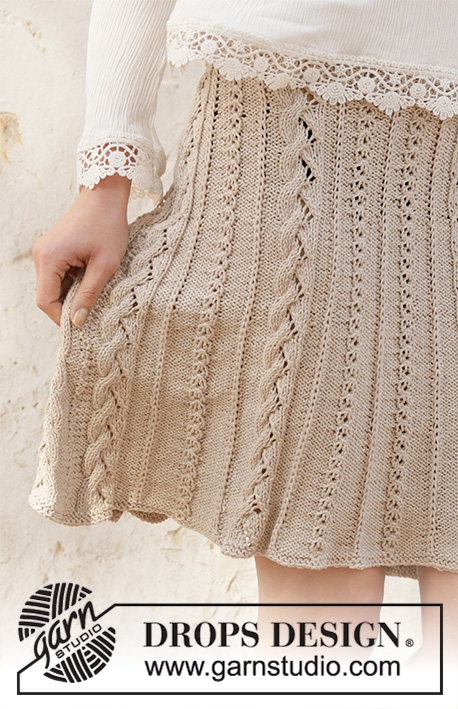
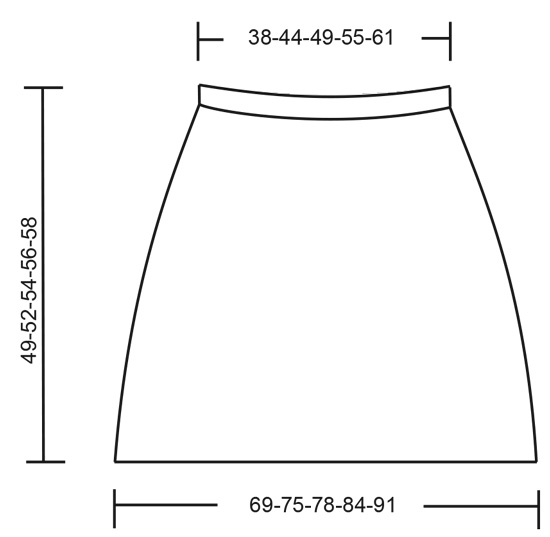
Knitted skirt in DROPS Cotton Light. The piece is worked top down with cables and lace pattern. Sizes S - XXXL.
DROPS 199-46 |
||||||||||||||||||||||||||||||||||
|
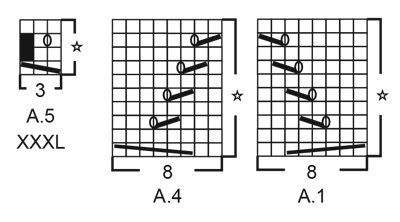
------------------------------------------------------- EXPLANATIONS FOR THE PATTERN: ------------------------------------------------------- RIDGE/GARTER STITCH (worked in the round): 1 ridge in height = 2 rounds. Knit 1 round and purl 1 round. PATTERN: See diagrams A.1 to A.5. Choose the right diagram for your size. A.5 applies only to Size XXXL. KNITTING TIP: All stitch-counts, when working cables and lace pattern on the skirt, are based on the small cables each having 3 stitches; be aware that the number of stitches in the small cables can vary between 3 and 2 and this will affect the number of stitches on the round. INCREASE TIP-1 (evenly spaced): To work out how to increase evenly, count the total number of stitches on the needle (e.g. 184 stitches) and divide by the number of increases to be made (e.g. 12) = 15.3. In this example, increase by making 1 yarn over after approx. each 15th stitch. On the next round knit the yarn overs twisted to avoid holes. INCREASE TIP-2 (for increasing in purled sections): Increase 1 stitch in a purled section by making 1 yarn over. On the next round purl the yarn over twisted to avoid a hole. Then purl the new stitches. NOTE: It is neatest if you increase alternately at the beginning and end of the purled section (not in middle). ------------------------------------------------------- START THE PIECE HERE: ------------------------------------------------------- SKIRT - SHORT OVERVIEW OF THE PIECE: The piece is worked in the round with circular needle, top down. First you work a lining in stockinette stitch for the elastic. The rest of the skirt is then worked with cables and lace pattern. LINING: Cast on 160-184-206-232-256 stitches with circular needle size 3 mm = US 2,5 and Cotton Light. Work stockinette stitch for 2 cm = ¾". Purl 1 round (= folding edge). Work stockinette stitch for 2 cm = ¾". Then knit 1 round where you increase 8-12-0-2-0 stitches evenly spaced – read INCREASE TIP-1 = 168-196-206-234-256 stitches. Then work the skirt as described below. SKIRT: Change to circular needle size 4 mm = US 6. The first row is worked as follows: SIZES S/M, L, XL and XXL: * Purl 1-1-6-6 stitches, work A.1 (= 8 stitches), A.2 (= 15-19-19-23 stitches), A.1 (= 8 stitches), A.3 (= 21-27-27-33 stitches), A.4 (= 8 stitches), A.2 (= 15-19-19-23 stitches) and A.4 (= 8 stitches) *, work from *-* 1 more time. SIZE XXXL: * Work A.5 (= 3 stitches), purl 7, work A.1 (= 8 stitches), A.2 (= 23 stitches), A.1 (= 8 stitches), A.3 (= 33 stitches), A.4 (= 8 stitches), A.2 (= 23 stitches), A.4 (= 8 stitches) and purl 7 *, work from *-* 1 more time. ALL SIZES: Continue the pattern described above and read KNITTING TIP! When the piece measures 8 cm = 3⅛" from the folding edge, increase 1 stitch in every other purled section on the round – read INCREASE TIP-2 (= 15-15-15-15-16 stitches increased). Repeat this increase when the piece measures 12 cm = 4¾" from the folding edge, but now increase in the purled sections where you did not increase the last time = 198-226-236-264-288 stitches. Continue the pattern as before with 1 more stitch in each purled section. REMEMBER THE KNITTING GAUGE! When the piece measures 16 cm = 6¼" from the folding edge, increase 1 stitch in every other purled section (= 15-15-15-15-16 stitches increased). When the piece measures 22-22-22-23-23 cm = 8¾"-8¾"-8¾"-9"-9", increase 1 stitch in the remaining purled sections (= 15-15-15-15-16 stitches increased). Increase like this every other purled section every 6-6-6-7-7 cm = 2⅜"-2⅜"-2⅜"-2¾"-2¾" until you have increased 2 more times in each purled section (a total of 4 times including the increases in the purled section described at the beginning of the skirt) = 288-316-326-354-384 stitches. Continue working until the piece measures 48-51-53-55-57 cm = 19"-20"-21"-21⅝"-22½"- from the folding edge at top (or to desired length; there is 1 cm left to finished length). Change to circular needle size 3 mm = US 2,5. Work 2 RIDGES in the round over all stitches – read description above. Change back to circular needle size 4 mm = US 6 and bind off with knit (this is done to avoid the bind-off edge being tight). The skirt measures approx. 49-52-54-56-58 cm = 19¼"-20½"-21¼"-22"-22¾" from the folding edge down. ASSEMBLY: Fold the lining to the wrong side and sew down neatly; leave a small opening to thread the elastic through. |
||||||||||||||||||||||||||||||||||
Diagram explanations |
||||||||||||||||||||||||||||||||||
|
||||||||||||||||||||||||||||||||||
 |
||||||||||||||||||||||||||||||||||
 |
||||||||||||||||||||||||||||||||||
 |
||||||||||||||||||||||||||||||||||
 |
||||||||||||||||||||||||||||||||||
Have you finished this pattern?Tag your pictures with #dropspattern #cablewaterfallskirt or submit them to the #dropsfan gallery. Do you need help with this pattern?You'll find 19 tutorial videos, a Comments/Questions area and more by visiting the pattern on garnstudio.com. © 1982-2026 DROPS Design A/S. We reserve all rights. This document, including all its sub-sections, has copyrights. Read more about what you can do with our patterns at the bottom of each pattern on our site. |
||||||||||||||||||||||||||||||||||


With over 40 years in knitting and crochet design, DROPS Design offers one of the most extensive collections of free patterns on the internet - translated to 17 languages. As of today we count 324 catalogs and 12291 patterns - 12281 of which are translated into English (US/in).
We work hard to bring you the best knitting and crochet have to offer, inspiration and advice as well as great quality yarns at incredible prices! Would you like to use our patterns for other than personal use? You can read what you are allowed to do in the Copyright text at the bottom of all our patterns. Happy crafting!
Post a comment to pattern DROPS 199-46
We would love to hear what you have to say about this pattern!
If you want to leave a question, please make sure you select the correct category in the form below, to speed up the answering process. Required fields are marked *.