
Popular categories
Looking for a yarn?


Comments / Questions (45)
![]() Loredana wrote:
Loredana wrote:
Rebonjour, je suis a la diagramme A5b (1ère flèche/augmentation) et je ne tombe pas sur les 300m serrés demandés (malgré mes 84 arceaux ) 84x3=252 +2x12=276 Ou est mon problème ? FLÈCHE-1: Augmenter 2 mailles serrées de chaque côté des fils marqueurs en crochetant 1 maille serrée en plus autour de chacun des 2 arceaux avant et après les fils marqueurs (= on augmente 48 mailles) = 300 mailles serrées. Merci de votre réponse
02.12.2018 - 19:19DROPS Design answered:
Bonjour Loredana, vous avez inséré 12 marqueurs, et vous augmentez 2 ms de chaque côté de chaque marqueur = vous augmentez 48 mailles au total, vous devez donc avoir 21 fois A.5b x 12 ms dans chaque A.5b = 300 m. Retrouvez les indications détaillées de cette partie ici (à faire sans les changements de couleur). Bon crochet!
03.12.2018 - 10:18
![]() Loredana wrote:
Loredana wrote:
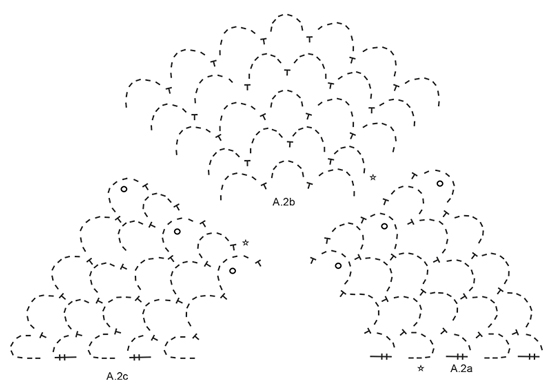
Bonjour, je commence le châle et j’arrive à l’a diagramme À.2a...je finis mes 4 arceaux (1rang) et au rang suivant je ne trouve pas de mailles en l’air ; le rang débute par un T qui est une maille serré !? Merci de m’expliquer comment faire...
29.11.2018 - 23:11DROPS Design answered:
Bonjour Loredana, vous trouverez pour ce modèle des photos détaillées de chaque étape ainsi que des vidéos ici. Elles vous permettront certainement de mieux comprendre comment lire les diagrammes. Bon crochet!
30.11.2018 - 08:29Araceli wrote:
Buen día, al iniciar el diagrama 5a en las instrucciones dice doblar la fila donde inicia el cuadro negro, se refiere a repetir esa fila?. Gracias.
15.11.2018 - 16:00DROPS Design answered:
Hola Araceli. En este caso se refiere a doblar la labor ( no repetir la fila), lado derecho contra lado derecho por la fila con el cuadrado negro, y trabajar alrededor de esta fila con los diagramas A.6A y A.6B
19.11.2018 - 23:14
![]() Karine wrote:
Karine wrote:
Bonjour Je n arrive pas à commencer ce châle. Pourriez vous s'il vous plait m expliquer les 2 premiers tours du diagramme 1? Merci d avance Belle journée Karine
06.10.2018 - 11:32DROPS Design answered:
Bonjour Karine, vous trouverez photos et vidéos pour la réalisation de ce châle sous notre Crochet-Along Magic Summer, soit par ex. comment crocheter A.1 ici. Bon crochet!
08.10.2018 - 08:14
![]() Andrea wrote:
Andrea wrote:
Når det står "Når A.3a til A.3d er heklet ferdig i høyden repeteres de siste 4 radene i diagrammene 3 ganger til i høyden." betyr det at når jeg er ferdig med den delen har jeg heklet totalt 17 rader (21 hvis du teller med fra diagram A.1 uten ring) eller er det når jeg har heklet den første raden jeg repeterer de fire siste tre ganger, med totalt 13 rader (17 hvis du teller med diagram A.1 uten ring)? Med 13 rader måler jeg akkurat 37 cm
03.10.2018 - 22:28DROPS Design answered:
Hei Andrea. Du skal første hekle hele A.3 = 5 rader. Så skal du gjenta de 4 siste radene 3 ganger til = 12 rader. Du har derfor heklet totalt 17 rader med A.3 når du er ferdig med det diagrammet. God fornøyelse.
04.10.2018 - 08:19
![]() Dominique wrote:
Dominique wrote:
Bonjour j'ai une question sur le diagramme A5b sur le rang après le rang d'augmentation (4ème flèche) on se retrouve avec 4 arceaux avec 4 brides pour le rang suivant c'est une maille serrée entre l'arceau de 3 mailles, 3 mailles en l'air, une maille serrée entre l'arceau. comment fait-on au niveau des arceaux de 4 mailles : on saute 3 mailles ou 4 mailles. merci de votre réponse
18.09.2018 - 17:15DROPS Design answered:
Bonjour Dominique, quand vous augmentez le nombre de mailles, vous augmentez en même temps le nombre de motifs que vous allez répéter en largeur, ainsi, au 5ème rang vous crochetez (3 ml, sautez 2 brides, 1 ms dans la m suivante) tout du long. Bon crochet!
19.09.2018 - 08:55
![]() Gitte wrote:
Gitte wrote:
Efter diagrammerne A2a A2b A2c skal der ifølge den skrevne opskrift være 17 luftmaskebuer på rækken. Jeg får det til 19 luftmaskebuer også når jeg tæller i diagrammet. Er der en fejl?
13.09.2018 - 22:15DROPS Design answered:
Hej Gitte, Se gerne vores instruktionsvideo DROPS Magic Summer God fornøjelse!
19.09.2018 - 14:43
![]() Wil Kerkmeer wrote:
Wil Kerkmeer wrote:
Het is voor mij niet duidelijk welke steken van a5b gehaakt moeten worden in 1 lus van de lussentoer van 84 lussen. Graag info of 1stokje, 3 lossen en 1 vaste in 1 losse lus gehaakt moeten worden, zoals ik vermoed. Alvast hartelijk dank. Vrgr
13.09.2018 - 19:08DROPS Design answered:
Dag Wil, Je begint met haken bij de toer waar een ster bij staat, dus je haakt steeds een bobbel en 3 lossen. De eerste toer haak je niet; deze toer is de laatste toer van A.4 en is erbij getekend, zodat je kunt zien hoe je in de steken van de vorige toer haakt.
19.09.2018 - 18:24
![]() Door wrote:
Door wrote:
Is het niet mogelijk om een diagram te maken zoals anderen dat ook doen? Dus niet losse fragmenten, maar de sjaal in klein formaat met alle toeren? Ik vind de patronen van Garnstudio fantastisch, maar wel steeds moeilijker worden door de manier van beschrijven.
11.09.2018 - 20:33DROPS Design answered:
Hallo Door, Er is juist voor gekozen om de telpatronen op te splitsen, zodat ze beter leesbaar zijn :) Als we ze allemaal in één telpatroon zetten, kunnen de symbolen piepklein worden en zijn ze niet goed leesbaar.
17.09.2018 - 20:31
![]() Caisa wrote:
Caisa wrote:
Hej! Alberta Autum virkad sjal.\\r\\nUnder rubriken Diagram har symbolerna fösvunnit och bara blivit tomma fyrkanter. Nu vet jag inte vilken symbol som hör till vilken beskrivning. Det syntes igår. Har provat på både iPad och PC men ingen skillnad..\\r\\nTacksam för hjälp.
10.09.2018 - 11:17
|
|||||||||||||||||||||||||||||||||||||||||||||||||||||||
Alberta Autumn#albertaautumnshawl |
|||||||||||||||||||||||||||||||||||||||||||||||||||||||
 |
 |
||||||||||||||||||||||||||||||||||||||||||||||||||||||
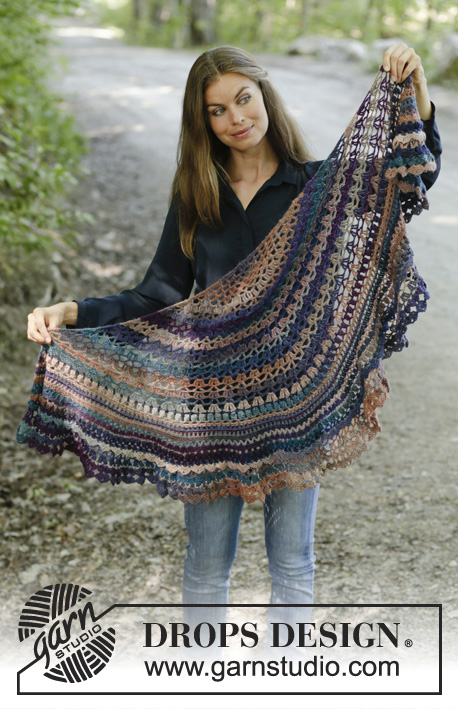
Crocheted shawl in DROPS Delight. Piece is crocheted top down with lace pattern and fans.
DROPS 197-30 |
|||||||||||||||||||||||||||||||||||||||||||||||||||||||
|
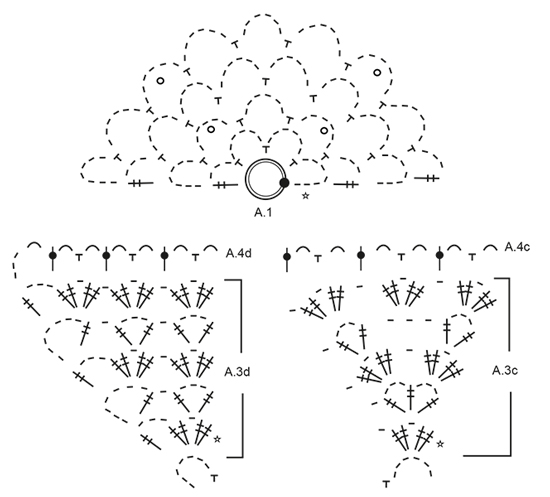
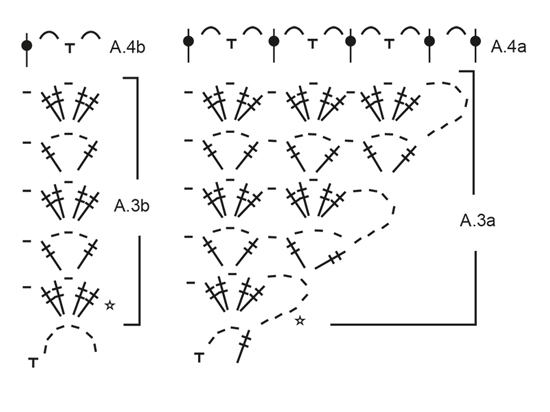
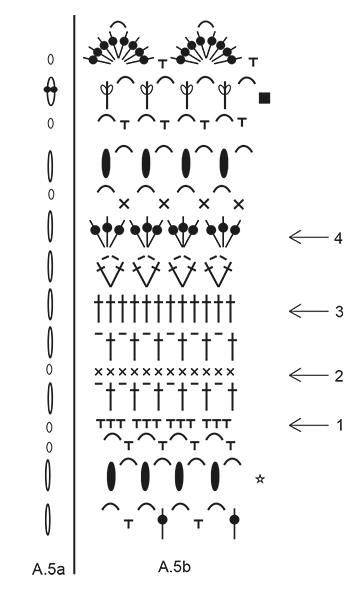
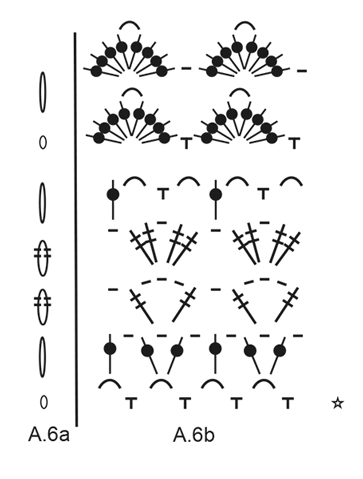
---------------------------------------------------------- EXPLANATION FOR THE PATTERN: ---------------------------------------------------------- PATTERN: See diagrams A.1 to A.6. A.5a and A.6a show how row begins. NOTE: Begin on rows drawn over each other in the same diagram even though they are worked alternately in right and left side of shawl and not over each other. ---------------------------------------------------------- START THE PIECE HERE: ---------------------------------------------------------- SHAWL - SHORT OVERVIEW OF THE PIECE: Piece is worked back and forth, top down. Work 5 chain stitches on hook size 3.5 mm/E/4 with Delight and form a ring with 1 slip stitch in first chain stitch made. Start on row with star and work pattern according to diagram A.1 back and forth. When diagram has been worked, continue as follows: A.2a, A.2b and A.2c. When diagrams have been worked vertically, there are 17 chain spaces on row. Piece measures approx. 8 cm / 3⅛" from the first chain stitch ring and down the middle of shawl. REMEMBER THE CROCHET GAUGE! Now work pattern from right side as follows: Work A.3a around first chain space, A.3b around each of the next 7 chain spaces, A.3c around next chain space (= the middle chain space on shawl), A.3b around each of the next 7 chain spaces, A.3d around the last chain space. When A.3a to A.3d have been worked vertically, repeat the last 4 rows in diagrams 3 more times vertically. Piece measures approx. 37 cm from beginning and down the middle of shawl. Now work a row with chain spaces from wrong side as follows: Work A.4a over A.3a, A.4b over A.3b, A.4c over A.3c, A.4d over A.3d. There are now 84 chain spaces on row. Now insert 12 marker threads in the piece. This is done to make it easier to increase stitches evenly. Insert the markers in the piece as follows: Insert first marker thread in double crochet after 4 chain spaces, * skip 7 chain spaces and insert next marker thread in next double crochet *, repeat from *-* 11 times in total, 3 chain spaces remain on row. Then work pattern A.5b (A.5a shows how every row begins and is worked in addition to stitches in A.5b), AT THE SAME TIME on rows with arrow increase stitches evenly as follows: ARROW-1: Increase 2 single crochets on each side of marker threads by working 1 extra single crochet around each of the 2 chain spaces before and after marker threads (= 48 stitches increased) = 300 single crochets. ARROW-2: Increase 1 single crochet on each side of marker threads by working 2 single crochets in a stitch (= 24 stitches increased) = 324 single crochets. ARROW-3: Increase 1 double crochet on each side of marker threads by working 2 double crochets in a stitch (= 24 stitches increased) = 348 double crochets. ARROW-4: Increase 2 double crochets on each side of marker threads by working 1 extra double crochet around each of the 2 chain spaces before and after marker threads (= 48 stitches increased) = 396 double crochets. Work the remaining rows in diagrams. Piece measures approx. 51 cm from beginning and down the middle of shawl. There are now 66 fans (= 33 repetitions of A.5b) on row. Fold last row in A.5a/A.5b down so that right side is against right side and work from wrong side around row with black square in A.5b (= row with: 1 half double crochet, 3 chain stitches, etc.) as follows: Work first row in A.6b as follows (A.6a shows how row begins and is worked in addition to A.6b): 4 chain stitches, 1 single crochet around first half double crochet, work (3 chain stitches, 1 single crochet around next half double crochet), work like this along the entire shawl AT THE SAME TIME increase 2 chain spaces on each side of marker threads by working 1 extra chain space in each of the 2 chain spaces before and after every marker thread (= 48 chain spaces increased) = 180 chain spaces. Continue back and forth with A.6a and A.6b until entire diagram has been worked vertically and finish with 1 double crochet in edge stitch on previous row. When entire A.6a and A.6b have been worked vertically, there are 90 fans on row. Shawl measures approx. 60 cm from beginning and down the middle of shawl. Fasten off. |
|||||||||||||||||||||||||||||||||||||||||||||||||||||||
Diagram explanations |
|||||||||||||||||||||||||||||||||||||||||||||||||||||||
|
|||||||||||||||||||||||||||||||||||||||||||||||||||||||
 |
|||||||||||||||||||||||||||||||||||||||||||||||||||||||
 |
|||||||||||||||||||||||||||||||||||||||||||||||||||||||
 |
|||||||||||||||||||||||||||||||||||||||||||||||||||||||
 |
|||||||||||||||||||||||||||||||||||||||||||||||||||||||
 |
|||||||||||||||||||||||||||||||||||||||||||||||||||||||
Have you finished this pattern?Tag your pictures with #dropspattern #albertaautumnshawl or submit them to the #dropsfan gallery. Do you need help with this pattern?You'll find 12 tutorial videos, a Comments/Questions area and more by visiting the pattern on garnstudio.com. © 1982-2026 DROPS Design A/S. We reserve all rights. This document, including all its sub-sections, has copyrights. Read more about what you can do with our patterns at the bottom of each pattern on our site. |
|||||||||||||||||||||||||||||||||||||||||||||||||||||||


With over 40 years in knitting and crochet design, DROPS Design offers one of the most extensive collections of free patterns on the internet - translated to 17 languages. As of today we count 324 catalogs and 12290 patterns - 12280 of which are translated into English (US/in).
We work hard to bring you the best knitting and crochet have to offer, inspiration and advice as well as great quality yarns at incredible prices! Would you like to use our patterns for other than personal use? You can read what you are allowed to do in the Copyright text at the bottom of all our patterns. Happy crafting!
Post a comment to pattern DROPS 197-30
We would love to hear what you have to say about this pattern!
If you want to leave a question, please make sure you select the correct category in the form below, to speed up the answering process. Required fields are marked *.