
Popular categories
Looking for a yarn?


Comments / Questions (44)
![]() Mariana wrote:
Mariana wrote:
I have finished the 10 cm (A &B) last row is B ( P 1, YO, Slip 1 St P side) Now I have to insert 6 markers every 11th st on a st K. Next I need to increase 4 st where the marker is. I do not understand where/what I have to do exactly. Can you please guide me step by step from the beginning of the row?
05.03.2026 - 19:05DROPS Design answered:
Dear Mariana, insert the markers in each 11th knit stitch (2nd stitch in A.1a) the whole round so that you will have either 22 or 24 sts between every marker, then increase every 4th cm in this stitch with a marker at the same time as you work first row of A.1a - this video shows how to increase, how to work the next round and the next increase. Happy knitting!
06.03.2026 - 07:35
![]() Mariana wrote:
Mariana wrote:
Hi, Can you explain me the diagrama row by row. I understand that there're 5 rows. Many thanks.
19.02.2026 - 20:52DROPS Design answered:
Hi Mariana, The diagram is read bottom up and from right to left and is repeated on the round. Row 1: P2 together, make 1 YO, slip 1 stitch purl-wise. Row 2: P1, knit together YO.+ knitted stitch. Row 3: P1, make 1 YO, slip 1 stitch purl-wise. Row 4: As Row 2, Row 5: As row 3. Hope this helps. Regards, Drops Team.
20.02.2026 - 07:02
![]() Guylaine wrote:
Guylaine wrote:
Bonjour, Est-ce que les fausses côtes anglaises sont le point brioche?
19.02.2026 - 06:00DROPS Design answered:
Bonjour Guylaine, pas exactement, car entre les mailles en côtes anglaises ici, on a 1 maille envers, retrouvez ici, en vidéo,comment on tricote le point de la jupe. Bon tricot!
19.02.2026 - 09:18
![]() Anette Kruse wrote:
Anette Kruse wrote:
Hvor kan jeg se mål så jeg ved jeg kommer til at strikke den rigtige størrelse - håber mit spørgsmål giver mening
03.01.2026 - 15:26
![]() Lily wrote:
Lily wrote:
Bonjour Je n arrive pas à tricoter A1. Pouvez vous m aider ou me montrer une vidéo ? Merci
08.12.2025 - 14:34DROPS Design answered:
Bonjour Lily, au tout 1er tour de A.1, tricotez (2 m ens à l'envers, 1 jeté, glissez 1 m à l'envers), tout le tour, puis continuez en fausses côtes anglaises, comme dans cette vidéo. Bon tricot!
08.12.2025 - 16:19
![]() Gitte wrote:
Gitte wrote:
Hej. Jeg er ved at strikke denne nederdel i størrelse L, men ønsker at strikke den i glat strik i stedet for falsk patent. Hvor mange masker skal jeg starte ud med efter de 8 cm rib, når det er glat strik og ikke patent? Resten skal jeg nok selv regne ud.
13.11.2025 - 12:21DROPS Design answered:
Hei Gitte. Design avd. har dessverre ikke anledning til å tilpasse en allerede skrevet oppskrifte til alle som måtte ønske det. mvh DROPS Design
17.11.2025 - 20:02
![]() Anonym wrote:
Anonym wrote:
Jeg forstår ikke helt økningen. Jeg strikker i str.M og skal markere 6 merker og telle tolv rette masker mellom hver. Jo mer jeg øker blir det jo et felt hvor det ikke blir en økning som blir større og større (om dette gir mening), blir dette riktig? Da blir det jo et ganske stort felt på det ferdige skjørtet som ikke får økning..
07.10.2025 - 08:55DROPS Design answered:
Hej. Ja det stämmer att du inte ökar på de partierna mellan markörerna, det kommer bli som du ser på bilden (du ser att i vissa partier är det inga ökningar). Mvh DROPS Design
10.10.2025 - 09:52
![]() Anonym wrote:
Anonym wrote:
Jeg forstår ikke helt økningen. Jeg strikker i str.M og skal markere 6 merker og telle tolv rette masker mellom hver. Jo mer jeg øker blir det jo et felt hvor det ikke blir en økning som blir større og større (om dette gir mening), blir dette riktig? Da blir det jo et ganske stort felt på det ferdige skjørtet som ikke får økning..
03.10.2025 - 22:45
![]() Nina wrote:
Nina wrote:
Hei, skal det strikkes med falsk pantent i vrangborden på 8 cm?
23.09.2025 - 23:22DROPS Design answered:
Hei Nina, Nei, vrangbord er som vanlig, med 2 vrang, 1 rett, i 8 cm. Hilsen Drops team.
24.09.2025 - 06:46
![]() Danielle Fowler wrote:
Danielle Fowler wrote:
I'm struggling to understand some of the instructions. I think I've finally understood the stitch pattern but I still don't understand how I seem to go from 264 sts (for my size) for the hem, and then, as we get to the pattern it goes down to 176 sts. What happened?
02.09.2025 - 15:27DROPS Design answered:
Hi Danielle, Diagram A.1 is read bottom up and from right to left from the right side. The first row in A.1 is purl 2 together, make 1 yarn over, slip 1 stitch on to right needle purl-wise. In your size, you repeat A.1 88 times on the round which decreases 88 stitches (from 264 to 176 stitches). You then continue A.1 on the 2nd row (purl1, knit together the yarn-over and knitted stitch) across all stitches. Hope this helps. Regards, Drops Team.
03.09.2025 - 06:47
|
||||||||||||||||
See You In Dublin#seeyouindublinskirt |
||||||||||||||||
 |
 |
|||||||||||||||
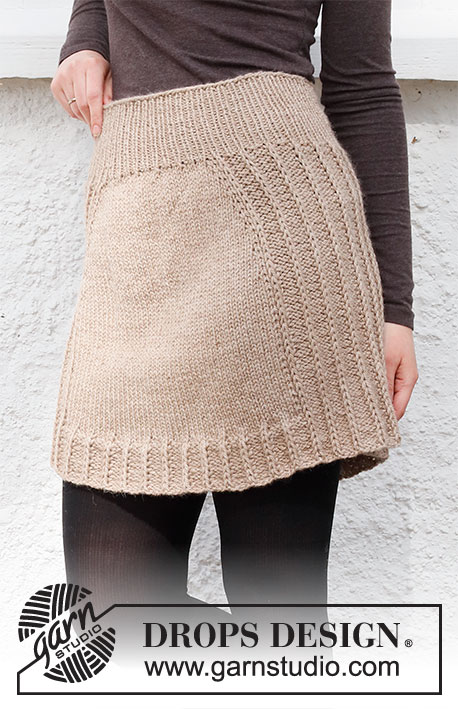
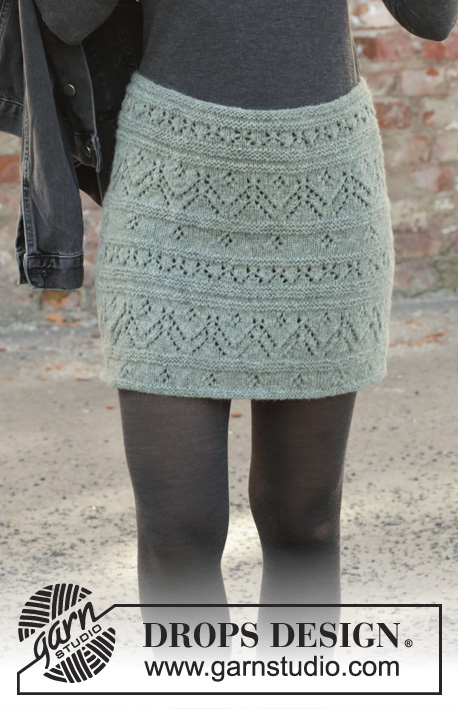
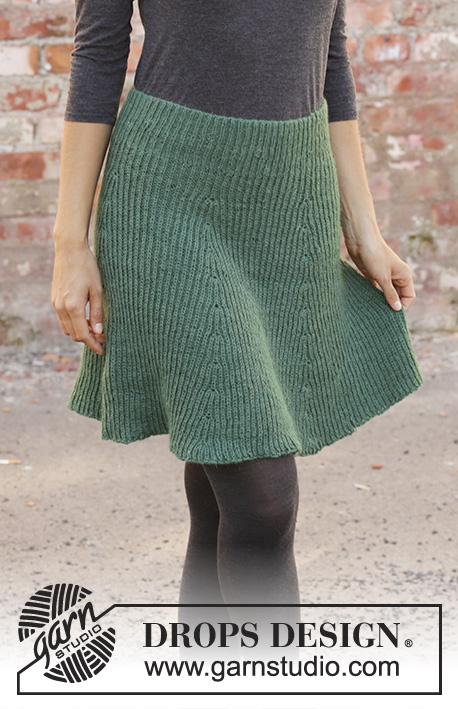
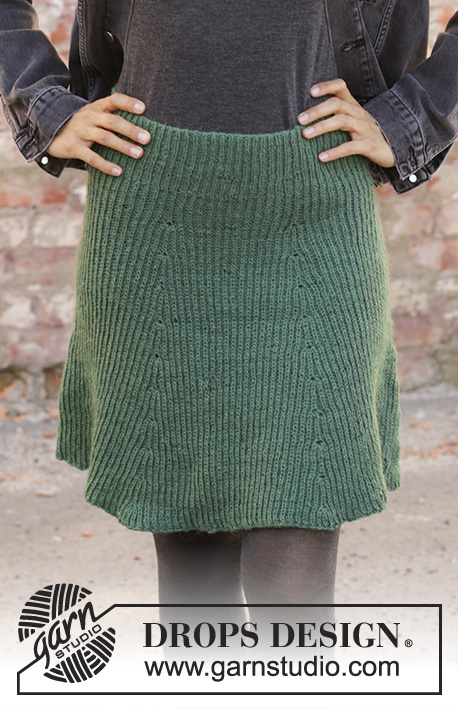
Knitted skirt in DROPS Nord. Piece is knitted top down with false English rib. Size: S - XXXL
DROPS 196-37 |
||||||||||||||||
|
---------------------------------------------------------- EXPLANATION FOR THE PATTERN: ---------------------------------------------------------- KNITTING GAUGES: Texture in garment will stretch when worn and has 2 knitting gauges. Knitting gauge 1 applies when garment is worked and is flat. The garment should have this knitting gauge when it is worked. Knitting gauge 2 is the knitting gauge the skirt will have at the waist when the garment is worn. Knitting gauge vertically is given according to knit stitch, which is knitted over 1 round less than purl stitch, because knit stitch is slipped loosely on to right needle every other round. I.e. 24 rows vertically measured in knit stitch on 10 cm / 4" = 48 rows measured in purl stitch on 10 vertically. Measurements in chart are given in cm when garment is worn. INCREASE TIP-1 (evenly): To calculate how to increase evenly, use the total number of stitches on row (e.g. 172 stitches) and divide stitches by number of increases to be done (e.g. 26) = 6.6. In this example increase by making 1 yarn over after alternately approx. every 6th and 7th stitch. On next round work yarn over twisted to avoid hole. INCREASE TIP-2: All increases are done on a round where yarn over and knit stitch are knitted together. Work 5 stitches in knit stitch and yarn over as follows: Knit yarn over and knit stitch together but wait to slip the yarn over and worked stitch off the needle * make 1 yarn over on right needle and knit knit stitch and yarn over together *, work from *-* 2 times in total = 5 stitches (= 4 stitches increased) PATTERN: See diagram A.1. ---------------------------------------------------------- START THE PIECE HERE: ---------------------------------------------------------- SKIRT - SHORT OVERVIEW OF THE PIECE: Worked in the round on circular needle, top down. First work a hem to thread the elastic through. Then work rib and false English rib. Texture in garment will behave differently when garment is worn - read KNITTING GAUGE. HEM: Cast on 172-188-202-228-250-292 stitches on circular needle size 2.5 mm / US 1.5 with Nord. Purl 1 round. Then work 4 rounds in stockinette stitch. Purl 1 round and increase 26-28-32-36-38-44 stitches evenly (= folding edge) - read INCREASE TIP-1 = 198-216-234-264-288-336 stitches. Insert 1 marker thread in the piece. NOW MEASURE PIECE FROM HERE! SKIRT: Work rib (purl 2/knit 1) for 8 cm / 3⅛". Switch to circular needle size 3 mm / US 2.5 and work A.1 over all stitches (= 66-72-78-88-96-112 times in the round). When first round in A.1 has been worked, there are 132-144-156-176-192-224 stitches on needle. Yarn overs are not counted as stitches. When A.1 has been worked 1 time vertically, repeat A.1a until finished measurements. REMEMBER THE GAUGE! When piece measures 10 cm / 4" from marker thread, insert 1 marker in every 11th-12th-13th-11th-12th-14th knit stitch (= 6-6-6-8-8-8 markers). Then increase 4 stitches in every stitch with marker – read INCREASE TIP-2 (= 24-24-24-32-32-32 stitches increased). Continue in the round with pattern, work the increased stitches in pattern. Increase like this every 4-4-4-4½-4½-4½ cm until piece measures 48-50-52-54-56-58 cm / 19"-19¾"-20½"-21¼"-22"-22¾" from marker thread. There are approx. 348-384-396-464-512-544 stitches on needle. Adjust so that last round is a round with yarn overs. Then bind off with knit over knit and purl over purl, BUT bind off yarn overs as regular stitches by knitting, this is done to avoid a tight bind-off edge. ASSEMBLY: Fold the hem towards wrong side and fasten neatly by sewing, let there be a small opening to thread the elastic through. |
||||||||||||||||
Diagram explanations |
||||||||||||||||
|
||||||||||||||||
 |
||||||||||||||||
Have you finished this pattern?Tag your pictures with #dropspattern #seeyouindublinskirt or submit them to the #dropsfan gallery. Do you need help with this pattern?You'll find 17 tutorial videos, a Comments/Questions area and more by visiting the pattern on garnstudio.com. © 1982-2026 DROPS Design A/S. We reserve all rights. This document, including all its sub-sections, has copyrights. Read more about what you can do with our patterns at the bottom of each pattern on our site. |
||||||||||||||||


With over 40 years in knitting and crochet design, DROPS Design offers one of the most extensive collections of free patterns on the internet - translated to 17 languages. As of today we count 325 catalogs and 12298 patterns - 12288 of which are translated into English (US/in).
We work hard to bring you the best knitting and crochet have to offer, inspiration and advice as well as great quality yarns at incredible prices! Would you like to use our patterns for other than personal use? You can read what you are allowed to do in the Copyright text at the bottom of all our patterns. Happy crafting!
Post a comment to pattern DROPS 196-37
We would love to hear what you have to say about this pattern!
If you want to leave a question, please make sure you select the correct category in the form below, to speed up the answering process. Required fields are marked *.