
Popular categories
Looking for a yarn?


Comments / Questions (20)
![]() Valérie wrote:
Valérie wrote:
Bonsoir, je sèche après avoir fais les côtes, sur le rang où il faut faire les diminutions. J'ai bien diminué sur les 45 premières mailles, mais pour la suite je ne comprend pas. Merci de bien vouloir m'aider.
21.03.2020 - 22:14DROPS Design answered:
Bonjour Valérie, après les côtes, vous tricotez: 5 m point mousse, A.5B (= on passe de 45 à 39 m), tricotez les mailles suivantes à l'endroit jusqu'à ce qu'il reste 50 m (= les mailles de A.2A + les 5 m de bordure devant) en diminuant en même temps 54-62-68 m (= cf taille) et terminez par A.2B (on passe de 45 à 39 m) et 5 m point mousse. Vous avez maintenant: 5 + 39 + 220-252-278 + 39+5= 308+340+366 m. Bon tricot!
23.03.2020 - 09:53
![]() Isabelle wrote:
Isabelle wrote:
Existe-t-il une vidéo pour montrer comment réunir le dos/devant et les manches ? Merci
27.02.2020 - 17:33DROPS Design answered:
Bonjour Isabelle, tout à fait, c'est cette vidéo qui montre comment réunir les manches - les mailles rabattues au début et à la fin du dernier rang de la manche doivent être contre les mailles rabattues pour les emmanchures à la fin du dos/devants. Bon tricot!
28.02.2020 - 07:51
![]() Cecilie wrote:
Cecilie wrote:
Det ser ut til at fordeling og strikking av knapphull har falt ut. Det samme gjelder alle felletips og øketips.
23.06.2019 - 23:39DROPS Design answered:
Hei Cecilie. Nå skal all informasjon til oppskriften være lagt inn. Takk for beskjed og god fornøyelse
24.06.2019 - 07:12
![]() Nathalie wrote:
Nathalie wrote:
Bonjour, J'ai 2 questions : Il manque un symbole dans la légende des diagrammes, le triangle rectangle noir avec angle droit en bas à gauche des 2 mailles. Les diagrammes sont ils inversés ou faut-il les lire de droite à gauche ? Parce que A3 commence par 2 mailles envers alors qu'on voit 2 mailles endroit après la bordure au point mousse, A4 finit par 2 mailles envers au lieu des 2 mailles endroit avant la bordure au point mousse. Pouvez vous m'éclairer ? Merci
09.04.2019 - 12:11DROPS Design answered:
Bonjour Nathalie, pour A.4, je tricoterai 2 m ens à l'envers également pour conserver la cohérence du motif - nos stylistes vont vérifier ça aussi rapidement que possible - Les diagrammes se lisent sur l'endroit de droite à gauche, A.3 va ainsi commencer par 2 m end sur l'end et A.4 terminera par 2 m end sur l'end. Sur l'envers, lisez les diagrammes de gauche à droite - cliquez ici pour en savoir plus sur les diagrammes. . Bon tricot!
09.04.2019 - 12:23
![]() Helen wrote:
Helen wrote:
Koftan liten i storleken. Jag är en Small, valde att sticka i Medium och kan inte ens knäppa knapparna samt att ärmarna är mycket tighta. Jag kan inte hitta var måtten för färdigt plagg finns.
27.02.2019 - 09:07
![]() Ildiko wrote:
Ildiko wrote:
I am working on the hat, I enjoy working with this pattern very much. Thank you for sharing it!
22.02.2019 - 22:27
![]() Ildiko wrote:
Ildiko wrote:
At the HAT: When we start with 117-123-127 stitches before decreasing 80 + 11 (with A.7), shouldn't we get to 26-32-36 stitches and at the end to 7-8-9 stitches? Could you please clarify where do I miss the other 4 decreases?
22.02.2019 - 22:19DROPS Design answered:
Dear Ildiko, when piece measures 10 cm, you decrease 1 st on each side of each 4 markers (= 8 sts dec per round), then after A.6 has been worked 3 times in height, work A.7 over each A.6, ie you will first decrease 8 sts in the stocking stitch sections, then decrease in pattern (A.7) and in the stocking stitch sections. Happy knitting!
25.02.2019 - 08:06
![]() Ildiko wrote:
Ildiko wrote:
I have a question regarding this part in the pattern of HAT: "AT THE SAME TIME when A.1 has been worked a total of 3 times in height in all sizes, work A.7 over the same 27 stitches." We work with A.6 in hat, not with A.1, am I right?
22.02.2019 - 21:56DROPS Design answered:
Hi Ildiko, Yes you are right, you work A.6 on the hat not A.1. Happy knitting!
23.02.2019 - 06:55
![]() M.de Ridder wrote:
M.de Ridder wrote:
Hoe kan ik een patroon uit printen?
28.12.2018 - 18:33DROPS Design answered:
Dag M.de Ridder,
Bij het 'Instructies voor het patroon' staan rechts boven een aantal knoppen. Hier zit ook een knop 'Patroon' bij met een print-pictogram. Deze knop kun je gebruiken om het patroon af te drukken.
01.01.2019 - 19:42
![]() Silvia wrote:
Silvia wrote:
Bei der mütze ist angegeben Muster A6 zu stricken und dann bei den Abnahmen dann auch A6 stehen ?
20.09.2018 - 07:15DROPS Design answered:
Liebe Silvia, bei der Mütze wird zuerst A.6 gestrickt, und dann wird es mit A.7 abegnommen. Viel Spaß beim stricken!
20.09.2018 - 09:30
|
|||||||||||||||||||
Green Luck#greenluckjacket |
|||||||||||||||||||
 |
 |
||||||||||||||||||
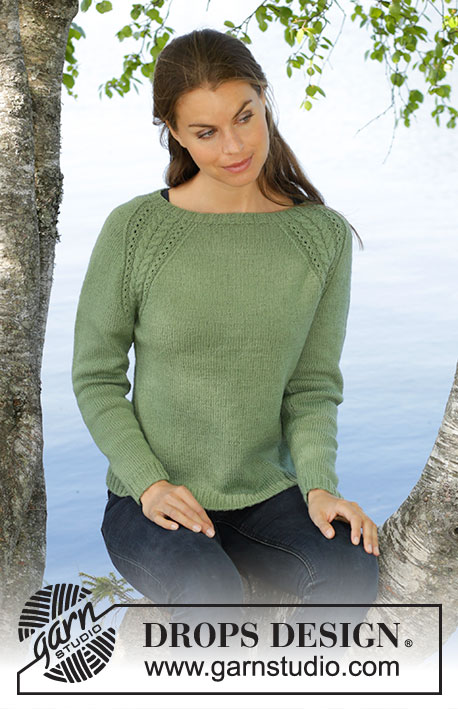
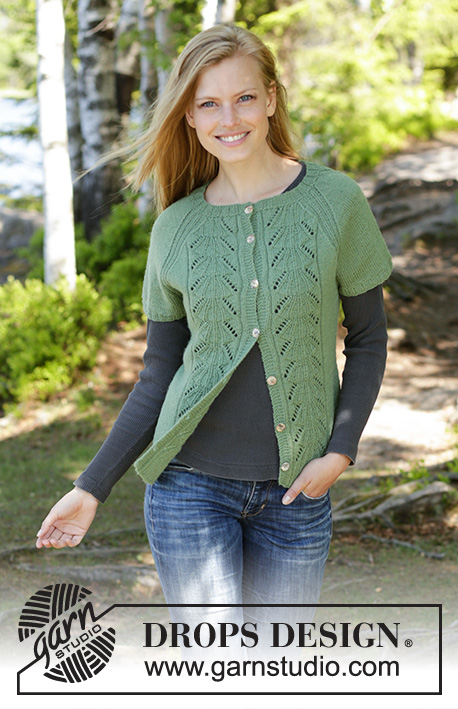
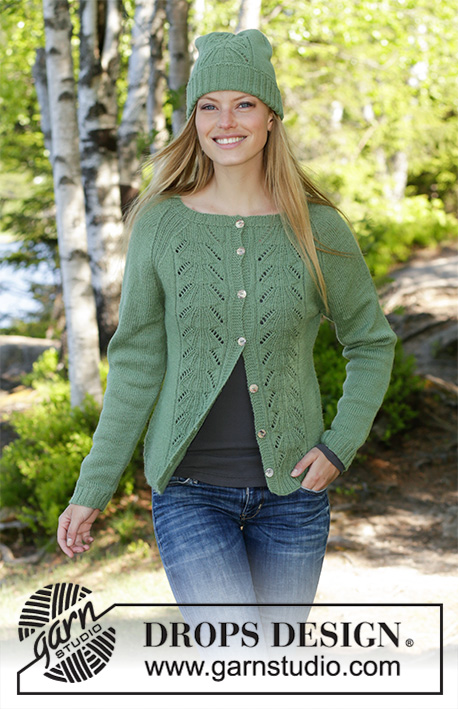
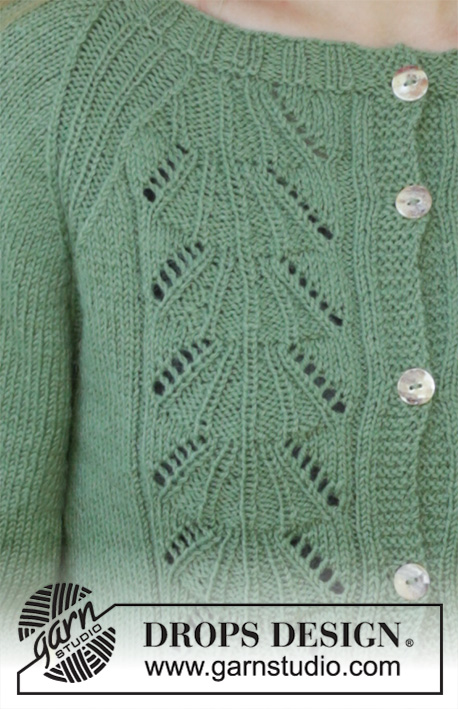
Knitted fitted jacket in DROPS Flora. The piece is worked with lace pattern and raglan. Sizes S - XXXL. Knitted hat in DROPD Flora. The piece is worked with a lace pattern and a folded edge in rib.
DROPS 196-11 |
|||||||||||||||||||
|
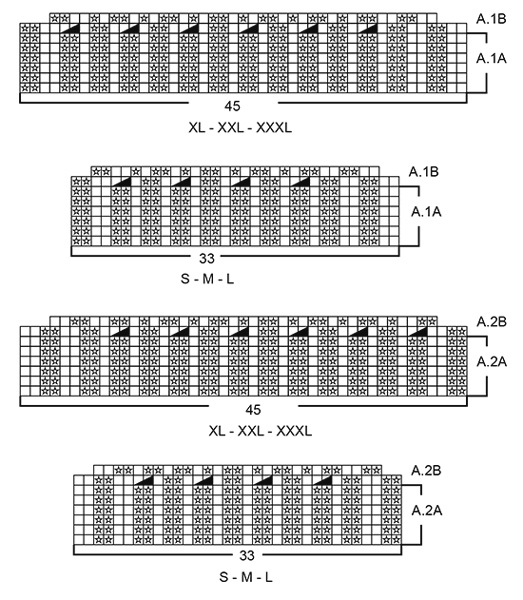
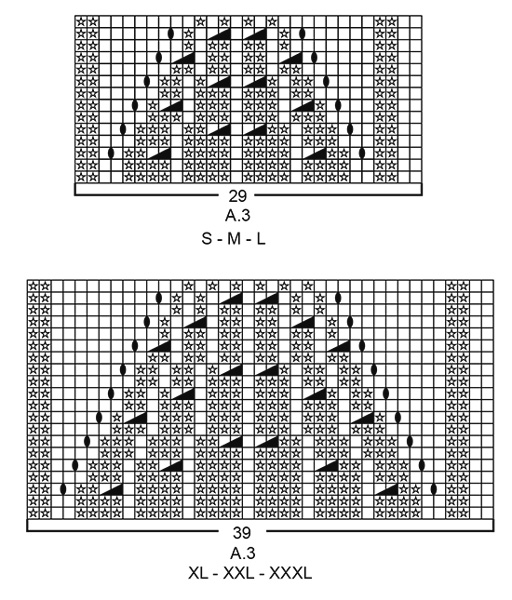
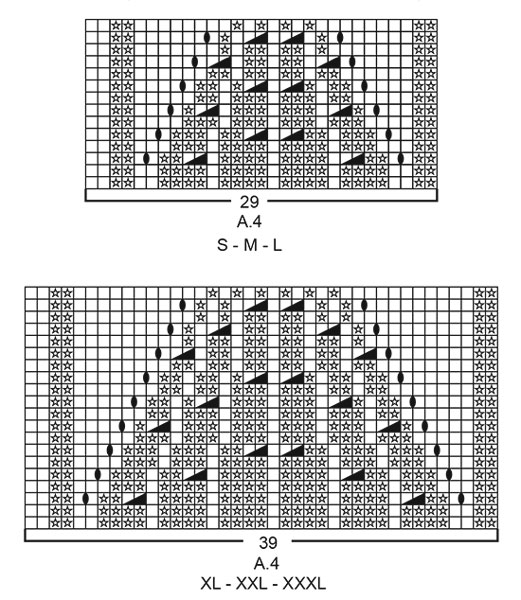
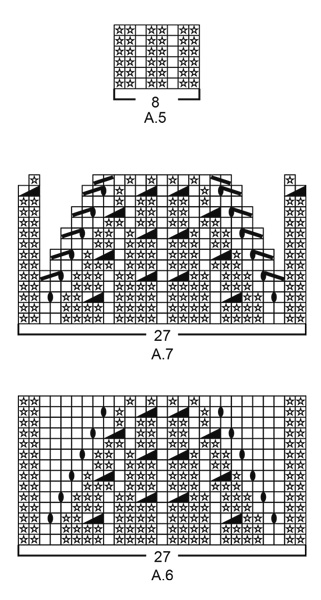
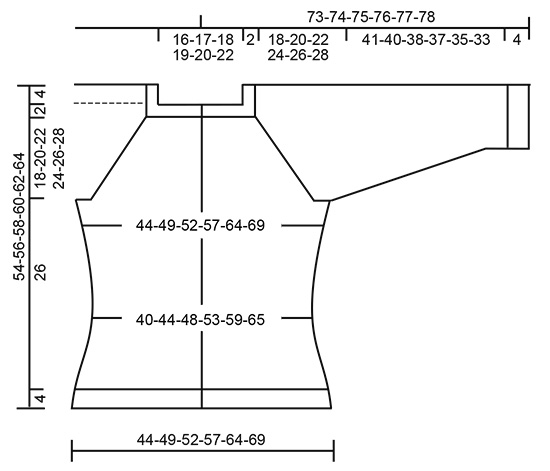
------------------------------------------------------- EXPLANATIONS FOR THE PATTERN: ------------------------------------------------------- RIDGE/GARTER STITCH (worked back and forth): 1 ridge = Knit 2 rows. PATTERN: Jacket: See diagrams A.1 to A.5. Choose diagram for your size. Hat: See diagrams A.6 and A.7. The diagrams show all rows in the pattern seen from the right side. BUTTONHOLES (bottom up): Work buttonholes on right band. 1 BUTTONHOLE = bind off third and fourth stitch from edge. On next row cast on 2 new stitches over the bind off stitches. Work buttonholes when the piece measures: S: 4, 12, 20, 28, 35, 42 and 49 cm M: 4, 12, 20, 28, 36, 44 and 51 cm L: 4, 12, 20, 28, 36, 44 and 53 cm XL: 4, 12, 20, 27, 34, 41, 48 and 55 cm XXL: 4, 12, 19, 27, 35, 43, 50 and 57 cm XXXL: 4, 12, 20, 28, 36, 44, 52 and 59 cm NOTE: The last of these 7-7-7-8-8-8 buttonholes is worked on the neck. DECREASE TIP-1 (for sides of body): All decreases are worked from the right side! Start 5 stitches before the marker thread, knit 2 together, knit 6 (the marker thread sits in the middle of these 6 stitches), slip 1 stitch as if to knit, knit 1, pass the slipped stitch over the knitted stitch (= 2 stitches decreased). DECREASE TIP-2 (evenly spaced on yoke): To work out how to decrease evenly, count the total number of stitches on the needle (e.g. 124 stitches) minus the bands (e.g. 10 stitches) and divide the remaining stitches by the number of decreases to be made (e.g. 26) = 4.4. In this example, decrease by knitting together alternately every 3rd and 4th stitch and every 4th and 5th stitch. Do not decrease over the bands. DECREASE TIP-3 (for hat): Decrease 1 stitch on each side of the marker thread as follows: Start 2 stitches before the marker thread, knit 2 together, marker thread, slip 1 stitch as if to knit, knit 1, pass the slipped stitch over the knitted stitch (= 2 stitches decreased). INCREASE TIP (for sides of body and mid under sleeves): All increases are worked from the right side! Work until there are 3 stitches left before the marker thread, make 1 yarn over, knit 6 (the marker thread sits in the middle of these 6 stitches), make 1 yarn over (= 2 stitches increased). On the next round purl the yarn overs twisted to avoid holes. Then work the new stitches in stockinette stitch. RAGLAN: All decreases are worked from the right side! Decrease to raglan in each transition between body and sleeves (i.e. decrease on each side of A.5) = 8 stitches decreased each time. Decrease as follows before A.5: Work until there are 2 stitches left before A.5, knit 2 together (= 1 stitch decreased). Decrease as follows after A.5: Slip 1 stitch as if to knit, knit 1, pass the slipped stitch over the knitted stitch (= 1 stitch decreased). ------------------------------------------------------- START THE PIECE HERE: ------------------------------------------------------- JACKET - SHORT OVERVIEW OF THE PIECE: The piece is worked back and forth with circular needle, bottom up as far as the armholes. The sleeves are worked in the round with double pointed needles/short circular needle. Then the body and sleeves are placed on the same circular needle and the yoke is finished back and forth from mid front. BODY: Cast on 286-314-334-374-414-446 stitches with circular needle size 2.5 mm / US 1.5 and Flora. Purl 1 row (= wrong side). The next row is worked as follows from the right side: 5 band stitches in GARTER STITCH - read description above, Work A.1A (= 33-33-33-45-45-45 stitches), * knit 2, purl 2 *, work from *-* a total of 52-59-64-68-78-86 times, knit 2, work A.2A (= 33-33-33-45-45-45 stitches) and finish with 5 band stitches in garter stitch. Continue the rib like this for 4 cm / 1½". The next row is worked as follows from the right side: Work 5 band stitches in garter stitch, but work 1 BUTTONHOLE on the band – read description above, work A.1B (= 33-33-33-45-45-45 stitches which decrease to 29-29-29-39-39-39 stitches), work stockinette stitch until there are 38-38-38-50-50-50 stitches left on the row and decrease at the same time 40-46-50-54-62-68 stitches evenly over these stitches (knit together approx. every 4th and 5th stitch), work A.2B (= 33-33-33-45-45-45 stitches which decrease to 29-29-29-39-39-39 stitches) and finish with 5 band stitches in garter stitch = 238-260-276-308-340-366 stitches. Change to circular needle size 3 mm / US 2.5 and work back from the wrong side with garter stitch over garter stitch, knit over knit and purl over purl. The next row is worked as follows from the right side: 5 band stitches in garter stitch, work A.3 (= 29-29-29-39-39-39 stitches), work stockinette stitch until there are 34-34-34-44-44-44 stitches left on the row, work A.4 (= 29-29-29-39-39-39 stitches) and finish with 5 band stitches in garter stitch. Continue this pattern. REMEMBER THE GAUGE! When the piece measures 6 cm / 2⅜" in all sizes, insert 1 marker thread 66-72-76-86-94-100 stitches in from each side (= 106-116-124-136-152-166 stitches between marker threads on the back piece). On the next row from the right side decrease 1 stitch on each side of both marker threads - read DECREASE TIP-1 = 4 stitches decreased. Decrease like this every 2 cm / ¾" a total of 5 times in each side = 218-240-256-288-320-346 stitches on the row. When the piece measures 20 cm / 8" increase 1 stitch on each side of both marker threads - read INCREASE TIP = 4 stitches increased. Increase like this every 2 cm / ¾" a total of 5 times in each side = 238-260-276-308-340-366 stitches. Continue until the piece measures 30 cm / 11¾" in all sizes. On the next row (wrong side) bind off 10-10-12-12-14-16 stitches in each side for the armholes (i.e. Bind off 5-5-6-6-7-8 stitches on each side of both markers). There are now 61-67-70-80-87-92 stitches on each front piece and 96-106-112-124-138-150 stitches on the back piece. Lay the piece to one side and work the sleeves as described below. SLEEVE: The sleeves are worked in the round with double pointed needles; change to short circular needle when necessary. Cast on 56-60-60-64-68-68 stitches with double pointed needles size 2.5 mm / US 1.5 and Flora. Knit 1 round. Then work rib in the round (= knit 2 / purl 2) for 4 cm / 1½". Knit 1 round where you decrease 10-12-10-12-12-10 stitches evenly on round = 46-48-50-52-56-58 stitches. Change to double pointed needles size 3 mm / US 2.5 and work stockinette stitch in the round. When the piece measures 8-8-8-6-6-6 cm / 3⅛"-3⅛"-3⅛"-2⅜"-2⅜"-2⅜" insert 1 marker thread at the beginning of the round (= mid under sleeve). On the next round increase 2 stitches mid under sleeve - read INCREASE TIP. Increase like this every 2½-2-1½-1½-1½-1½ cm a total of 13-15-17-16-13-9 times and then every 1 cm / ⅜" a total of 2-4-6-8-12-17 times = 76-86-96-100-106-110 stitches. Continue working until the piece measures 45-44-42-41-39-37 cm / 17⅝"-17 ¼"-16 ½"-16⅛"-15 ¼"-14 ½" (shorter measurements in larger sizes due to longer yoke). The next round is worked as follows: bind off 5-5-6-6-7-8 stitches for the armhole, knit 66-76-84-88-92-94 stitches and bind off the remaining 5-5-6-6-7-8 stitches. Lay the piece to one side and work the other sleeve in the same way. YOKE: Place the sleeves on same circular needle size 3 mm / US 2.5 as the body and where you bind off stitches for the armholes (do this without working the stitches) = 350-392-420-460-496-522 stitches on the needle. Insert 1 marker in each transition between body and sleeves = 4 markers. The first row is worked as follows from the right side: 5 band stitches in garter stitch, continue A.3 as before, work stockinette stitch until there are 4 stitches left before the first marker, work A.5 (= 8 stitches – the marker sits in the middle of these 8 stitches), work stockinette stitch over the sleeve until there are 4 stitches left before the next marker, work A.5 (= 8 stitches), work stockinette stitch over the back piece until there are 4 stitches left before the next marker, work A.5 (= 8 stitches), work stockinette stitch over the sleeve until there are 4 stitches left before the next marker, work A.5 (= 8 stitches), work stockinette stitch as far as A.4, continue A.4 and finish with 5 band stitches in garter stitch. Continue this pattern. AT THE SAME TIME when you have worked 2 rows after the body and sleeves were combined, decrease to RAGLAN on the next row from the right side – read description above. Continue to decrease to raglan every 4th row a total of 3 times in all sizes and then every 2nd row a total of 22-26-29-33-36-38 times. After the last decrease there are 150-160-164-172-184-194 stitches left on the needle. The piece measures approx. 48-50-52-54-56-58 cm / 19"-19¾"-20½"-21¼"-22"-22¾" from the cast-on edge down mid front. Knit 1 row where you decrease 26-32-32-32-40-42 stitches evenly on row - read DECREASE TIP-3 = 124-128-132-140-144-152 stitches. Then work neck as described below. NECK: Change to circular needle size 2.5 mm / US 1.5. Knit 1 row from the wrong side. Knit 1 row from the right side and work the last buttonhole on this row. The next row is worked as follows from the wrong side: 5 band stitches in garter stitch, * purl 2, knit 2 *, work from *-* until there are 7 stitches left on the row, purl 2 and finish with 5 band stitches in garter stitch. Continue the rib like this for 2 cm / ¾". Bind off with knit over knit and purl over purl. The jacket measures approx. 54-56-58-60-62-64 cm / 21¼"-22"-22¾"-23⅝"-24⅜"-25¼" / 21¼"-22"-22¾"-23⅝"-24⅜"-25¼" from the shoulder down. ASSEMBLY: Sew the openings under the sleeves. Sew the buttons onto the left band. ------------------------------------------------------- HAT – SHORT OVERVIEW OF THE PIECE: The piece is worked in the round with short circular needle, bottom up. Change to double pointed needles when necessary. HAT: Cast on 128-136-144 stitches with short circular needle size 2.5 mm / US 1.5 and Flora. Purl 1 round. Then work rib in the round (= knit 2 / purl 2). When the rib measures 11-13-15 cm / 4 ¼"-5⅛"-5⅞" knit 1 round where you decrease 11-13-17 stitches evenly on round - read DECREASE TIP-2 = 117-123-127 stitches. Purl 1 round, knit 1 round, purl 1 round and knit 1 round. Change to circular needle size 3 mm / US 2.5 and work the next round as follows: 45-48-50 stitches in stockinette stitch, work A.6 (= 27 stitches), work 45-48-50 stitches in stockinette stitch. Continue this pattern. REMEMBER THE GAUGE! When the piece measures 10 cm / 4" from the garter stitch edge, insert 4 marker threads in the piece as follows: The first marker thread is inserted after the first 11-11-11 stitches on the round, 2nd after the next 22-22-23 stitches, 3rd marker thread inserted after the next 51-57-59 stitches and the 4th after the next 22-22-23 stitches. There are now 11-11-11 stitches left on the round after the last marker thread. Continue with pattern and stockinette stitch as before. AT THE SAME TIME decrease 1 stitch on each side of the 4 marker threads - read DECREASE TIP-3 in information for pattern below = 8 stitches decreased on the round. Decrease like this every 2nd round a total of 10 times. AT THE SAME TIME when A.6 has been worked a total of 3 times in height in all sizes, work A.7 over the same 27 stitches. When A.7 has been completed and all decreases are finished there are 23-29-33 stitches left on the needle. Knit 2 rounds where you knit all stitches together 2 and 2 = 6-7-8 stitches left. Cut the strand, pull it through the remaining stitches, tighten and fasten well. The hat measures approx. 28-30-32 cm / 11"-11 ¾"-12 ½" from the top down, including the rib. Fold half the rib on the bottom edge double towards the right side. |
|||||||||||||||||||
Diagram explanations |
|||||||||||||||||||
|
|||||||||||||||||||
 |
|||||||||||||||||||
 |
|||||||||||||||||||
 |
|||||||||||||||||||
 |
|||||||||||||||||||
 |
|||||||||||||||||||
Have you finished this pattern?Tag your pictures with #dropspattern #greenluckjacket or submit them to the #dropsfan gallery. Do you need help with this pattern?You'll find 28 tutorial videos, a Comments/Questions area and more by visiting the pattern on garnstudio.com. © 1982-2026 DROPS Design A/S. We reserve all rights. This document, including all its sub-sections, has copyrights. Read more about what you can do with our patterns at the bottom of each pattern on our site. |
|||||||||||||||||||


With over 40 years in knitting and crochet design, DROPS Design offers one of the most extensive collections of free patterns on the internet - translated to 17 languages. As of today we count 325 catalogs and 12298 patterns - 12288 of which are translated into English (US/in).
We work hard to bring you the best knitting and crochet have to offer, inspiration and advice as well as great quality yarns at incredible prices! Would you like to use our patterns for other than personal use? You can read what you are allowed to do in the Copyright text at the bottom of all our patterns. Happy crafting!
Post a comment to pattern DROPS 196-11
We would love to hear what you have to say about this pattern!
If you want to leave a question, please make sure you select the correct category in the form below, to speed up the answering process. Required fields are marked *.