
Popular categories
Looking for a yarn?


Comments / Questions (18)
![]() Ana Lucía wrote:
Ana Lucía wrote:
Hola! Estoy haciendo el patrón en talla S, al llegar a los 14 cm de la espalda tengo 69 puntos (3 puntos musgo a cada lado (6), 60 puntos en A3A y 3 puntos en A3B). Luego mencionan que debo aumentar 1 punto dentro de los 3 puntos en punto musgo a cada lado (ya tendría 2 puntos más = 71 puntos en total) y luego dicen que debo aumentar 1 punto a cada lado en cada fila por el lado derecho 5 veces (tendría 10 puntos más = 81 puntos en total) y ustedes mencionan que solo son 79?
04.06.2020 - 00:09DROPS Design answered:
Hola Ana Lucia! Cuando la labor mida 14 cm (medidos desde el hombro), aumentar 1 punto dentro de los 3 puntos en punto musgo a cada lado - aumentar 1 punto a cada lado en cada fila por el lado derecho (= cada segunda fila) 5 veces en total (10 puntos mas) = 79 puntos. Buen trabajo!
20.11.2020 - 10:11
![]() Emilie wrote:
Emilie wrote:
Strikker toppen i størrelse L, men får ikke A3.A til å stemme over både A1 og A2. Får den til å stemme over A2 men ikke over A1 uansett hvordan jeg vrir og vender på det. Hvordan skal jeg få det til å gå opp?
10.04.2020 - 20:39DROPS Design answered:
Hej Emilie, jo men hvis du sørger for at hver 2.mønster pind forskydes over A.1 og A.2 så kommer det til at gå op. God fornøjelse!
29.04.2020 - 09:58
![]() Mari wrote:
Mari wrote:
Buongiorno Nella taglia XL quando unisco le spalle dietro, non combaciano i motivi A3 non combacia su A2 e A1 Non capisco dove sbaglio!
12.09.2019 - 17:20DROPS Design answered:
Buongiorno Mari. Quando lavora il diagramma A3 deve iniziare dalla riga che le consente di proseguire correttamente il motivo lavorato con i diagrammi A1 e A2. Non necessariamente è la prima riga. Buon lavoro!
12.09.2019 - 23:21
![]() Sylke Thompson wrote:
Sylke Thompson wrote:
Ich bin eigentlich fertig, aber beim abketten hat sich der rand zusammen gezogen. wie kann ich das vermeiden
10.09.2019 - 00:37DROPS Design answered:
Liebe Frau Thompson, Sie können mit einer größeren Nadel abketten. Viel Spaß beim stricken!
10.09.2019 - 09:23
![]() Jances Antifave wrote:
Jances Antifave wrote:
How do you know how many balls od yarn to use
22.05.2019 - 17:57DROPS Design answered:
Hi Jances Antifave, there is 50 g in a ball, so in size S you will need 7 balls (350 g in total). Happy knitting!
22.05.2019 - 18:21
![]() Merete wrote:
Merete wrote:
Tak for svar på tidligere. Matematikken passer fint hvis jeg kun skal strikke A3, men det kommer ikke til at passe med både A1og A2. Jeg tilføjer 37 masker mellem A1 og A2. Hvis de skal kunne strikkes sammen med mønsteret i A1 og A2 burde dette masketal fratrukket 3 være deleligt med 6. Uanset hvad der så foregår at retstrik i kanten. Jeg kan i hvert fald ikke få det til at passe på nogen måde. Til gengæld fungerer det smukt hvis jeg tilføjer 39 masker i midten i stedet for 37!
20.08.2018 - 16:14
![]() Henny wrote:
Henny wrote:
Op een hoogte van 14 cm moet je aan de goede kant meerderen en de gebreide steken aan de zijkant in patroon A3 inbreien. Hoe doe je dit zonder dat het patroon verspringt?
14.08.2018 - 21:26DROPS Design answered:
Dag Henny, Je breit de gemeerderde steken in A.3, zodra er genoeg steken zijn om ze in patroon te breien. Als er nog niet genoeg steken zijn, brei je ze in tricotsteek.
15.08.2018 - 10:15
![]() Merete wrote:
Merete wrote:
Jeg strikker denne top i str XL og kan ikke få mønsteret til at passe. Når jeg samler højre og venstre skulder med opslag har jeg 73 masker. Jeg strikker 3 masker retstrik og 2 masker glatstrik og fortsætter med diagram A3, så det stemmer med mønsteret på diagram A2 og videre over de opslagene masker frem til den anden skulder. Og her passer mønsteret så ikke længere over det der på skulderen er strikket efter A1, men er forskudt med 2 masker. Er der mon en fejl i opskriften?
11.07.2018 - 16:02DROPS Design answered:
Hej Merete, Du har 73 masker, de yderste 5 masker i hver side strikkes i retstrik/glatstrik, det vil sige at du har 63 masker tilbage til A.3. Hvis du strikker A.3A over 6 masker 10 gange, så har du 3 masker tilbage hvor du strikker A.3B (så mønsteret bliver ens i hver side). God fornøjelse!
20.08.2018 - 15:51
|
|||||||||||||||||||
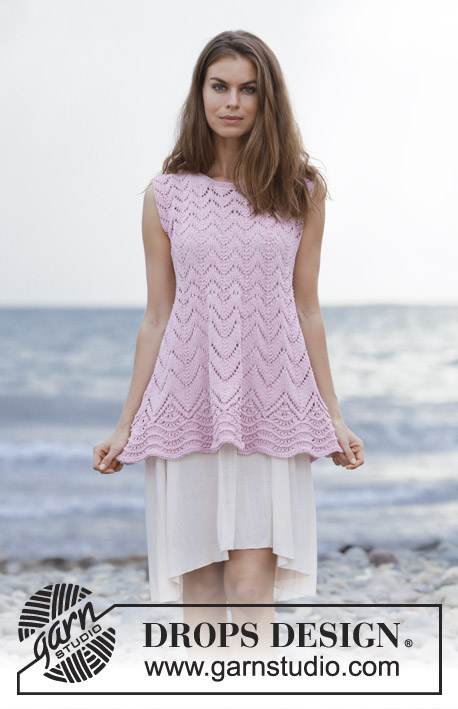
Loving Summer#lovingsummertop |
|||||||||||||||||||
 |
 |
||||||||||||||||||
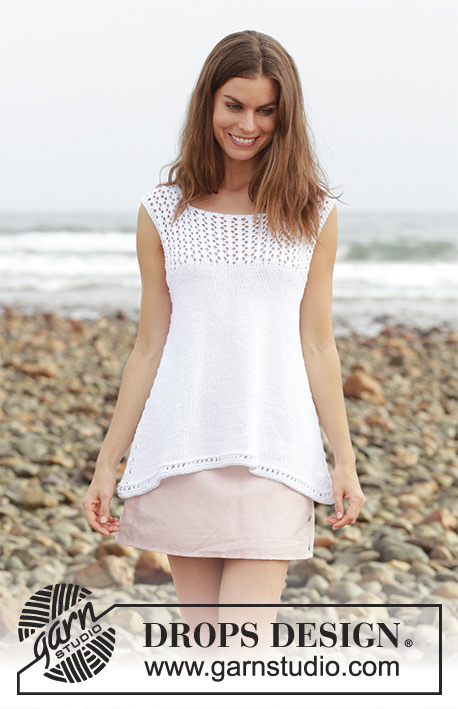
Top with lace pattern, worked top down. Size: S - XXXL Piece is knitted in DROPS Cotton Light.
DROPS 190-13 |
|||||||||||||||||||
|
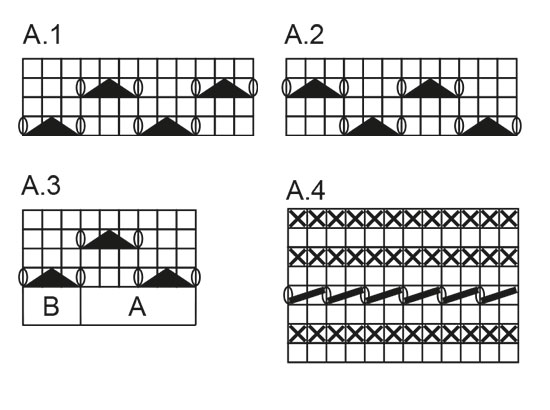
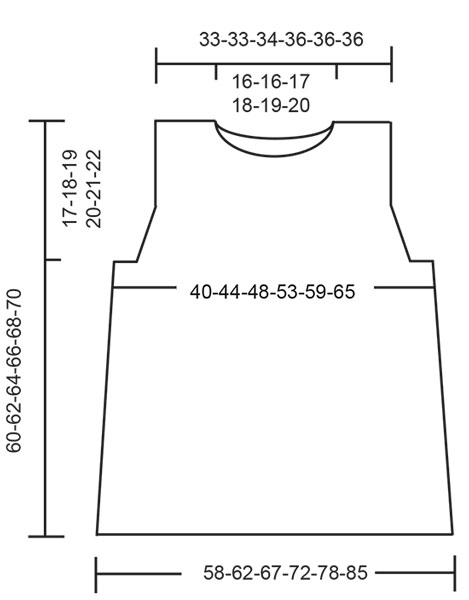
INFORMATION FOR PATTERN: GARTER STITCH (worked in the round): 1 ridge = 2 rounds. Knit 1 round and purl 1 round. GARTER STITCH (back and forth): 1 ridge = knit 2 rows. PATTERN: See diagrams A.1 to A.4. Diagrams show all rows in pattern seen from the right side. INCREASE TIP-1 (sides on front and back piece): Increase 1 stitch inside 3 stitches in garter stitch. Increase with 1 yarn over, on next row purl yarn over twisted to avoid holes. INCREASE TIP-2 (body): Increase on each side of marker thread + 1 stitch on each side. Increase with 1 yarn over, on next round knit yarn over, it should make a hole. ---------------------------------------------------------- TOP: Worked top down. Front and back piece is worked back and forth separately down to body. Then all stitches are slipped on the same circular needle. Then work in the round. BACK PIECE: LEFT SHOULDER: Cast on 18-18-18-18-18-18 stitches on circular needle size 4 mm / US 6 with Cotton Light. Work 1 ridge in GARTER STITCH - see explanation above, then work as follows - from right side: 3 stitches in garter stitch, A.1 (= 12 stitches), 3 stitches in garter stitch. Continue like this until piece measures 2 cm / ¾" and finish with 1 row from wrong side. Cut the yarn and put piece aside. RIGHT SHOULDER: Cast on and work as left shoulder but work A.2 instead of A.1. Work like this until piece measures 2 cm / ¾" and finish with 1 row from wrong side. Work 1 row from right side, cast on 33-33-35-37-39-41 new stitches, and work stitches from left shoulder back on needle = 69-69-71-73-75-77 stitches. Work as follows from wrong side: 3 stitches in garter stitch, A.2, 39-39-41-43-45-47 stitches in garter stitch, A.1, 3 stitches in garter stitch. Continue like this until 2 ridges have been worked over the middle 39-39-41-43-45-47 stitches. Work next row as follows from right side: 3 stitches in garter stitch, 0-0-1-2-0-1 stitch in stockinette stitch, A.3 A over the next 60-60-60-60-66-66 stitches, A.3 B (= 3 stitches),0-0-1-2-0-1 stitch in stockinette stitch, 3 stitches in garter stitch – NOTE! Make sure that A.3 fits over A.2 and A.1. When piece measures 14-12-11-11-9-8 cm / 5 ½"-4⅝"-4 ¼"-4 ¼"-3 ½"-3⅛" (measured from shoulder), increase 1 stitch inside 3 stitches in garter stitch in each side - READ INCREASE TIP-1. Increase 1 stitch in each side on every row from right side (= every other row) 5-9-11-13-17-20 times in total = 79-87-93-99-109-117 stitches, work the increased stitches in the side in A.3. When increases in the sides are done, put piece aside, finish after a row from wrong side, piece measures approx. 17-18-19-20-21-22 cm / 6¾"-7"-7½"-8"-8¼"-8¾" from shoulder. FRONT PIECE: LEFT SHOULDER: Cast on 18-18-18-18-18-18 stitches on needle size 4 mm / US 6 with Cotton Light. Work 1 ridge, then work as follows - from right side: 3 stitches in garter stitch, A.1 (= 12 stitches), 3 stitches in garter stitch. Continue like this until piece measures 6 cm / 2⅜" and finish with 1 row from wrong side. Cut the yarn and put piece aside. RIGHT SHOULDER: Cast on and work as left shoulder but work A.2 instead of A.1. Work like this until piece measures 6 cm / 2⅜" and finish with 1 row from wrong side. Work 1 row from right side, cast on 33-33-35-37-39-41 new stitches, and work stitches from left shoulder back on needle = 69-69-71-73-75-77 stitches. Work as follows from wrong side: 3 stitches in garter stitch, A.2, 39-39-41-43-45-47 stitches in garter stitch, A.1, 3 stitches in garter stitch. Continue like this until 2 ridges have been worked over the middle 39-39-41-43-45-47 stitches. Work next row as follows from right side: 3 stitches in garter stitch, 0-0-1-2-0-1 stitch in stockinette stitch, A.3 A over the next 60-60-60-60-66-66 stitches, A.3 B (= 3 stitches),0-0-1-2-0-1 stitch in stockinette stitch, 3 stitches in garter stitch – NOTE! Make sure that A.3 fits over A.2 and A.1. When piece measures 14-12-11-11-9-8 cm / 5 ½"-4⅝"-4 ¼"-4 ¼"-3 ½"-3⅛" (measured from shoulder), increase 1 stitch inside 3 stitches in garter stitch in each side - READ INCREASE TIP-1. Increase 1 stitch in each side on every row from right side (= every other row) 5-9-11-13-17-20 times in total = 79-87-93-99-109-117 stitches, work the increased stitches in the side in A.3. When increases in the sides are done, put piece aside, finish after a row from wrong side, piece measures approx. 17-18-19-20-21-22 cm / 6¾"-7"-7½"-8"-8¼"-8¾" from shoulder. Work next row from right side as follows: Work the 79-87-93-99-109-117 stitches from front piece, cast on 6-6-8-12-14-20 new stitches, work the 79-87-93-99-109-117 stitches from back piece and cast on 6-6-8-12-14-20 new stitches. BODY: = 170-186-202-222-246-274 stitches. NOW MEASURE THE PIECE FROM HERE! Insert 1 marker thread in each side, in the middle of the new stitches that were cast on. Work the next 3 rounds as follows: Continue with stockinette stitch, but work 2 ridges over the middle 12-12-14-18-20-26 stitches in each side (purl 1 round, knit 1 round, purl 1 round) for armholes. Continue working in stockinette stitch over all stitches. When piece measures 4 cm / 1½", increase 1 stitch on each side of each marker thread in the side (= 4 stitches increased) - READ INCREASE TIP-2, repeat increase every 6th round until piece measures 40-41-42-43-44-45 cm / 15¾"-16⅛"-16½"-17"-17¼"-17¾", there are approx. 244-262-280-302-328-358 stitches on needle. Work A.4 over all stitches and bind off. Piece measures approx. 60-62-64-66-68-70 cm / 23⅝"-24⅜"-25¼"-26"-26¾"-27½" from shoulder. ASSEMBLY: Sew the shoulder seams. |
|||||||||||||||||||
Diagram explanations |
|||||||||||||||||||
|
|||||||||||||||||||
 |
|||||||||||||||||||
 |
|||||||||||||||||||
Have you finished this pattern?Tag your pictures with #dropspattern #lovingsummertop or submit them to the #dropsfan gallery. Do you need help with this pattern?You'll find 24 tutorial videos, a Comments/Questions area and more by visiting the pattern on garnstudio.com. © 1982-2026 DROPS Design A/S. We reserve all rights. This document, including all its sub-sections, has copyrights. Read more about what you can do with our patterns at the bottom of each pattern on our site. |
|||||||||||||||||||


With over 40 years in knitting and crochet design, DROPS Design offers one of the most extensive collections of free patterns on the internet - translated to 17 languages. As of today we count 324 catalogs and 12290 patterns - 12280 of which are translated into English (US/in).
We work hard to bring you the best knitting and crochet have to offer, inspiration and advice as well as great quality yarns at incredible prices! Would you like to use our patterns for other than personal use? You can read what you are allowed to do in the Copyright text at the bottom of all our patterns. Happy crafting!
Post a comment to pattern DROPS 190-13
We would love to hear what you have to say about this pattern!
If you want to leave a question, please make sure you select the correct category in the form below, to speed up the answering process. Required fields are marked *.