
Looking for a yarn?


Comments / Questions (18)
![]() Pia wrote:
Pia wrote:
Hallo, Ich stricke das Modell 190-13 Loving Summer. In Rückenteil werden neben 3 kraus rechten Maschen zugenommen. Diese sollen in A.3 eingearbeitet werden. Damit verschiebt sich doch der Muster immer eine Masche, oder? Also wenn ich nach den 3 Randmaschen mit dem Muster anfange. Ist es korrekt? Und wenn die Zunahme vor A.3 gemacht wird, müsste ich 2 Umschläge auf ein Mal machen. Wie geht das? Danke für die Hilfe im voraus! LG, Pia
12.05.2023 - 13:36DROPS Design answered:
Liebe Pia, das Muster soll nicht verschoben werden, dh stricken Sie die neuen Maschen glatt rechts, bis genügend Maschen zugenommen werden um ein neues Lochmuster in der Breite zu stricken. Beachten Sie nur, daß das Lochmuster immer wie zuvor in der Höhe weitergestrickt wird. Viel Spaß beim stricken!
12.05.2023 - 14:44
![]() Gitte Røssel wrote:
Gitte Røssel wrote:
Hvilket hulmønster er der i siden på denne top? Jeg kan ikke se hulmønsteret i opskriften, men det er på billederne og jeg syntes at det giver et fint look.
26.05.2022 - 09:17DROPS Design answered:
Hej Gitte. Det är udtagningarna som skapar hulmønsteret, se UDTAGNINGSTIPS-2. Mvh DROPS Design
27.05.2022 - 10:14
![]() Lirenka wrote:
Lirenka wrote:
Witam serdecznie. Proszę o pomoc w zrozumieniu opisu. Chodzi o moment, gdy zaczynam dobierać oczka na dekolt (tył robótki). "Dalej przerabiać 1 rząd na prawej stronie robótki, nabrać....... itd." Ale w jaki sposób "przerabiać"? Dziergając wzór ażurowy, czy ściegiem francuskim (czyli oczka prawe), czy tak, jak się ukazują oczka (czyli dżersejem). W następnym rzędzie (czyli lewa strona robótki) mam dziergać wzór ażurowy? To nie jest pomyłka? Pozdrawiam.
03.03.2022 - 08:36DROPS Design answered:
Witaj Lirenko, oczka ramion przerabiasz na prawej stronie robótki ściegiem ażurowym jak wcześniej. Teraz przerabiać na lewej stronie robótki następująco: 3 oczka ściegiem francuskim, A.2, 39-39-41-43-45-47 oczek ściegiem francuskim, A.1, 3 oczka ściegiem francuskim. Dalej przerabiać tak samo, aż zostaną przerobione 2 ściągacze francuskie ponad 39-39-41-43-45-47 oczkami środkowymi. Pozdrawiamy!
03.03.2022 - 17:03
![]() Diane wrote:
Diane wrote:
Bonjour je suis encore en difficulté, pour le diagramme,A3A, on commence avec un jeté ou une maille endroit? Et, quand on est au A3B, faut-il faire 2 jetés de suite, 1 en finissant A3A et l’autre en commençant A3B? De plus, quand vous dites une maille jersey, est-ce une maille à l’endroit? Merci
23.03.2021 - 14:30DROPS Design answered:
Bonjour Diane, au 1er rang de A.3A, on a: *1 jeté, glisser 1 m à l'end, 2 m ens à l'end, passer la m glissée par-dessus la m tricotée, 1 jeté, 3 m end* (= 6 mailles pour chaque A.3A), répétez de *-* et tricotez A.3B ainsi: 1 jeté, glisser 1 m à l'end, 2 m ens à l'end, passer la m glissée par-dessus la m tricotée, 1 jeté (= 3 m pour A.3B). 1 m jersey se tricote à l'endroit sur l'endroit (et à l'envers sur l'envers). Bon tricot!
23.03.2021 - 15:31
![]() Diane wrote:
Diane wrote:
Bonjour, j’ai besoin d’aide! Après avoir réuni l’épaule gauche et la droite, j’ai monté les 41 mailles, j’ai tricoté sur l’envers le diagramme A2 et A1, sur 4 rangs c.à d. 2 côtes mousse au-dessus des 47 mailles, donc j’ai fini sur l’endroit! Le patron indique de « tricoter ensuite le rang suivant sur l’endroit: 3 mailles au point mousse 1 maille jersey, A3 au-dessus des 66 mailles suivantes, sauf que je suis sur l’envers! Où fais-je erreur? Merci
21.03.2021 - 20:58DROPS Design answered:
Bonjour Diane, tricotez encore 1 rang sur l'envers et tricotez ensuite le rang suivant avec A.3 comme indiqué. Bon tricot!
22.03.2021 - 09:37
![]() Dyane wrote:
Dyane wrote:
Bonjour, j’ai besoin d’aide! Après avoir réuni l’épaule gauche et la droite, j’ai monté les 41 mailles, j’ai tricoté sur l’envers le diagramme A2 et A1, sur 4 rangs c.à d. 2 côtes mousse au-dessus des 47 mailles, donc j’ai fini sur l’endroit! Le patron indique de « tricoter ensuite le rang suivant sur l’endroit: 3 mailles au point mousse 1 maille jersey, A3 au-dessus des 66 mailles suivantes, sauf que je suis sur l’envers! Où fais-je erreur? Merci
21.03.2021 - 15:45
![]() Diane wrote:
Diane wrote:
Bonjour, après avoir monté 41 mailles et réuni l’épaule gauche, j’ai monté les 41 mailles), j’ai tricoté sur l’envers le diagramme A2 et A1, sur 4 rangs c.à d. 2 côtes mousse au-dessus des 47 mailles, donc j’ai fini sur l’endroit! Le patron indique de « tricoter ensuite le rang suivant sur l’endroit: 3 mailles au point mousse 1 maille jersey, A3 au-dessus des 66 mailles suivantes, sauf que je suis sur l’envers! Où fais-je erreur? Merci
20.03.2021 - 20:48
![]() Diane wrote:
Diane wrote:
Merci pour vos beaux patrons et vos bons conseils, dommage que les réponses ne puissent pas être traduites (en français), elles seraient vraiment utiles et me donneraient de la confiance pour entreprendre cet ouvrage! Bonne continuité!
14.03.2021 - 20:30DROPS Design answered:
Bonjour Diane et merci. Lisez attentivement les explications, consultez les vidéos et les leçons si besoin, et, si vous avez une question, n'hésitez pas à utiliser cet espace. Bon tricot!
15.03.2021 - 09:17
![]() Tanja wrote:
Tanja wrote:
Ich verstehe nicht, wie A3 genau über A2 und A1 passen soll, wenn ich nach den 3 krausen Maschen noch 2 glatt rechte Maschen stricken muss. Da hat das Muster doch automatisch einen Versatz? (Größe L)
16.08.2020 - 21:40DROPS Design answered:
Liebe Tanja, schauen Sie mal die letzte Reihe die Sie mit A.2/A.1 gestrickt haben, wenn diese Reihe die 2. Reihe ist, dann beginnen Sie A.3 mit 3. Reihe (und dann, wenn A.3 fertig ist, von 1. bis 4. Reihe wiederholen) - wenn die letzte Reihe in A.1/A.2 die 4. Reihe war, dann stricken Sie A.3 von der 1. Reihe. Das Muster soll sich einfach übereinander passen. Viel Spaß beim stricken!
17.08.2020 - 09:05
![]() Annie wrote:
Annie wrote:
Hi. I am a bit confused with the joining of the shoulders. Do I work the last row of the shoulders on the wrong side and then cast on and join on the right side, or do i finish right side and then cast on and join on the wrong side? I ended up with a bit of mess and A2 working over A1 Thanks!
29.07.2020 - 12:59DROPS Design answered:
Dear Annie, last row on left shoulder, back piece will be worked from WS. Work then right shoulder the same way (= last row from WS), then work next row from RS right shoulder, cast on new sts for neck, sts from left shoulder the work next row from WS as before with A.2 over A.2, the new sts in garter st, A.1 over A.1and 3 sts in garter st on each side; from RS work: 3 sts in garter st, A.1 as before, garter st, A.2 as before, 3 sts in garter st. Happy knitting!
29.07.2020 - 13:28
|
|||||||||||||||||||
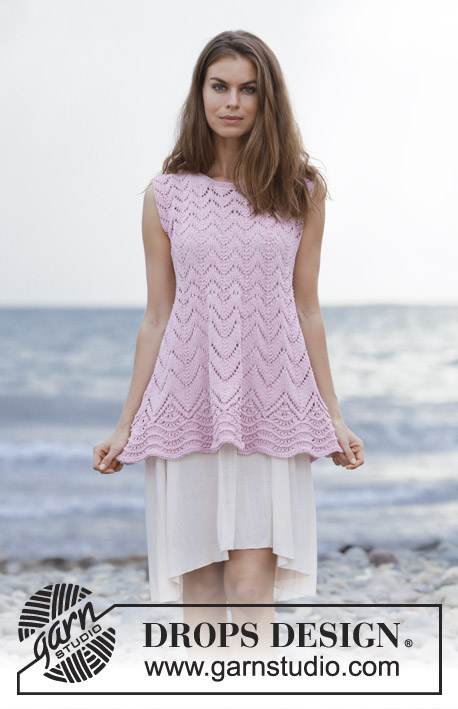
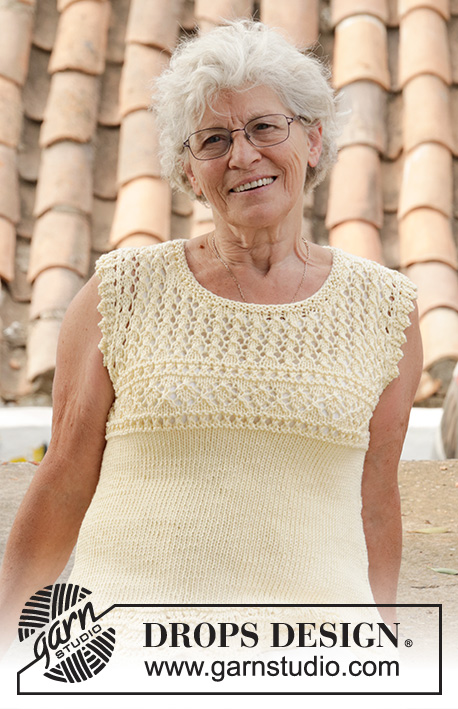
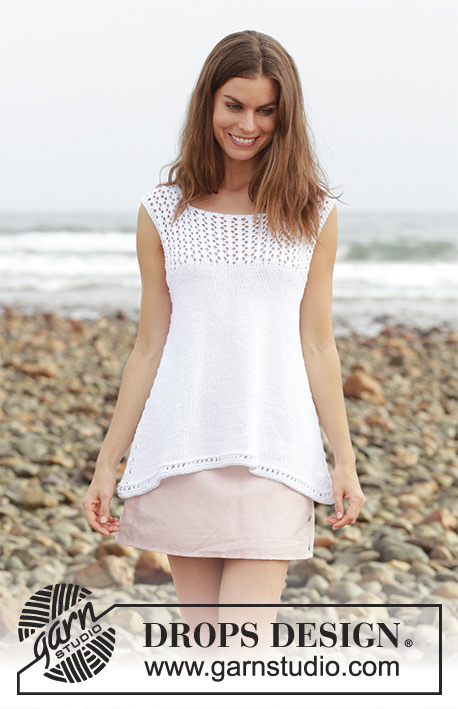
Loving Summer#lovingsummertop |
|||||||||||||||||||
 |
 |
||||||||||||||||||
Top with lace pattern, worked top down. Size: S - XXXL Piece is knitted in DROPS Cotton Light.
DROPS 190-13 |
|||||||||||||||||||
|
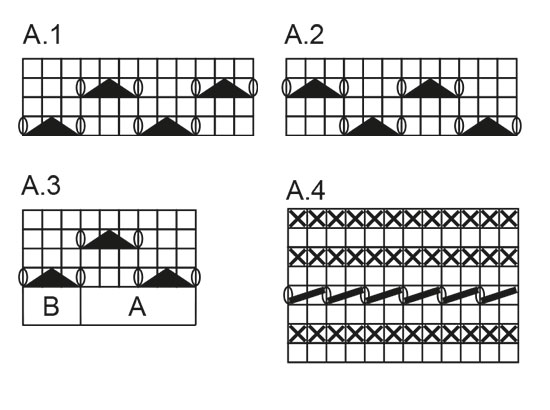
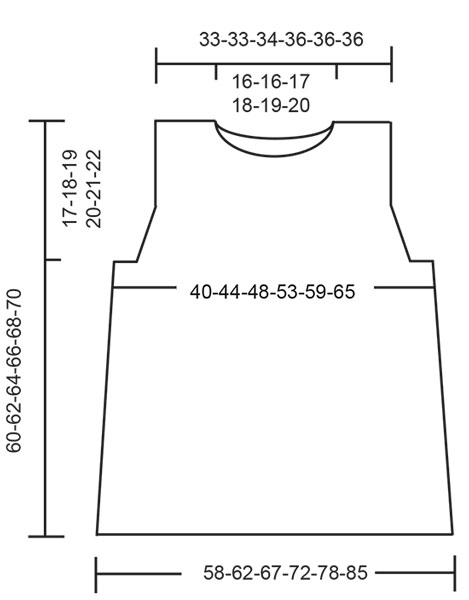
INFORMATION FOR PATTERN: GARTER STITCH (worked in the round): 1 ridge = 2 rounds. Knit 1 round and purl 1 round. GARTER STITCH (back and forth): 1 ridge = knit 2 rows. PATTERN: See diagrams A.1 to A.4. Diagrams show all rows in pattern seen from the right side. INCREASE TIP-1 (sides on front and back piece): Increase 1 stitch inside 3 stitches in garter stitch. Increase with 1 yarn over, on next row purl yarn over twisted to avoid holes. INCREASE TIP-2 (body): Increase on each side of marker thread + 1 stitch on each side. Increase with 1 yarn over, on next round knit yarn over, it should make a hole. ---------------------------------------------------------- TOP: Worked top down. Front and back piece is worked back and forth separately down to body. Then all stitches are slipped on the same circular needle. Then work in the round. BACK PIECE: LEFT SHOULDER: Cast on 18-18-18-18-18-18 stitches on circular needle size 4 mm / US 6 with Cotton Light. Work 1 ridge in GARTER STITCH - see explanation above, then work as follows - from right side: 3 stitches in garter stitch, A.1 (= 12 stitches), 3 stitches in garter stitch. Continue like this until piece measures 2 cm / ¾" and finish with 1 row from wrong side. Cut the yarn and put piece aside. RIGHT SHOULDER: Cast on and work as left shoulder but work A.2 instead of A.1. Work like this until piece measures 2 cm / ¾" and finish with 1 row from wrong side. Work 1 row from right side, cast on 33-33-35-37-39-41 new stitches, and work stitches from left shoulder back on needle = 69-69-71-73-75-77 stitches. Work as follows from wrong side: 3 stitches in garter stitch, A.2, 39-39-41-43-45-47 stitches in garter stitch, A.1, 3 stitches in garter stitch. Continue like this until 2 ridges have been worked over the middle 39-39-41-43-45-47 stitches. Work next row as follows from right side: 3 stitches in garter stitch, 0-0-1-2-0-1 stitch in stockinette stitch, A.3 A over the next 60-60-60-60-66-66 stitches, A.3 B (= 3 stitches),0-0-1-2-0-1 stitch in stockinette stitch, 3 stitches in garter stitch – NOTE! Make sure that A.3 fits over A.2 and A.1. When piece measures 14-12-11-11-9-8 cm / 5 ½"-4⅝"-4 ¼"-4 ¼"-3 ½"-3⅛" (measured from shoulder), increase 1 stitch inside 3 stitches in garter stitch in each side - READ INCREASE TIP-1. Increase 1 stitch in each side on every row from right side (= every other row) 5-9-11-13-17-20 times in total = 79-87-93-99-109-117 stitches, work the increased stitches in the side in A.3. When increases in the sides are done, put piece aside, finish after a row from wrong side, piece measures approx. 17-18-19-20-21-22 cm / 6¾"-7"-7½"-8"-8¼"-8¾" from shoulder. FRONT PIECE: LEFT SHOULDER: Cast on 18-18-18-18-18-18 stitches on needle size 4 mm / US 6 with Cotton Light. Work 1 ridge, then work as follows - from right side: 3 stitches in garter stitch, A.1 (= 12 stitches), 3 stitches in garter stitch. Continue like this until piece measures 6 cm / 2⅜" and finish with 1 row from wrong side. Cut the yarn and put piece aside. RIGHT SHOULDER: Cast on and work as left shoulder but work A.2 instead of A.1. Work like this until piece measures 6 cm / 2⅜" and finish with 1 row from wrong side. Work 1 row from right side, cast on 33-33-35-37-39-41 new stitches, and work stitches from left shoulder back on needle = 69-69-71-73-75-77 stitches. Work as follows from wrong side: 3 stitches in garter stitch, A.2, 39-39-41-43-45-47 stitches in garter stitch, A.1, 3 stitches in garter stitch. Continue like this until 2 ridges have been worked over the middle 39-39-41-43-45-47 stitches. Work next row as follows from right side: 3 stitches in garter stitch, 0-0-1-2-0-1 stitch in stockinette stitch, A.3 A over the next 60-60-60-60-66-66 stitches, A.3 B (= 3 stitches),0-0-1-2-0-1 stitch in stockinette stitch, 3 stitches in garter stitch – NOTE! Make sure that A.3 fits over A.2 and A.1. When piece measures 14-12-11-11-9-8 cm / 5 ½"-4⅝"-4 ¼"-4 ¼"-3 ½"-3⅛" (measured from shoulder), increase 1 stitch inside 3 stitches in garter stitch in each side - READ INCREASE TIP-1. Increase 1 stitch in each side on every row from right side (= every other row) 5-9-11-13-17-20 times in total = 79-87-93-99-109-117 stitches, work the increased stitches in the side in A.3. When increases in the sides are done, put piece aside, finish after a row from wrong side, piece measures approx. 17-18-19-20-21-22 cm / 6¾"-7"-7½"-8"-8¼"-8¾" from shoulder. Work next row from right side as follows: Work the 79-87-93-99-109-117 stitches from front piece, cast on 6-6-8-12-14-20 new stitches, work the 79-87-93-99-109-117 stitches from back piece and cast on 6-6-8-12-14-20 new stitches. BODY: = 170-186-202-222-246-274 stitches. NOW MEASURE THE PIECE FROM HERE! Insert 1 marker thread in each side, in the middle of the new stitches that were cast on. Work the next 3 rounds as follows: Continue with stockinette stitch, but work 2 ridges over the middle 12-12-14-18-20-26 stitches in each side (purl 1 round, knit 1 round, purl 1 round) for armholes. Continue working in stockinette stitch over all stitches. When piece measures 4 cm / 1½", increase 1 stitch on each side of each marker thread in the side (= 4 stitches increased) - READ INCREASE TIP-2, repeat increase every 6th round until piece measures 40-41-42-43-44-45 cm / 15¾"-16⅛"-16½"-17"-17¼"-17¾", there are approx. 244-262-280-302-328-358 stitches on needle. Work A.4 over all stitches and bind off. Piece measures approx. 60-62-64-66-68-70 cm / 23⅝"-24⅜"-25¼"-26"-26¾"-27½" from shoulder. ASSEMBLY: Sew the shoulder seams. |
|||||||||||||||||||
Diagram explanations |
|||||||||||||||||||
|
|||||||||||||||||||
|
|||||||||||||||||||
|
|||||||||||||||||||
Have you finished this pattern?Tag your pictures with #dropspattern #lovingsummertop or submit them to the #dropsfan gallery. Do you need help with this pattern?You'll find 25 tutorial videos, a Comments/Questions area and more by visiting the pattern on garnstudio.com. © 1982-2025 DROPS Design A/S. We reserve all rights. This document, including all its sub-sections, has copyrights. Read more about what you can do with our patterns at the bottom of each pattern on our site. |
|||||||||||||||||||


With over 40 years in knitting and crochet design, DROPS Design offers one of the most extensive collections of free patterns on the internet - translated to 17 languages. As of today we count 314 catalogs and 11821 patterns - 11811 of which are translated into English (US/in).
We work hard to bring you the best knitting and crochet have to offer, inspiration and advice as well as great quality yarns at incredible prices! Would you like to use our patterns for other than personal use? You can read what you are allowed to do in the Copyright text at the bottom of all our patterns. Happy crafting!
Post a comment to pattern DROPS 190-13
We would love to hear what you have to say about this pattern!
If you want to leave a question, please make sure you select the correct category in the form below, to speed up the answering process. Required fields are marked *.