
Popular categories
Looking for a yarn?


Comments / Questions (35)
![]() Annicka wrote:
Annicka wrote:
Går det bra att visa mönster just för puls värmare
23.11.2025 - 18:58DROPS Design answered:
Hei Annicka. Om du leser oppskriften vil du se at pulshanskene er skrevet for seg selv, både garnmengde, str. og pinne str / strikkefasthet står øverst og om du scroller deg lengre ned står selve oppskriften på pulshansker for seg selv. mvh DROPS Design
24.11.2025 - 14:03
![]() Kati wrote:
Kati wrote:
En ollenkaan ymmärrä miten myssyn kavennus tulisi tehdä. Saisiko tähän selkeät ohjeet.
27.10.2025 - 12:13DROPS Design answered:
Kavenna jokaisen merkkilangan kohdalla näin: Neulo merkkilankaan asti, neulo sitten 2 silmukkaa nurin yhteen. Tee tällaiset kavennukset joka 2. kerroksella yhteensä 9 kertaa.
27.10.2025 - 16:17
![]() Eva wrote:
Eva wrote:
Las instrucciones del patrón del gorro no están bien explicadas una vez se empiezan con las disminuciones. He tenido que abandonar el proyecto.
22.09.2025 - 10:22
![]() Birgit wrote:
Birgit wrote:
Kann ich für dieses Modell auch drops air nehmen?
18.09.2025 - 09:09DROPS Design answered:
Hi Birgit, yes you can, DROPS Air is from the same Yarn Group. Happy knitting!
18.09.2025 - 21:57
![]() Eva wrote:
Eva wrote:
Estoy con las disminuciones del gorro, en la primera vuelta de las disminuciones si tejo 2 ptos juntos del revés luego como sigo con A1? Queda totalmente descuadrado Lo siento pero no lo entiendo, veo que más personas han preguntado lo mismo y la respuesta no aclara nada en absoluto.
16.09.2025 - 23:19
![]() Rosy wrote:
Rosy wrote:
Bonjour, je tricote le tour de cou, mais au niveau des bords en points mousse, cela rebique vers l'intérieur... Je crains que même en repassant pour bloquer, cela recommence à rebiquer. Comment faire pour éviter cela ? Merci d'avance.
08.09.2025 - 18:10DROPS Design answered:
Bonjour Rosy, vous pouvez simplement bloquer votre ouvrage à la fin en l'humidifiant et en le faisant sécher bien à plat, les bordures ne devraient plus s'enrouler. Le fer à repasser n'est pas toujours la solution en fonction de la laine et du point utilisé. Votre magasin aura peut-être une autre astuce à vous partager, même par mail ou téléphone, n'hésitez pas à les contacter. Bon tricot!
11.09.2025 - 11:34
![]() Denise wrote:
Denise wrote:
Buongiorno, È il primo modello che eseguo sul vostro sito, ma ho intenzione di farne molti altri. Il problema è che non riesco a seguire lo schema. Forse perché sono mancina, ma non mi viene proprio. Dall'immagine del cappellino, il motivo sembra essere reversibile, ma a me il viene un disegno sul rovescio. Dallo schema sembrano 1 maglia a maglia rasata dritta, 1 a rasata rovescio e una a punto riso, perciò reversibile, ma non mi viene per niente così. Quindi, come lo leggo da mancina?
19.08.2025 - 07:56DROPS Design answered:
Buonasera Denise, il cappellino è lavorato in tondo. Deve leggere il diagramma dal basso verso l'alto e da destra verso sinistra, come se stesse sempre lavorando sul diritto del lavoro. Buon lavoro!
19.08.2025 - 18:03
![]() Anne G wrote:
Anne G wrote:
Dear Drops team, I don\'t understand how to decrease: in row pkk, after the p2tog, what should I knit? k, kk or start anew the pkk sequence? I read other comments and many have asked the same without a clear response. It may be useful to add the scheme with the decrease to the pattern. Thank you for your understanding and help.
10.03.2025 - 12:12DROPS Design answered:
Dear Anne G, after the row with decreases just work the stitches as before to avoid breaking the pattern, so when you purl together the first 2 stitches after marker = the first 2 sts in A.1 then just knit the next stitch = 3rd stitch of A.1; make sure the rib will continue exactly as before, adjusting the new stitch after each decrease in height, making sure rib will still be lined up. Happy knitting!
10.03.2025 - 13:13
![]() Eva wrote:
Eva wrote:
Buongiorno, sto avendo difficoltà nelle diminuzioni del cappello. Ho messo i segnapunti e sono nella riga RDD nello schema A1. Dopo il segnapunto, lavoro due maglie insieme a rovescio (che vale come rovescio nello schema), poi proseguo con 2 D o con 1 D solo? E al giro RRD successivo, la diminuzione corrisponde al primo R, poi seguo sempre con R e D o diversamente? Adoro i vostri schemi, ma faccio molta fatica in alcuni punti! Grazie molte
07.03.2025 - 17:22DROPS Design answered:
Buongiorno Eva, può proseguire come indicato dallo schema e guardando le maglie sotto. Buon lavoro!
08.03.2025 - 11:39
![]() Linda Déraspe wrote:
Linda Déraspe wrote:
J'essaie de tricoter le bonnet et mon premier rang est à l'endroit donc lorsque je commence le premier rang du patron de fantaisie A.1 mes mailles devraient être 1 m. envers, 1 m. endroit, 1 m. endroit. Est-ce bien cela? 2ème question: Lorsque j'ai terminé le premier patron A.1 , je recommence à nouveau le patron mais les mailles du premier rang ne sont pas les mêmes qu'au premier tour c`est plutôt : 1 m. envers, 1 m. envers, 1 m. endroit. Est-ce bien ça ?
01.02.2025 - 02:05DROPS Design answered:
Bonjour Mme Déraspe, quand vous tricotez A.1 en rond, répétez ces 2 rangs ainsi: 1er rang (1 malles envers, 2 mailles endroit), répétez de (à) tout le tour. 2ème rang: (2 mailles envers, 1 maille endroit), répétez de (à) tout le tour. Vous avez ainsi des côtes (1 m envers, 1 m point mousse, 1 m jersey endroit). Répétez ces 2 rangs. Bon tricot!
03.02.2025 - 11:04
|
|||||||
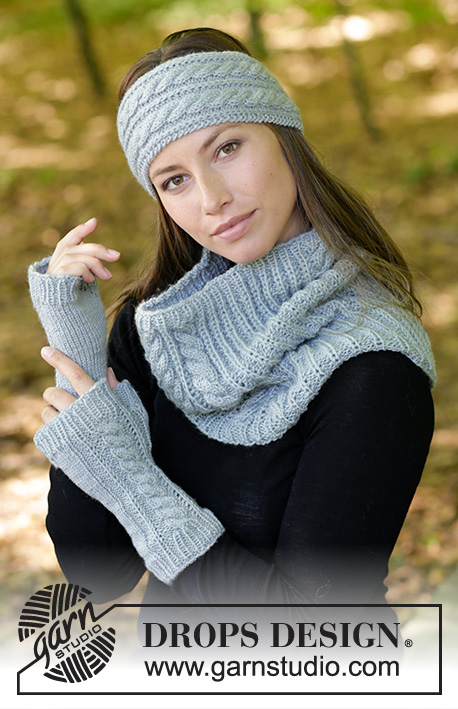
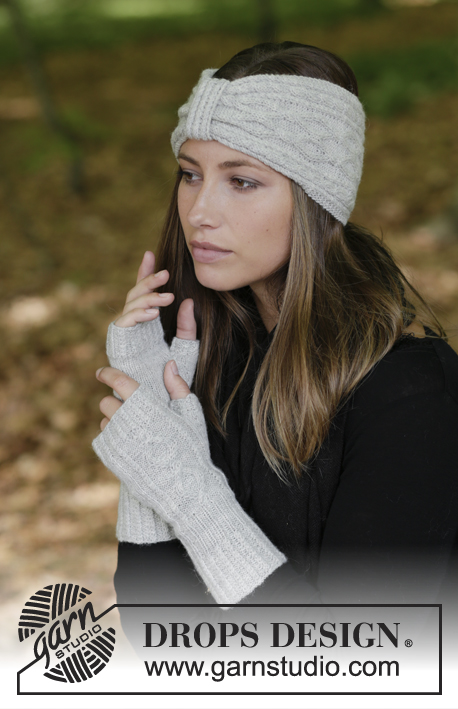
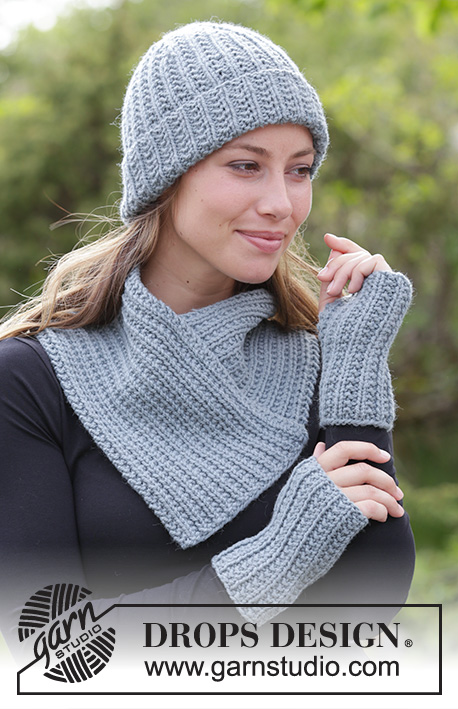
Warm Snap#warmsnapset |
|||||||
 |
 |
||||||
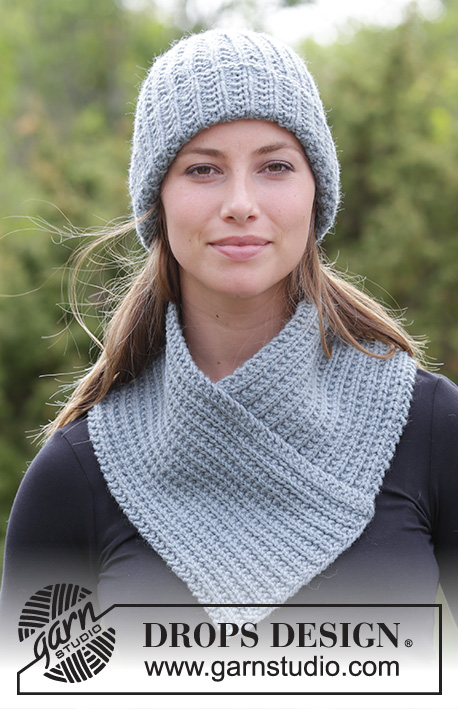
The set consists of: Knitted hat/hipster hat, neck warmer and wrist warmers with textured pattern. The set is knitted in DROPS Nepal.
DROPS 182-17 |
|||||||
|
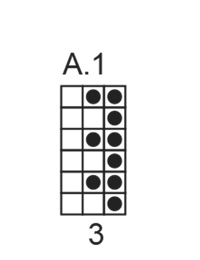
INFORMATION FOR THE PATTERN: RIDGE/GARTER STITCH (worked back and forth): 1 ridge = Knit 2 rows. PATTERN: See diagram A.1. The diagram shows all the rows in the pattern seen from the right side. ---------------------------------------------------------- HAT: The piece is worked in the round with circular needle. Change to double pointed needles when necessary. Cast on 84 stitches with circular needle size 5 mm / US 8 and Nepal. Work PATTERN according to diagram A.1 in the round (= 28 repeats of 3 stitches). REMEMBER THE GAUGE! When the piece measures 20 cm / 8" insert 7 marker threads in the piece as follows: The first marker thread is inserted after the first 3 stitches on the round (i.e. after 1 knitted stitch), then insert the next 6 with 12 stitches between each. When the last marker thread has been inserted, there are 9 stitches left on the round. Now start the decreases. Continue A.1 upwards, but on the first round, decrease 1 stitch after each marker thread by purling 2 stitches together (= 7 stitches decreased). Decrease in this way every 2nd round a total of 9 times = 21 stitches left. Work 1 round without decreases. On the next round knit all stitches twisted together, two and two = 11 stitches left. Cut the strand, pull it through the remaining stitches, tighten and fasten well. The hat measures approx. 29 cm / 11⅜" from the top down. Turn up an edge of approx. 5-6 cm / 2"-2⅜" at the bottom of the hat. ---------------------------------------------------------- NECK WARMER: The piece is worked back and forth on the needle and is sewn together at the end. Cast on 35 stitches with needle size 5 mm / US 8 and Nepal. Work 1 RIDGE – see description above. Work pattern from the right side as follows: 2 edge stitches in garter stitch, knit 1, work PATTERN according to diagram A.1 (= 10 repeats of 3 stitches), 2 edge stitches in garter stitch. REMEMBER THE GAUGE! When the piece measures 21 cm / 8¼" insert a marker at the beginning of the next row from the right side (= marker for assembly). When the piece measures 89 cm / 35" work 1 ridge over all stitches. Bind off. To avoid getting a tight bind-off edge, you can use a larger needle size or make a yarn over after approx. every 4th stitch, which is then bind off. ASSEMBLY: Sew the bind-off edge to the one long-side (between the cast-on edge and the marker inserted after 21 cm / 8¼"). Sew inside the bind-off edge and in the outermost stitch along the edge so that the seam is not thick. Cut and fasten the strand. ---------------------------------------------------------- WRIST WARMERS: The piece is worked back and forth on the needle and is sewn together at the end. Cast on 32-35 stitches with needle size 5 mm / US 8 and Nepal. Work pattern from the right side as follows: 2 edge stitches in GARTER STITCH - see description above, knit 1, work PATTERN according to diagram A.1 (= 9-10 repeats of 3 stitches), 2 edge stitches in garter stitch. Continue the pattern back and forth in this way. REMEMBER THE GAUGE! When the piece measures 16-17 cm / 6¼"-6¾" bind off. To avoid getting a tight bind-off edge you can use a larger needle or make a yarn over after approx. every 4th stitch which is then bind off. Cut and fasten the strand. ASSEMBLY: Sew together the sides of the wrist warmer as follows: Sew in the outermost loop of the outermost stitch, in every stitch upwards so that the seam is not thick: Start at the bottom of the wrist warmer and sew the seam 9-10 cm / 4" upwards, Cut and fasten the strand. Skip 5 cm / 2" (= hole for the thumb) and sew the last 2 cm / ¾" together. Work 1 more wrist warmer in the same way. |
|||||||
Diagram explanations |
|||||||
|
|||||||
 |
|||||||
Have you finished this pattern?Tag your pictures with #dropspattern #warmsnapset or submit them to the #dropsfan gallery. Do you need help with this pattern?You'll find 18 tutorial videos, a Comments/Questions area and more by visiting the pattern on garnstudio.com. © 1982-2026 DROPS Design A/S. We reserve all rights. This document, including all its sub-sections, has copyrights. Read more about what you can do with our patterns at the bottom of each pattern on our site. |
|||||||


With over 40 years in knitting and crochet design, DROPS Design offers one of the most extensive collections of free patterns on the internet - translated to 17 languages. As of today we count 324 catalogs and 12290 patterns - 12280 of which are translated into English (US/in).
We work hard to bring you the best knitting and crochet have to offer, inspiration and advice as well as great quality yarns at incredible prices! Would you like to use our patterns for other than personal use? You can read what you are allowed to do in the Copyright text at the bottom of all our patterns. Happy crafting!
Post a comment to pattern DROPS 182-17
We would love to hear what you have to say about this pattern!
If you want to leave a question, please make sure you select the correct category in the form below, to speed up the answering process. Required fields are marked *.