
Popular categories
Looking for a yarn?


Comments / Questions (49)
![]() Chantal wrote:
Chantal wrote:
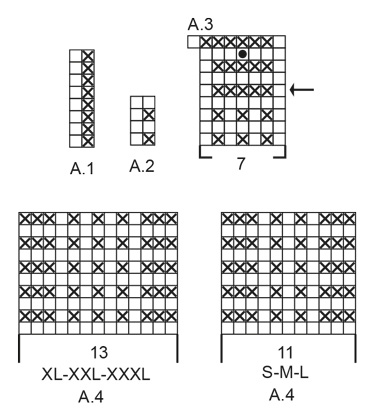
Bonjour Il me semble bizarre que le rang avec flèche de A3 soit tricoté sur l'envers puisque le rang précédent (tricoté selon A2) est sur l'envers. A2 : sur l'endroit, j'alterne mailles endroit et envers. sur l'envers je tricote toutes les mailles à l'envers. Est-ce une erreur ? ou je n'ai pas bien compris ?
09.06.2022 - 10:02DROPS Design answered:
Bonjour Chantal, effectivement, une note a été envoyée à nos stylistes, j'ajusterai A.3 comme il faut pour retomber juste (= pour que les 1ers rangs de A.3 sous la flèche correspondent à A.2), en attendant un retour. Merci d'avance, bonne continuation!
09.06.2022 - 13:23
![]() María Fernanda Yáñez wrote:
María Fernanda Yáñez wrote:
Hola! Para la talla M, los 95 puntos de A2 no encajan con el sentido de los 7 puntos centrales de A3 (para que encajen tendría que tener 43 puntos a un lado y 45 en el otro). Hago el comentario para saber si es que hay un error en el patrón. Gracias por la respuesta.
15.03.2022 - 05:30
![]() Irene Simeone wrote:
Irene Simeone wrote:
Buongiorno, un'altra domanda. Quando si deve iniziare il diagramma A.3, le istruzioni dicono di iniziare dalla riga indicata dalla freccia su un ferro sul rovescio del lavoro. Questo significa che le 7 maglie centrali devono essere lavorati così: 1 dir, 5 rov, 1 dir? Grazie ancora. Irene
03.03.2022 - 15:43DROPS Design answered:
Buonasera Irene, dal rovescio del lavoro deve lavorare come indicato nella legenda e cioè 1 maglia rovescio, 5 maglie diritto e 1 maglia rovescio. Buon lavoro!
05.03.2022 - 22:09
![]() Irene Simeone wrote:
Irene Simeone wrote:
Buongiorno, sto seguendo le istruzioni ma sono un po' confusa :( il davanti del lavoro è quello in cui si vedono le coste oppure quello in cui ci sono una specie di nodini? spero riusciate a capire cosa intendo. Grazie mille! Irene
03.03.2022 - 15:24DROPS Design answered:
Buonasera Irene, il davanti del lavoro è quello in cui inizia a lavorare a coste sul dietro. Buon lavoro!
04.03.2022 - 17:46
![]() Stella wrote:
Stella wrote:
When it says to work 4 rows over 10 garter stitches, does is mean 4 rows with the 10 garter stitches or the 10 garter stitches with 4 rows of A2 over it?
03.01.2022 - 21:52DROPS Design answered:
Dear Stella, this means you work the next 4 rows with the 10 sts in garter stitch instead of pattern and the remaining stitches as before. Happy knitting!
04.01.2022 - 07:26
![]() Angela Beaty wrote:
Angela Beaty wrote:
In the Back Piece section, work from arrow in A.3 over the middle 7 stitches on row, Is this actually in the middle of the 96 stitches? So you skip the first 4 rows and just do the arrow row? Then work A.3 over the first 48 stitches do you start from the bottom of the diagram or from the arrow?
19.08.2021 - 10:21DROPS Design answered:
Dear Angela, when you work from the arrow, yes, you're working over the middle 7 stitches of the 96 stitches and you skip the first 4 rows and start from the arrow row. In the rest of the stitches, you work A.2. After finishing A.3, in the next row, there is a split for the opening. The rows under the arrow are actually from A.2 and are there just to give a context or to make it continuous visually.
30.08.2021 - 19:26
![]() Katzilicious wrote:
Katzilicious wrote:
I'm still confused, can you explain "work from arrow in A.3 over the middle 7 stitches on row - adjust so that this row marked with arrow is worked from wrong side. On first row from right side after A.3 work over the first 44-48-52-57-63-70 stitches on row and slip the remaining 44-48-52-57-63-70 stitches on 1 stitch holder"? So how do I read the chart? From the right bottom? And when i work from arrow A.3 do i start with RS or WS? Thank you
18.05.2021 - 12:06DROPS Design answered:
Dear Katzilicious, you read the diagram from right to left and from bottom up, from the right side. Here you have a lesson on how to read a diagram: https://www.garnstudio.com/lesson.php?id=68&cid=19 A.3 begins from the wrong side. Work 5 rows of A.3, which is in the center of the front or the back. The next step is to separate this part into two. You work one part with the V-neck and then you work the second part from the stitch holder. Happy knitting!
07.08.2021 - 11:30
![]() Jessica wrote:
Jessica wrote:
Hi again! Thanks for the help, it clears things up, but I’m still not sure what I should be doing when I switch to the A.3 chart. It says the row marked by the arrow should be worked from the WS, but to do that, I’d have to work the row below from the RS, meaning I’d be doing a row of knitting. But the A.2 pattern states that for RS rows I should P1 K1. I’m not sure how these two charts fit together. Any help would be great.
07.05.2021 - 13:32
![]() Jessica wrote:
Jessica wrote:
Hi! I’m a little confused about what to do once I’ve done the first 8 rows in A.1. I’m finishing on the WS so starting A.2 on the RS with a P1 K1 and 3 garter stitches at each end, then on the WS purling all stitches, but from previous comments that doesn’t seem to be the correct pattern, and after I got to switching to A.3, doing the row indicated by the arrow on the WS indicates that the previous RS row should be all knitted, not P1 K1 as I have done. Any help would be appreciated.
07.05.2021 - 11:22DROPS Design answered:
Dear Jessica, the garter stitches in A.2 (= P from RS, P from WS) should be worked over the P stitches in A.1, so that you will work A.2 from RS: 3 sts in garter st, K1, (P1, K1) repeat from (to) and finish with 3 sts in garter stitch and from WS: K3, P to the last 3 sts, P3. Happy knitting!
07.05.2021 - 13:00
![]() Katzilicious wrote:
Katzilicious wrote:
I'm confuse about worked A.1 until it had been vertically worked and work A.2 over A.1 can you please explain? Thank you
06.05.2021 - 07:39DROPS Design answered:
Dear Katzilicious, work first the 8 rows in A.1 as explained: (from RS = 3 sts in garter stitch, knit 1, repeat A.1 (read from the right towards the left= P1, K1), 3 sts in garter st / from WS: 3 sts in garter st, A.1 (read from the left towards the right = P1, K1), P1, 3 sts in garter st). Then work: 3 sts in garter st, knit 1, repeat A.2 (= 1 st in garter st, 1 st in stocking st), and finish with 3 sts in garter st, from WS: 3 sts in garter st, repeat A.1 (=1 st in stocking st = P, 1 st in garter st = K), P1, 3 sts in garter st. Hope this help. Happy knitting!
06.05.2021 - 07:45
|
|||||||||||||
Mazo#mazotop |
|||||||||||||
 |
 |
||||||||||||
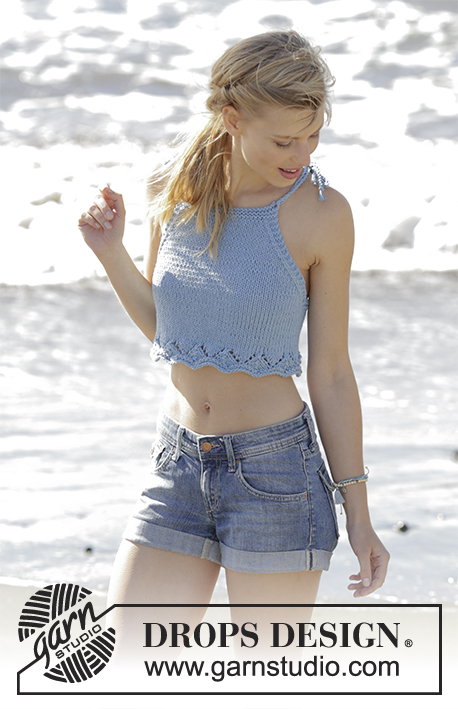
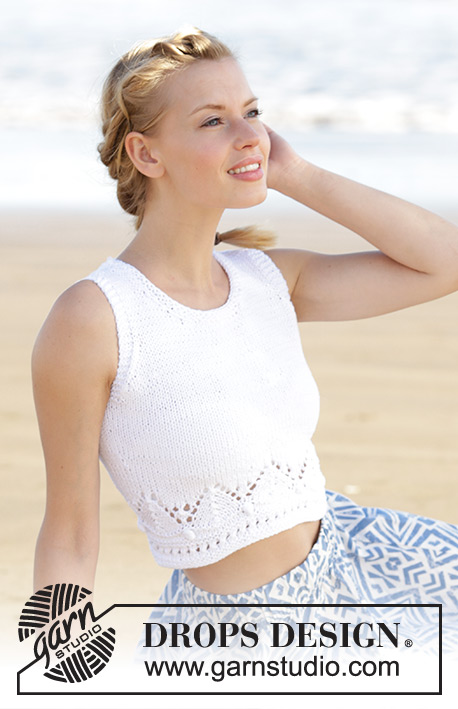
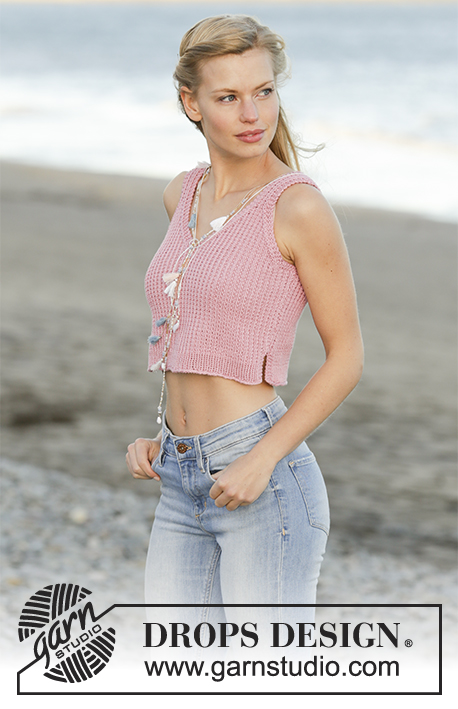
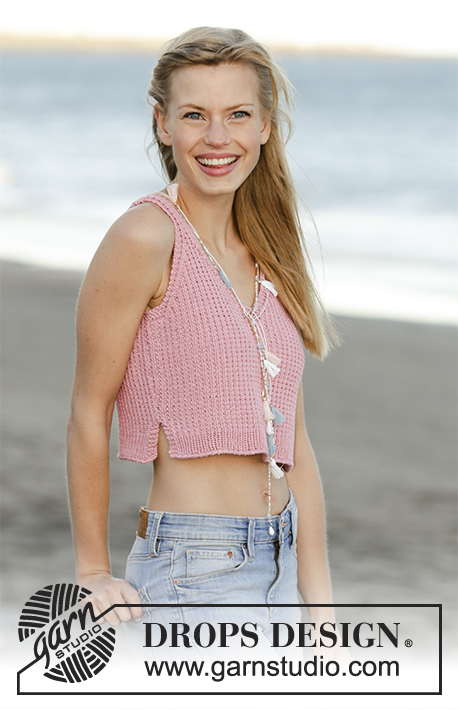
Top with V-neck, textured pattern and vents in the sides, worked bottom up in DROPS Muskat. Size: S - XXXL.
DROPS 178-66 |
|||||||||||||
|
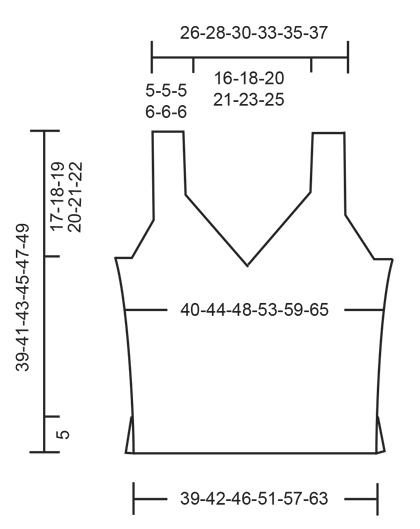
GARTER STITCH (back and forth): Knit all rows. 1 ridge = knit 2 rows. PATTERN: See diagrams A.1 to A.4. Diagrams show all rows in pattern seen from the right side. Choose diagram for your size. INCREASE TIP: Increase 1 stitch by making a yarn over. On next row knit yarn over twisted to avoid hole. NOTE: Work the new stitches gradually in the pattern A.2. DECREASE TIP: Decrease 1 stitch inside 3 edge stitches in garter stitch. All decreases are done from the right side. Decrease as follows after 3 edge stitches in garter stitch: Slip 1 stitch knitwise, knit 1, pass slipped stitch over stitch worked Decrease as follows before 3 edge stitches in garter stitch: Begin 2 stitches before the 3 edge stitches in garter stitch and knit 2 together. ---------------------------------------------------------- TOP: Worked back and forth in 2 parts and sewn together when finished. BACK PIECE: Cast on 81-89-97-107-119-133 stitches with Muskat on circular needle size 4 mm / US 6. Purl 1 row from wrong side. Work rib as follows (1st row = right side): Work 3 stitches in GARTER STITCH - see explanation above, knit 1 stitch, repeat A.1 (= 2 stitches) until 3 stitches remain on row, work 3 stitches in garter stitch. Continue pattern back and forth like this until A.1 has been worked vertically. Then work A.2 (= 2 stitches) over A.1. REMEMBER THE GAUGE! When piece measures 5 cm / 2", cast on 1 new stitch at the end of the next 2 rows (marks where vents end) = 83-91-99-109-121-135 stitches. Work pattern as follows: 1 edge stitch in garter stitch, knit 1, A.2 until 1 stitch remains, 1 edge stitch in garter stitch. When piece measures 7 cm / 2¾", increase 1 stitch inside 1 edge stitches in garter stitch in each side - READ INCREASE TIP! Repeat increase when piece measures 10 cm / 4" = 87-95-103-113-125-139 stitches. When piece measures 19-20-21-22-23-24 cm / 7½"-8"-8¼"-8¾"-9"-9½", work from arrow in A.3 over the middle 7 stitches on row - adjust so that this row marked with arrow is worked from wrong side. On first row from right side after A.3 work over the first 44-48-52-57-63-70 stitches on row and slip the remaining 44-48-52-57-63-70 stitches on 1 stitch holder. RIGHT SIDE AT THE BACK: = 44-48-52-57-63-70 stitches. READ ALL OF THE FOLLOWING SECTION - decrease for neck and armhole at the same time as follows: Work pattern A.2 as before with 3 edge stitches in garter stitch towards neck and 1 edge stitch in garter stitch towards the side. NECK: On first row from right side begin decrease for neck. Decrease 1 stitch inside the 3 edge stitches in garter stitch - READ DECREASE TIP. Decrease like this every other row (i.e. on every row from right side) 16-18-20-22-24-26 times in total. ARMHOLE: When piece measures 21-22-23-24-25-26 cm / 8¼"-8¾"-9"-9½"-9¾"-10¼", work in garter stitch over the outermost 10-10-12-11-11-14 stitches towards the side (including 1 edge stitch in garter stitch). When 4 rows have been worked (= 2 ridges) over these stitches, bind off the first 7-7-9-8-8-11 stitches at beginning of row for armhole. Work the next 3 stitches in garter stitch (= edge towards armhole). Decrease 1 stitch inside the 3 edge stitches in garter stitch towards the armhole. Decrease like this every other row (i.e. on every row from right side) 10-12-12-14-18-20 times in total. After all bind offs and decreases for armhole and neck, 11-11-11-13-13-13 stitches remain on row for strap. Continue the pattern as before with 3 edge stitches in garter stitch in each side. Work strap as shown in A.4 - choose diagram for size. When piece measures 39-41-43-45-47-49 cm / 15¼"-16"-17"-17¾"-18½"-19¼", bind off all stitches. LEFT SIDE AT THE BACK: Slip the 44-48-52-57-63-70 stitches from stitch holder in the other side back on circular needle size 4 mm / US 6 and work the same way as right side at the back but reversed – NOTE: When binding off for armhole in the side, bind off at beginning of row from wrong side (instead of beginning of row from right side). The remaining decreases for armhole and neck are done from right side. FRONT PIECE: Cast on and work as back piece. ASSEMBLY: Sew the two straps together with grafting/kitchener stitches to avoid a chunky seam. Sew side seam inside 1 edge stitch in garter stitch in each side from armhole and down to vent. Repeat in the other side. Fasten off. |
|||||||||||||
Diagram explanations |
|||||||||||||
|
|||||||||||||
 |
|||||||||||||
 |
|||||||||||||
Have you finished this pattern?Tag your pictures with #dropspattern #mazotop or submit them to the #dropsfan gallery. Do you need help with this pattern?You'll find 22 tutorial videos, a Comments/Questions area and more by visiting the pattern on garnstudio.com. © 1982-2026 DROPS Design A/S. We reserve all rights. This document, including all its sub-sections, has copyrights. Read more about what you can do with our patterns at the bottom of each pattern on our site. |
|||||||||||||


With over 40 years in knitting and crochet design, DROPS Design offers one of the most extensive collections of free patterns on the internet - translated to 17 languages. As of today we count 324 catalogs and 12291 patterns - 12281 of which are translated into English (US/in).
We work hard to bring you the best knitting and crochet have to offer, inspiration and advice as well as great quality yarns at incredible prices! Would you like to use our patterns for other than personal use? You can read what you are allowed to do in the Copyright text at the bottom of all our patterns. Happy crafting!
Post a comment to pattern DROPS 178-66
We would love to hear what you have to say about this pattern!
If you want to leave a question, please make sure you select the correct category in the form below, to speed up the answering process. Required fields are marked *.