
Popular categories
Looking for a yarn?


Comments / Questions (37)
![]() Åse wrote:
Åse wrote:
Raglan øking står det: øk på hver side av merketråder. Jeg har økt en m. på hver side av merketråder på de omg. det strikkes bare rett i mønster, tilsammen 8 m. på annenhver omg. I tillegg øker jeg det som viser i mønster. Blir dette for mye? Skulle økning i hver ende av mønster erstatte fire av disse ? Veldig usikker her nå?
02.04.2019 - 21:17DROPS Design answered:
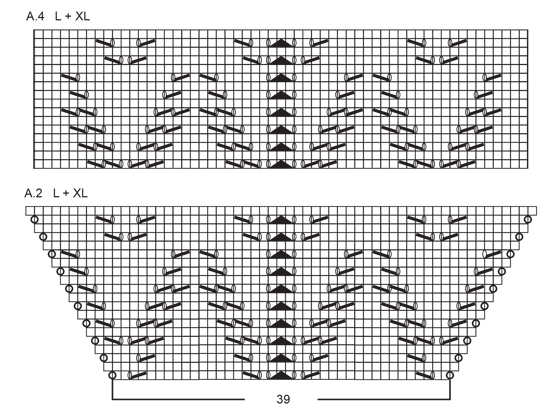
Hei Åse. Om du leser uner RAGLAN helt øverst i oppskriften står det at økningene på ermene er tegnet inn i diagram A.2. Du øker altså på hver side av hvert merke, men på ermene er disse økningene en del av diagrammet. Når alle økinger er ferdig har du 232-244-272-284-316-320 masker på pinnen. God fornøyelse
08.04.2019 - 14:18
![]() Heidi Jensen wrote:
Heidi Jensen wrote:
Umiddelbart før afsnittet “ryg- og forstykke” fremgår det, at der fremadrettet skal måles fra nederst på ærmegabet. I afsnittet “ryg- og forstykke” fremgår, at udtagning påbegyndes efter 3 cm. Efter de 7 udtagninger i str M vil længden fra skulder være ca 50 cm og længden fra nederst på ærmegabet vil være knap 30 cm. Er det virkelig korrekt, at arbejdet i str M skal måle 66 cm fra nederst på ærmegabet, inden der tages ud igen og strikkes efter diagram A.3?
30.03.2019 - 22:24
![]() Inge Spille wrote:
Inge Spille wrote:
Entschuldigung wenn ich noch einmal nach frage ... ist es egal, an welcher Stelle ich diese Masche zunehme? Herzlichen Dank für Ihre Geduld und Mühe!
25.03.2019 - 10:41DROPS Design answered:
Liebe Frau Spille, siehe vorrige Antwort + die Zunahmen für Vorder- und Rückenteil werden nach dem Markierer am Anfang Vorder- und Rückenteil und vor dem Markierer am Ende Vorder- und Rückenteil gestrickt. Viel Spaß beim stricken!
25.03.2019 - 12:21
![]() Inge Spille wrote:
Inge Spille wrote:
Liebes Dropsteam, danke für eure wunderbaren Anleitungen. Ich stricke zum ersten Mal Raglan von Oben.A1 ist zu Ende gestrickt. Die Ärmelzunahme habe ich verstanden. Aber wie ist das mit der Zunahme für Vorder- und Rückenteil? In jeder Reihe nur 1 Masche oder jeweils 1 Masche vorn und hinten? Oder jeweils an jeder Raglannaht also 4 Maschen? Danke für eure Hilfe!
23.03.2019 - 14:52DROPS Design answered:
Liebe Frau Spille, für Vorder- und Rückenteil nehmen Sie je nach der Grösse 1 M in jeder Runde (nur in die 3 grösseren Größe) und 1 Masche in jeder 2. Runde in allen Größen (6-8-9-8-8-8 Mal). Viel Spaß beim stricken!
25.03.2019 - 10:10
![]() Renate wrote:
Renate wrote:
Habe vergessen brauche in xxl. ich hoffe daß auch im frühjahr 2019 wieder etwas mit loch und rundpasse dabei ist.danke nochmal
25.09.2018 - 20:11DROPS Design answered:
Liebe Renate, wir können leider nicht jede unsere Anleitung nach jeder individuellen Anfrage anpassen - für individuelle Hilfe zu dieser Anleitung, nehmen Sie bitte Kontakt mit dem Laden auf, wo Sie Ihre Wolle gekauft haben. Viel Spaß beim stricken!
26.09.2018 - 07:48
![]() Renate wrote:
Renate wrote:
Hallo liebes drops team. ich finde eure anleitungen super,nur habe ich ein problemmit dem umrechnen bei 178-15 Da ich dünneres garn lauflänge185m und 3,5stricknadel verwende,schaut es bei mir irgenwie immer anders aus und ich trenne sehr viel. wie rechne ich richtig um,so das es wie auf dem bild ausschaut.vielen dank
25.09.2018 - 17:12DROPS Design answered:
Liebe Renate, Diese Tunika wird mit einer Maschenprobe von 17 M x 22 Reihen glatt rechts = 10 x 10 cm. Wenn Sie diese Maschennprobe nicht haben, ist vielleicht der Garn nicht das richtige - Hier lesen Sie mehr über Garnalternativen. Viel Spaß beim stricken!
26.09.2018 - 07:30
![]() Kasia wrote:
Kasia wrote:
Dodawanie oczek - Reglan na przodzie/tyle. Rozmiar XXL Czy dobrze rozumiem, że na początku mam dodawać oczko w okrążeniu 1, 2, 3, 4, 5 , 7, 9, 11, 13, 15, 17, 19, 21 przed oczkiem z markerem?
06.09.2018 - 09:11DROPS Design answered:
Witaj Kasiu! Dodajesz oczka na reglan na tyle/przodzie dokładnie w tych okrążeniach, które wskazujesz. Dodajesz je w 4 miejscach w okrążeniu, zależy gdzie jest początek okrążenia (przyjmijmy, że w miejscu 1-szego markera): wtedy dodajesz za 2-gim markerem, przed 3-cim markerem, za 4-tym markerem i przed 1-szym markerem (inaczej mówiąc na tyle i przodzie, ale nie na rękawach). Powodzenia!
06.09.2018 - 10:11
![]() Ines wrote:
Ines wrote:
Bin gerade am Ärmel stricken, habe A 2 und A4 einmal gestrickt. Jetzt fällt mir auf das der Ärmel nicht so lang ist wie auf dem Foto abgebildet. Habe ich einen Fehler gemacht ?
31.05.2018 - 23:36DROPS Design answered:
Liebe Ines, in allen Größen messen die Ärmel 25 cm von der Passe - siehe auch Maßskizze. Viel Spaß beim stricken!
01.06.2018 - 08:36
![]() Ines wrote:
Ines wrote:
Hallo, da ich zum ersten mail nach eine Strickschrift arbeite brauch ich etwas Hilfe. Ich habe die Passe gearbeitet und jetzt weiß ich nicht wo es weitergeht? Soll es wie oben beschrieben ist weiterstricken oder ab der Korrektur?? Ich bitte um Hilfe. Vielen Dank im Voraus
21.04.2018 - 16:27DROPS Design answered:
Liebe Ines, wenn Sie die Anleitung gedrückt haben, bevor die Korrektur geschrieben war, sollen Sie nach Korrektur weiter stricken, aber wenn Sie die Anleitung nach dem Korrektur gedrückt haben, enthalten die Anleittung alle Korrekturen. Viel Spaß beim stricken!
23.04.2018 - 09:12
![]() Mercedes wrote:
Mercedes wrote:
Estoy tejiendo este patrón con Paris denim recycled. He comprado 700 gramos para la talla L, y sin embargo, he consumido casi todo el hilo en el cuerpo, no tengo suficiente para las mangas con las cantidades que indica el patrón.
20.08.2017 - 20:15DROPS Design answered:
Hola Mercedes, puede ser que tu tensión del tejido era más floja que la recomendada, por lo que has tenido que utilizar más hilo. En general, 700 gramos es suficiente para realizar esta prenda en la talla L.
23.08.2017 - 17:29
|
||||||||||||||||||||||
Time for Tea#timeforteatunic |
||||||||||||||||||||||
 |
 |
|||||||||||||||||||||
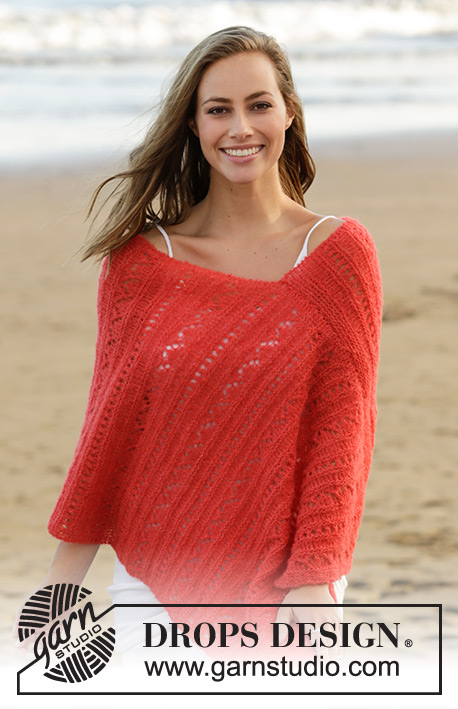
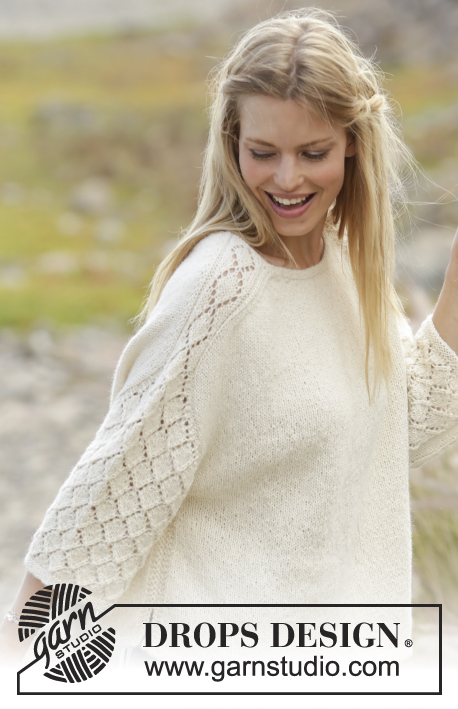
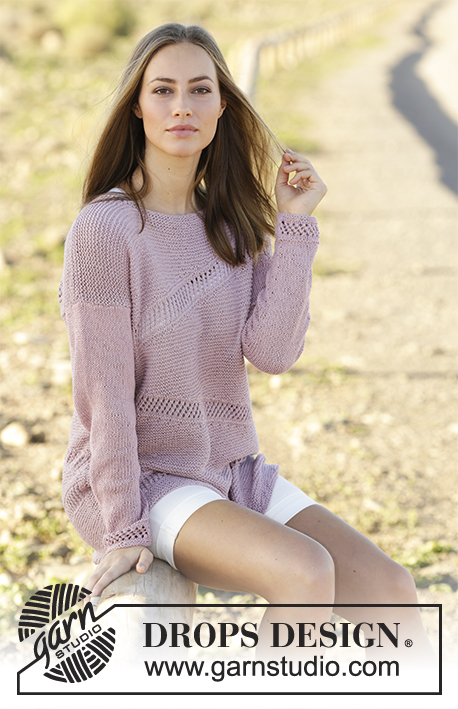
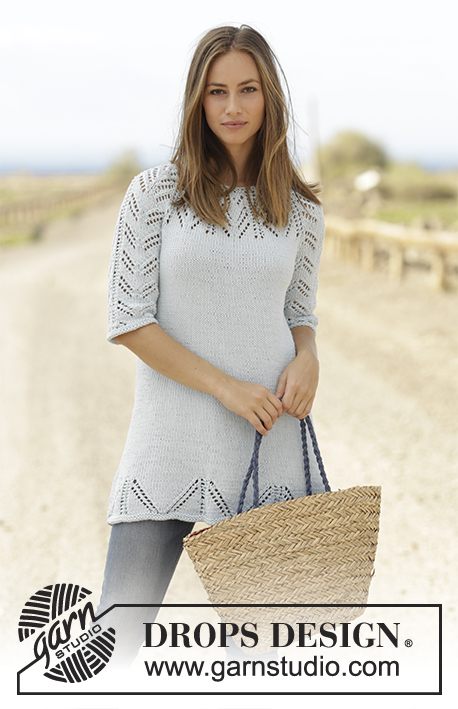
Tunic with lace pattern, raglan and ¾ sleeve, worked top down in DROPS Paris. Size: S - XXXL
DROPS 178-15 |
||||||||||||||||||||||
|
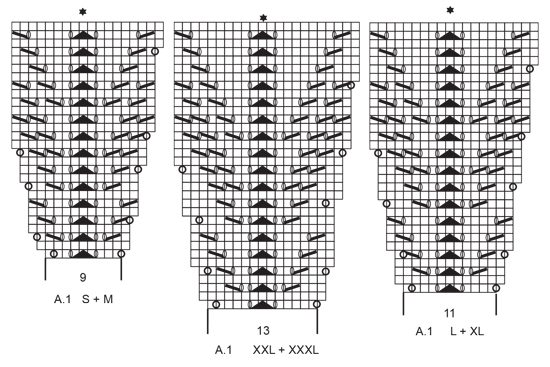
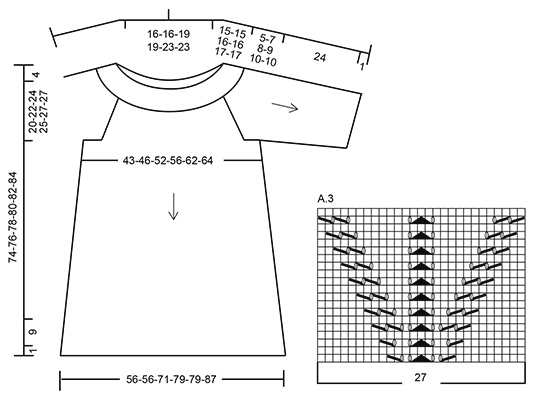
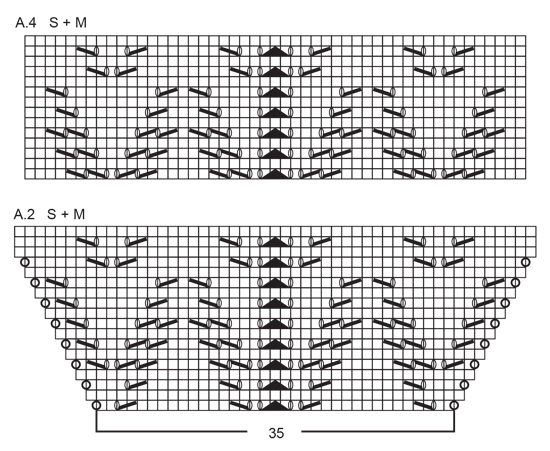
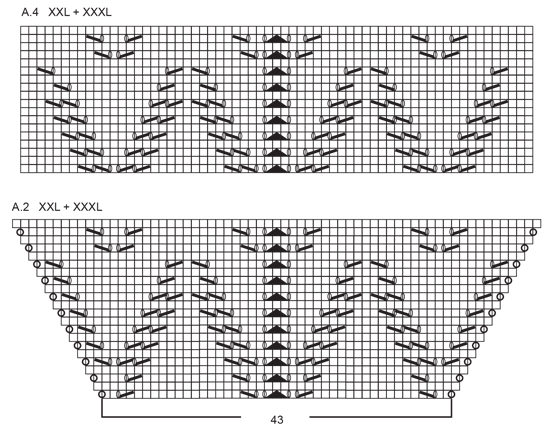
GARTER STITCH (worked in the round): 1 ridge = 2 rounds. Knit 1 round and purl 1 round. PATTERN: See diagrams A.1 to A.4. Diagrams show all rows in pattern seen from the right side. Choose diagram for your size. RAGLAN: Increase for raglan on each side of the 4 marker threads. NOTE: Increase differently on body and sleeves. Increases on sleeves are shown in diagram A.2. Increase 1 stitch by making a yarn over. On next round knit yarn overs twisted to avoid holes. INCREASE TIP (evenly spaced): To calculate how to increase evenly, use the total number of stitches on row (e.g. 86 stitches) and divide number of stitches by number of increases to be done (e.g. 4) = 21.5. In this example increase after approx. every 21st stitch. INCREASE TIP (applies to sides of body): Work until 2 stitches remain before marker thread, 1 yarn over, knit 4 (marker is in the middle of these 4 stitches), 1 yarn over (= 2 stitches increased). On next round knit yarn overs twisted to avoid holes. DECREASE TIP (applies to mid under sleeve): Begin 3 stitches before marker and knit 2 together, knit 2 (marker is between these 2 stitches), slip 1 stitch knitwise, knit 1, pass slipped stitch over (= 2 stitches decreased). ---------------------------------------------------------- TUNIC: Worked top down in the round on circular needle/double pointed needle. YOKE: Cast on 86-88-92-96-100-106 stitches on circular needle size 4.5 mm / US 7 with Paris. Work 2 ridges in GARTER STITCH - see explanation above, switch to circular needle size 5 mm / US 8. Knit 1 round while increasing 4-2-18-14-30-24 stitches evenly - READ INCREASE TIP (evenly spaced) = 90-90-110-110-130-130 stitches. On next round knit yarn overs twisted to avoid holes. Work pattern in the round according to diagram A.1 – choose diagram for your size (= 10 repetitions of 9-9-11-11-13-13 stitches). REMEMBER THE KNITTING GAUGE When A.1 has been worked 1 time vertically, there are 180-180-200-200-220-220 stitches on round. Piece measures approx. 15-15-16-16-17-17 cm / 6"-6"-6¼"-6¼"-6¾"-6¾" from cast-on edge. Insert 4 marker threads in piece without working stitches as follows: Insert every marker thread in the middle stitch in a repetition of A.1 (see star in diagrams) as follows: Insert 1st marker thread in the middle stitch in 1st repetition of A.1, insert 2nd marker thread in 3rd repetition of A.1, insert 3rd marker in 6th repetition of A.1 and insert 4th marker thread in 8th repetition of A.1. Stitches between 1st and 2nd marker thread = right sleeve. Stitches between 2nd and 3rd marker thread = front piece. Stitches between 3rd and 4th marker thread = left sleeve. Stitches between 4th and 1st marker thread = back piece. READ ALL OF THE FOLLOWING SECTION BEFORE CONTINUING! On next round begin increase for RAGLAN – see explanation above, and work pattern as follows: Now work pattern A.2 (= 35-35-39-39-43-43 stitches) on sleeves (= between 1st and 2nd marker thread and between 3rd and 4th marker thread), and work in stockinette stitch on front piece (= between 2nd and 3rd marker thread), on back piece (= between 4th and 1st marker thread) and work the 4 stitches with marker in stockinette stitch. RAGLAN SLEEVES: Increases on sleeves are shown in diagram A.2. Increase 1 stitch after 1st and 3rd marker thread and 1 stitch before 2nd and 4th marker thread. Increase like this every other round 7-8-9-10-11-11 times in total, i.e. until 5-3-3-1-1-1 round in A.2 remains. RAGLAN FOR FRONT AND BACK PIECE: Increase 1 stitch every round 0-0-0-3-5-6 times, and 1 stitch every other round 6-8-9-8-8-8 times. When all increases are done and 5-3-3-1-1-1 round in diagram A.2 remains there are 232-244-272-284-316-320 stitches on needle. Work next round as follows: Work until 1st marker thread, slip stitches between 1st and 2nd marker thread on a stitch holder (= 49-51-57-59-65-65 stitches for sleeve), cast on 6-8-10-12-12-14 new stitches under sleeve, work the next 67-71-79-83-93-95 stitches, slip stitches between 3rd and 4th marker thread on a stitch holder (= 49-51-57-59-65-65 stitches on sleeve), cast on 6-8-10-12-12-14 new stitches under sleeve, work the remaining stitches on round. Piece measures approx. 20-22-24-25-27-27 cm / 8"-8¾"-9½"-9¾"-10½"-10½" from cast-on edge. Remove the 4 marker threads in every transition between body and sleeves and insert 2 new marker threads in piece in the middle of the new stitches cast on under each sleeve. NOW MEASURE PIECE FROM HERE! BODY: = 146-158-178-190-210-218 stitches. Work in stockinette stitch in the round. When piece measures 3 cm / 1", increase 1 stitch on each side of both marker threads - READ INCREASE TIP (= 4 stitches increased). Increase like this every 8th-8th-5th-4th-5th-4th round 9-7-15-18-14-19 times in total = 182-186-238-262-266-294 stitches. When piece measures 40-40-40-41-41-43 cm / 15¾"-15¾"-15¾"-16⅛"-16⅛"-17", increase 7-3-5-8-4-3 stitches evenly = 189-189-243-270-270-297 stitches. Work pattern in the round according to diagram A.3 (= 7-7-9-10-10-11 repetitions of 27 stitches). When entire diagram A.3 has been worked vertically, switch to circular needle size 4.5 mm / US 7. Work 2 ridges. Switch back to circular needle size 5 mm / US 8 and bind off - make sure to avoid a tight bind-off edge. SLEEVE: Work sleeves in the round on a short circular needle/double pointed needles. Slip the 49-51-57-59-65-65 stitches from stitch holder in one side of piece on double pointed needles size 5 mm / US 8 and pick in addition up 1 new stitch in each of the 6-8-10-12-12-14 new stitches cast on under sleeve = 55-59-67-71-77-79 stitches on needle. Insert a marker thread mid under sleeve (i.e. in the middle of the 6-8-10-12-12-14 new stitches). Now work pattern as follows: Work 3-5-5-7-7-8 stitches in stockinette stitch, continue with pattern A.2/A.4 over the next 49-49-57-57-63-63 stitches - i.e. in size S, M and L work the remaining rounds in A.2 (without increases in each side of diagram) before continue with A.4 over A.2, work in stockinette stitch over the remaining 3-5-5-7-7-8 stitches on round. When sleeve measures 3 cm / 1" from the new stitch cast on, decrease 1 stitch on each side of marker thread - READ DECREASE TIP. Decrease like this every 9th-7th-5th-4th-4th-4th round 6-7-10-11-11-11 times in total = 43-45-47-49-55-57 stitches (work the stitches that do not fit the pattern when decreasing in stockinette stitch). When sleeve measures 24 cm / 9½", switch to double pointed needles size 4.5 mm / US 7. Work 2 ridges. Switch back to double pointed needles size 5 mm / US 8 and bind off - make sure to avoid a tight bind-off edge. |
||||||||||||||||||||||
Diagram explanations |
||||||||||||||||||||||
|
||||||||||||||||||||||
 |
||||||||||||||||||||||
 |
||||||||||||||||||||||
 |
||||||||||||||||||||||
 |
||||||||||||||||||||||
 |
||||||||||||||||||||||
Have you finished this pattern?Tag your pictures with #dropspattern #timeforteatunic or submit them to the #dropsfan gallery. Do you need help with this pattern?You'll find 25 tutorial videos, a Comments/Questions area and more by visiting the pattern on garnstudio.com. © 1982-2026 DROPS Design A/S. We reserve all rights. This document, including all its sub-sections, has copyrights. Read more about what you can do with our patterns at the bottom of each pattern on our site. |
||||||||||||||||||||||


With over 40 years in knitting and crochet design, DROPS Design offers one of the most extensive collections of free patterns on the internet - translated to 17 languages. As of today we count 325 catalogs and 12298 patterns - 12288 of which are translated into English (US/in).
We work hard to bring you the best knitting and crochet have to offer, inspiration and advice as well as great quality yarns at incredible prices! Would you like to use our patterns for other than personal use? You can read what you are allowed to do in the Copyright text at the bottom of all our patterns. Happy crafting!
Post a comment to pattern DROPS 178-15
We would love to hear what you have to say about this pattern!
If you want to leave a question, please make sure you select the correct category in the form below, to speed up the answering process. Required fields are marked *.