Comments / Questions (35)
![]() Carmen-Gabriela wrote:
Carmen-Gabriela wrote:
Hallo, wird A.4 für den Ärmel wiederholt bis zur gewünschten Länge? Leider misst meine Passe nach A.1 gedehnt nur 13 cm lang (S/M). Nun weiß ich noch nicht, ob ich gleich mit glatt re. VT/RT + Raglan weiterstricke od. ob ich die Lochmusterpasse verlängere (mit Zunahmen) und ggf. dementsprechend die Raglanzunahmen reduziere. Haben Sie einen Tipp? Maschenprobe hatte gestimmt.
21.01.2022 - 18:32DROPS Design answered:
Liebe Carmen-Gabriela, welche Größe stricken Sie? S oder M? Nach alle Raglanzunahmen soll die Passe ca 20-22 cm sein (15 cm nach A.1 + ca 6-7 cm Raglan). Kann das Ihnen helfen?
26.01.2022 - 10:00
![]() Hannelore Meier wrote:
Hannelore Meier wrote:
Guten Tag. Kann ich mir auch dieses tolle Muster auch ausdrucken?
14.10.2021 - 16:59DROPS Design answered:
Liebe Frau Meier, ganz gerne, klicken Sie auf "Drucken", dann wählen Sie "Anleitung", ein neues Fenster öffnet sich dann, klicken Sie auf "Die Anleitung ausdrucken →" um das Dialogfenster von Ihrem Drucker wird angezeigt. Viel Spaß beim stricken!
15.10.2021 - 13:38
![]() IRENE CAMBUS wrote:
IRENE CAMBUS wrote:
J'ai commencé à tricoter le modèle 178-15 avec des aiguilles normales en commençant par le bas en prenant le diagramme à l'envers et c'est correct. Comment faire le raglan de cette façon? Merci pour vos conseils. Cordialement
24.05.2021 - 18:29DROPS Design answered:
Bonjour Mme Cambus, nous ne sommes malheureusement pas en mesure de pouvoir adapter chacun de nos modèles à chaque demande; si vous tricotez ici la robe de bas en haut, il va vous falloir diminuer au lieu d'augmenter pour le raglan et diminuer au lieu d'augmenter dans les diagrammes après le raglan. Votre magasin saura vous aider, même par mail ou téléphone. Bon tricot!
25.05.2021 - 08:52
![]() Lidia wrote:
Lidia wrote:
"When all increases are done and 5-3-3-1-1-1 round in diagram A.2 remains there are 232-244-272-284-316-320 stitches on needle" - Hi. I'm knitting the S size of this pattern and I have a question on the instruction above. Do these 232 stiches include the 4 stiches with the marker? My sums don't match if I include them in these 232. Can you please clarify? Thanks.
21.01.2021 - 17:57DROPS Design answered:
Dear Lidia, after A.1 there were 180 sts, you increase then 2 sts on each sleeve a total of 7 times (= 5 rows remain in A.2) = 28 sts in total + 2 sts on front/back piece a total of 6 times = 24 sts. When 5 rows in A.2 remain, there are: 180+28+24= 232 sts. Happy knitting!
22.01.2021 - 07:49
![]() Mary Galvin wrote:
Mary Galvin wrote:
Hi, Is it possible to get the 178-15 Time for Tea pattern in smaller sizes? I would like to knit it for a young teenager. Thank you!
18.04.2020 - 19:34DROPS Design answered:
Dear Mary, unfortunately we cannot modify our patterns to each individual request. We hope you will understand. Happy Knitting!
19.04.2020 - 20:59
![]() Heidi Jensen wrote:
Heidi Jensen wrote:
Jeg har et spørgsmål vedr ærmerne (sidst i opskriften). Efter “læs INDTAGNINGSTIPS” står der, at man i str S efter 3 cm for hver 9 cm skal tage 2 masker ind i alt 6 gange. Det vil jo resultere i et ærme på ca 48 cm. Men umiddelbart efter står der, at man skal runde af med retstrik, når ærmet er 24 cm. Skal der være 9 pinde i stedet for 9 cm imellem indtagningerne?
23.05.2019 - 22:36DROPS Design answered:
Hei Heidi. Ja, det har du helt rett i, det skal stå hver 9 pinne. Vi skal få rettet dette i oppskriften. Takk for beskjed, og god fornøyelse
24.05.2019 - 08:09
![]() Åse wrote:
Åse wrote:
Bolen: str M starter med 158 m. og øker 4 etter 3cm. da har en 162 m. Så skal en øke slik 7 ganger = 28m. og har da etter alle økninger 190 m. og ikke 186 som mønsteret sier.
21.04.2019 - 10:42
![]() Heidi Jensen wrote:
Heidi Jensen wrote:
Jeg har stillet et spørgsmål 30/3 og tør ikke fortsætte på arbejdet, før jeg har fået svar :-). Jeg spørger derfor igen: Er det korrekt som angivet i opskriften, at arbejdet i str M skal måle 66 cm fra nederst på ærmegabet, inden der tages ud igen og strikkes efter diagram A.3? Eller skal arbejdet i stedet måle 66 cm fra skulderen?
08.04.2019 - 20:23DROPS Design answered:
Hei Heidi. Ja, dette er hel lengde på arbeidet. Vi skal få rettet oppskriften slik at målene er oppgitt fra ermhullet og ned. Tips til neste gang: om du stiller spørsmålet ditt som et "spørsmål" isteden for en "kommentar" vil vi se det raskere. God fornøyelse
09.04.2019 - 11:56
![]() Åse wrote:
Åse wrote:
Raglan øking står det: øk på hver side av merketråder. Jeg har økt en m. på hver side av merketråder på de omg. det strikkes bare rett i mønster, tilsammen 8 m. på annenhver omg. I tillegg øker jeg det som viser i mønster. Blir dette for mye? Skulle økning i hver ende av mønster erstatte fire av disse ? Veldig usikker her nå?
02.04.2019 - 21:17DROPS Design answered:
Hei Åse. Om du leser uner RAGLAN helt øverst i oppskriften står det at økningene på ermene er tegnet inn i diagram A.2. Du øker altså på hver side av hvert merke, men på ermene er disse økningene en del av diagrammet. Når alle økinger er ferdig har du 232-244-272-284-316-320 masker på pinnen. God fornøyelse
08.04.2019 - 14:18
![]() Heidi Jensen wrote:
Heidi Jensen wrote:
Umiddelbart før afsnittet “ryg- og forstykke” fremgår det, at der fremadrettet skal måles fra nederst på ærmegabet. I afsnittet “ryg- og forstykke” fremgår, at udtagning påbegyndes efter 3 cm. Efter de 7 udtagninger i str M vil længden fra skulder være ca 50 cm og længden fra nederst på ærmegabet vil være knap 30 cm. Er det virkelig korrekt, at arbejdet i str M skal måle 66 cm fra nederst på ærmegabet, inden der tages ud igen og strikkes efter diagram A.3?
30.03.2019 - 22:24
Time for Tea#timeforteatunic |
||||||||||||||||||||||
 |
 |
|||||||||||||||||||||
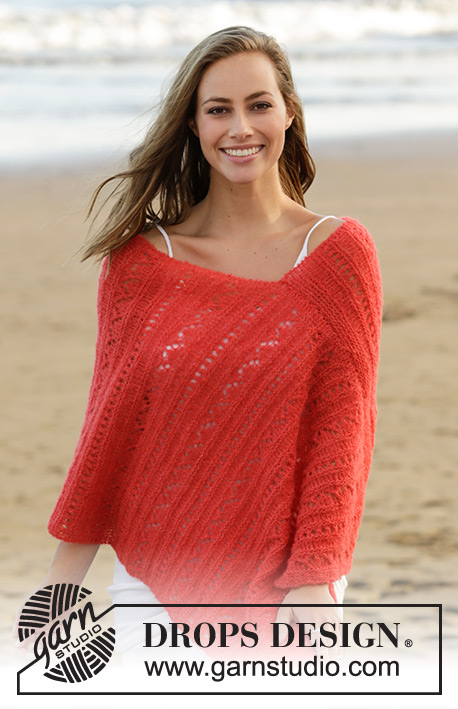
Tunic with lace pattern, raglan and ¾ sleeve, worked top down in DROPS Paris. Size: S - XXXL
DROPS 178-15 |
||||||||||||||||||||||
|
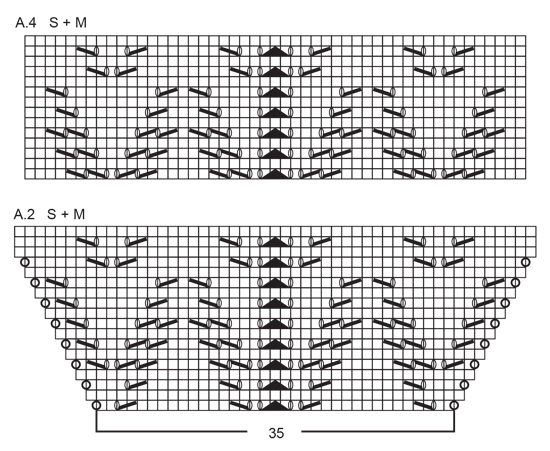
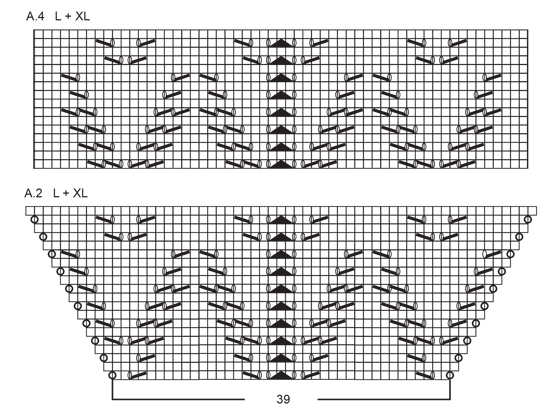
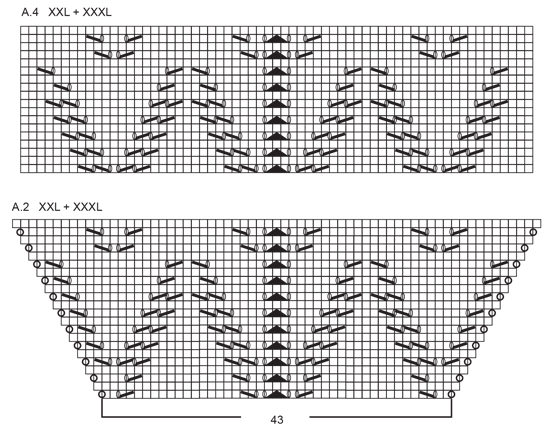
GARTER STITCH (worked in the round): 1 ridge = 2 rounds. Knit 1 round and purl 1 round. PATTERN: See diagrams A.1 to A.4. Diagrams show all rows in pattern seen from the right side. Choose diagram for your size. RAGLAN: Increase for raglan on each side of the 4 marker threads. NOTE: Increase differently on body and sleeves. Increases on sleeves are shown in diagram A.2. Increase 1 stitch by making a yarn over. On next round knit yarn overs twisted to avoid holes. INCREASE TIP (evenly spaced): To calculate how to increase evenly, use the total number of stitches on row (e.g. 86 stitches) and divide number of stitches by number of increases to be done (e.g. 4) = 21.5. In this example increase after approx. every 21st stitch. INCREASE TIP (applies to sides of body): Work until 2 stitches remain before marker thread, 1 yarn over, knit 4 (marker is in the middle of these 4 stitches), 1 yarn over (= 2 stitches increased). On next round knit yarn overs twisted to avoid holes. DECREASE TIP (applies to mid under sleeve): Begin 3 stitches before marker and knit 2 together, knit 2 (marker is between these 2 stitches), slip 1 stitch knitwise, knit 1, pass slipped stitch over (= 2 stitches decreased). ---------------------------------------------------------- TUNIC: Worked top down in the round on circular needle/double pointed needle. YOKE: Cast on 86-88-92-96-100-106 stitches on circular needle size 4.5 mm / US 7 with Paris. Work 2 ridges in GARTER STITCH - see explanation above, switch to circular needle size 5 mm / US 8. Knit 1 round while increasing 4-2-18-14-30-24 stitches evenly - READ INCREASE TIP (evenly spaced) = 90-90-110-110-130-130 stitches. On next round knit yarn overs twisted to avoid holes. Work pattern in the round according to diagram A.1 – choose diagram for your size (= 10 repetitions of 9-9-11-11-13-13 stitches). REMEMBER THE KNITTING GAUGE When A.1 has been worked 1 time vertically, there are 180-180-200-200-220-220 stitches on round. Piece measures approx. 15-15-16-16-17-17 cm / 6"-6"-6¼"-6¼"-6¾"-6¾" from cast-on edge. Insert 4 marker threads in piece without working stitches as follows: Insert every marker thread in the middle stitch in a repetition of A.1 (see star in diagrams) as follows: Insert 1st marker thread in the middle stitch in 1st repetition of A.1, insert 2nd marker thread in 3rd repetition of A.1, insert 3rd marker in 6th repetition of A.1 and insert 4th marker thread in 8th repetition of A.1. Stitches between 1st and 2nd marker thread = right sleeve. Stitches between 2nd and 3rd marker thread = front piece. Stitches between 3rd and 4th marker thread = left sleeve. Stitches between 4th and 1st marker thread = back piece. READ ALL OF THE FOLLOWING SECTION BEFORE CONTINUING! On next round begin increase for RAGLAN – see explanation above, and work pattern as follows: Now work pattern A.2 (= 35-35-39-39-43-43 stitches) on sleeves (= between 1st and 2nd marker thread and between 3rd and 4th marker thread), and work in stockinette stitch on front piece (= between 2nd and 3rd marker thread), on back piece (= between 4th and 1st marker thread) and work the 4 stitches with marker in stockinette stitch. RAGLAN SLEEVES: Increases on sleeves are shown in diagram A.2. Increase 1 stitch after 1st and 3rd marker thread and 1 stitch before 2nd and 4th marker thread. Increase like this every other round 7-8-9-10-11-11 times in total, i.e. until 5-3-3-1-1-1 round in A.2 remains. RAGLAN FOR FRONT AND BACK PIECE: Increase 1 stitch every round 0-0-0-3-5-6 times, and 1 stitch every other round 6-8-9-8-8-8 times. When all increases are done and 5-3-3-1-1-1 round in diagram A.2 remains there are 232-244-272-284-316-320 stitches on needle. Work next round as follows: Work until 1st marker thread, slip stitches between 1st and 2nd marker thread on a stitch holder (= 49-51-57-59-65-65 stitches for sleeve), cast on 6-8-10-12-12-14 new stitches under sleeve, work the next 67-71-79-83-93-95 stitches, slip stitches between 3rd and 4th marker thread on a stitch holder (= 49-51-57-59-65-65 stitches on sleeve), cast on 6-8-10-12-12-14 new stitches under sleeve, work the remaining stitches on round. Piece measures approx. 20-22-24-25-27-27 cm / 8"-8¾"-9½"-9¾"-10½"-10½" from cast-on edge. Remove the 4 marker threads in every transition between body and sleeves and insert 2 new marker threads in piece in the middle of the new stitches cast on under each sleeve. NOW MEASURE PIECE FROM HERE! BODY: = 146-158-178-190-210-218 stitches. Work in stockinette stitch in the round. When piece measures 3 cm / 1", increase 1 stitch on each side of both marker threads - READ INCREASE TIP (= 4 stitches increased). Increase like this every 8th-8th-5th-4th-5th-4th round 9-7-15-18-14-19 times in total = 182-186-238-262-266-294 stitches. When piece measures 40-40-40-41-41-43 cm / 15¾"-15¾"-15¾"-16⅛"-16⅛"-17", increase 7-3-5-8-4-3 stitches evenly = 189-189-243-270-270-297 stitches. Work pattern in the round according to diagram A.3 (= 7-7-9-10-10-11 repetitions of 27 stitches). When entire diagram A.3 has been worked vertically, switch to circular needle size 4.5 mm / US 7. Work 2 ridges. Switch back to circular needle size 5 mm / US 8 and bind off - make sure to avoid a tight bind-off edge. SLEEVE: Work sleeves in the round on a short circular needle/double pointed needles. Slip the 49-51-57-59-65-65 stitches from stitch holder in one side of piece on double pointed needles size 5 mm / US 8 and pick in addition up 1 new stitch in each of the 6-8-10-12-12-14 new stitches cast on under sleeve = 55-59-67-71-77-79 stitches on needle. Insert a marker thread mid under sleeve (i.e. in the middle of the 6-8-10-12-12-14 new stitches). Now work pattern as follows: Work 3-5-5-7-7-8 stitches in stockinette stitch, continue with pattern A.2/A.4 over the next 49-49-57-57-63-63 stitches - i.e. in size S, M and L work the remaining rounds in A.2 (without increases in each side of diagram) before continue with A.4 over A.2, work in stockinette stitch over the remaining 3-5-5-7-7-8 stitches on round. When sleeve measures 3 cm / 1" from the new stitch cast on, decrease 1 stitch on each side of marker thread - READ DECREASE TIP. Decrease like this every 9th-7th-5th-4th-4th-4th round 6-7-10-11-11-11 times in total = 43-45-47-49-55-57 stitches (work the stitches that do not fit the pattern when decreasing in stockinette stitch). When sleeve measures 24 cm / 9½", switch to double pointed needles size 4.5 mm / US 7. Work 2 ridges. Switch back to double pointed needles size 5 mm / US 8 and bind off - make sure to avoid a tight bind-off edge. |
||||||||||||||||||||||
Diagram explanations |
||||||||||||||||||||||
|
||||||||||||||||||||||
 |
||||||||||||||||||||||
 |
||||||||||||||||||||||
 |
||||||||||||||||||||||
 |
||||||||||||||||||||||
 |
||||||||||||||||||||||
Have you finished this pattern?Tag your pictures with #dropspattern #timeforteatunic or submit them to the #dropsfan gallery. Do you need help with this pattern?You'll find 24 tutorial videos, a Comments/Questions area and more by visiting the pattern on garnstudio.com. © 1982-2026 DROPS Design A/S. We reserve all rights. This document, including all its sub-sections, has copyrights. Read more about what you can do with our patterns at the bottom of each pattern on our site. |
||||||||||||||||||||||


Post a comment to pattern DROPS 178-15
We would love to hear what you have to say about this pattern!
If you want to leave a question, please make sure you select the correct category in the form below, to speed up the answering process. Required fields are marked *.