
Popular categories
Looking for a yarn?


Comments / Questions (37)
![]() Gudrun wrote:
Gudrun wrote:
Hallo, diese Anleitung würde ich gerne mit Puna stricken. Wie muss ich das rechnen?
13.03.2026 - 16:23DROPS Design answered:
Liebe Gudrun, dieses Kleid wird mit Paris = Garngruppe C gestrickt, Puna gehört aber der Garngruppe B und wird hier keine Alternative, da die Maschenprobe nicht stimmen wird, so sollen Sie entweder die ganze Anleitung je nach Ihrer Maschenprobe anpassen (dafür können Sie sich von einem ähnlichen Modell mit gleicher Maschenprobe inspirieren) oder suchen Sie eine andere Anleitung, die für Puna mehr geeignet wird. Viel Spaß beim Stricken!
16.03.2026 - 07:08
![]() Michelle wrote:
Michelle wrote:
In the instruction (for size L) it states: RAGLAN FOR FRONT AND BACK PIECE: increase 1 stitch every round 0 times and 1 stitch every other round 9 times. My questions are, do I increase 1 stitch on the front and the back (total 2 stitches a round) or just 1 side? Where do I put the increases?
17.02.2026 - 21:33DROPS Design answered:
Hi Michelle, You increase 1 stitch on each side of the front and the back piece (4 stitches increased on the front and back pieces) after/before each marker-stitch. So work the marker-stitch, then increase 1 stitch after the marker-stitch, work to the other side of the back/front piece and increase 1 stitch before the next marker-stitch. Regards, Drops Team.
18.02.2026 - 06:43
![]() Hauraix Jaklin wrote:
Hauraix Jaklin wrote:
Bonjour très très beau modèle, est il possible de le réaliser en pull over? Merci beaucoup pour la richesse de votre site.😍🧡 Cordialement.
02.05.2025 - 10:53DROPS Design answered:
Bonjour Mme Hauraix, tout à fait, il vous suffit juste d'ajuster les manches aussi bien que le dos/le devant à la longueur souhaitée - pensez également à vérifier que votre nombre de mailles soit multiple de 27 à la fin pour tricoter la bordure ajourée A.3 en bas du pull. Bon tricot!
02.05.2025 - 13:30
![]() Pia Halvorsen wrote:
Pia Halvorsen wrote:
Undskyld. Strikker den i str. xl
28.05.2024 - 06:15DROPS Design answered:
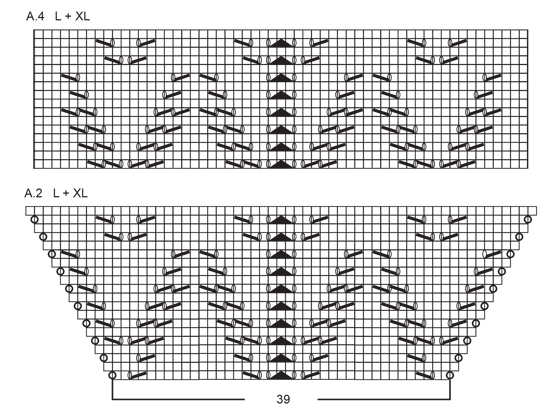
Hej Pia, Du har 71 masker, strikker 7 masker glatstrik, fortsæt med mønster A.4 over de næste 57 masker og glatstrik over de sidste 7 masker på omgangen.
30.05.2024 - 14:43
![]() Pia Halvorsen wrote:
Pia Halvorsen wrote:
Har problemer med at tyde opskriften ved ærmet. Strikker str xxl. Der står at man skal strikke 7 masker glatstrikning og fortsætte med mønster A2/A4 over de næste 57 masker. Hvordan skal dette forståes?
27.05.2024 - 05:03DROPS Design answered:
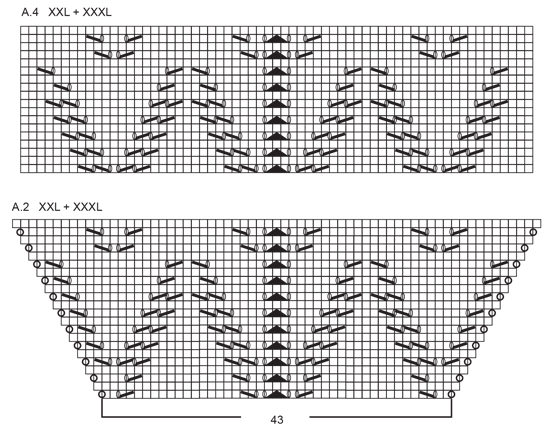
Hei Pia. I str. XXL skal det nå være 77 masker på pinnen. Strikk da 7 masker glattstrikk, fortsett med mønster A.4 (A.2 er kun i str. S, M og L) over de neste 63 maskene (ikke 57, som er str. XL) og strikk 7 masker over de resterende maskene = 7 + 63 +7 = 77 masker som det skal være på pinnen. mvh DROPS Design
27.05.2024 - 11:51
![]() Cynthia Blanckaert wrote:
Cynthia Blanckaert wrote:
Ik twijfel bij de 4 markeringen plaatsen voor een M De eerste is vanaf de 1ste herhaling Bedoel je daarmee de 2de keer je het patroon breit of vanaf de start van het telpatroon Mvg
15.03.2023 - 02:49DROPS Design answered:
Dag Cynthia,
Je plaatst de markeerdraden of markeerders ter hoogte van waar je op dat moment bent (je hebt dan dus al een herhaling in de hoogte gemaakt) en je plaatst ze in de middelste steek van A.1 (dus waar je A.1 hebt gebreid en daar de middelste steek van.)
16.03.2023 - 20:42
![]() Marian wrote:
Marian wrote:
Kan ik het patroon ook breien met 2 draden Drops Fabel?
07.11.2022 - 19:31DROPS Design answered:
Dag Marian,
Ja, dat kan! Fabel valt in garencategorie A en 2 draden van categorie A komt overeen met de dikte van categorie C.
08.11.2022 - 19:40
![]() Alexandra wrote:
Alexandra wrote:
Hallo, liebes Drops-Team, ich habe eine Frage zum Diagramm. Ich habe noch nie ein richtiges Lochmuster gestrickt, deshalb kenne ich mich noch nicht aus. Laut Diagramm müssten alle Umschläge in der nächsten Reihe verschränkt gestrickt werden damit kein Loch entsteht (das Symbol mit dem hohlen Kreis) - aber dann entsteht doch auch kein Lochmuster, glaube ich. Oder müssten einige dieser Kreise doch normal rechts gestrickt werden - wenn ja, welche?
01.08.2022 - 01:54DROPS Design answered:
Liebe Alexandra, bei diesem Modell und den Diagrammen sind es 2 Sorten Umschläge: die für das Lochmuster sind mit 2., 3. und 4. Symbol erklärt und sollen Löcher bilden und die für die Zunahmen sind wie beim 5. Symbol gestrickt -diese sollen keine Löcher bilden. Viel Spaß beim stricken!
01.08.2022 - 12:05
![]() Emanuela wrote:
Emanuela wrote:
Vorrei lavorare il maglione dal basso verso l'alto, è possibile? Devo fare le diminuzioni al posto degli aumenti sullo sprone? Come posso fare le diminuzioni dei raglan Grazie per la risposta
16.05.2022 - 15:24DROPS Design answered:
Buonasera Emanuela, questo modello è stato progettato per essere lavorato dall'alto in basso. Sul nostro sito può trovare tantissimi modelli lavorati dal basso verso l'alto. Buon lavoro!
17.05.2022 - 19:02
![]() Christine Almond wrote:
Christine Almond wrote:
Can it be converted to straight needles
25.04.2022 - 10:27DROPS Design answered:
Dear Mrs Amond, this lesson might help you to adapt the pattern into straight needles - it might be sometimes easier to have a try on circular needle, look at our videos, they might help you to understand how to do; happy knitting!
25.04.2022 - 12:12
|
||||||||||||||||||||||
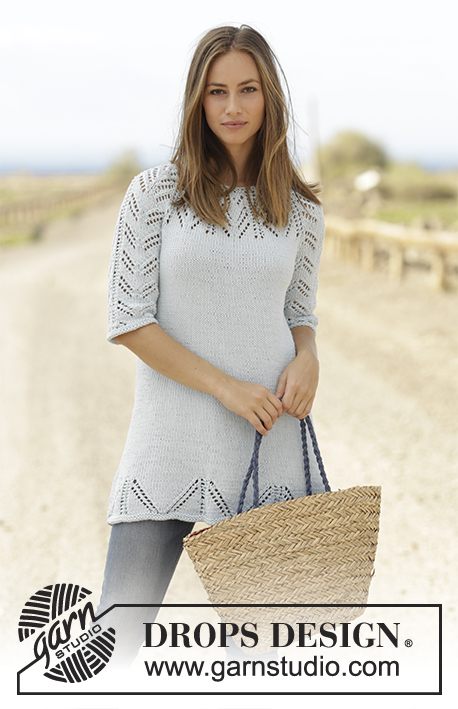
Time for Tea#timeforteatunic |
||||||||||||||||||||||
 |
 |
|||||||||||||||||||||
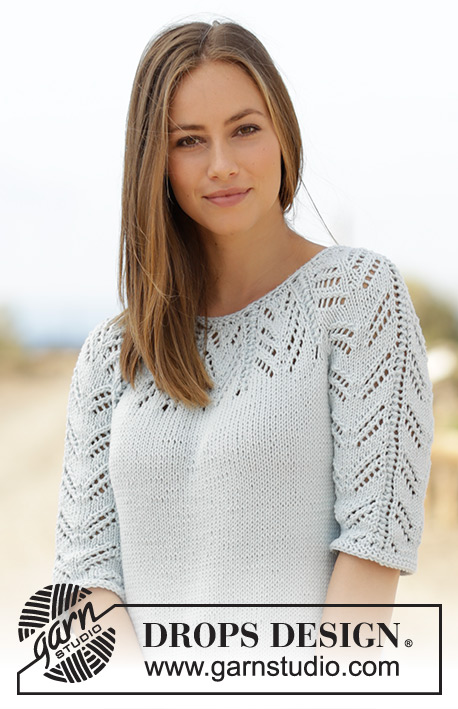
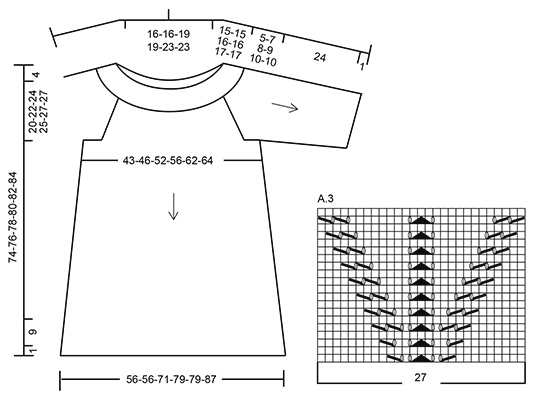
Tunic with lace pattern, raglan and ¾ sleeve, worked top down in DROPS Paris. Size: S - XXXL
DROPS 178-15 |
||||||||||||||||||||||
|
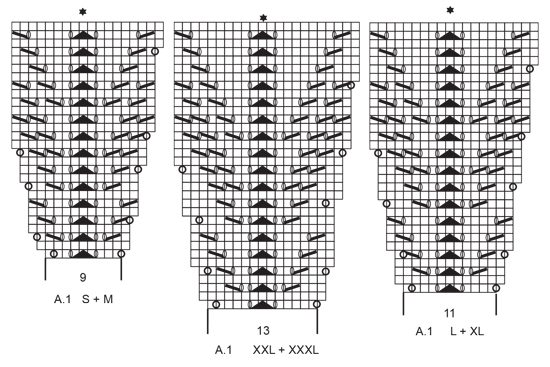
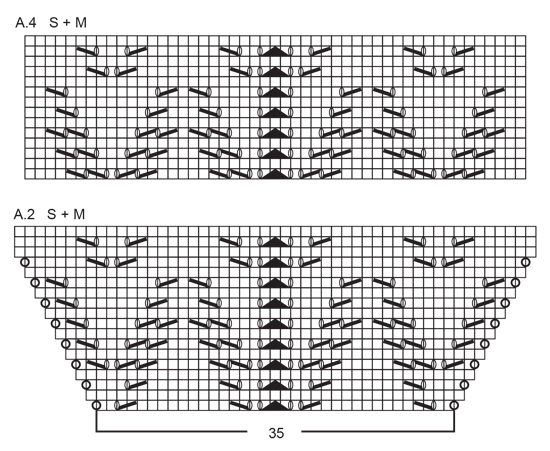
GARTER STITCH (worked in the round): 1 ridge = 2 rounds. Knit 1 round and purl 1 round. PATTERN: See diagrams A.1 to A.4. Diagrams show all rows in pattern seen from the right side. Choose diagram for your size. RAGLAN: Increase for raglan on each side of the 4 marker threads. NOTE: Increase differently on body and sleeves. Increases on sleeves are shown in diagram A.2. Increase 1 stitch by making a yarn over. On next round knit yarn overs twisted to avoid holes. INCREASE TIP (evenly spaced): To calculate how to increase evenly, use the total number of stitches on row (e.g. 86 stitches) and divide number of stitches by number of increases to be done (e.g. 4) = 21.5. In this example increase after approx. every 21st stitch. INCREASE TIP (applies to sides of body): Work until 2 stitches remain before marker thread, 1 yarn over, knit 4 (marker is in the middle of these 4 stitches), 1 yarn over (= 2 stitches increased). On next round knit yarn overs twisted to avoid holes. DECREASE TIP (applies to mid under sleeve): Begin 3 stitches before marker and knit 2 together, knit 2 (marker is between these 2 stitches), slip 1 stitch knitwise, knit 1, pass slipped stitch over (= 2 stitches decreased). ---------------------------------------------------------- TUNIC: Worked top down in the round on circular needle/double pointed needle. YOKE: Cast on 86-88-92-96-100-106 stitches on circular needle size 4.5 mm / US 7 with Paris. Work 2 ridges in GARTER STITCH - see explanation above, switch to circular needle size 5 mm / US 8. Knit 1 round while increasing 4-2-18-14-30-24 stitches evenly - READ INCREASE TIP (evenly spaced) = 90-90-110-110-130-130 stitches. On next round knit yarn overs twisted to avoid holes. Work pattern in the round according to diagram A.1 – choose diagram for your size (= 10 repetitions of 9-9-11-11-13-13 stitches). REMEMBER THE KNITTING GAUGE When A.1 has been worked 1 time vertically, there are 180-180-200-200-220-220 stitches on round. Piece measures approx. 15-15-16-16-17-17 cm / 6"-6"-6¼"-6¼"-6¾"-6¾" from cast-on edge. Insert 4 marker threads in piece without working stitches as follows: Insert every marker thread in the middle stitch in a repetition of A.1 (see star in diagrams) as follows: Insert 1st marker thread in the middle stitch in 1st repetition of A.1, insert 2nd marker thread in 3rd repetition of A.1, insert 3rd marker in 6th repetition of A.1 and insert 4th marker thread in 8th repetition of A.1. Stitches between 1st and 2nd marker thread = right sleeve. Stitches between 2nd and 3rd marker thread = front piece. Stitches between 3rd and 4th marker thread = left sleeve. Stitches between 4th and 1st marker thread = back piece. READ ALL OF THE FOLLOWING SECTION BEFORE CONTINUING! On next round begin increase for RAGLAN – see explanation above, and work pattern as follows: Now work pattern A.2 (= 35-35-39-39-43-43 stitches) on sleeves (= between 1st and 2nd marker thread and between 3rd and 4th marker thread), and work in stockinette stitch on front piece (= between 2nd and 3rd marker thread), on back piece (= between 4th and 1st marker thread) and work the 4 stitches with marker in stockinette stitch. RAGLAN SLEEVES: Increases on sleeves are shown in diagram A.2. Increase 1 stitch after 1st and 3rd marker thread and 1 stitch before 2nd and 4th marker thread. Increase like this every other round 7-8-9-10-11-11 times in total, i.e. until 5-3-3-1-1-1 round in A.2 remains. RAGLAN FOR FRONT AND BACK PIECE: Increase 1 stitch every round 0-0-0-3-5-6 times, and 1 stitch every other round 6-8-9-8-8-8 times. When all increases are done and 5-3-3-1-1-1 round in diagram A.2 remains there are 232-244-272-284-316-320 stitches on needle. Work next round as follows: Work until 1st marker thread, slip stitches between 1st and 2nd marker thread on a stitch holder (= 49-51-57-59-65-65 stitches for sleeve), cast on 6-8-10-12-12-14 new stitches under sleeve, work the next 67-71-79-83-93-95 stitches, slip stitches between 3rd and 4th marker thread on a stitch holder (= 49-51-57-59-65-65 stitches on sleeve), cast on 6-8-10-12-12-14 new stitches under sleeve, work the remaining stitches on round. Piece measures approx. 20-22-24-25-27-27 cm / 8"-8¾"-9½"-9¾"-10½"-10½" from cast-on edge. Remove the 4 marker threads in every transition between body and sleeves and insert 2 new marker threads in piece in the middle of the new stitches cast on under each sleeve. NOW MEASURE PIECE FROM HERE! BODY: = 146-158-178-190-210-218 stitches. Work in stockinette stitch in the round. When piece measures 3 cm / 1", increase 1 stitch on each side of both marker threads - READ INCREASE TIP (= 4 stitches increased). Increase like this every 8th-8th-5th-4th-5th-4th round 9-7-15-18-14-19 times in total = 182-186-238-262-266-294 stitches. When piece measures 40-40-40-41-41-43 cm / 15¾"-15¾"-15¾"-16⅛"-16⅛"-17", increase 7-3-5-8-4-3 stitches evenly = 189-189-243-270-270-297 stitches. Work pattern in the round according to diagram A.3 (= 7-7-9-10-10-11 repetitions of 27 stitches). When entire diagram A.3 has been worked vertically, switch to circular needle size 4.5 mm / US 7. Work 2 ridges. Switch back to circular needle size 5 mm / US 8 and bind off - make sure to avoid a tight bind-off edge. SLEEVE: Work sleeves in the round on a short circular needle/double pointed needles. Slip the 49-51-57-59-65-65 stitches from stitch holder in one side of piece on double pointed needles size 5 mm / US 8 and pick in addition up 1 new stitch in each of the 6-8-10-12-12-14 new stitches cast on under sleeve = 55-59-67-71-77-79 stitches on needle. Insert a marker thread mid under sleeve (i.e. in the middle of the 6-8-10-12-12-14 new stitches). Now work pattern as follows: Work 3-5-5-7-7-8 stitches in stockinette stitch, continue with pattern A.2/A.4 over the next 49-49-57-57-63-63 stitches - i.e. in size S, M and L work the remaining rounds in A.2 (without increases in each side of diagram) before continue with A.4 over A.2, work in stockinette stitch over the remaining 3-5-5-7-7-8 stitches on round. When sleeve measures 3 cm / 1" from the new stitch cast on, decrease 1 stitch on each side of marker thread - READ DECREASE TIP. Decrease like this every 9th-7th-5th-4th-4th-4th round 6-7-10-11-11-11 times in total = 43-45-47-49-55-57 stitches (work the stitches that do not fit the pattern when decreasing in stockinette stitch). When sleeve measures 24 cm / 9½", switch to double pointed needles size 4.5 mm / US 7. Work 2 ridges. Switch back to double pointed needles size 5 mm / US 8 and bind off - make sure to avoid a tight bind-off edge. |
||||||||||||||||||||||
Diagram explanations |
||||||||||||||||||||||
|
||||||||||||||||||||||
 |
||||||||||||||||||||||
 |
||||||||||||||||||||||
 |
||||||||||||||||||||||
 |
||||||||||||||||||||||
 |
||||||||||||||||||||||
Have you finished this pattern?Tag your pictures with #dropspattern #timeforteatunic or submit them to the #dropsfan gallery. Do you need help with this pattern?You'll find 25 tutorial videos, a Comments/Questions area and more by visiting the pattern on garnstudio.com. © 1982-2026 DROPS Design A/S. We reserve all rights. This document, including all its sub-sections, has copyrights. Read more about what you can do with our patterns at the bottom of each pattern on our site. |
||||||||||||||||||||||


With over 40 years in knitting and crochet design, DROPS Design offers one of the most extensive collections of free patterns on the internet - translated to 17 languages. As of today we count 325 catalogs and 12298 patterns - 12288 of which are translated into English (US/in).
We work hard to bring you the best knitting and crochet have to offer, inspiration and advice as well as great quality yarns at incredible prices! Would you like to use our patterns for other than personal use? You can read what you are allowed to do in the Copyright text at the bottom of all our patterns. Happy crafting!
Post a comment to pattern DROPS 178-15
We would love to hear what you have to say about this pattern!
If you want to leave a question, please make sure you select the correct category in the form below, to speed up the answering process. Required fields are marked *.