
Popular categories
Looking for a yarn?


Comments / Questions (40)
![]() Marianne Hansen wrote:
Marianne Hansen wrote:
Jeg kan ikke finde ændringen af diagram 3. jeg har svært ved at følge diagrammerne. jeg synes ikke de passer med blusen. v h marianne 🙂
02.06.2022 - 12:45DROPS Design answered:
Hej Marianne, Du skal først følge teksten hvor det står STRIBER øverst i opskriften, når det står diag A.3 starter du nederst i A.3 og følger diagrammet opad, så A.2. Det er de rettede diagrammer som ligger i opskriften. God fornøjelse!
02.06.2022 - 14:38
![]() Bernadette Alain wrote:
Bernadette Alain wrote:
Merci beaucoup pour ce modèle je réalise pour mes ptits loulous facile à faire et bien expliquer merci beaucoup et félicitations à toute votre équipe
10.07.2021 - 17:58
![]() Lelletta wrote:
Lelletta wrote:
Buonasera, sono arrivata ai 50 cm di lunghezza, dove dite di aumentare 32 maglie (taglia 7/8) arrivando ad ottenere 196 maglie, ma in questo modo il maglione non diventa troppo largo alla base? E' giusta la spiegazione? Scusate, ma ho qualche dubbio, visto che gli schemi sono sbagliati...Vi ringrazio se vorrete rispondermi. Buona serata!
10.06.2021 - 16:22DROPS Design answered:
Buongiorno Lelletta, al momento non ci sono correzioni in merito, in ogni caso è l'ultima parte del maglione, può provarlo durante la lavorazione per controllare se il numero di maglie da aumentare le risulta eccessivo. Buon lavoro!
11.06.2021 - 08:00
![]() Lelletta wrote:
Lelletta wrote:
Buonasera, il diagramma A3 non corrisponde alle righe della foto! Vi è stato segnalato anche dalla signora Liesbeth a settembre del 2020....
08.06.2021 - 19:06DROPS Design answered:
Buongiorno Lelletta, trasmetteremo la sua segnalazione al settore design per una verifica. Se ci saranno correzioni le potrà trovare direttamente online nei prossimi giorni. Buon lavoro!
11.06.2021 - 07:55
![]() Carina wrote:
Carina wrote:
Hur mycket garn går det om man stickar det i en färg? Mvh Carina
27.05.2021 - 20:24DROPS Design answered:
Hej Carina, du kan säkert dra bort den naturfärgade i den storleken du väljer :)
28.05.2021 - 13:44
![]() Liesbeth wrote:
Liesbeth wrote:
Klopt het schema A3 wel? In het schema staan 2 ndl lichtbruin dan 2 nld wit en dan 4 nld lichtbruin. Op de foto echter zie je 4 nld lichtbruin, 2 nld wit en 8 ndl lichtbruin. Graag Uw hulp. bij voorbaar dank.
13.09.2020 - 14:34DROPS Design answered:
Dag Liesbeth,
Het lijkt er inderdaad op dat er een foutje in zit en dat je A.3 breit zoals je aangeeft. Ik zal het doorgeven aan de ontwerpafdeling om te controleren.
15.09.2020 - 09:13
![]() Anki King wrote:
Anki King wrote:
Synes det låter merkelig å skulle øke 28 masker på en runde etter at ermene har kommet på tråd. I alle andre ragland oppskrifter jeg finner strikkes det bare rett ned under ermene.
03.05.2020 - 11:09DROPS Design answered:
Hei Anki. Det skal ikke økes rett etter ermene er satt på en tråd, men når arbeidet måler totalt 41-45-50-55-59-64 cm fra skulderen. Da strikkes det 1 omgang glattstrikk SAMTIDIG som det økes 28-32-32-36-36-40 m jevnt fordelt = 172-184-196-208-216-228 masker. Nå byttes det til rundpinne 3 og det strikkes vrangbord. God Fornøyelse!
04.05.2020 - 12:05
![]() Anki wrote:
Anki wrote:
Hei, Er på bærestykke og er usikker på økningen på hver side av de fire merkene. Er det hvorsomhelst mellom merkene man skal øke eller så nærme merket som mulig? Ser at man ofte velger en midt maske ved ragland, men her skal man øke på hver side av merket, så jeg vet ikke om det betyr at man skal øke to masker i samme mellomrom der merket er, eller på andre siden av maskene på hver side av merket?
03.05.2020 - 02:32DROPS Design answered:
Hei Anki. Slik øker du til raglan: Start 2 masker før merket: lag 1 kast, strikk 2 rett (merket sitter midt mellom disse maskene), lag 1 kast. På neste omgang strikkes kastene vridd rett for å unngå hull (dvs strikk i bakre del av masken istedenfor i fremre). Neste gang de skal økes gjør du det samme: Start 2 masker før merket: lag 1 kast, strikk 2 rett (merket sitter midt mellom disse maskene), lag 1 kast osv. mvh DROPS design
04.05.2020 - 14:37
![]() Andrea wrote:
Andrea wrote:
Hallo, ich komme mit der Farbverteilung beim Diagramm A2 nicht klar. Das Dunkelbraun sehe ich auf dem Foto nicht und auch mit der Reihenanzahl scheinen Foto und Diagramm nicht übereinzustimmen.
19.03.2019 - 06:44DROPS Design answered:
Liebe Andrea, edit 21/03 Die Streifen stimmen schon: der PUllover wird oben nach unten gestrickt, aber die Diagramme stricken Sie von unten nach oben, nach 6-7-8-10-11-12 Rd mit dunkelbraun (siehe Streifen) stricken Sie A.3 und damit mit 2 Runden dunkelbraun anfangen. Viel Spaß beim stricken!
19.03.2019 - 11:09
![]() Virginia Ransom wrote:
Virginia Ransom wrote:
Ich will wissen ob meine Bestellung der nötige Wolle von Sticks and Stones eingegangen ist, und habe die telefon Kontaktnummer +47 23 303220 vergeblich versucht. Ich verstehe die norwegische Sprache leider nicht. Können Sie mir bitte helfen ob meine Bestellung eingegangen ist oder nicht.
28.01.2019 - 16:31DROPS Design answered:
Liebe Frau Ransom, wie früher beantwortet, können wir Ihnen leider nicht weiterhelfen, an den Verkaufer/Laden sollen Sie sich direkt wenden. Nur so können Sie mehr über Ihre Bestellung wissen.
28.01.2019 - 16:39
|
|||||||||||||
Sticks and Stones#sticksandstonessweater |
|||||||||||||
 |
 |
||||||||||||
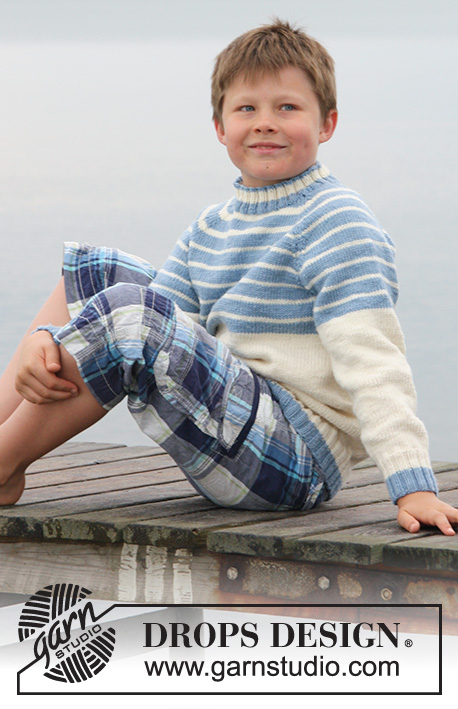
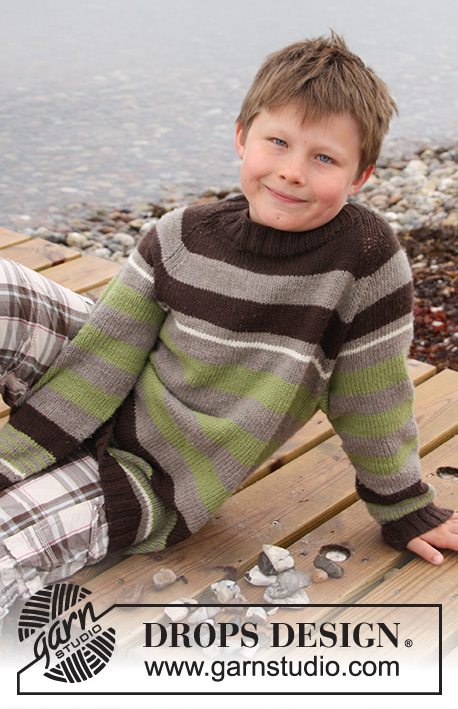
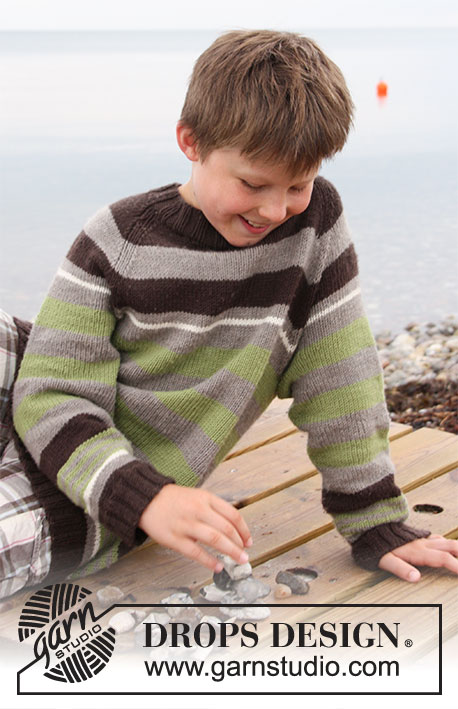
Knitted sweater with stripes and raglan, worked top down in DROPS Merino Extra Fine. Size children 3 to 14 years.
DROPS Children 27-18 |
|||||||||||||
|
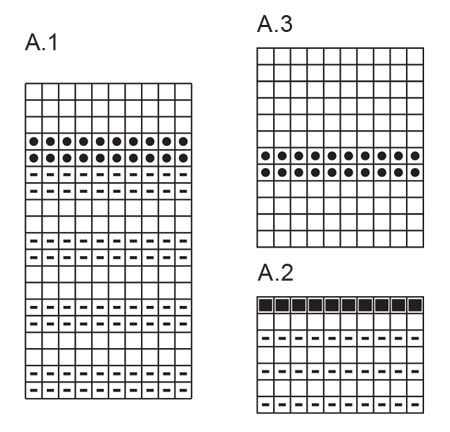
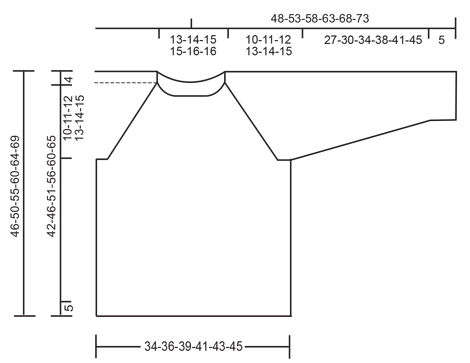
INCREASE TIP (applies to raglan): Work until 2 sts remain before marker: Make 1 YO, K 2 sts (marker is in the middle of these sts), make 1 YO. On next round K YOs twisted (i.e. work in back loop of st instead of front) to avoid holes. DIAGRAM: See diagram A.1-A.3. STRIPES: Work: 21-21-26-20-20-24 rounds with dark brown (including rib and short rows on neck) , 6-7-8-10-11-12 rounds with light brown and 6-7-8-10-11-12 round with dark brown, diagram A.3, diagram A.2 (work 6-7-8-10-11-12 rounds of each stripe), diagram A.1. Then work with dark brown until finished measurements. IE: In diagram A.1 and A.3 each row of diagram = 1 round. In diagram A.2 work 6-7-8-10-11-12 rounds (= approx. 2-2.5-3-3.5-4-4 cm of each stripe (Stripes in A.2 vary in the different sizes according to length of garment). DECREASE TIP (applies to sleeves): Work until 2 sts remain before marker, K 2 tog and K 2 twisted tog (i.e. work in back loop of st instead of front). -------------------------------------------------------- JUMPER: Worked in the round on circular needle, from top down in STRIPES - see explanation above. YOKE: Cast on 92-92-96-96-96-96 sts on a short circular needle size 3 mm with dark brown, insert 1 marker at beg of round (= mid back). K 1 round. Work rib = K 2/P 2 for 3 cm/1". Then work an elevation in back of neck as follows (continue in rib): Work 8 sts past marker, turn, tighten yarn and work 16 sts back, turn, tighten yarn and work 24 sts, turn, continue by working 8 sts more on every turn until a total of 48-48-64-64-64-64 sts have been worked, turn and work 1 round until marker mid back again. Switch to circular needle size 4 mm / US 6 and work 1 round in stockinette st while at the same time inc 10 sts evenly = 102-102-106-106-106-106 sts. Now insert 4 new markers (for raglan) as follows: Work 17-17-18-18-18-18 sts from marker mid back, insert 1st marker here (at the same time remove marker mid back), work 17 sts more (= sleeve), insert 2nd marker, work 34-34-36-36-36-36 sts (= front piece) and insert 3rd marker, work 17 sts (= sleeve), insert 4th marker and work until 1st marker again (there are 34-34-36-36-36-36 sts between markers on back piece). REMEMBER STRIPES! Then on 1st round, inc 1 st on each side of the 4 markers for raglan (= 8 inc) - SEE INCREASE TIP! Repeat inc every round 1-3-3-5-5-7 times (= 2-4-4-6-6-8 times in total) and then every other round 13-13-15-15-17-17 times = 222-238-258-274-290-306 sts on needle. Work next round as follows: Slip the 47-51-55-59-63-67 sts between 1st and 2nd marker on a stitch holder, cast on 8 new sts over stitch holder, work until 3rd marker, slip the 47-51-55-59-63-67 sts between 3rd and 4th marker on a stitch holder, cast on 8 new sts over stitch holder, work until 1st marker again = 144-152-164-172-180-188 sts on needle. BODY: Continue with STRIPES in stockinette st. Work until piece measures 41-45-50-55-59-64 cm / 16"-17¾"-19¾"-21½"-23¼"-25¼" in total from shoulder. Work first 1 round in stockinette st while AT THE SAME TIME inc 28-32-32-36-36-40 sts evenly = 172-184-196-208-216-228 sts. Switch to circular needle size 3 mm / US 2.5 and work rib = K 2/P 2 for 5 cm / 2". LOOSELY bind off with K over K and P over P. Piece measures in total approx. 42-46-51-56-60-65 cm / 16½"-18"-20"-22"-23½"-25½" from neck (= 46-50-55-60-64-69 cm / 18"-19¾"-21½"-23½"-25¼"-27" in total from shoulder and down). SLEEVE: Slip sts from one stitch holder on double pointed needles size 4 mm / US 6 and cast in addition on 8 new sts under sleeve = 55-59-63-67-71-75 sts. Insert 1 marker mid under sleeve (i.e. in the middle of the 8 new sts). NOW MEASURE PIECE FROM HERE! Continue with STRIPES - AT THE SAME TIME when 2.5 cm / ⅞" have been worked, dec 1 st on each side of marker – SEE DECREASE TIP! Repeat dec every 2.5 cm / ⅞" 8-10-11-13-14-15 more times (= 9-11-12-14-15-16 times in total) = 37-37-39-39-41-43 sts. Continue to work until sleeve measures 27-30-34-38-41-45 cm / 10½"-11½"-13½"-15"-16"-17¾". Work 1 round in stockinette st while AT THE SAME TIME inc 7-7-9-9-7-9 sts evenly = 44-44-48-48-48-52 sts. Switch to double pointed needles size 3 mm / US 2.5 and work rib = K 2/P 2 for 5 cm / 2". Then LOOSELY bind off with K over K and P over P. Work the other sleeve the same way. ASSEMBLY: Sew the openings under the sleeves. |
|||||||||||||
Diagram explanations |
|||||||||||||
|
|||||||||||||
 |
|||||||||||||
 |
|||||||||||||
Have you finished this pattern?Tag your pictures with #dropspattern #sticksandstonessweater or submit them to the #dropsfan gallery. Do you need help with this pattern?You'll find 24 tutorial videos, a Comments/Questions area and more by visiting the pattern on garnstudio.com. © 1982-2026 DROPS Design A/S. We reserve all rights. This document, including all its sub-sections, has copyrights. Read more about what you can do with our patterns at the bottom of each pattern on our site. |
|||||||||||||


With over 40 years in knitting and crochet design, DROPS Design offers one of the most extensive collections of free patterns on the internet - translated to 17 languages. As of today we count 324 catalogs and 12290 patterns - 12280 of which are translated into English (US/in).
We work hard to bring you the best knitting and crochet have to offer, inspiration and advice as well as great quality yarns at incredible prices! Would you like to use our patterns for other than personal use? You can read what you are allowed to do in the Copyright text at the bottom of all our patterns. Happy crafting!
Post a comment to pattern DROPS Children 27-18
We would love to hear what you have to say about this pattern!
If you want to leave a question, please make sure you select the correct category in the form below, to speed up the answering process. Required fields are marked *.