
Popular categories
Looking for a yarn?


Comments / Questions (84)
![]() Monica wrote:
Monica wrote:
Har precis börjat på denna modell och när jag stickar förhöjningen i slätstickning i nacken tycker jag inte det ser ut som på bilden. Men flickans hår skymmer ju hur det ska se ut. (slätstickningen kommer under den rätstickade kanten???)
16.11.2016 - 16:07DROPS Design answered:
Hej Monica. Ja, det er korrekt - du skal strikke slätstickning erfter retkanten og herefter kommer mönstret.
17.11.2016 - 13:32
![]() Kathrin Kok wrote:
Kathrin Kok wrote:
Der er fejl. Der står ingen steder at du skal stoppe med a2 når du har taget ud til ærmer.
29.10.2016 - 22:19DROPS Design answered:
Hej Kathrin. Naar du deler arbejdet op i forstk/rygstk og aermer fortsaetter du först som för over ryg/forstk (dvs, du strikker videre over maskerne til disse dele som för) og naar du strikker aermet fortsaetter du med A.2 som beskrevet.
01.11.2016 - 10:24
![]() Kathleen Baker wrote:
Kathleen Baker wrote:
Hi,just want to thank you for help ,it all seems to be going okay at the moment. many thanks.Kate Baker
23.10.2016 - 19:46
![]() Jan wrote:
Jan wrote:
Just to clarify my first question. I want to know the basic size in centimeters. S/M/ L etc; etc; is a bit vague.
22.10.2016 - 00:56DROPS Design answered:
Dear Jan, see answer below. Happy knitting!
24.10.2016 - 09:20
![]() Jan wrote:
Jan wrote:
I may be overlooking something. I cannot find the measurements for this cardigan. Thanks.
22.10.2016 - 00:51DROPS Design answered:
Dear Jan, you will find a measurement chart at the bottom of the page with all measurements for each side, taken flat from side to side. Compare these to a similar garment you have and like the shape to find out the matching size. Read more here. Happy knitting!
24.10.2016 - 09:20
![]() Kathleen Baker wrote:
Kathleen Baker wrote:
Hi,could you tell me where the marker should be after all the increases are done as I am about to start the decreases in the body after the sleeves separate and I am not sure where the marker should be .Many thanks .Kate Baker
19.10.2016 - 17:58DROPS Design answered:
Dear Mrs Baker, the markers on the sides should be inserted in the middle of the new sts cast on under sleeve, ie in the middle of the 6-6-8-8-10-12 new sts cast on. Happy knitting!
20.10.2016 - 11:41
![]() Nicole Chapdelaine wrote:
Nicole Chapdelaine wrote:
Ce modèle devrait être identique pour le devant gauche et devant droit. Pour le devant droit il y a un A.2 de trop Merci de bien vouloir me répondre Nicole
18.10.2016 - 06:17DROPS Design answered:
Bonjour Mme Chapedlaine, on tricote 4 fois A.2 au total, chaque A.2 correspond à la ligne du raglan et se tricotent (vu sur l'endroit): entre le devant gauche et la manche, entre la manche et le dos, entre le dos et la manche et entre la manche et le devant droit. Quand vous augmentez pour les devants, augmentez avant A.2 sur le devant gauche et après A.2 pour le devant droit. Bon tricot!
18.10.2016 - 09:38
![]() Dorte Schleimann wrote:
Dorte Schleimann wrote:
Denne opskrift er, til dato, den dårligst gennemarbejdede og umulige, jeg har oplevet, fyldt med fejl.. Venligst Dorte Schleimann
29.09.2016 - 21:37DROPS Design answered:
Hej Dorte. Okay... Men er det muligt at du kan sige hvad du synes der er fejl - og hvilken str du laver. For saa kan vi kigge det igennem og se hvad der eventuelt er galt. ;-)
30.09.2016 - 14:02
![]() Betina Eriksen wrote:
Betina Eriksen wrote:
Jeg starter med at have 16 m ærme, tager 2 x 20 ud = 40 m, total 56 m, hvorfor skal der så 64 m på tråd til ærme?
22.09.2016 - 20:37DROPS Design answered:
Hej Betina. Du saetter ogsaa 4 m af A.2 i hver side paa aermet = undersiden af aermet.
27.10.2016 - 16:40
![]() Betina Eriksen wrote:
Betina Eriksen wrote:
Hvor sættes der mærker på ryg/forstyk? der skal tages 1 maske ind på hver side af mærker
22.09.2016 - 12:39
|
|||||||||||||||||||
Lobelia#lobeliacardigan |
|||||||||||||||||||
 |
 |
||||||||||||||||||
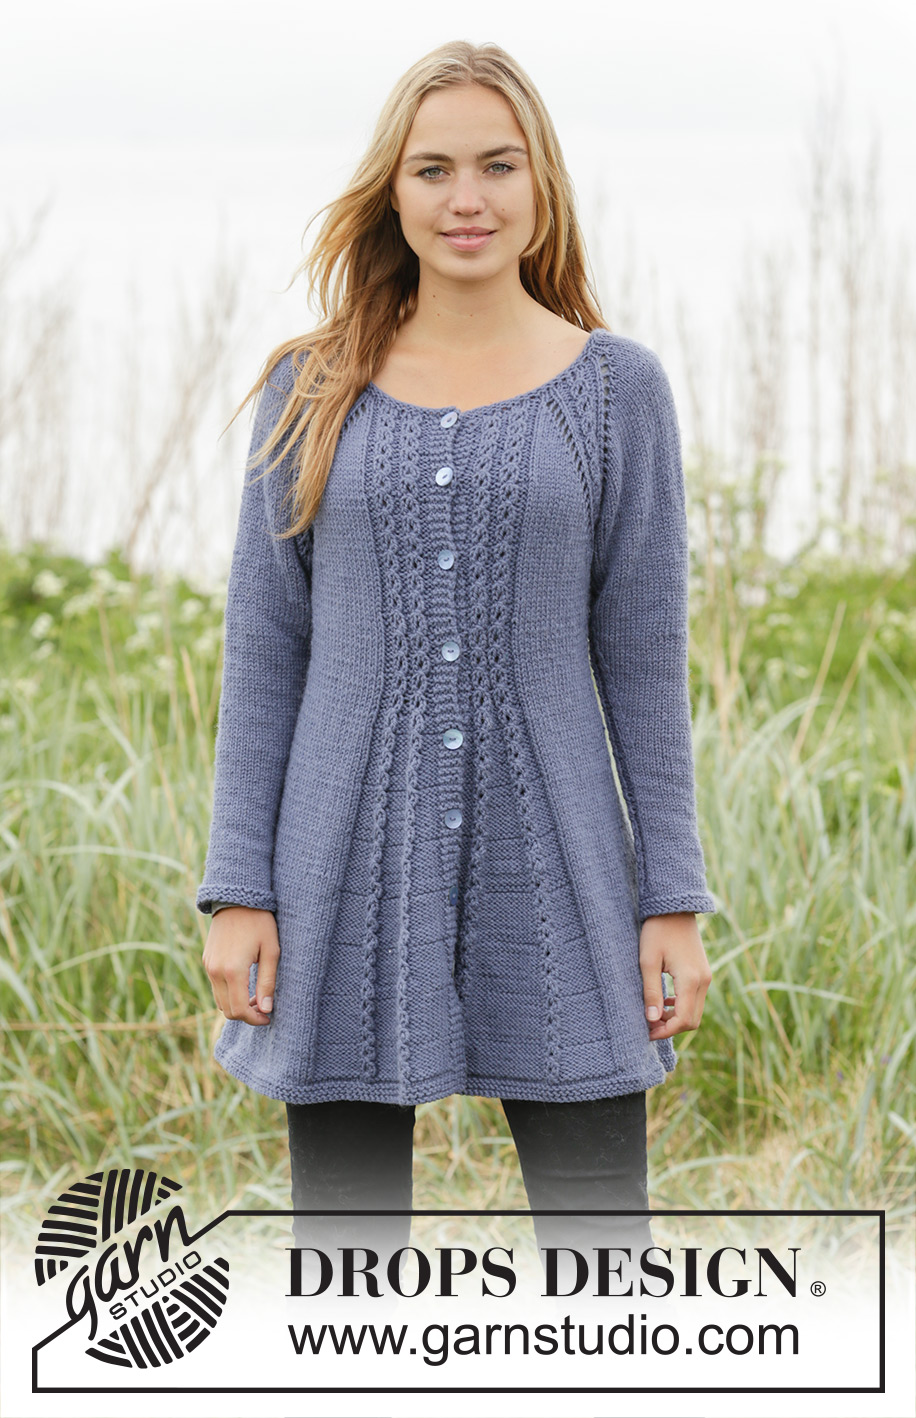
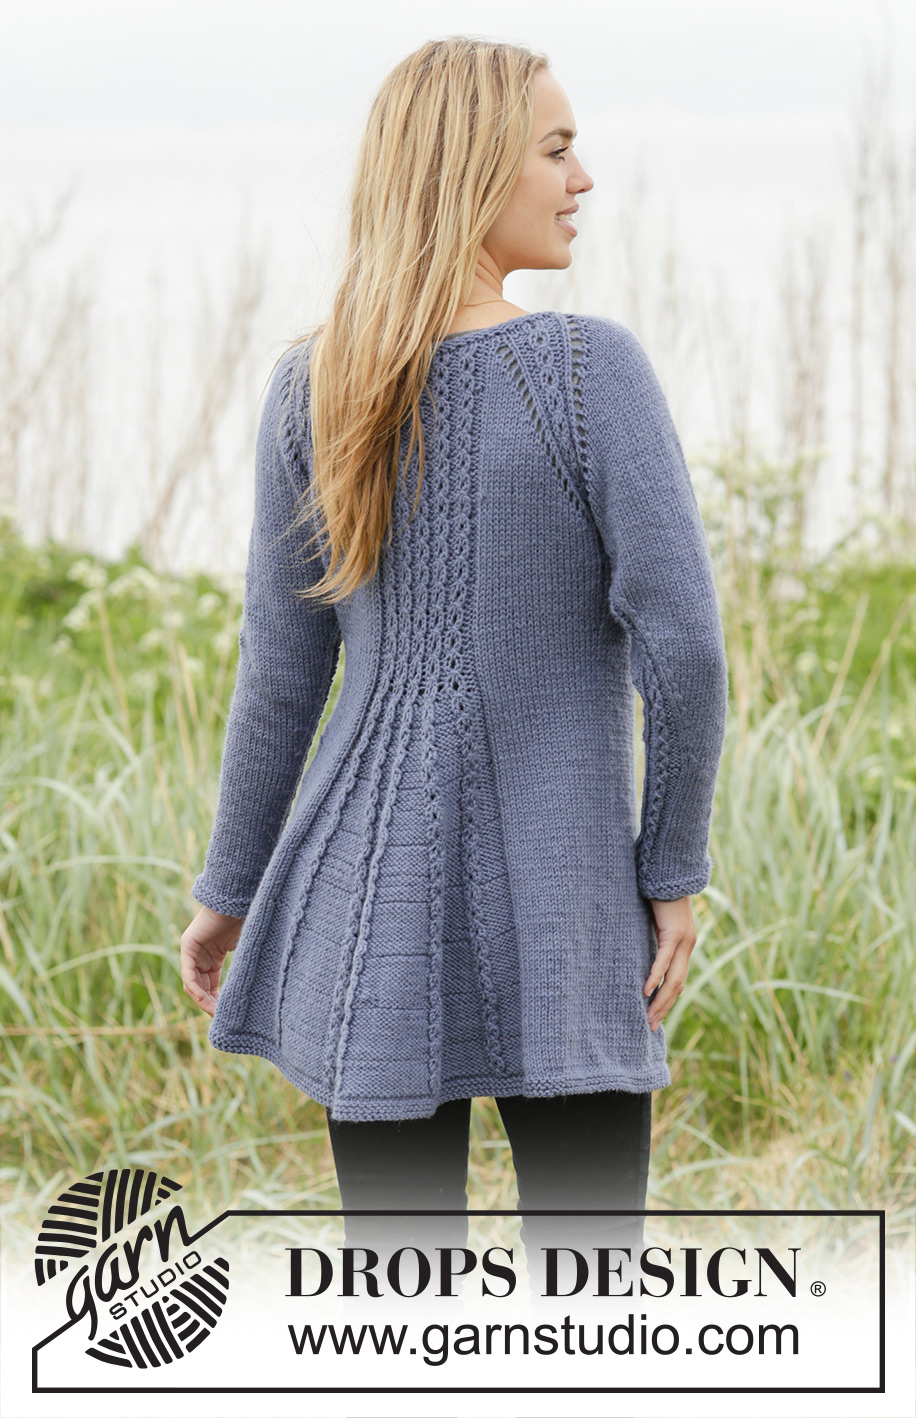
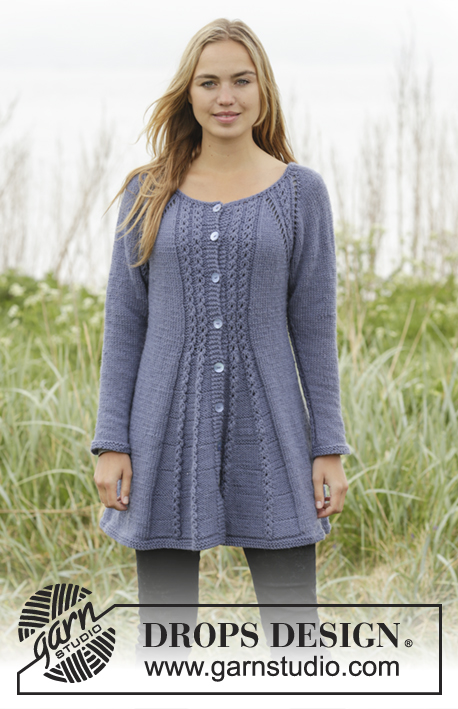
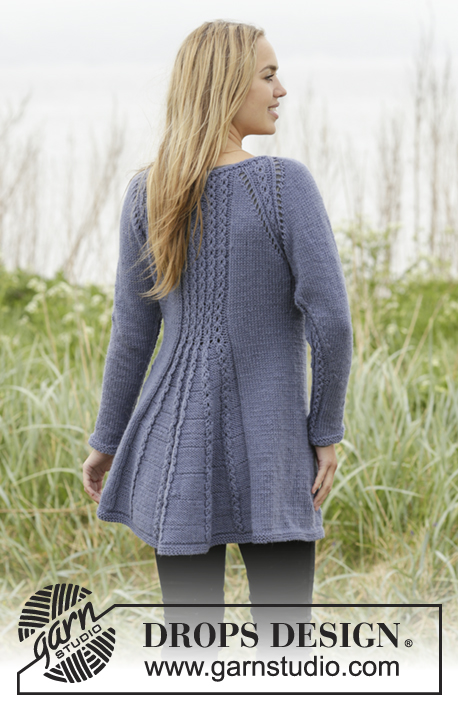
Knitted DROPS jacket with raglan and cables, worked top down in ”Nepal”. Size S-XXXL.
DROPS 171-14 |
|||||||||||||||||||
|
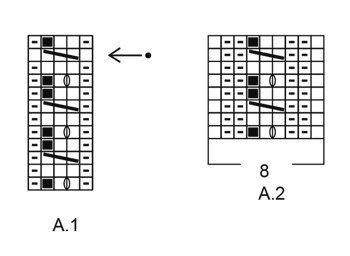
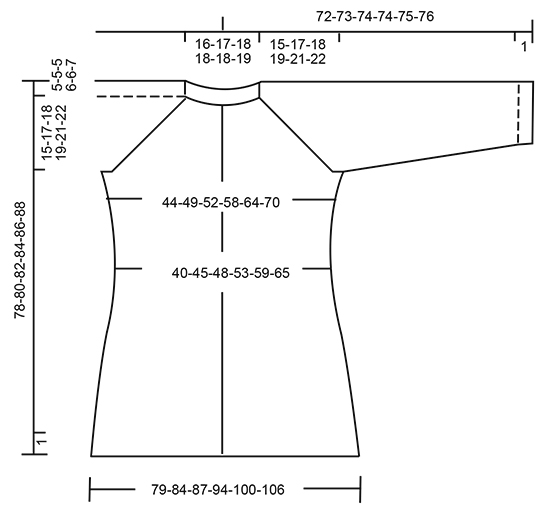
GARTER ST (worked in the round): 1 ridge = 2 rounds. * K 1 round and P 1 round *, repeat from *-*. GARTER ST (back and forth): K all rows. 1 ridge = K2 rows. PATTERN: See diagrams A.1 and A.2. The diagrams show all rows in pattern seen from RS. INCREASE TIP-1 (evenly spaced): To calculate how often inc should be done, use the total no of sts on row (e.g. 97 sts), minus bands (e.g. 8 sts) and divide the remaining sts by no of inc to be done (e.g. 20) = 4.4. I.e. in this example inc 1 st alternately for every 4th and 5th st (and do not inc over bands). INCREASE TIP-2 (body): All inc are done from RS. Inc 1 st P by making a YO. On next row K YO twisted to avoid holes. RAGLAN SLEEVE: Inc 1 st after/before A.2 on sleeve by making a YO (= 2 sts inc on each sleeve). On next row P YOs to make holes. RAGLAN BODY: Inc first 2 sts before/after A.2 on front and back piece (= 8 sts inc in total), then inc 1 st before/after A.2 on front and back piece (= 4 sts inc in total). Inc 2 sts before A.2 as follows: Work until 1 st remains before A.2, 1 YO, K 1, 1 YO. Inc 2 sts after A.2 as follows: 1 YO, K 1, 1 YO. NOTE: On next row P YOs closest A.2 to make holes. P the other YOs twisted to avoid holes. Inc 1 st before/after A.2 as follows: Inc 1 st by making a YO. On next row P YOs to make holes. DECREASE TIP-1 (body): Work until 4 sts remain before marker, K 2 tog, K 4 (marker is between these sts), slip next st as if to K, K 1, psso. Repeat in the other side (= 4 sts dec). DECREASE TIP-2 (sleeve): Work until 2 sts remain before A.2, K 2 tog, A.2, slip next st as if to K, K 1, psso (= 2 sts dec). BUTTONHOLES: Dec for buttonholes on right band. I.e. band at the end of row seen from RS. 1 buttonhole = K tog third and fourth st from edge and make 1 YO. Dec for buttonholes when piece measures (from cast-on edge and along the band): SIZE S: 2, 11, 20, 29, 38 and 47 cm. SIZE M: 2, 11, 20, 29, 38 and 47 cm. SIZE L: 2, 12, 21, 31, 40 and 50 cm SIZE XL: 2, 12, 21, 31, 40 and 50 cm SIZE XXL: 2, 12, 22, 32, 42 and 52 cm SIZE XXXL: 2, 12, 22, 32, 42 and 52 cm Conversion to inch - see page 4. BIND-OFF TIP: To avoid a tight bind-off edge you may use a needle ½ size larger. ---------------------------------------------------------- JACKET: Worked back and forth on circular needle, top down. YOKE: Cast on 97-99-103-109-111-117 sts (includes 4 band sts in garter st in each side) on circular needle size 4.5 mm / US 7. Work 2 ridges in GARTER ST - see explanation above and inc 17-19-19-25-27-25 sts evenly on last row from RS - READ INCREASE TIP-1 = 114-118-122-134-138-142 sts. Switch to circular needle size 5 mm / US 8. Now work an elevation in stockinette st in the back of neck as follows: Work the first 61-63-67-73-77-79 sts, turn and work 16-16-20-20-24-24 sts, turn and work 20-20-24-24-28-28 sts, turn and work 24-24-28-28-32-32 sts, turn and work the rest of row. Then P 1 row with 4 band sts in garter st in each side. REMEMBER BUTTONHOLES! Now work pattern as follows from RS: 4 band sts in garter st, P 1, A.1 (= 4 sts) 2-2-2-3-3-3 times, P 1, K 1-2-2-1-2-3 (= left front piece), A.2 (= 8 sts on 1st row), K 14-14-16-16-16-16 (= sleeve), A.2, K 1-2-2-1-2-3, P 1, A.1 5-5-5-7-7-7 times, P 1, K 1-2-2-1-2-3, (= back piece) A.2, K 14-14-16-16-16-16 (= sleeve), A.2, K 1-2-2-1-2-3, P 1, A.1 2-2-2-3-3-3 times, P 1, 4 band sts in garter st. Work 1 row from WS the same way. REMEMBER THE KNITTING GAUGE On next row from RS, beg inc for RAGLAN BODY and RAGLAN SLEEVE – see explanation above. NOTE: Inc differently on sleeves and body. BODY: Inc 2 sts every other row 4-4-5-6-7-9 times and 1 st every other row 11-14-14-14-15-14 times (= 15-18-19-20-22-23 times in total). SLEEVES: Inc like this every other row 15-18-19-20-22-23 times in total. When all inc are done there are 250-278-294-318-342-362 sts on needle. Now work as follows from WS: Work the first 38-42-44-49-53-57 sts (= right front piece), slip the next 52-58-62-64-68-70 sts on a stitch holder (= sleeve), cast on 6-6-8-8-10-12 sts under sleeve, work the next 70-78-82-92-100-108 sts (= back piece), slip the next 52-58-62-64-68-70 sts on a stitch holder (= sleeve), cast on 6-6-8-8-10-12 sts under sleeve, work the remaining 38-42-44-49-53-57 sts (= left front piece). Piece measures approx. 15-17-18-19-21-22 cm / 6"-6¾"-7"-7½"-8¼"-8¾" along band. BODY: There are now 158-174-186-206-226-246 sts for body. NOW MEASURE THE PIECE FROM HERE. Continue pattern back and forth as before and insert a marker in the middle of the new sts under sleeve in each side. Then dec in each side and in pattern as follows: DECREASE IN THE SIDES: When piece measures 4 cm / 1½", dec 1 st on each side of marker in each side - READ DECREASE TIP-1 (body). Repeat dec every 8th row 2 times in total = 8 sts dec in total. DECREASE IN PATTERN: When piece measures 6 cm / 2⅜", dec 1 st P by P 2 tog in every section with P between 2 cables = 6-6-6-10-10-10 sts dec (i.e. dec 1-1-1-2-2-2 sts on each front piece and 4-4-4-6-6-6 sts on back piece). When all dec are done, there are 144-160-172-188-208-228 sts on needle. When piece measures 15-15-16-16-16-16 cm / 6"-6"-6¼"-6¼"-6¼"-6¼"", inc 1 st P in every section where P sts were dec – READ INCREASE TIP-2 (= 6-6-6-10-10-10 sts inc) = 150-166-178-198-218-238 sts. On next row from RS inc 1 st P on each side of each cable = 18-18-18-26-26-26 sts inc on needle. Inc like this every 10th-10th-10th-14th-14th-14th row (= every 5th-5th-5th-7th-7th-7th row from RS) 7-7-7-5-5-5 times in total = 276-292-304-328-348-368 sts. When all inc are done, continue back and forth in pattern. When piece measures 56-56-57-57-57-57 cm / 22"-22"-22½"-22½"-22½"-22½" – adjust to finish after 4th or 8th row in pattern, work 2 rows in stockinette st inside 4 band sts in garter st in each side. Switch to circular needle size 4.5 mm / US 7 and work 2 ridges. Bind off - READ BIND-OFF TIP. SLEEVE: Work sleeves in the round on double pointed needles. Slip the 52-58-62-64-68-70 sts from stitch holder on double pointed needles size 5 mm / US 8 and pick up 1 st in each of the 6-6-8-8-10-12 new sts cast on under sleeves = 58-64-70-72-78-82 sts. Insert a marker in the middle of the new sts. NOW MEASURE THE PIECE FROM HERE. Now work A.2 (= 8 sts on 1st row) mid under sleeve (i.e. there are 4 sts of A.2 on each side of marker), work the remaining sts on round in stockinette st. When piece measures 4 cm / 1½", dec 1 st on each side of A.2 - READ DECREASE TIP-2 (sleeve). Dec like this every 8th-6th-5th-4th-4th-4th round 11-14-15-19-18-19 times in total = 36-36-40-40-42-44 sts. When sleeve measures 48-47-46-45-44-44 cm / 19"-18½"-18"-17¾"-17¼"-17¼", switch to double pointed needles size 4.5 mm / US 7. Work 2 ridges. Bind off. Make another sleeve the same way. ASSEMBLY: Sew the buttons on to left band. |
|||||||||||||||||||
Diagram explanations |
|||||||||||||||||||
|
|||||||||||||||||||
 |
|||||||||||||||||||
 |
|||||||||||||||||||
Have you finished this pattern?Tag your pictures with #dropspattern #lobeliacardigan or submit them to the #dropsfan gallery. Do you need help with this pattern?You'll find 30 tutorial videos, a Comments/Questions area and more by visiting the pattern on garnstudio.com. © 1982-2026 DROPS Design A/S. We reserve all rights. This document, including all its sub-sections, has copyrights. Read more about what you can do with our patterns at the bottom of each pattern on our site. |
|||||||||||||||||||


With over 40 years in knitting and crochet design, DROPS Design offers one of the most extensive collections of free patterns on the internet - translated to 17 languages. As of today we count 325 catalogs and 12298 patterns - 12288 of which are translated into English (US/in).
We work hard to bring you the best knitting and crochet have to offer, inspiration and advice as well as great quality yarns at incredible prices! Would you like to use our patterns for other than personal use? You can read what you are allowed to do in the Copyright text at the bottom of all our patterns. Happy crafting!
Post a comment to pattern DROPS 171-14
We would love to hear what you have to say about this pattern!
If you want to leave a question, please make sure you select the correct category in the form below, to speed up the answering process. Required fields are marked *.