
Popular categories
Looking for a yarn?


Comments / Questions (35)
![]() Eleonora wrote:
Eleonora wrote:
Buongiorno, posso usare ferri NON circolari per realizzare il maglione? In realtà non capisco l'uso dei ferri circolari che generalmente utilizzo per realizzare il collo. Grazie per la risposta.
05.01.2026 - 13:14DROPS Design answered:
Buonasera Eleonora, i ferri circolari si possono usare per lavorare qualsiasi modello, e, anzi, al di fuori dell'Italia sono utilizzati praticamente per tutto. In ogni caso questo modello è un cardigan e può essere lavorato con i ferri dritti. Buon lavoro!
06.01.2026 - 22:21
![]() Annalisa wrote:
Annalisa wrote:
Buingiorno, come realizzo la maglia rasata rovescia? Lavorando tutti i ferri a rovescio? Grazie
15.02.2024 - 23:43DROPS Design answered:
Buonasera Annalisa, si esatto, è tutto a rovescio. Buon lavoro!
16.02.2024 - 19:16
![]() Angelika wrote:
Angelika wrote:
Biljett är bästa mönstret att sticka en nybörjarkofta när man är van att sticka med vanliga (strump)stickor, fram och tillbaka? Har inte lärt mig tekniken på rundsticka, men vill gärna lära mig, tips på videor tas tacksamt emot. Tacksam för svar.
21.10.2023 - 18:41DROPS Design answered:
Hej Angelika, du finder alle aktuelle videoer til opskriften nederst på siden: Rundsticka - fram och tillb på rundsticka
24.10.2023 - 09:07
![]() Lisa wrote:
Lisa wrote:
Hallo liebes Drops-Team, bei folgenden Teil eurer Anleitung für das erste vordere Seitenteil hänge ich leider: ...folgt abketten: 2 M 1 x und dann 1 M 2 x = 16-18-21-23-26-29 Schulter-M übrig. Alle M locker abketten, wenn die Arb eine Gesamtlänge von 78-80-82-84-86-88 cm hat... Ich verstehe nicht, was die Anleitung zum abketten 2 M 1x und dann 1M 2x aussagt. Über eine Antwort würde ich mich sehr freuen! Viele Grüße
26.09.2023 - 15:03DROPS Design answered:
Liebe Lisa, für das rechte Vorderteil werden Sie jetzt die Maschen für den Halsauschnitt abketten (die ersten 9 oder 10 Maschen sind schon stillgegelt), so jetzt ketten Sie 2 Maschen am Anfang der nächsten Hin-Reihe (= ab Halsausschnitt) , dann 1 Masche am Anfang der 2 nächsten Hin-Reihe (= 3 Maschen insgesamt) ab. Viel Spaß beim stricken!
26.09.2023 - 15:19
![]() Maria wrote:
Maria wrote:
Hej Kan jeg strikke rygstykket og forstykkerne samtidigt på rundpinden?
18.09.2023 - 16:08DROPS Design answered:
Hei Maria. Plagget blir veldig tungt ved å strikke rundt, men du kan gjøre det. Bare tilpasse maskeantallet ihht kantmaskene, bruk merketråd til fellingene og ta hensyn til / tilpass MÅLETIPS 1 og 2. mvh DROPS Design
26.09.2023 - 13:12
![]() Camilla wrote:
Camilla wrote:
What is the width of the front right/left piece in cm? I am using a different wool and I just want to make sure my measurements are right. Thank you
15.12.2022 - 05:14DROPS Design answered:
Hi Camilla, You can find a size chart at the bottom of the pattern, with all the measurements for the different sizes. Happy knitting!
15.12.2022 - 06:47
![]() Catherine Shaw wrote:
Catherine Shaw wrote:
Hi. I'm a bit confused at the good. I have CO the hood sts. On the increase row I am not sure what type of stitch should be showing from the right side. Is the garter stitch all along, and the 2 ridges you refer to is 2 ridges of garter stitch all along? Or is it 2 ridges of reverse stockinette on the right side all along with garter stitch at the bands? Is the actual hood in stockinette on the outside with garter stitch at the bands?
12.02.2022 - 15:23DROPS Design answered:
Dear Catherine, you work garter stitch in the bands and the rest in stocking stitch. In the last rows, you work the last 2 ridges in garter stitch over all stitches. Happy knitting!
13.02.2022 - 19:49
![]() Catherine Shaw wrote:
Catherine Shaw wrote:
Hello. I'm reading through the pattern, back piece and I am stuck at the instructions in the waist are: Work A.1 over all sts with 1 edge st in garter st in each side (edge st continues in garter st). When A.1 has been worked 1 time vertically, work piece until finished measurements in reversed stockinette st (edge st in garter st). Is this telling me to do 1 ridge of garter st before doing the reverse stockinette? In the picture it looks like more than 1 ridge at the waist band,
09.01.2022 - 12:47DROPS Design answered:
Dear Mrs Shaw, for A.1, you will work, starting from RS: K1 from RS, K1 from WS (= 1 ridge), 3 rows stocking stitch, K1 from WS( = 2nd ridge), 2 rows stocking stitch. Happy knitting!
10.01.2022 - 08:50
![]() Jackie wrote:
Jackie wrote:
I understand. Thank you for taking the time to get back to me with an explanation. Blessings, Chaplain Jackie
13.07.2021 - 17:21
![]() Jackie wrote:
Jackie wrote:
I really want to make this sweater. I have done the math for the yarn required; therefore needing ~1470 yards. I have 1360 yards of a comparable yarn. I really don't want the hood. 1. Approximately how much yardage is needed to make the hood? 2. Without making the hood, would I have enough yarn to make a shawl collar? 3, Or, enough yarn to just have the border go up and around the neck? Help will be greatly appreciated!
12.07.2021 - 20:59DROPS Design answered:
Dear Jackie, please understand that these patterns are made available to support DROPS yarns (you can use our yarn converter for substituting DROPS yarns), and we cannot help you with other brands, also, we are sorry, but it is impossible to modify and recalculate our patterns (and yarn amounts) to each individual request. Happy Stitching!
13.07.2021 - 01:48
|
|||||||
Aredhel#aredheljacket |
|||||||
 |
 |
||||||
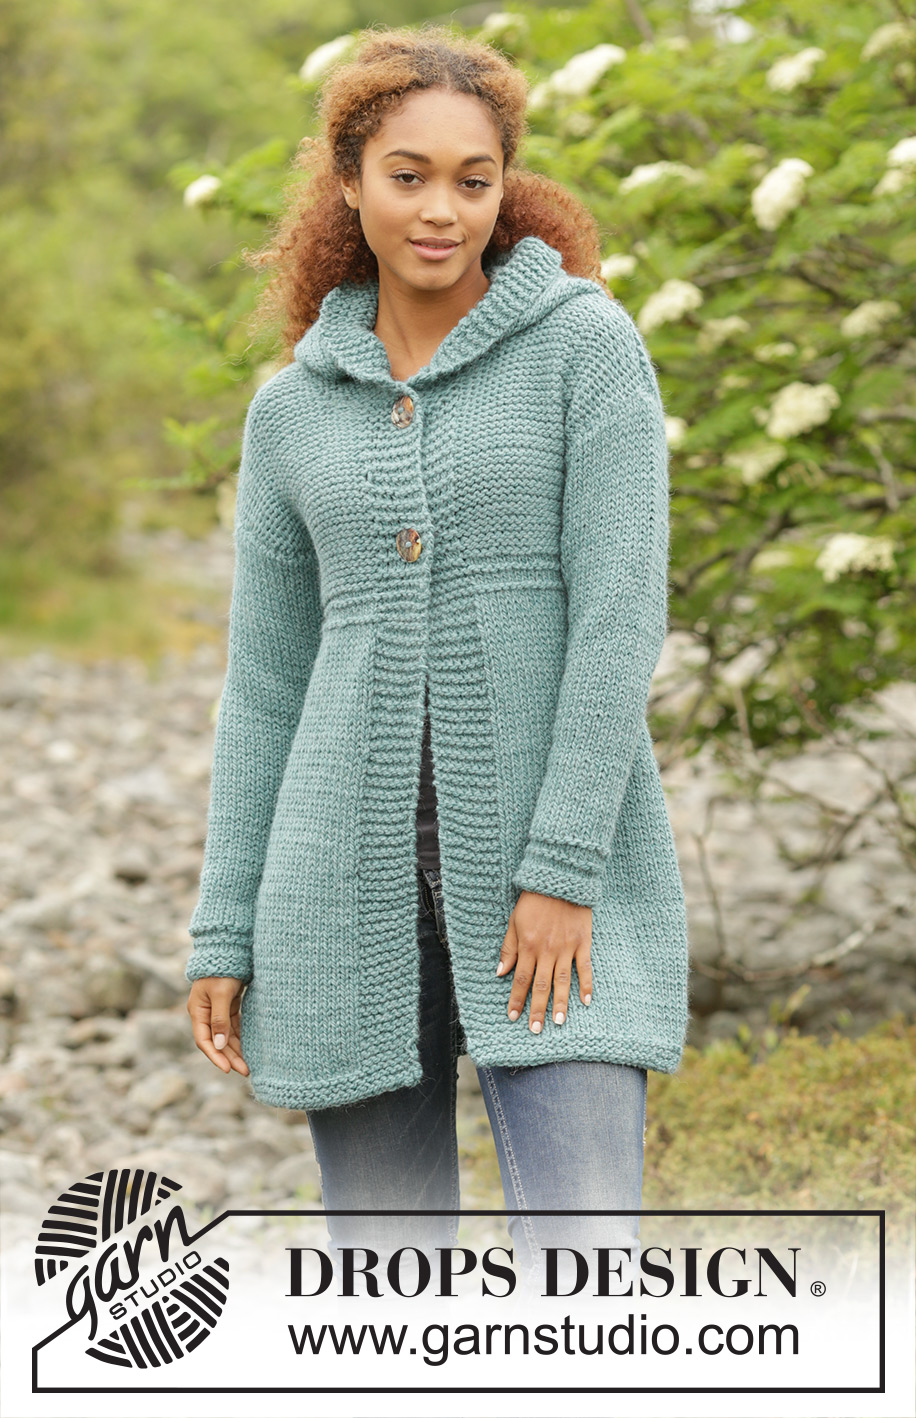
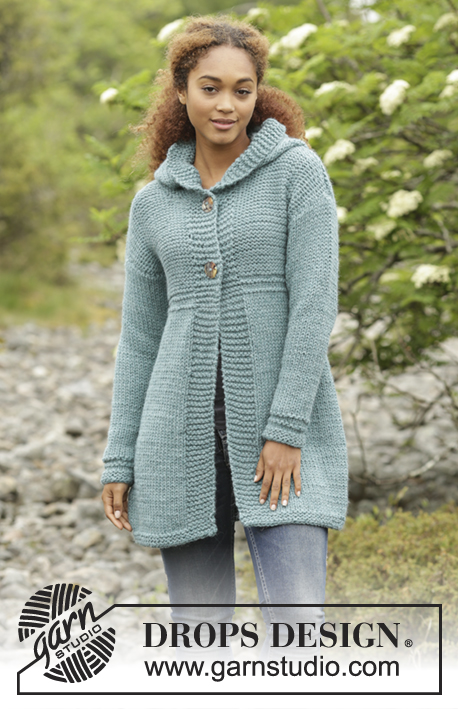
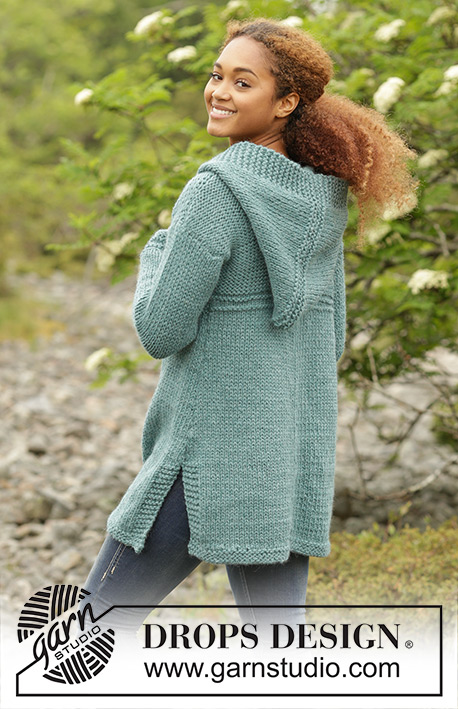
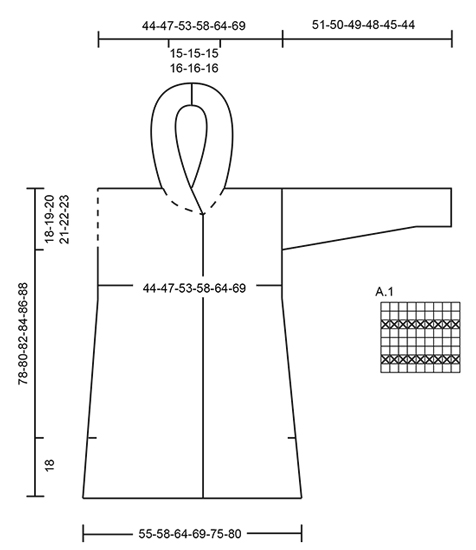
Knitted DROPS jacket with hood and A-shape in "Andes". Size: S - XXXL.
DROPS 172-46 |
|||||||
|
GARTER ST (back and forth): K all rows. 1 ridge = K2 rows. PATTERN: See diagram A.1. The diagram shows all rows in pattern seen from RS. DECREASE TIP: All dec are done from RS! Dec inside 1 st K and 1 edge st in garter st. Dec as follows when 2 sts remain before 1 K st and 1 edge st in garter st: K 2 tog. Dec as follows after 1 st in garter st and K 1: Slip 1 st as if to K, K 1, psso. INCREASE TIP: All inc are done from RS. Inc inside 1 edge st in garter st and 1 K by making 1 YO. On next row P YO twisted to avoid holes. MEASURING TIP-1 (applies to front and back piece): To get the right proportions on jacket length measurements are done when piece is flat. Because of the weight of the yarn the piece will be approx. 10 cm / 4" longer than measurements in chart. MEASURING TIP-2 (applies to sleeve): Because of the weight of the yarn length measurements are done when piece is held up. BUTTONHOLES: bind off for buttonholes on right front piece (from RS): Work 3 sts, bind off 2 sts for buttonhole, work the rest of row. On next row cast on 2 new sts over the bind off sts. bind off for buttonholes when piece measures: SIZE S: 56 and 70 cm / 22" and 27½" SIZE M: 57 and 72 cm / 22½" and 28½" Size L: 58 and 74 cm / 22¾" and 29" SIZE XL: 59 and 76 cm / 23¼" and 30" Size XXL: 60 and 78 cm / 23½" and 30¾" SIZE XXXL: 61 and 80 cm / 24" and 31½" ---------------------------------------------------------- BACK PIECE: The piece is worked back and forth on circular needle because of no of sts. Cast on 60-64-70-76-82-88 sts on circular needle size 7 mm / US 10.75 with Andes. Work 3 ridges in GARTER ST - see explanation above. Switch to circular needle size 8 mm / US 11 and work in stockinette st with 5 sts in garter st in each side. REMEMBER THE KNITTING GAUGE When piece measures 18 cm / 7", cast on 1 edge st in each side = 62-66-72-78-84-90 sts. Continue in stockinette st with 1 edge sts in garter st in each side. When piece measures 19 cm / 7½", dec 1 st in each side (= 2 sts dec) - READ DECREASE TIP and MEASURING TIP-1! Dec in each side every 7-7-8-8-8-8 cm / 2¾"-2¾"-3"-3"-3"-3" a total of 6 times = 50-54-60-66-72-78 sts. AT THE SAME TIME when piece measures 48-49-50-51-52-53 cm / 19"-19¼"-19¾"-20"-20½"-21", work as follows: Work A.1 over all sts with 1 edge st in garter st in each side (edge st continues in garter st). When A.1 has been worked 1 time vertically, work piece until finished measurements in reversed stockinette st (edge st in garter st). When piece measures 60-61-62-63-64-65 cm / 23½"-24"-24½"-24¾"-25¼"-25½", bind off 1 edge st in each side = 48-52-58-64-70-76 sts. When piece measures 76-78-80-82-84-86 cm / 30"-30¾"-31½"-32¼"-33"-33⅞", bind off the middle 14-14-14-16-16-16 sts for neck and finish each shoulder separately. Continue to bind off 1 st on next row from neck = 16-18-21-23-26-29 sts remain on the shoulder. Loosely bind off all sts when piece measures 78-80-82-84-86-88 cm / 30¾"-31½"-32¼"-33"-33⅞"-34⅝". Repeat on the other shoulder. RIGHT FRONT PIECE: Worked back and forth on circular needle. Cast on 35-37-40-43-46-49 sts (includes 8 band sts towards mid front) on circular needle size 7 mm / US 10.75 with Andes. Work 3 ridges. Switch to circular needle size 8 mm / US 11 and work next row from RS as follows: 8 sts in garter st (= band), stockinette st until 5 sts remain, work 5 sts in garter st. Continue like this in stockinette st and garter st. When piece measures 18 cm / 7", work as follows from RS: 8 sts in garter st, stockinette st over the remaining sts, cast on 1 edge st at the end of row (edge st in garter st) = 36-38-41-44-47-50 sts. When piece measures 19 cm / 7½", dec in the side as on back piece, dec 6 times in total = 30-32-35-38-41-44 sts. AT THE SAME TIME when piece measures 48-49-50-51-52-53 cm / 19"-19¼"-19¾"-20"-20½"-21", work as follows: Work 8 sts in garter st, work A.1 over the remaining sts (edge st in garter st). When A.1 has been worked 1 time vertically, work piece until finished measurements in reversed stockinette st (continue band and edge st in garter st). AT THE SAME TIME when piece measures 56-57-58-59-60-61 cm / 22"-22½"-22¾"-23¼"-23½"-24", bind off for BUTTONHOLES - see explanation above. When piece measures 60-61-62-63-64-65 cm / 23½"-24"-24½"-24¾"-25¼"-25½", bind off 1 edge st in the side = 29-31-34-37-40-43 sts. When piece measures 72-74-76-78-80-82 cm / 28⅜"-29⅛"-30"-30¾"-31½"-32¼", slip the outermost 9-9-9-10-10-10 sts towards mid front on 1 stitch holder for neck (work them before slipping them on stitch holder to avoid cutting the yarn). Continue to bind off for neck at beg of every row from neck as follows: bind off 2 sts 1 time and then 1 st 2 times = 16-18-21-23-26-29 sts remain on shoulder. Loosely bind off all sts when piece measures 78-80-82-84-86-88 cm / 30¾"-31½"-32¼"-33"-33⅞'-34⅝". LEFT FRONT PIECE: Cast on and work as right front piece but reversed. Do not dec for buttonholes on left front piece. ASSEMBLY: Sew the shoulder seams. HOOD: Pick up approx. 46 to 58 sts around the neck (includes sts on stitch holders at the front) on circular needle size 7 mm / US 10.75 with Andes. K 1 row from WS while inc evenly to 66-68-70-72-74-76 sts - do not inc over bands. Work 2 ridges. Switch to circular needle size 8 mm / US 11. Then work in stockinette st with 8 sts in garter st in each side, back and forth over all sts until hood measures approx. 30-31-32-33-34-35 cm / 11¾"-12¼"-12½"-13"-13⅜"-13¾". Switch to circular needle size 7 mm / US 10.75. Work 2 ridges over all sts. Bind off. Fold the hood double and sew tog at the top with grafting/kitchener sts. SLEEVE: Worked back and forth on circular needle. Cast on 22-22-24-24-26-26 sts (includes 1 edge st in each side) on circular needle size 7 mm / US 10.75 with Andes. Work 3 ridges - then work A.1 over all sts. Work A.1 1 time vertically. Switch to circular needle size 8 mm / US 11 and work in stockinette st with 1 edge st in garter st in each side. When piece measures 8-8-8-8-10-8 cm / 3"-3"-3"-3"-4"-3", inc 1 st in each side - READ INCREASE TIP (= 2 sts inc) and MEASURING TIP-2. Inc every 5-4-4-3½-3-3 cm / 2"-1½"-1½"-1¼"-1"-1" 9-10-10-11-11-12 times in total = 40-42-44-46-48-50 sts. Bind off when piece measures 51-50-49-48-45-44 cm / 20"-19¾"-19¼"-19"-17¾"-17¼" (NOTE: Shorter measurements in the larger sizes because of wider shoulders). Make another sleeve. ASSEMBLY: Sew in sleeves. Sew under arm and side seams inside 1 edge st, finish when 18 cm / 7" remain at the bottom of body for vent. Sew the buttons on to left front piece. |
|||||||
Diagram explanations |
|||||||
|
|||||||
 |
|||||||
Have you finished this pattern?Tag your pictures with #dropspattern #aredheljacket or submit them to the #dropsfan gallery. Do you need help with this pattern?You'll find 27 tutorial videos, a Comments/Questions area and more by visiting the pattern on garnstudio.com. © 1982-2026 DROPS Design A/S. We reserve all rights. This document, including all its sub-sections, has copyrights. Read more about what you can do with our patterns at the bottom of each pattern on our site. |
|||||||


With over 40 years in knitting and crochet design, DROPS Design offers one of the most extensive collections of free patterns on the internet - translated to 17 languages. As of today we count 324 catalogs and 12290 patterns - 12280 of which are translated into English (US/in).
We work hard to bring you the best knitting and crochet have to offer, inspiration and advice as well as great quality yarns at incredible prices! Would you like to use our patterns for other than personal use? You can read what you are allowed to do in the Copyright text at the bottom of all our patterns. Happy crafting!
Post a comment to pattern DROPS 172-46
We would love to hear what you have to say about this pattern!
If you want to leave a question, please make sure you select the correct category in the form below, to speed up the answering process. Required fields are marked *.