
Popular categories
Looking for a yarn?






























Comments / Questions (141)
Jade Peaches wrote:
I finished it XD. My summer is very hot so i will wear it next time ^^. Thank Garnstudio so much :3.
30.08.2016 - 06:03
 Laura wrote:
Thanks for the reply to my last question I am sorry but I have another. On the main body of this top it says to repeat the increase every 1.5 cm, I am having trouble incorporating these increases and keeping the pattern correct, the first and last row of a1a is OK but am having trouble on the rows inbetween. Can you help? Thanks Laura
25.08.2016 - 12:09DROPS Design answered:
Dear Laura, inc have to be made on a row with tr, adjust the 1,5 cm if necessary so that inc are made evenly and always on a tr row. Happy crocheting!
25.08.2016 - 13:22
Laura wrote:
Hi am I right in thinking that the 10 underarm stitches are continued to be worked as 1st stitch of row ie DC or treble, all the way down the body and the pattern stitchs in between these? Thanks Laura
11.08.2016 - 11:36DROPS Design answered:
Dear Laura, the 10 sts underarm will be worked as first st in A.1A on first round, ie either dc or tr. But then you will repeat A.1A in width ie also over these sts (beg/end of round in A.4). Happy crocheting!
15.08.2016 - 09:43
 Anne Flakk wrote:
Hei!. Jeg hekler str XL. Holder på med bærestk - det skal økes i omgang 6. er det omgang 6 i arbeidet, eller omgang 6 i diagrammet?
09.07.2016 - 11:22DROPS Design answered:
Hej Anne. Det er den 6 omgang i diagrammet (du teller den förste omg med st med). Det er den med st, lige under begyndelsen af A.1a
12.07.2016 - 16:55Tana wrote:
I just finish it!! it is lovely!!! Beautiful design. True to size. Love it!! Thanks for your help!!
05.07.2016 - 11:49Tana wrote:
Hi! I am making an L size. I am working on the Yoke, I just finished the 1st row of fans (3rd row in both A1 and A2 graphics). My question is: which graphic should I follow to make the following row, graphic A1 or graphic A2? Thank you!
03.07.2016 - 06:52DROPS Design answered:
Dear Tana, you are following both diagrams at the same time: A.1 and A.2 on the same row as before. On row 6 in A.1 you will then inc sts evenly (see written pattern). Happy crocheting!
04.07.2016 - 10:40
 Anna wrote:
Hej Ditte! Man kunde t.ex. virka ihop var 27 & 28 st.
07.06.2016 - 16:57
 Ditte wrote:
Hej, under "ALLE STR" i ryg- og forstykke står "Gentag A1a i højden. Når arb måler 12 cm sørg for at næste omg er med st, tages der 6 st ind jævnt fordelt. Jeg hækler str. M :)
06.06.2016 - 15:48DROPS Design answered:
Hej Ditte. Okay, saa er jeg med - det havde jeg lige misset. Du gentager A.1a i höjden og tager ind i en rk med st i A.1a; dvs, rk 1, 3, 5 osv. Du tager de 6 m ind jaevnt fordelt paa raekken.
08.06.2016 - 16:38
Ditte wrote:
Hej, jeg er igang med bærestykket og har gentaget A1a til 12 cm i længden. Der skal nu tages 6 stgm ind - men hvor skal det gøres? Under ærmerne eller i A1a?
06.06.2016 - 10:25DROPS Design answered:
Hej Ditte. Kan du lige hjaelpe mig og fortaelle hvilken str du laver? (jeg kan ikke lige finde de 12 cm og indtagning, men maaske har jeg ogsaa bare stirret mig lidt blind paa det). Tak
06.06.2016 - 14:46
 Stardy wrote:
Eine super Anleitung! Gerade habe ich das Modell in Größe XL beendet. Musste allerdings mehr Maschen unterm Arm zunehmen. Aber dafür gibt es ja ein Maßband ;) den unteren Abschluss und die Ärmelabschlüsse habe ich mit dem Muschelstich (3 Stäbchen, 2 LM, 3 Stäbchen) gemacht. Sieht so schön verspielt aus. Ein Tragefoto gibts ab morgen in meinem Blog :) LG, Stardy
31.05.2016 - 21:56
|
||||||||||||||||||||||||||||
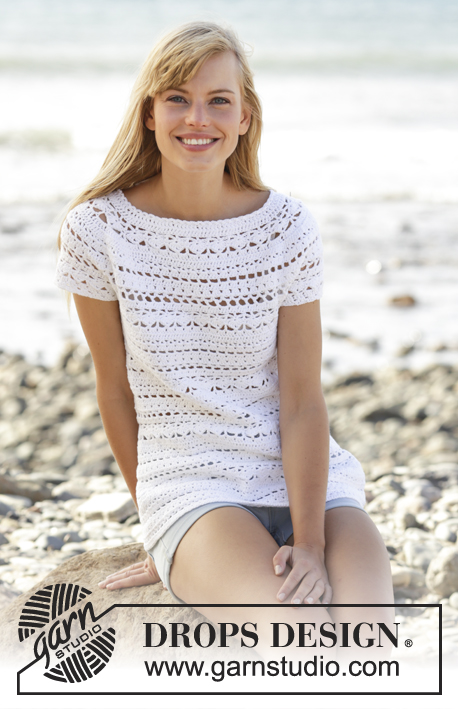
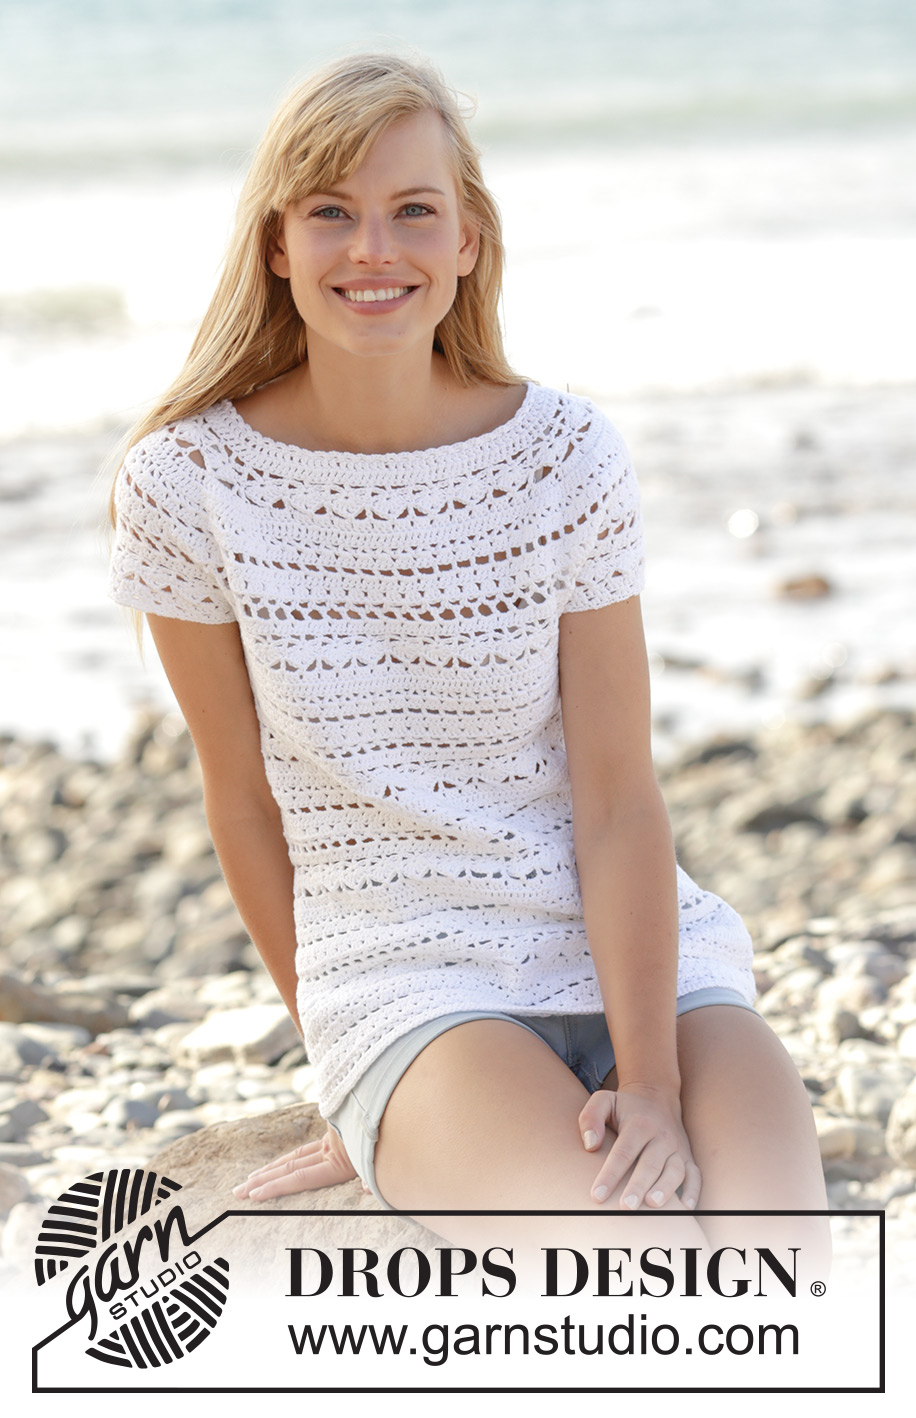
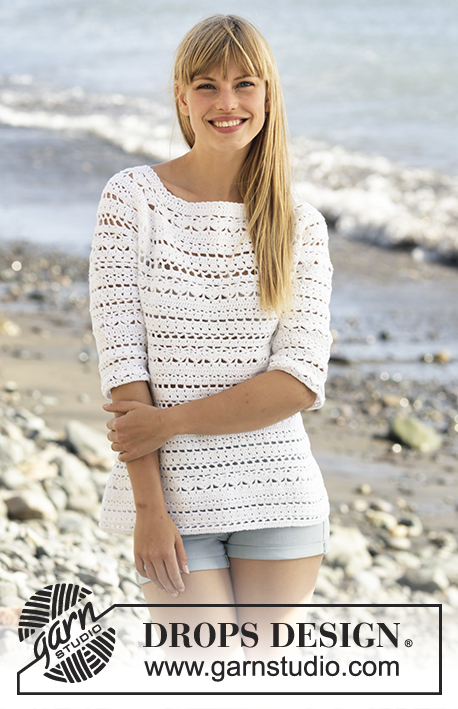
Seashore Bliss Top#seashoreblisstop |
||||||||||||||||||||||||||||
|
|
||||||||||||||||||||||||||||
Crochet DROPS top with lace pattern and round yoke in ”Muskat”. The piece is worked top down. Size: S - XXXL.
DROPS 169-26 |
||||||||||||||||||||||||||||
|
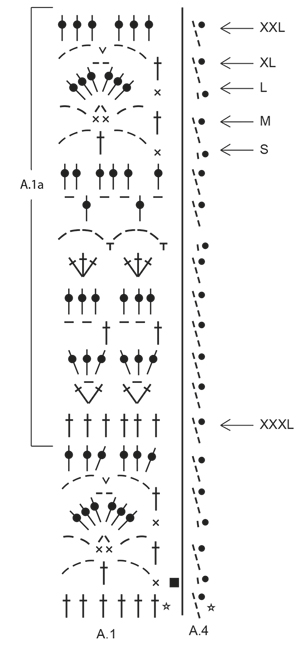
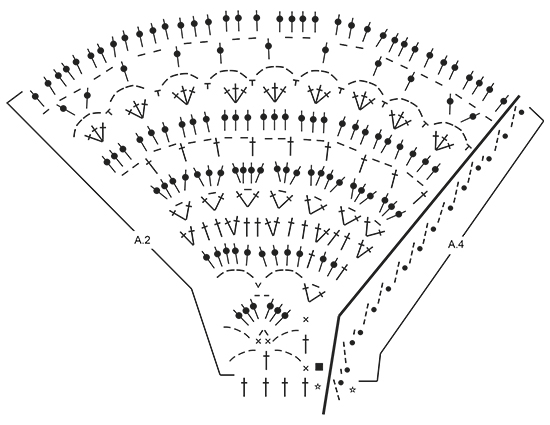
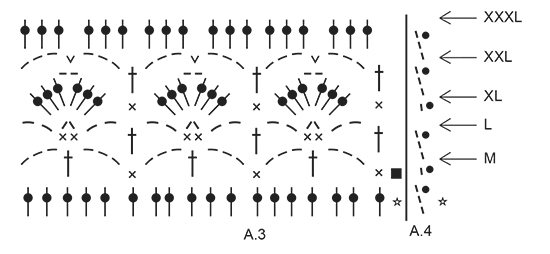
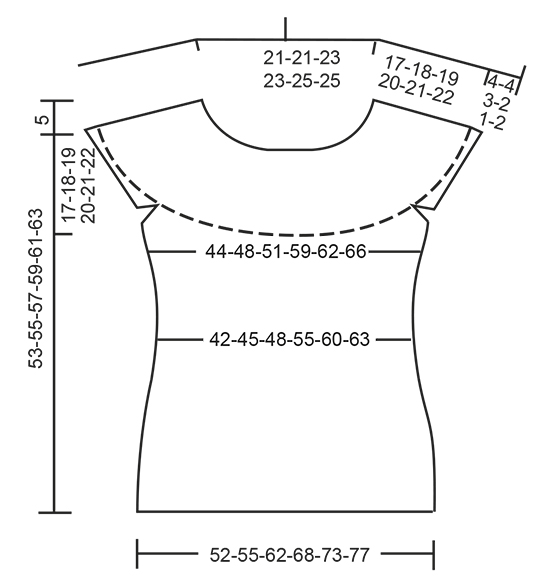
PATTERN: See diagrams A.1 to A.4. Diagram A.4 shows how round beg and ends. CROCHET INFO: Replace first dc at beg of every dc round with 3 ch. Finish round with 1 sl st in 3rd ch at beg of round. Replace first sc at beg of every sc round with 1 ch. Finish every round with 1 sl st in ch from beg of round. INCREASE TIP: Inc 1 dc by working 2 dc in same dc. DECREASE TIP: Dec 1 dc by working 2 dc tog as follows: Work 1 dc but wait with last pull through (= 2 sts on hook), then work next dc but on last pull through, pull yarn through all 3 sts on hook. TIP ARMHOLE: Size S, M and XL: In the last repeat of A.1 before marker 1 and marker 3 (= beginning of armhole), replace the last chain stitch with a double crochet in the last stitch of the same repeat on previous row. ---------------------------------------------------------- TOP: The piece is worked top down. NOTE: It is important to keep the crochet gauge vertically so that the measurements on yoke will be correct. YOKE: Work 108-108-117-117-124-124 ch on hook size 4 mm / G/6 with Muskat and form 1 ring with 1 sl st in first ch. Work first round as follows: Work 3 ch (= 1 dc) - READ CROCHET INFO, 1 dc in each of the next 3-3-5-5-5-5 ch, * skip ch 1, 1 dc in each of the next 6 ch *, repeat from *-* the entire row = 94-94-102-102-108-108 dc. Work 1 round with 1 dc in every dc and inc 18-18-22-22-28-40 dc evenly - READ INCREASE TIP = 112-112-124-124-136-148 dc. Work next round and insert 8 markers in the piece as follows: A.4 shows how round beg and ends. Insert 1st marker at beg of round, work A.2 over the first 4 dc, insert 2nd marker, A.1 over the next 12 dc (= 2 times in width), insert 3rd marker, A.2 over the next 4 dc, insert 4th marker, work A.1 over the next 36-36-42-42-48-54 dc (= 6-6-7-7-8-9 times in width), insert 5th marker, A.2 over the next 4 dc, insert 6th marker, A.1 over the next 12 dc (= 2 times in width), insert 7th marker, A.2 over the next 4 dc, insert 8th marker, A.1 over the last 36-36-42-42-48-54 dc (= 6-6-7-7-8-9 times in width). REMEMBER THE CROCHET GAUGE! SIZE XXL-XXXL: On 5th round (round with dc) in A.1 inc evenly as follows: Between 2nd and 3rd marker and 6th and 7th marker: Inc 6-6 dc. 12-12 dc have been inc in total on round (= 18-18 dc between 2nd and 3rd marker and 6th and 7th marker). Repeat A.1 3-3 times between 2nd and 3rd marker and between 6th and 7th marker: ALL SIZES: On 6th round (round with dc) in A.1 inc evenly as follows: Between 2nd and 3rd marker and 6th and 7th marker: Inc 0-0-6-6-6-6 dc (= 12-12-18-18-24-24 dc between these markers). Between 4th and 5th marker and 8th and 1st marker: Inc 0-6-6-6-6-6 dc (= 36-42-48-48-54-60 dc between each of these markers). Then repeat diagram A.1 2-2-3-3-4-4 times between 2nd and 3rd marker, 6-7-8-8-9-10 times between 4th and 5th marker, 2-2-3-3-4-4 times between 6th and 7th marker and 6-7-8-8-9-10 times between 8th and 1st marker. Work A.2 as before. SIZE XL-XXL-XXXL: On 8th round (round with dc) in A.1 inc evenly as follows: Between 4th and 5th marker and 8th and 1st marker: Inc 6-6-6 dc (= 54-60-66 dc between each of these markers). 12-12-12 dc have been inc in total on round. Repeat A.1 9-10-11 times between 4th and 5th marker and between 8th and 1st marker. Repeat inc on 10th round in A.1 (= 60-66-72 dc between each of these markers). Repeat diagram A.1 10-11-12 times between 4th and 5th marker and between 8th and 1st marker. ALL SIZES: On last round in A.2 insert 1 new marker in the middle of each A.2 (i.e. 18 dc on each side of marker in A.2 = 4 markers). Remove the old markers (= 4 markers remain in piece). Sts between markers are for sleeves (= 48-48-54-54-60-60 dc on each sleeve). When A.2 has been worked 1 time vertically, there are 240-252-276-300-324-336 dc on round. Yoke is now done in size S. SIZE M-L-XL-XXL-XXXL: Continue with pattern A.1 as before but over dc in A.2 (= 36 dc) work A.3 2 times in total in width (marker is in the middle of these repetitions). Work 1-2-3-4-5 rounds of A.3 (see arrow in diagram for correct size). Piece now measures 17-18-19-20-21-22 cm / 6¾"-7"-7½"-8"-8¼"-8¾" vertically. ALL SIZES: Work A.1a (see arrow on where pattern beg in the different sizes) 3 times in total in width until first marker - SEE ARMHOLE TIP, work 8-8-8-10-10-10 ch, skip sts between the 2 markers (= sleeve), work A.1a 12-13-14-16-17-18 times in total in width until next marker (= front piece), work 8-8-8-10-10-10 ch, skip sts between the 2 markers (= sleeve), work A.1a 9-10-11-13-14-15 times in total in width (= 160-172-184-212-224-236 sts). Fasten off. BODY: Beg round mid under sleeve as follows: Size S-L: Work 1 sl st in 5th ch, ch 1, work 1 sc in each of the next 3-3 ch, work A.1a as before until ch under 2nd sleeve, 1 sc in each of the 8-8 ch under sleeve, work A.1a as before the rest of round. Work the 8-8 sts under each sleeve as 1st st in A.1a. SIZE M-XL-XXL-XXXL: Work 1 sl st in 5th ch, ch 3, work 1 dc in each of the next 3-5-5-5 ch, work A.1a as before until ch under 2nd sleeve, 1 dc in each of the 8-10-10-10 ch under sleeve, work A.1a as before the rest of round. Work the 8-10-10-10 sts under each sleeve as 1st st in A.1a. ALL SIZES: Insert 1 marker in piece, NOW MEASURE PIECE FROM HERE. On first round with dc dec 4-4-4-2-2-2 dc evenly - READ DECREASE TIP = 156-168-180-210-222-234 dc. Then repeat A.1a 26-28-30-35-37-39 times in width. Repeat A.1a vertically. When piece measures 12 cm / 4¾", adjust so that next round is with dc, dec 6 dc evenly = 150-162-174-204-216-228 dc. Now repeat A.1a 25-27-29-34-36-38 times in width. SIZE XL: Repeat dec when piece measures 16 cm / 6¼" from marker = 198 dc. Now repeat A.1a 33 times in width. ALL SIZES: When piece measures 20-21-22-23-24-25 cm / 8"-8¼"-8¾"-9"-9½"-9¾" from marker – adjust so that next round is with dc, inc 6 dc evenly. Repeat inc every 2-2-1½-1½-1½-1½ cm / ¾"-¾"-½"-½"-½"-½ 5-5-7-7-7-7 more times = 186-198-222-246-264-276 dc. Repeat A.1a 1 more in width on every inc. When all inc are done, repeat A.1a 31-33-37-41-44-46 times in width. Work until piece measures 36-37-38-39-40-41 cm / 14¼"-14½"-15"-14¼"-15¾"-16⅛" from marker, adjust to finish nicely according to pattern. Fasten off. SLEEVE EDGE: SIZE S: Beg by working mid under sleeve as follows: Work 1 sl st in 4th ch of the 8 ch worked in armhole on body. Work 1 ch (= 1 sc). Then work with 1 sc in each of the next ch 4, work A.3 over the next 18 dc, work A.1 (adjust pattern according to A.3) 2 times in total in width as before, work A.3 over the next 18 dc, finish with 1 sc in each of the last 3 ch. Work as 1st st in A.3 in the 8 sts under sleeve. On last round in A.3 dec 10 dc evenly = 46 dc. SIZE M-XL-XXL: Beg by working mid under sleeve as follows: Work 1 sl st in 4th ch of the 8-10-10 ch worked in armhole on body. Work 3 ch (= 1 dc). Then work with 1 dc in each of the next 4-6-6 ch, work A.3 as before, work A.1 (adjust pattern according to A.3) 2-3-4 times in total in width as before, work A.3, finish with 1 dc in each of the last 3 ch. Work as 1st st in A.3 in the 8-10-10 sts under sleeve. On last round in A.3 dec 10 dc evenly = 46-54-60 dc. SIZE L: Beg by working mid under sleeve as follows: Work 1 sl st in 4th ch of the 8 ch worked in armhole on body. Work 1 ch (= 1 sc). Then work 1 sc in each of the next ch 4, work A.3 as before, work A.1 (adjust pattern according to A.3) 3 times in total in width as before, work A.3, finish with 1 sc in each of the last 3 ch. Work as 1st st in A.3 in the 8 sts under sleeve. On last round in A.3 dec 10 dc evenly = 52 dc. SIZE XXXL: Beg by working mid under sleeve as follows: Work 1 sl st in 4th ch of the 10 ch worked in armhole on body. Work 3 ch (= 1 dc). Then work 1 dc in each of the next ch 6, work 1 dc in each of the 60 dc, finish with 1 dc in each of the last 3 ch. Work 1 dc in every dc and dec 10 dc evenly = 60 dc. ALL SIZES: Work * 1 sc in first/next dc, 1 ch, skip approx. 1 cm / ⅜" *, repeat from *-* around the entire sleeve. Fasten off. Work the other sleeve the same way. NECK EDGE: Crochet an edge around the neck. Beg mid back. Work * 1 sc in first/next dc, ch 3, skip approx. 1 cm / ⅜" *, repeat from *-* around the entire neck. Make sure to avoid a tight neck edge, adjust to finish with 1 sl st in first ch. Fasten off. |
||||||||||||||||||||||||||||
Diagram explanations |
||||||||||||||||||||||||||||
|
||||||||||||||||||||||||||||
 |
||||||||||||||||||||||||||||
 |
||||||||||||||||||||||||||||
 |
||||||||||||||||||||||||||||
 |
||||||||||||||||||||||||||||
Have you finished this pattern?Tag your pictures with #dropspattern #seashoreblisstop or submit them to the #dropsfan gallery. Do you need help with this pattern?You'll find 11 tutorial videos, a Comments/Questions area and more by visiting the pattern on garnstudio.com. © 1982-2026 DROPS Design A/S. We reserve all rights. This document, including all its sub-sections, has copyrights. Read more about what you can do with our patterns at the bottom of each pattern on our site. |
||||||||||||||||||||||||||||






With over 40 years in knitting and crochet design, DROPS Design offers one of the most extensive collections of free patterns on the internet - translated to 17 languages. As of today we count 333 catalogs and 12532 patterns - 12522 of which are translated into English (US/in).
We work hard to bring you the best knitting and crochet have to offer, inspiration and advice as well as great quality yarns at incredible prices! Would you like to use our patterns for other than personal use? You can read what you are allowed to do in the Copyright text at the bottom of all our patterns. Happy crafting!
Post a comment to pattern DROPS 169-26
We would love to hear what you have to say about this pattern!
If you want to leave a question, please make sure you select the correct category in the form below, to speed up the answering process. Required fields are marked *.