
Popular categories
Looking for a yarn?


Comments / Questions (52)
![]() Patricia wrote:
Patricia wrote:
Bonjour, Est il possible de supprimer les mailles jersey sur les cotés, et les remplacer par le motif ? J’aimerai bien qu’il y ai un motif continu. Merci
20.03.2026 - 15:22DROPS Design answered:
Bonjour Patricia, sur les côtés, on va d'abord diminuer pour marquer la taille puis augmenter, il sera plus simple d'avoir des mailles jersey pour ne pas "perturber" le point fantaisie. Bon tricot!
20.03.2026 - 16:15
![]() Patrícia Reís wrote:
Patrícia Reís wrote:
Como fazer as carreiras pares? Como fazer mate simples em liga? Por onde começar a carreira par? Pelo gráfico A1 à direita, ou pelo lado esquerdo?
16.03.2026 - 01:26DROPS Design answered:
Boa tarde, Todas as carreiras (incluindo as pares) estão representadas no gráfico, que se lê da esquerda para a direita em todas as carreiras, por se tricotar em redondo.. Quanto aos remates,pode encontrar, na página das explicações, no separador Vídeos, vários vídeos que a ajudarão a tricotar este modelo: https://www.garnstudio.com/pattern.php?id=7329&cid=28 Bons tricôs, A equipa DROPS
16.03.2026 - 14:49
![]() Sarah C wrote:
Sarah C wrote:
How di I find the mid back point?
03.09.2025 - 22:42DROPS Design answered:
Hi Sarah, mid back is in the middle of 71-81-83-95-101-113 stitches of back piece (between stitches decreased for armholes), so it is 36-41-42-48-51-57th stitch from the beginning of row. Happy knitting!
04.09.2025 - 08:04
![]() Marie-Claude wrote:
Marie-Claude wrote:
Bonjour, je suis rendu a monter l’empiècement, au dessus des mailles rabattues pour les emmanchures, qu’entendez-vous par ¨ sans les tricoter avant¨
03.04.2025 - 15:19DROPS Design answered:
Bonjour Marie-Claude, cela signifie que vous glissez d'abord toutes les mailles: dos, devant et manches sur la même aiguille circulaire = sans les tricoter. Puis, vous tricotez A.2 dès le 1er tour sur toutes les mailles de l'empiècement. Bon tricot!
03.04.2025 - 15:59
![]() Marie-Christine P wrote:
Marie-Christine P wrote:
Bonjour Les diminutions de l'empiècement et de l'encolure ne sont pas élégantes Avez vous une astuce pour qu'elles ne se voient pas autant
14.05.2023 - 17:09DROPS Design answered:
Bonjour Marie-Christine, je ne suis pas bien sûre de saisir votre question, on doit diminuer ici comme indiqué par le diagramme A.2, autrement dit, en tricotant 2 m ensemble à l'endroit au début ou à la fin de chaque A.2; essayez de serrer le fil si besoin pour éviter que ces 2 mailles tricotées ensemble ne soient pas trop lâches. Sinon, n'hésitez pas à montrer votre ouvrage à votre magasin (même en photo par mail), ce sera plus facile pour eux de pouvoir vous aider en voyant votre pull. Merci pour votre compréhension. Bon tricot!
15.05.2023 - 08:53
![]() Car8n wrote:
Car8n wrote:
Hallo breisterren, ik heb het patroon nog een nagelezen en zie nergens staan dat er m-a een markeerder geplaatst moet worden. De markeerders worden geplaatst na *x-aantal tricot steken, patroon A.1A,A.1B, A.1C, x-aantal tricot steken,*, dan moet je van *-* herhalen dan komt de vierde markeerder. Ik ben dan ook van mening dat er een fout in het patroon staat. Ik zal zelf wel uitvogelen wat m-a is.
12.11.2022 - 15:59
![]() Carin wrote:
Carin wrote:
Halle breisterren, ik heb het patroon nog eens nagelezen en heb de eerste markeerder vlgs patroon moeten plaatsen na *13 steken tricot steek, de tweede markeerder na tel-patroon A.1A, A.1B en na A.1C,* dan de derde markeerder na 26 steken tricot steek dan moet je van *-* herhalen en dan de vierde markeerder plaatsen. Ik lees nergens dat er een markeerder ma geplaatst moet worden. Ik probeer het zelf wel te achterhalen wat ma zou moeten zijn maar ik ben van mening dat de beschrijving niet goed is
12.11.2022 - 15:54DROPS Design answered:
Dag Carin,
Je hebt gelijk; het staat niet in het patroon, maar waar je begint met breien is midden achter.
13.11.2022 - 18:29
![]() Carin wrote:
Carin wrote:
Hallo registreren, Ik heb een vraag m.b.t. het bepalen van middenachter om de halsband te breien. Graag wil ik van jullie horen hoe ik middenachter kan vinden. Bij het breien van de pas heb ik een markeer naald geplaatst bij het begin van de mouw. Verder is het patroon super leuk en mooi om te breien.
09.11.2022 - 20:19DROPS Design answered:
Dag Carin,
Midden achter is aan het begin van de toer. Bij het lijf heb je in het begin markeerders geplaatst, waarbij je na de laatste markeerder nog een aantal steken moest breien om de toer af te maken. Na deze laatste steken zit je op midden achter.
10.11.2022 - 17:02
![]() Aina Marie Finsand wrote:
Aina Marie Finsand wrote:
Jeg skjønner ikke hvordan jeg skal finne midterste maske bak for å begynne på halskant med forhøyning. Det har jo vært så mange fellinger opp gjennom bærestykket. Begynte selve bærestykket med venstre arm, deretter forstykket, høyre arm og rygg.
10.09.2022 - 21:42DROPS Design answered:
Hei Aina. Tell maskene fra det ene ermet til det andre, midterste maske / mellom de 2 midterste maskene er midten. Kontrollsjekk at du har samme antall masker på ermene, og foran og bak. mvh DROPS Design
12.09.2022 - 13:22
![]() Deborah Ringrose wrote:
Deborah Ringrose wrote:
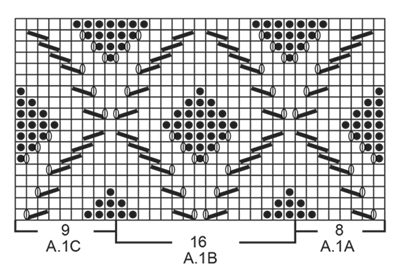
Hello im working on the Clara-170.7 pattern and am asking about the diagram A.1B . in the middle of this section it shows K2tog YO and then am i to K 1 stitch? and then YO ,then slip 1 st K1 ,psso.? or is it K2tog YO then slip 1 st, K1, psso?
15.03.2021 - 22:02DROPS Design answered:
Dear Mrs Ringrose, yes correct, that's how to work the first row in A.1B - this video shows how to work the diagrams A.1A, A.1B, A.1C and can help you to understand how to read the diagram. Happy knitting!
17.03.2021 - 08:02
|
||||||||||||||||
Clara#clarasweater |
||||||||||||||||
|
|
||||||||||||||||
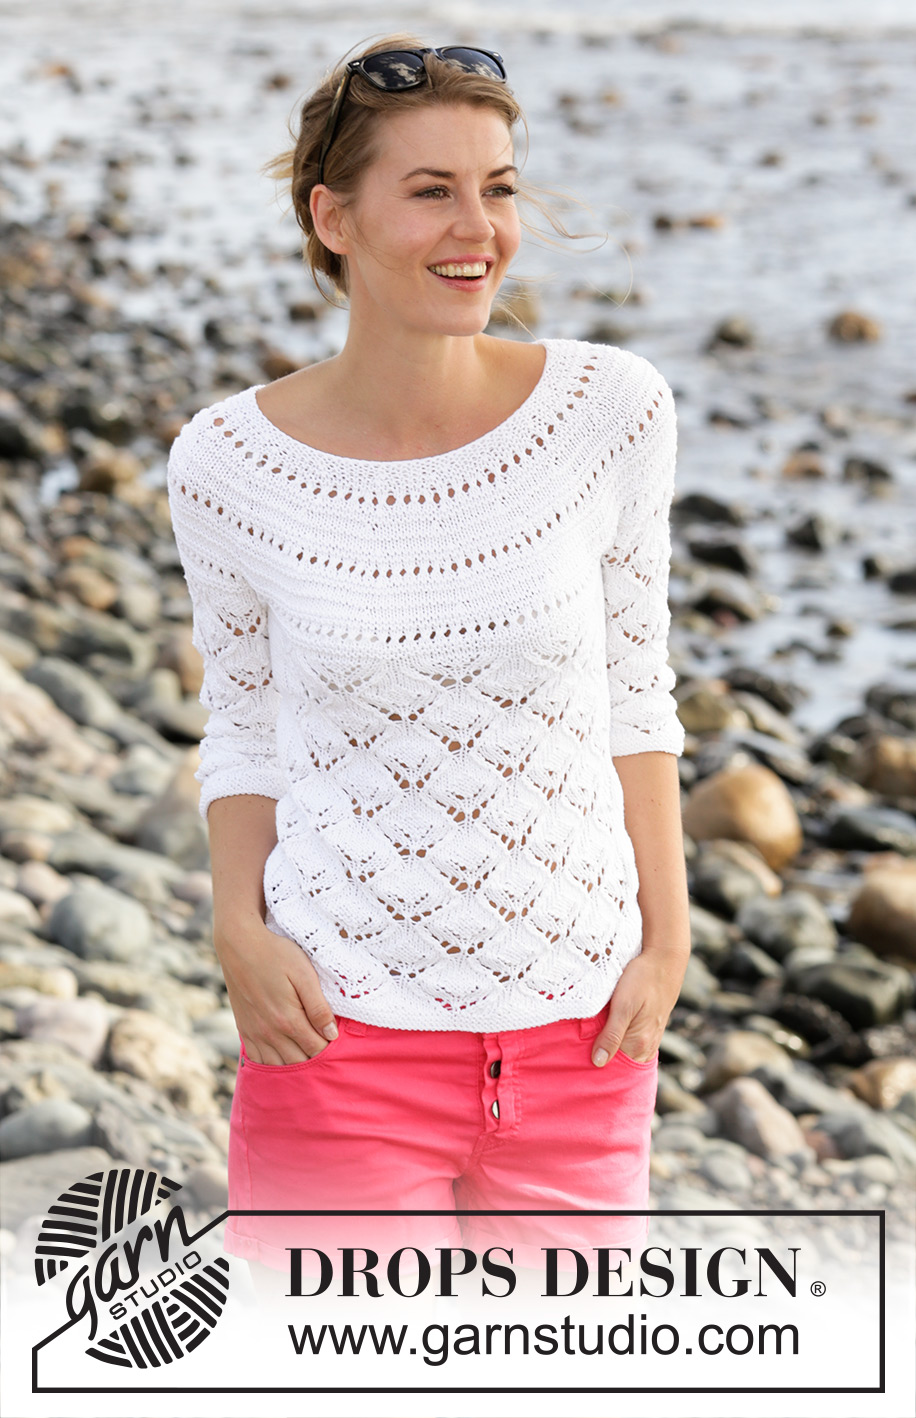
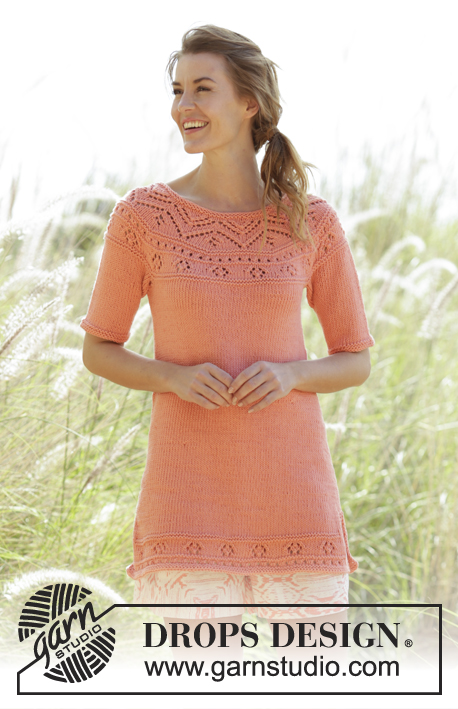
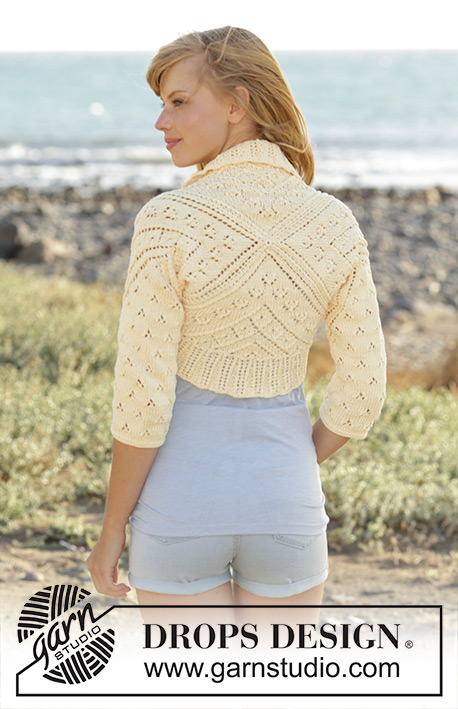
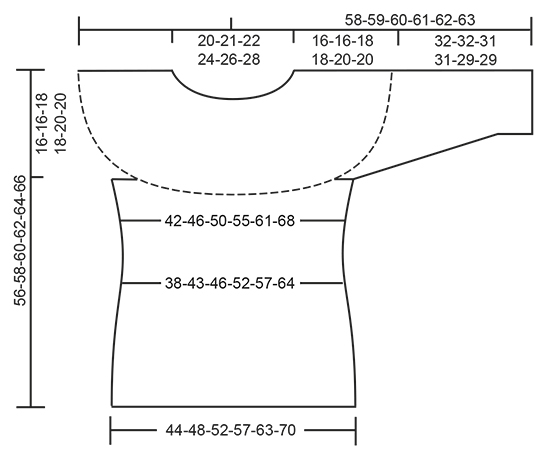
Knitted DROPS jumper with lace pattern, round yoke and ¾ sleeves in ”Cotton Light”. Size: S - XXXL.
DROPS 170-7 |
||||||||||||||||
|
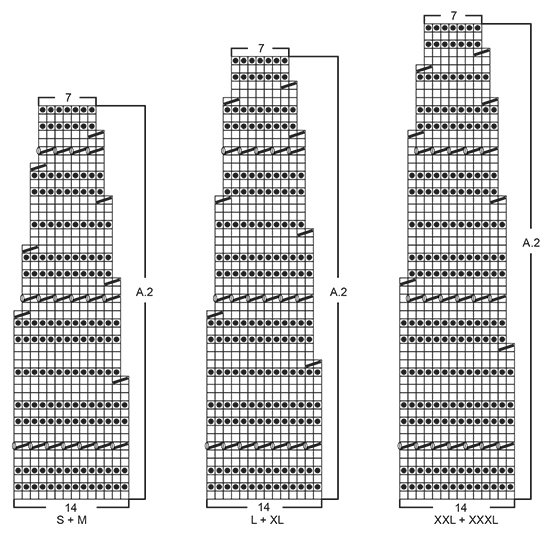
GARTER ST (worked in the round): 1 ridge = 2 rounds. * K 1 round and P 1 round *, repeat from *-*. PATTERN: See diagrams A.1 and A.2. NOTE: Note that on some rounds in A.1 there is pattern on EVERY round. DECREASE TIP-1: To calculate how often dec should be done, use the total no of sts on round (e.g. 184 sts) and divide by no of dec to be done (e.g. 22) = 8.4. I.e. in this example K approx. every 7th and 8th st tog. DECREASE TIP-2 (applies to sides of body): Dec as follows before first and third marker: Beg 2 sts before marker and K 2 tog. Dec as follows after second and fourth marker: Slip 1 st as if to K, K 1, psso. INCREASE TIP (applies to sides of body): Inc as follows before first and third and after second and fourth marker: Make 1 YO. On next round K YO twisted to avoid holes. ---------------------------------------------------------- BODY: Because of pattern in A.1 work piece in the round on circular needle. Cast on 184-202-218-240-264-294 sts on circular needle size 3.5 mm / US 4 with Cotton Light. Work 3 ridges in GARTER ST - see explanation above. Switch to circular needle size 4 mm / US 6 and K 1 round while dec 22-20-28-26-34-40 sts evenly - READ DECREASE TIP-1 = 162-182-190-214-230-254 sts. Work next round as follows: Work 8-13-7-13-9-7 sts in stockinette st, insert 1 marker (= first marker), * work pattern according to diagram A.1A (= 8 sts), repeat A.1B over the next 48-48-64-64-80-96 sts (= 3-3-4-4-5-6 repetition of 16 sts), work A.1C (= 9 sts) *, insert 1 marker (= second marker), work 16-26-14-26-18-14 sts in stockinette st, insert 1 marker (= third marker), repeat from *-* one more time, insert 1 marker (= fourth marker) and finish with 8-13-7-13-9-7 sts in stockinette st. Continue pattern like this. REMEMBER THE KNITTING GAUGE When piece measures 6 cm / 2⅜", dec before first and third and after second and fourth marker – READ DECREASE TIP-2 (= 4 sts dec). Repeat dec every 3 cm / 1" a total of 6 times = 138-158-166-190-206-230 sts. When piece measures 26 cm / 10¼", inc before first and third and after second and fourth marker – READ INCREASE TIP (= 4 sts inc). Repeat inc every 3-4-4-4-4-5 cm / 1"-1½"-1½"-1½"-1½"-2" a total of 4 times = 154-174-182-206-222-246 sts. When piece measures 40-42-42-44-44-46 cm / 15¾"-16½"-16½"-17¼"-17¼"-18", work next round as follows: bind off 3-3-4-4-5-5 sts for armhole, K 71-81-83-95-101-113 (= back piece), bind off 6-6-8-8-10-10 sts for armhole, K 71-81-83-95-101-113 (= front piece) and bind off the last 3-3-4-4-5-5 sts for armhole. Put piece aside and knit the sleeves. SLEEVE: Because of pattern in A.1 work piece in the round on double pointed needles. Cast on 58-58-58-60-62-64 sts on double pointed needles size 3.5 mm / US 4 with Cotton Light. Work 3 ridges. Switch to double pointed needles size 4 mm / US 6 and K 1 round while dec 7 sts evenly = 51-51-51-53-55-57 sts. Work next round as follows: 1-1-1-2-3-4 sts in stockinette st, work pattern according to diagram A.1A (= 8 sts), repeat A.1B over the next 32 sts (= 2 repetitions of 16 sts), work A.1C (= 9 sts) and finish with 1-1-1-2-3-4 sts in stockinette st. Continue pattern like this. When piece measures 8 cm / 3⅛", inc 1 st on each side of the middle 2 sts mid under sleeve (inc by making 1 YO, on next round K YO twisted to avoid holes). Repeat inc every 5-4-3½-3-2½-2 cm / 2"-1½"-1¼"-⅞"-¾" 5-6-7-8-9-10 times in total = 61-63-65-69-73-77 sts. When piece measures 32-32-31-31-29-29 cm / 12½"-12½"-12¼"-12¼"-11½"-11½" (NOTE: Shorter measurements in the larger sizes because of longer yoke) work next round as follows: bind off 3-3-4-4-5-5 sts, K 55-57-57-61-63-67 and bind off the last 3-3-4-4-5-5 sts. Put piece aside and make another sleeve. YOKE: Switch to circular needle size 3.5 mm / US 4 and slip sleeves on to same circular needle as body where armholes were bound off (without working them first) = 252-276-280-312-328-360 sts. Then work pattern in the round according to diagram A.2 (choose diagram for correct size = 17-18-19-21-22-24 repetitions of 14 sts), AT THE SAME TIME dec 14-24-14-18-20-24 sts evenly on first round – READ DECREASE TIP-1 = 238-252-266-294-308-336 sts on needle. When diagram A.2 has been worked, there are 119-126-133-147-154-168 sts on needle and piece measures approx. 56-58-60-62-64-66 cm / 22"-22¾"-23⅝"-24⅜"-25¼"-26", cut the yarn. NECK EDGE WITH ELEVATION: Beg from RS mid back and work in garter st back and forth on circular needle size 3.5 as follows: K 7-7-8-9-9-10 sts, turn, tighten yarn and K 14-14-16-18-18-20 sts back. Turn, tighten yarn and K 21-21-24-27-27-30 sts, turn, tighten yarn and K 28-28-32-36-36-40 sts back. Continue back and forth like this and work 7-7-8-9-9-10 sts more on every turn until 56-56-64-72-72-80 sts in total have been worked (= 8 rows in total), turn piece, tighten yarn and K until mid back. K 1 round over all sts while dec 23-24-27-31-34-36 sts evenly = 96-102-106-116-120-132 sts on needle. P 1 round, K 1 round and P 1 round. Then loosely bind off with K. ASSEMBLY: Sew the openings under the sleeves. |
||||||||||||||||
Diagram explanations |
||||||||||||||||
|
||||||||||||||||
 |
||||||||||||||||
 |
||||||||||||||||
 |
||||||||||||||||
Have you finished this pattern?Tag your pictures with #dropspattern #clarasweater or submit them to the #dropsfan gallery. Do you need help with this pattern?You'll find 26 tutorial videos, a Comments/Questions area and more by visiting the pattern on garnstudio.com. © 1982-2026 DROPS Design A/S. We reserve all rights. This document, including all its sub-sections, has copyrights. Read more about what you can do with our patterns at the bottom of each pattern on our site. |
||||||||||||||||


With over 40 years in knitting and crochet design, DROPS Design offers one of the most extensive collections of free patterns on the internet - translated to 17 languages. As of today we count 324 catalogs and 12291 patterns - 12281 of which are translated into English (US/in).
We work hard to bring you the best knitting and crochet have to offer, inspiration and advice as well as great quality yarns at incredible prices! Would you like to use our patterns for other than personal use? You can read what you are allowed to do in the Copyright text at the bottom of all our patterns. Happy crafting!
Post a comment to pattern DROPS 170-7
We would love to hear what you have to say about this pattern!
If you want to leave a question, please make sure you select the correct category in the form below, to speed up the answering process. Required fields are marked *.