
Popular categories
Looking for a yarn?


Comments / Questions (31)
![]() Anja M wrote:
Anja M wrote:
Bei dem ersten Muster nach 3 normalen Reihen, wird in der 1. Musterreihe mit Pistazie und dunkel türkis gestrickt. In der zweiten Reihe soll man nur mit einem Faden stricken, heißt das, daß ich die pistazienfarbene Masche mit Pistazie stricke und die dunkel türkisfarben mit dunkel türkis?
29.08.2020 - 00:40DROPS Design answered:
Liebe Anja, die 2. Reihe im Muster wird mit der Farbe, die for die 1. Reihe im Muster gestrickt war. Viel Spaß beim stricken!
31.08.2020 - 09:16
![]() Valérie wrote:
Valérie wrote:
Bonjour, j'aimerai bien tricoter ce modèle mais je ne trouve pas dans la boutique où sont les perles en bois. Pouvez-vous m'indique où les trouver ?
21.07.2020 - 12:22DROPS Design answered:
Bonjour Valérie, c'est un modèle DROPS ancien et nous n'avons plus ces perles en référence, toutefois, votre magasin DROPS devrait pouvoir vous aider à en trouver. Bon tricot!
29.07.2020 - 08:28
![]() Winnie Ankerdal wrote:
Winnie Ankerdal wrote:
Jeg har købt garn til Sun Pearl og vil strikke den. Skal den strikkes med enkelt eller dobbelt garn? Vh. Winnie
19.07.2020 - 21:41DROPS Design answered:
Hej Winnie, det er kun de 2 pinde i Mønster du strikker med 2 tråde, resten af trøjen strikkes i en tråd. God fornøjelse!
28.07.2020 - 12:18
![]() Elisa wrote:
Elisa wrote:
"Quando il lavoro misura 7 cm aumentare 1 m a ogni lato ogni 5-5-5-5 cm per un totale di 5-5-5 volte = 78-86-94-100 m. " Buongiorno, nella spiegazione manca un 4: "per un totale di 4-5-5-5 volte"
03.07.2020 - 19:17DROPS Design answered:
Buongiorno Elisa. Abbiamo corretto il testo. La ringraziamo per la segnalazione. Buon lavoro!
03.07.2020 - 22:21
![]() Alicia Ledesma Lecona wrote:
Alicia Ledesma Lecona wrote:
Please in Spanish.
26.06.2020 - 15:12DROPS Design answered:
Hola Alicia, aquí tienes el patrón en castellano: https://www.garnstudio.com/pattern.php?id=720&cid=23
30.06.2020 - 12:42
![]() Ingvild Ulberget wrote:
Ingvild Ulberget wrote:
Hej! Jag undrar om det är bomullsgarn den är gjort av, sedan om det går att köpa mönstret på svenska och färdig tryckt på papper? Mvh Ingvild
26.06.2020 - 08:48DROPS Design answered:
Hej Ingvild. Tröjan är gjord i DROPS Paris som är ett garn i 100% bomull. Du kan själv skriva ut mönstret här på denna sida helt gratis på svenska, eller så kan du höra där du beställer garnet om de kan skicka med en utskrift på mönstret. Här är en lista på återförsäljare som du kan kontakta. Mvh DROPS Design
26.06.2020 - 10:13
![]() Marianne wrote:
Marianne wrote:
Hej, jag har precis sytt ihop tröjan och undrar bara vilken storlek är det på träkulorna? Tack på förhand Marianne
07.06.2020 - 10:49DROPS Design answered:
Hej Marianne. Dessa träkulor finns dessvärre inte längre i vårt sortiment, men du kan bara välja den storlek du tycker passar. Jag skulle tro att de på bilden är ca 0,5-1 cm. Mvh DROPS Design
08.06.2020 - 10:57
![]() Angelita wrote:
Angelita wrote:
Ho acquistato il filato DROPS PARIS nei vari colori per eseguire il modello in data 15/04/2020 e sto eseguendo il lavoro. Se mi servissero altri gomitoli trovo lo stesso bagno di colore ? (turchese chiaro col.2 Dyelot 9626 - turchese col.10 Dyelot 9626 - wasabi col.39 Dyelot 2195) grazie mille saluti Angelita
26.04.2020 - 11:35DROPS Design answered:
Buongiorno Angelita, per questi dettagli deve scrivere al rivenditore dove ha acquistato il filato. Buon lavoro!
26.04.2020 - 12:11
![]() Sylvie wrote:
Sylvie wrote:
Bonjour, dans le § "Devant", ià la troisième ligne, "Après 3 rangs, changer pour 1 fil turquoise foncé + 1 fil pistache et Tricoter le point fantaisie 2", faut-il tricoter les deux fils en même temps comme si s'en était qu'un ? Merci Sylvie
13.09.2019 - 15:01DROPS Design answered:
Bonjour Sylvie, le point fantaisie-2 a été modifié pour être plus clair, au 1er rang, on tricote toutes les mailles ensemble 2 par 2 avec 2 fils, sauf les mailles lisières (il reste la moitié des mailles + les mailles lisières), au 2ème rang, on reprend la couleur du rang précédent et ont tricote toutes les mailles à l'endroit (la 1ère des double mailles tricotée doit toujours être la même couleur tout le rang). Bon tricot!
13.09.2019 - 15:42
![]() Lilou wrote:
Lilou wrote:
Bonjour Madame A la fin des diminutions des manches: "et 2 m jusqu'à...cela veut dire qu'il faut diminuer 2 m tous les 2 rangs, jusqu'à 59 cm ou les 2 m marque la fin des diminutions, et tricoter droit jusqu'à 59 cm?. Merci de votre aide
04.07.2019 - 08:01DROPS Design answered:
Bonjour Lilou, vous rabattez 2 m au début de chaque rang de chaque côté (= sur l'endroit et sur l'envers) jusqu'à ce que la manche mesure 59 cm de hauteur totale, au rang suivant (= sur l'endroit) vous rabattez les mailles restantes. Bon tricot!
04.07.2019 - 09:47
|
||||||||||
Sun Pearl |
||||||||||
 |
 |
|||||||||
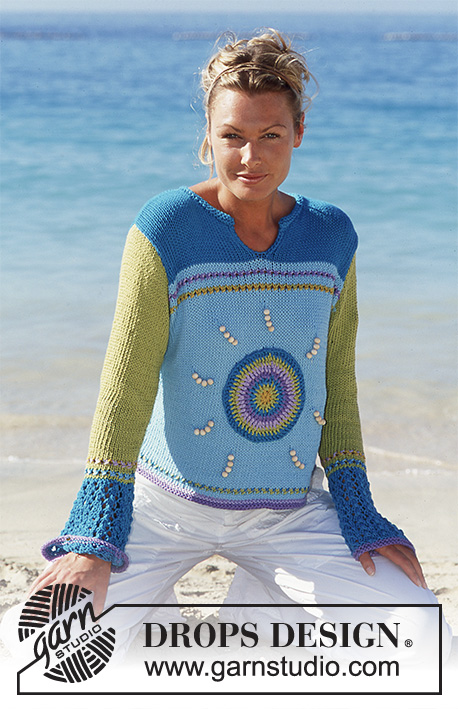
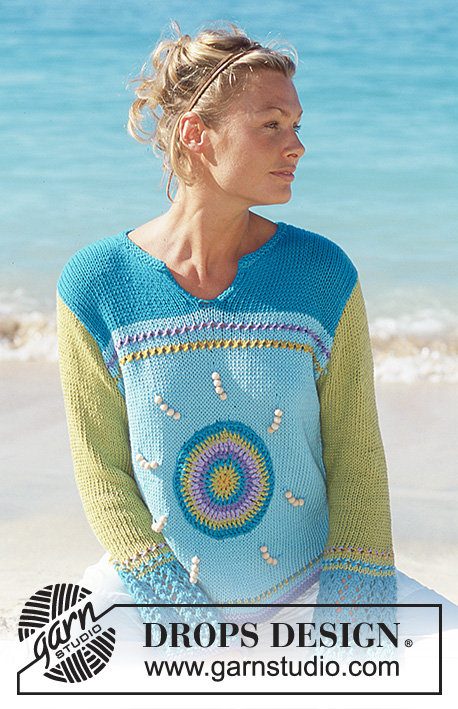
DROPS Pullover in Paris
DROPS 69-12 |
||||||||||
|
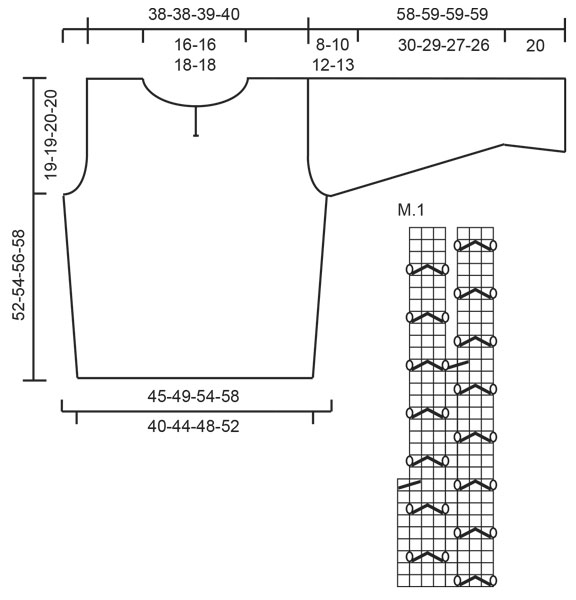
Gauge: 17 sts x 22 rows = 10 x 10 cm [4" x 4"] on larger needles in stockinette st. Garter st, when knitting flat: Knit all sts, all rows. Pattern 1: See chart. The pattern is seen from the right side. Pattern 2: Row 1 (wrong side): with 2 strands of yarn, knit as follows: K 1 (edge st knit in garter st throughout), * P 2, pass the 1st st over the 2nd st *, repeat from * - * to last st, K 1. Now all sts except first and last edge st are K2 tog with 2 strands of the yarn. Row 2 (right side) with 1 strand of yarn: change back to the color used before row 1 in Pattern, Now all sts should be divided and each of the strands in the st (except 1 edge st each side) are knitted separately as 1 st. Make sure it's the same color strand that are knitted first in each st. Front: Cast on 70-76-84-90 sts on smaller needles with purple. Knit 2 rows garter st, change to lilac and knit 2 rows garter st. Change to larger needles and light turquoise and knit stockinette st. After 3 rows change to 1 strand dark turquoise + 1 strand pistachio. Knit Pattern 2 - see instructions above. Then continue with stockinette st and 1 strand light turquoise. When the piece measures 7 cm [2.75"] inc 1 st at each side on every 5-5-5-5 cm [2"] a total of 4-5-5-5 times = 78-86-94-100 sts. Read the entire next section before knitting. Armhole: When the piece measures 33-35-36-38 cm [13"-13.75"-14⅛"-14⅞"] bind off for armhole at each side every other row: 3 sts 1-1-1-1 time, 2 sts 1-2-3-4 times and 1 st 2-4-5-5 times = 64-64-66-68 sts. At the same time when the piece measures 34-36-37-39 cm [13⅜"-14⅛"-14.5"-15.25"] change to 1 strand mustard and 1 strand pistachio. Knit Pattern 2, then knit 2 rows with light turquoise, change to 1 strand lilac + 1 strand purple and knit Pattern 2. After the pattern knit 2 rows with light turquoise. Change to dark turquoise and knit stockinette st to finished dimensions. Neck: At the same time when the piece measures 39-41-42-44 cm [15.25"-16⅛"-16.5"-17.25"] P (on right side row) the center 2 sts. On the next row divide at center front and knit each piece separately. Knit stockinette st keeping 1 st at neck edge in garter st. When the piece measures 46-48-49-51 cm [18⅛"-18⅞"-19.25"-20"] bind off 6 sts for the neck. Then bind off at neck edge every other row: 2 sts 2-2-2-2 times and 1 st 4-4-5-5 times. Bind off the remaining 18-18-18-19 sts on shoulder when the piece measures 52-54-56-58 cm [20.5"-21.25"-22"-22⅞"]. Back: Cast on and knit the same as the front. Bind off for armhole as on front and continue in stockinette st until the piece measures 50-52-54-56 cm [19.75"-20.5"-21.25"-22"]. Bind off the center 26-26-28-28 sts for the neck. On the next row dec 1 st at each neck edge = 18-18-18-19 sts remain on each shoulder. Bind off when the piece measures 52-54-56-58 cm [20.5"-21.25"-22"-22⅞"]. Sleeve: Cast on 58-58-66-66 sts on smaller needles with purple. Knit 2 rows garter st, change to larger needles and dark turquoise and knit Pattern 1. After Pattern 1 the piece measures approx. 18 cm [7"] and there are 44-44-50-50 sts. Change to pistachio and knit 2 rows stockinette st. Change to 1 strand light turquoise + 1 strand dark turquoise and knit Pattern 2, then knit 2 rows stockinette st in pistachio. Change to 1 strand mustard + 1 strand light lilac, knit Pattern 2, then continue with pistachio in stockinette st to finished dimensions. The piece measures approx. 22 cm [8⅝"] after Pattern 2 rows -- now inc 1 st at each side 8-8-7-7 times every 3.5 cm [1⅜"] = 60-60-64-64 sts. When sleeve measures 50-49-47-46 cm [19.75"-19.25"-18.5"-18⅛"] bind off for sleeve cap at each side every other row: 3 sts 1-1-1-1 time, 2 sts 4-3-3-2 times, 1 st 1-3-6-8 times, then bind off 2 sts at each side until the piece measures 58-59-59-59 cm [22⅞"-23.25"-23.25"-23.25"]. Bind off the remaining sts. Assembly: Sew shoulder seams. Pick up approx. 68 to 78 sts around the neck on smaller needles with dark turquoise. Knit 4 rows garter st, bind off. Sew in sleeves. Sew sleeve and side seams using edge sts as a seam allowance. Crocheted sun: Ch 5 with mustard and join into a ring with 1 sl st. Ch 2 to turn every row and work as follows: Row 1: 9 dc in the ring. Row 2: Change to pistachio and work 2 dc in each dc from previous row = 18 dc Row 3: Change to dark turquoise and crochet as follows: * 1 dc in first dc, 2 dc in next dc *, repeat from * - * = 27 dc Row 4: Change to purple and crochet as follows: * 1 dc, 2 dc in next dc, 1 dc *, repeat from * - * = 36 dc Row 5: Change to lilac and crochet as follows: * 1 dc, 2 dc in next dc, 2 dc *, repeat from * - * = 45 dc Row 6: Change to pistachio and crochet as follows: * 1 dc, 2 dc in next dc, 3 dc *, repeat from * - * = 54 dc Row 7: Change to dark turquoise and crochet as follows: * 1 dc, 2 dc in next dc, 4 dc *, repeat from * - * = 63 dc. The sun now has a diameter of approx. 16 cm [6.25"]. Stitch down to the center of the light turquoise part of front. Sunbeams: For each beam: thread 4 beads on a strand of light turquoise. Fasten beams on the pullover by threading the 2 ends of yarn through front and tying together on wrong side. Fasten 8 beams around sun. |
||||||||||
Diagram explanations |
||||||||||
|
||||||||||
 |
||||||||||
Have you finished this pattern?Tag your pictures with #dropspattern or submit them to the #dropsfan gallery. Do you need help with this pattern?You'll find 28 tutorial videos, a Comments/Questions area and more by visiting the pattern on garnstudio.com. © 1982-2026 DROPS Design A/S. We reserve all rights. This document, including all its sub-sections, has copyrights. Read more about what you can do with our patterns at the bottom of each pattern on our site. |
||||||||||


With over 40 years in knitting and crochet design, DROPS Design offers one of the most extensive collections of free patterns on the internet - translated to 17 languages. As of today we count 325 catalogs and 12298 patterns - 12288 of which are translated into English (US/in).
We work hard to bring you the best knitting and crochet have to offer, inspiration and advice as well as great quality yarns at incredible prices! Would you like to use our patterns for other than personal use? You can read what you are allowed to do in the Copyright text at the bottom of all our patterns. Happy crafting!
Post a comment to pattern DROPS 69-12
We would love to hear what you have to say about this pattern!
If you want to leave a question, please make sure you select the correct category in the form below, to speed up the answering process. Required fields are marked *.