The yarn cost is calculated from the pattern’s smallest size and the yarn’s cheapest product type. Looking for an even better price? You might find it on the DROPS Deals!
-------------------------------------------------------
Alternative Yarn – See how to change yarns here
Yarn Groups A to F – Use the same pattern and change the yarn here
Yarn usage using an alternative yarn – Use our yarn converter here
-------------------------------------------------------
The yarn cost is calculated from the pattern’s smallest size and the yarn’s cheapest product type. Looking for an even better price? You might find it on the DROPS Deals!
All measurements in charts are in cm.
= K 1 | |
= K 2 tog. | |
= yo, sl 1, K 2 tog, psso, yo. |
Each of our patterns has specific tutorial videos to help you.
These step-by-step tutorials might also help you:
Why is the knitting/crochet tension so important?
Knitting tension is what determines the final measurements of your work, and is usually measured per 10 x 10 cm. It is provided like so: number of stitches in width x number of rows in height - eg: 19 stitches x 26 rows = 10 x 10 cm.
The knitting tension is very individual; some people knit/crochet loosely while others work tightly. You adjust the knitting tension with the needle size, which is why the suggested needle size only serve as a guide! You need to adjust this (up or down) to ensure that YOUR knitting tension matches the knitting tension provided in the pattern. If you work with a different knitting tension than provided you will have a different yarn consumption, and your work will have different measurements than what the pattern suggests.
The knitting tension also determines which yarns can replace each other. As long as you achieve the same knitting tension you can replace one yarn with another.
See DROPS lesson: How to measure your tension/gauge
See DROPS video: How to make a gauge tension swatch
How do I know how many balls of yarn I need?
The required amount of yarn is provided in grams, eg: 450 g. To calculate how many balls you’ll need you first need to know how many grams are in 1 ball (25g, 50g or 100g). This information is available if you click on the individual yarn quality on our pages. Divide the amount required with the amount of each ball. For example, if each ball is 50g (the most common amount), the calculation will be as follows: 450 / 50 = 9 balls.
Can I use a different yarn than what the pattern suggests?
The important thing when changing from one yarn to another is that the knitting/crochet tension remains the same. This is so that the measurements of the finished piece will be the same as on the sketch provided. It is easier to achieve the same knitting tension using yarns from the same yarn group. It is also possible to work with multiple strands of a thinner yarn to achieve the knitting tension of a thicker one. Please try our yarn converter. We recommend you to always work a test swatch.
Please NOTE: when changing yarn the garment might have a different look and feel to the garment in the photo, due to individual properties and qualities of each yarn.
See DROPS lesson: Can I use a different yarn than the one mentioned in the pattern?
What are the yarn groups?
All our yarns are categorised into yarn groups (from A to F) according to thickness and knitting tension – group A contains the thinnest yarns and group F the thickest. This makes it easier for you to find alternative yarns to our patterns, should you wish to switch yarn. All yarns within the same group have a similar knitting tension and can easily replace each other. However, different yarn qualities have different structures and properties which will give the finished work a unique look and feel.
How do I use the yarn converter?
At the top of all our patterns you’ll find a link to our yarn converter, which is a helpful tool should you wish to use a different yarn than suggested. By filling in the yarn quality you wish to replace, the amount (in your size) and number of strands, the converter will present good alternative yarns with the same knitting tension. Additionally it will tell you how much you’ll require in the new qualities and whether you’ll need to work with multiple strands. Most skeins are 50g (some are 25g or 100g).
If the pattern is worked with multiple colours, every colour will have to be converted separately. Similarly, if the pattern is worked with several strands of different yarns (for example 1 strand Alpaca and 1 strand Kid-Silk) you will have to find alternatives for each, individually.
Why do you show discontinued yarns in the patterns?
Since different yarns have different qualities and textures we have chosen to keep the original yarn in our patterns. However, you can easily find options among our available qualities by using our yarn converter, or simply pick a yarn from the same yarn group.
It is possible that some retailers still have discontinued yarns in stock, or that someone has a few skeins at home that they would like to find patterns for.
The yarn converter will provide both alternative yarn as well as required amount in the new quality.
What size should I knit?
If you think it's hard to decide what size to make, it can be a good idea to measure a garment you own already and like the size of. Then you can pick the size by comparing those measures with the ones available in the pattern's size chart.
You'll find the size chart at the bottom of the pattern.
See DROPS lesson: How to read size chart
Why do I get the wrong knitting tension with the suggested needle size?
The needle size provided in the pattern serves only as a guide, the important thing is to follow the knitting tension. And since knitting tension is very individual, you will have to adjust the needle size to ensure that YOUR tension is the same as in the pattern – maybe you’ll have to adjust 1, or even 2 needle sizes, up or down to achieve the correct tension. For this, we recommend that you work test swatches.
Should you work with a different knitting tension than the one provided, the measurements of the finished garment might deviate from the measurement sketch.
See DROPS lesson: How to measure your tension/gauge
See DROPS video: How to make a gauge tension swatch
Why is the pattern worked top-down?
Working a garment top-down provides more flexibility and room for personal adjustment. For example it is easier to try the garment on while working, as well as making adjustments to length of yoke and shoulder caps.
The instructions are carefully explaining every step, in the correct order. Diagrams are adjusted to the knitting direction and are worked as usual.
How do I work according to a knitting diagram?
The diagram depicts all rows/rounds, and every stitch seen from the right side. It is read from bottom to top, from right to left. 1 square = 1 stitch.
When working back and forth, every other row is worked from the right side and every other row is worked from the wrong side. When working from the wrong side, the diagram will have to be worked reversed: from left to right, knit stitches are purled, purl stitches are knit etc.
When working in the round every round is worked from the right side and the diagram are worked from right to left on all rounds.
See DROPS lesson: How to read knitting diagrams
How do I work according to a crochet diagram?
The diagram depicts all rows/rounds, and every stitch seen from the right side. It is worked from bottom to top, from right to left.
When working back and forth every other row is worked from the right side: from right to left and every other row is worked from the wrong side: from left to right.
When working in the round, every row in the diagram are worked from the right side, from right to left.
When working a circular diagram you start in the middle and work your way outwards, counter clockwise, row by row.
The rows usually start with a given number of chain stitches (equivalent to the height of the following stitch), this will either be depicted in the diagram or explained in the pattern.
See DROPS lesson: How to read crochet diagrams
How do I work several diagrams simultaneously on the same row/round?
Instructions for working several diagrams after each other on the same row/round, will often be written like so: “work A.1, A.2, A.3 a total of 0-0-2-3-4 times". This means you work A.1 once, then A.2 is worked once, and A.3 is repeated (in width) the number of times provided for your size – in this case like so: S = 0 times, M = 0 times, L=2 times, XL= 3 times and XXL = 4 times.
The diagrams are worked as usual: begin with the first row in A.1, then work the first row in A.2 etc.
See DROPS lesson: How to read knitting diagrams
See DROPS lesson: How to read crochet diagrams
Why are the sleeves shorter in larger sizes?
The total width of the garment (from wrist-to-wrist) will be larger in the larger sizes, despite the actual sleeves being shorter. The larger sizes have longer sleeve caps and wider shoulders, so there will be a good fit in all sizes.
Where on the garment is the length measured?
The measurement sketch/schematic drawing provides information regarding the full length of the garment. If it’s a jumper or a jacket the length is measured from the highest point on the shoulder (usually closest to the neckline), and straight down to the bottom of the garment. It is NOT measured from the tip of shoulder. Similarly, the length of yoke is measured from the highest point on the shoulder and down to where yoke is split into body and sleeves.
See DROPS lesson: How to read a schematic drawing
What is a repeat?
Diagrams are often repeated on the round or in height. 1 repeat is the diagram the way it appears in the pattern. If it says to work 5 repeats of A.1 in the round, then you work A.1 a total of 5 times after/next to each other in the round. If it says to work 2 repeats of A.1 vertically/in height you work the entire diagram once, then begin again at the start and work the entire diagram one more time.
Why does the piece start with more chain stitches than it’s worked with?
Chain stitches are slightly narrower than other stitches and to avoid working the cast-on edge too tight, we simply chain more stitches to begin with. The stitch count will be adjusted on the following row to fit the pattern and measurement sketch.
Why increase before the rib edge when the piece is worked top-down?
The rib edge is more elastic and will contract slightly compared to, for example, stocking stitch. By increasing before the rib edge, you avoid a visible difference in width between the rib edge and the rest of the body.
Why increase in the cast-off edge?
It’s very easy to cast off too tightly, and by making yarn overs while casting off (and simultaneously casting these off) you avoid a too tight cast off edge.
See DROPS video: How to bind off with yarn overs (yo)
How do I increase/decrease on every 3rd and 4th row/round alternately?
To achieve an even increase (or decrease) you can increase on, for example: every 3rd and 4th row alternately, like so: work 2 rows and increase on the 3rd row, work 3 rows and increase on the 4th. Repeat this until the increase is complete.
See DROPS lesson: Increase or decrease 1 st on every 3rd and 4th row alternately
How can I work a jacket in the round instead of back and forth?
Should you prefer to work in the round instead of back and forth, you may of course adjust the pattern. You’ll need to add steeks mid-front (usually 5 stitches), and follow the instructions. When you would normally turn and work from the wrong side, simply work across the steek and continue in the round. At the end you’ll cut the piece open, pick up stitches to work bands, and cover the cut edges.
See DROPS video: How to knit steeks and cut open
Can I work a jumper back and forth instead of in the round?
Should you prefer to work back and forth instead of in the round, you may of course adjust the pattern so you work the pieces separately and then assemble them at the end. Divide the stitches for the body in 2, add 1 edge stitch in each side (for sewing) and work the front and back pieces separately.
See DROPS lesson: Can I adapt a pattern for circular needles into straight needles?
Why is the pattern slightly different than what I see in the photo?
Pattern repeats can vary slightly in the different sizes, in order to get the correct proportions. If you’re not working the exact same size as the garment in the photo, yours might deviate slightly. This has been carefully developed and adjusted so that the complete impression of the garment is the same in all sizes.
Make sure to follow instructions and diagrams for your size!
How do I make a women’s size garment into a men’s size one?
If you have found a pattern you like which is available in women’s size it’s not very difficult to convert it to men’s size. The biggest difference will be the length of sleeves and body. Start working on the women size that you think would fit across the chest. The additional length will be worked right before you cast off for the armhole/sleeve cap. If the pattern is worked top-down you can add the length right after the armhole or before the first decrease on sleeve.
Regarding additional yarn amount, this will depend on how much length you add, but it is better with a skein too many than too few.
How do I prevent a hairy garment from shedding?
All yarns will have excess fibres (from production) that might come off as lint or shedding. Brushed yarns (ie hairier yarns) have more of these loose, excess fibres, causing more shedding.
Shedding also depends on what is worn under or over the garment, and whether this pulls at the yarn fibres. It’s therefore not possible to guarantee that there will be no shedding
Below are some tips on how to get the best result when working with hairier yarns:
1. When the garment is finished (before you wash it) shake it vigorously so the looser hairs come off. NOTE: do NOT use a lint roller, brush or any method that pulls at the yarn.
2. Place the garment in a plastic bag and put it in your freezer - the temperature will cause the fibres to become less attached to each other, and excess fibres will come off easier.
3. Leave in the freezer for a few hours before taking it out and shaking it again.
4. Wash the garment according to the instructions on the yarn label.
Why does my garment pill?
Pilling is a natural process that happens to even the most exclusive of fibers. It's a natural sign of wear and tear that is hard to avoid, and that is most visible in high friction areas of your garment like a sweater's arms and cuffs.
You can make your garment look as new by removing the pilling, using a fabric comb or a pill/lint remover.
Sun Pearl |
||||||||||
|
|
|||||||||
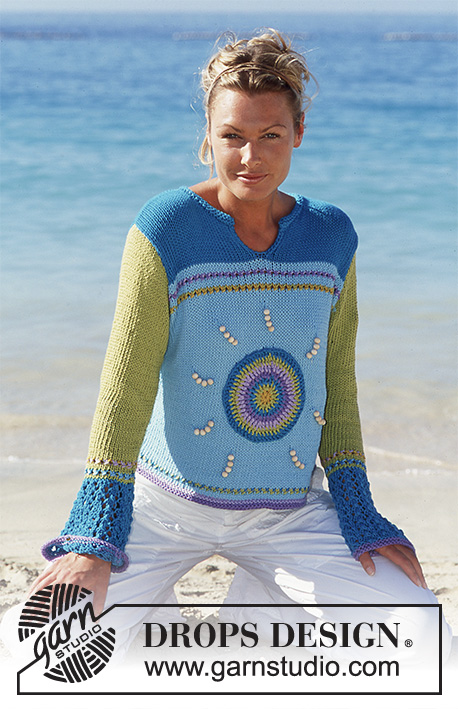
DROPS Pullover in Paris
DROPS 69-12 |
||||||||||
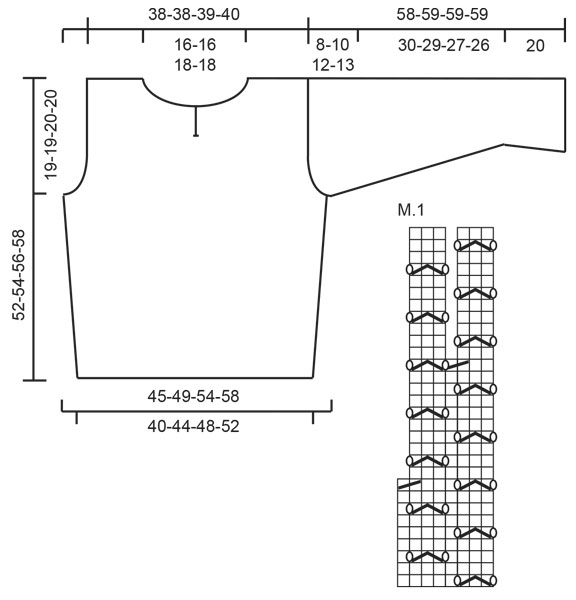
Gauge: 17 sts x 22 rows = 10 x 10 cm [4" x 4"] on larger needles in stockinette st. Garter st, when knitting flat: Knit all sts, all rows. Pattern 1: See chart. The pattern is seen from the right side. Pattern 2: Row 1 (wrong side): with 2 strands of yarn, knit as follows: K 1 (edge st knit in garter st throughout), * P 2, pass the 1st st over the 2nd st *, repeat from * - * to last st, K 1. Now all sts except first and last edge st are K2 tog with 2 strands of the yarn. Row 2 (right side) with 1 strand of yarn: change back to the color used before row 1 in Pattern, Now all sts should be divided and each of the strands in the st (except 1 edge st each side) are knitted separately as 1 st. Make sure it's the same color strand that are knitted first in each st. Front: Cast on 70-76-84-90 sts on smaller needles with purple. Knit 2 rows garter st, change to lilac and knit 2 rows garter st. Change to larger needles and light turquoise and knit stockinette st. After 3 rows change to 1 strand dark turquoise + 1 strand pistachio. Knit Pattern 2 - see instructions above. Then continue with stockinette st and 1 strand light turquoise. When the piece measures 7 cm [2.75"] inc 1 st at each side on every 5-5-5-5 cm [2"] a total of 4-5-5-5 times = 78-86-94-100 sts. Read the entire next section before knitting. Armhole: When the piece measures 33-35-36-38 cm [13" - 13.75" - 14⅛" - 14⅞"] bind off for armhole at each side every other row: 3 sts 1-1-1-1 time, 2 sts 1-2-3-4 times and 1 st 2-4-5-5 times = 64-64-66-68 sts. At the same time when the piece measures 34-36-37-39 cm [13⅜" - 14⅛" - 14.5" - 15.25"] change to 1 strand mustard and 1 strand pistachio. Knit Pattern 2, then knit 2 rows with light turquoise, change to 1 strand lilac + 1 strand purple and knit Pattern 2. After the pattern knit 2 rows with light turquoise. Change to dark turquoise and knit stockinette st to finished dimensions. Neck: At the same time when the piece measures 39-41-42-44 cm [15.25" - 16⅛" - 16.5" - 17.25"] P (on right side row) the center 2 sts. On the next row divide at center front and knit each piece separately. Knit stockinette st keeping 1 st at neck edge in garter st. When the piece measures 46-48-49-51 cm [18⅛" - 18⅞" - 19.25" - 20"] bind off 6 sts for the neck. Then bind off at neck edge every other row: 2 sts 2-2-2-2 times and 1 st 4-4-5-5 times. Bind off the remaining 18-18-18-19 sts on shoulder when the piece measures 52-54-56-58 cm [20.5" - 21.25" - 22" - 22⅞"]. Back: Cast on and knit the same as the front. Bind off for armhole as on front and continue in stockinette st until the piece measures 50-52-54-56 cm [19.75" - 20.5" - 21.25" - 22"]. Bind off the center 26-26-28-28 sts for the neck. On the next row dec 1 st at each neck edge = 18-18-18-19 sts remain on each shoulder. Bind off when the piece measures 52-54-56-58 cm [20.5" - 21.25" - 22" - 22⅞"]. Sleeve: Cast on 58-58-66-66 sts on smaller needles with purple. Knit 2 rows garter st, change to larger needles and dark turquoise and knit Pattern 1. After Pattern 1 the piece measures approx. 18 cm [7"] and there are 44-44-50-50 sts. Change to pistachio and knit 2 rows stockinette st. Change to 1 strand light turquoise + 1 strand dark turquoise and knit Pattern 2, then knit 2 rows stockinette st in pistachio. Change to 1 strand mustard + 1 strand light lilac, knit Pattern 2, then continue with pistachio in stockinette st to finished dimensions. The piece measures approx. 22 cm [8⅝"] after Pattern 2 rows -- now inc 1 st at each side 8-8-7-7 times every 3.5 cm [1⅜"] = 60-60-64-64 sts. When sleeve measures 50-49-47-46 cm [19.75" - 19.25" - 18.5" - 18⅛"] bind off for sleeve cap at each side every other row: 3 sts 1-1-1-1 time, 2 sts 4-3-3-2 times, 1 st 1-3-6-8 times, then bind off 2 sts at each side until the piece measures 58-59-59-59 cm [22⅞" - 23.25" - 23.25" - 23.25"]. Bind off the remaining sts. Assembly: Sew shoulder seams. Pick up approx. 68 to 78 sts around the neck on smaller needles with dark turquoise. Knit 4 rows garter st, bind off. Sew in sleeves. Sew sleeve and side seams using edge sts as a seam allowance. Crocheted sun: Ch 5 with mustard and join into a ring with 1 sl st. Ch 2 to turn every row and work as follows: Row 1: 9 dc in the ring. Row 2: Change to pistachio and work 2 dc in each dc from previous row = 18 dc Row 3: Change to dark turquoise and crochet as follows: * 1 dc in first dc, 2 dc in next dc *, repeat from * - * = 27 dc Row 4: Change to purple and crochet as follows: * 1 dc, 2 dc in next dc, 1 dc *, repeat from * - * = 36 dc Row 5: Change to lilac and crochet as follows: * 1 dc, 2 dc in next dc, 2 dc *, repeat from * - * = 45 dc Row 6: Change to pistachio and crochet as follows: * 1 dc, 2 dc in next dc, 3 dc *, repeat from * - * = 54 dc Row 7: Change to dark turquoise and crochet as follows: * 1 dc, 2 dc in next dc, 4 dc *, repeat from * - * = 63 dc. The sun now has a diameter of approx. 16 cm [6.25"]. Stitch down to the center of the light turquoise part of front. Sunbeams: For each beam: thread 4 beads on a strand of light turquoise. Fasten beams on the pullover by threading the 2 ends of yarn through front and tying together on wrong side. Fasten 8 beams around sun. |
||||||||||
Diagram explanations |
||||||||||
|
||||||||||
Have you made this or any other of our designs? Tag your pictures in social media with #dropsdesign so we can see them! Do you need help with this pattern?You'll find tutorial videos, a Comments/Questions area and more by visiting the pattern on garnstudio.com. © 1982-2024 DROPS Design A/S. We reserve all rights. This document, including all its sub-sections, has copyrights. Read more about what you can do with our patterns at the bottom of each pattern on our site. |
With over 40 years in knitting and crochet design, DROPS Design offers one of the most extensive collections of free patterns on the internet - translated to 17 languages. As of today we count 304 catalogs and 11422 patterns - 11417 of which are translated into English (US/in).
We work hard to bring you the best knitting and crochet have to offer, inspiration and advice as well as great quality yarns at incredible prices! Would you like to use our patterns for other than personal use? You can read what you are allowed to do in the Copyright text at the bottom of all our patterns. Happy crafting!
Comments / Questions (26)
Claudia wrote:
Chiedo scusa ma non capisco come fare il motivo 2, potrebbe ripristinare il video che c'era in una vecchia risposta. Grazie.
20.03.2023 - 22:58DROPS Design answered:
Buonasera Claudia, abbiamo segnalato alla casa madre il problema della visualizzazione dei video. Per il motivo 2 deve lavorare il 1° ferro con 2 capi e lavorare 2 maglie a rovescio e poi accavallare la 1° sulla seconda. Sul 2° ferro lavora con 1 capo di filato e deve lavorare singolarmente ogni capo delle maglie precedenti, quindi come se lavorasse 2 maglie in una maglia. Buon lavoro!
23.03.2023 - 20:55Regine wrote:
Bonjour que représente les blancs dans le diagramme M1 ? Faut ils les tricoter ou pas..? Merci pour votre réponse rapidement
05.05.2022 - 17:52DROPS Design answered:
Bonjour Régine, qu'entendez-vous par les "blancs"? Les espaces vides après la dernière maille , partir du 9ème rang, correspond à la maille diminuée à la fin de M.1; et celui entre les 2 séries de 3 mailles, à la maille diminuée au 19ème rang; autrement dit, M.1 se commence sur 8 mailles, on diminue 2 fois 1 maille et il se termine sur 6 mailles. Bon tricot!
06.05.2022 - 07:41Hester wrote:
Bij de mouwen heeft mijn breiwerk na het breien van het gaatjesmotief een hoogte van ca 13 cm i.p.v. de 18 cm die in het patroon staat. Mijn stekenverhouding klopt wel. Zal ik het gaatjesmotief dan nog een stuk doorbreien of klopt die 18 cm niet? In de tekening wordt namelijk al na 20 cm gemeerderd, terwijl dat in het patroon later is. Dus één van beiden moet niet kloppen.
16.06.2021 - 17:05DROPS Design answered:
Dag Hester,
Het zou kunnen dat het gaatjesmotief tijdens het breien wat in elkaar gaat zitten in de hoogte en dat het, als het breiwerk klaar is, nog wat opgespannen moet worden. Je kun het beste je breiwerk meten terwijl je het goed plat neerlegt op een stroef oppervlak, bijvoorbeeld op een stoffen bank. Als de hoogte dan nog erg afwijkt, kun je inderdaad nog een paar naalden door breien in het gaatjesmotief.
Helaas zit er soms wat verschil in cm's met de tekening, je kunt het beste de beschrijving aanhouden.
23.06.2021 - 20:39Valérie wrote:
Bonjour. Pouvez-vous m'expliquer comment commencer le point fantaisie M1 des manches ? Faut il faire une maille lisière ? Merci
06.02.2021 - 13:03DROPS Design answered:
Bonjour, vous tricotez 1 maille lisse au point mousse, ensuite M1 (7 ou 8 fois, cela depends de votre taille) et 1 maille lisse au point mousse. Bon tricot!
06.02.2021 - 19:05Anja M wrote:
Bei dem ersten Muster nach 3 normalen Reihen, wird in der 1. Musterreihe mit Pistazie und dunkel türkis gestrickt. In der zweiten Reihe soll man nur mit einem Faden stricken, heißt das, daß ich die pistazienfarbene Masche mit Pistazie stricke und die dunkel türkisfarben mit dunkel türkis?
29.08.2020 - 00:40DROPS Design answered:
Liebe Anja, die 2. Reihe im Muster wird mit der Farbe, die for die 1. Reihe im Muster gestrickt war. Viel Spaß beim stricken!
31.08.2020 - 09:16Valérie wrote:
Bonjour, j'aimerai bien tricoter ce modèle mais je ne trouve pas dans la boutique où sont les perles en bois. Pouvez-vous m'indique où les trouver ?
21.07.2020 - 12:22DROPS Design answered:
Bonjour Valérie, c'est un modèle DROPS ancien et nous n'avons plus ces perles en référence, toutefois, votre magasin DROPS devrait pouvoir vous aider à en trouver. Bon tricot!
29.07.2020 - 08:28Winnie Ankerdal wrote:
Jeg har købt garn til Sun Pearl og vil strikke den. Skal den strikkes med enkelt eller dobbelt garn? Vh. Winnie
19.07.2020 - 21:41DROPS Design answered:
Hej Winnie, det er kun de 2 pinde i Mønster du strikker med 2 tråde, resten af trøjen strikkes i en tråd. God fornøjelse!
28.07.2020 - 12:18Elisa wrote:
"Quando il lavoro misura 7 cm aumentare 1 m a ogni lato ogni 5-5-5-5 cm per un totale di 5-5-5 volte = 78-86-94-100 m. " Buongiorno, nella spiegazione manca un 4: "per un totale di 4-5-5-5 volte"
03.07.2020 - 19:17DROPS Design answered:
Buongiorno Elisa. Abbiamo corretto il testo. La ringraziamo per la segnalazione. Buon lavoro!
03.07.2020 - 22:21Alicia Ledesma Lecona wrote:
Please in Spanish.
26.06.2020 - 15:12DROPS Design answered:
Hola Alicia, aquí tienes el patrón en castellano: https://www.garnstudio.com/pattern.php?id=720&cid=23
30.06.2020 - 12:42Ingvild Ulberget wrote:
Hej! Jag undrar om det är bomullsgarn den är gjort av, sedan om det går att köpa mönstret på svenska och färdig tryckt på papper? Mvh Ingvild
26.06.2020 - 08:48DROPS Design answered:
Hej Ingvild. Tröjan är gjord i DROPS Paris som är ett garn i 100% bomull. Du kan själv skriva ut mönstret här på denna sida helt gratis på svenska, eller så kan du höra där du beställer garnet om de kan skicka med en utskrift på mönstret. Här är en lista på återförsäljare som du kan kontakta. Mvh DROPS Design
26.06.2020 - 10:13