
Popular categories
Looking for a yarn?


Comments / Questions (41)
![]() ANNA RUSSO wrote:
ANNA RUSSO wrote:
Buongiorno, purtroppo non so lavorare con i ferri circolari è possibile realizzare lo stesso modello con i ferri normali? Se si come si avvia il lavoro?
26.11.2015 - 09:18DROPS Design answered:
Buonasera Anna, potrebbe lavorare il poncho avanti e indietro sui f unendo al centro dietro, ma dovrà porre particolare attenzione alla lavorazione del motivo. Buon lavoro!
26.11.2015 - 22:33
![]() An wrote:
An wrote:
Maskantallet stemmer ikke. Det står vi skal øke med 4 masker hver fjerde rille, og 4 masker hver andre rille. Dette blir ikke 232 masker slik det står i oppskriften. Hadde vært fint om dere kunne enten legge ut ny oppskrift med riktig antall masker eller sendt den på e-post til meg. mvh. An
26.11.2015 - 01:17
![]() Judith wrote:
Judith wrote:
Ich habe bzgl. den Zunahmen in Muster A1 noch eine Frage. Da ich vor dem Muster 232M habe und danach 260M muss ich ja innerhalb von A1 7x zunehmen (7x4 = 28). Das Lochmuster sieht eine Zunahme in jeder 4ten Reihe vor. A1 hat 24 Reihen, damit komme ich aber nur auf 6 Zunahmen (24:4)? In welchen Reihen von A1 muss ich zunehmen? Gleich in der ersten Reihe (schwarz)?
08.11.2015 - 11:37DROPS Design answered:
Sie nehmen in A.1 6x zu, A.1 hat ja, wie Sie selbst schreiben, 24 Rd, wenn Sie in jeder 4. Rd zunehmen, sind das 6 Zunahme-Rd. Darüber hinaus nehmen Sie in der vorletzten Rd von A.1 4 M gleichmäßig verteilt zu, das ist die "fehlende" Zunahme, dann kommen Sie auf insgesamt 28 zugenommene M.
12.11.2015 - 19:49
![]() Judith wrote:
Judith wrote:
Vielen Dank für die Antwort. Mache ich so.
07.11.2015 - 16:57
![]() Judith wrote:
Judith wrote:
Hallo, ich stricke den Poncho gerade in Größe S. Ich habe jetzt alle Zunahmen gemach und 232 M. Aber erst 29cm. Soll ich nun bis 31cm (ab da beginnt ja erst das Muster) weiterhin Vorne Mitte und Hinten Maschen zunehmen? Auf dem Foto sieht das für mich so aus. Aber dann hätte ich ja deutlich mehr Maschen. Passt das das Muster noch?
05.11.2015 - 15:45DROPS Design answered:
Wenn Sie noch weiter zunehmen, bevor Sie mit dem Muster beginnen, geht das Muster nicht mehr auf. Sttricken Sie es also mit der richtigen Maschenzahl, auch wenn es etwas eher beginnt als in der Anleitung beschrieben, das ist nicht so schlimm, er hängt sich ja auch noch etwas aus. Sie können besser am Ende, wenn der Poncho tatsächlich etwas zu kurz sein sollte, noch ein Stück in Schwarz anstricken, aber probieren Sie ihn dann vorher einfach einmal an. Auch mit den Fransen können Sie ihn noch etwas verlängern, wenn Sie möchten.
07.11.2015 - 12:24
![]() Rita wrote:
Rita wrote:
Molto bello ma dovreste essere più precisi nelle spiegazioni
03.11.2015 - 16:12
![]() Marianne Frederiksen wrote:
Marianne Frederiksen wrote:
Fejl i opskriften... Send venligst en rettet udgave. Det passer slet ikke med udtagninger... Og, længde. Måler langt fra 31 cm, når jeg har taget ud. Kun omkring de 22-23 cm.
10.10.2015 - 13:14DROPS Design answered:
Hej Marianne, Strikker du i DROPS Nepal? Og har du 22p glatstrik i højden på 10 cm?
12.10.2015 - 12:09
![]() Berit wrote:
Berit wrote:
Hej .Jeg er også stødt på problemer med denne opskrift,med hensyn til udtagninger,og kan ikke komme videre.venligst send den rigtige opskrift til min mail.mvh berit
22.09.2015 - 09:55
![]() Annita wrote:
Annita wrote:
Dette er den anden model jeg forsøger mig på og har lige læst en kommentar at der "også" er fejl i denne opskrift. Synes det sker for ofte og som i sikkert er klar over er det særlig morsomt at sidde og trævle op og starte om og om igen. Jeg strikker str. s/m så venligst send en revideret og rigtig opskrift til min email. På forhånd tak for ellers dejlige opskrifter:-) mvh Annita
20.09.2015 - 09:47
![]() Christina Bjørn Nilsson wrote:
Christina Bjørn Nilsson wrote:
Hej jeg er ved at strikke denne poncho, men der er fejl i maskeantallet, udtagningerne i forhold til opskriften, kan I hjælpe med det? VH Christina
29.08.2015 - 17:20
|
||||||||||||||||
Southwest#southwestponcho |
||||||||||||||||
 |
 |
|||||||||||||||
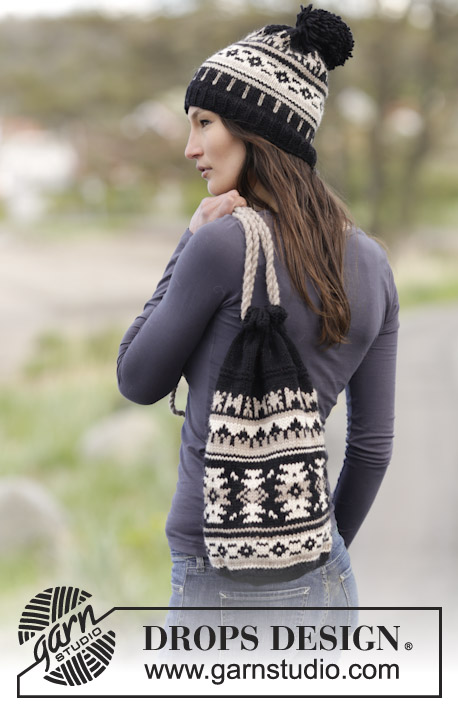
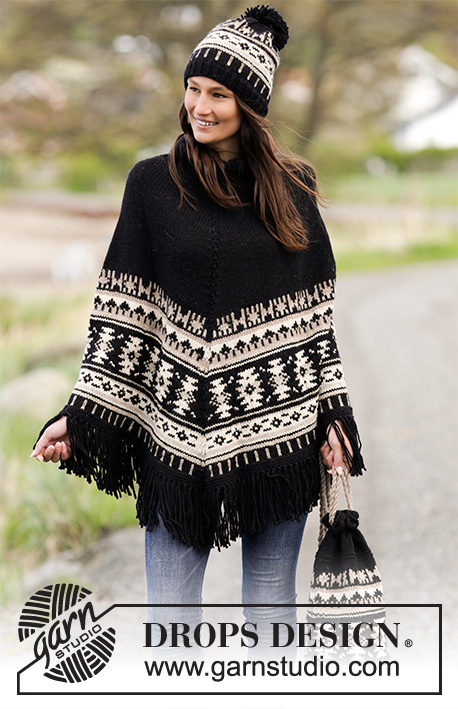
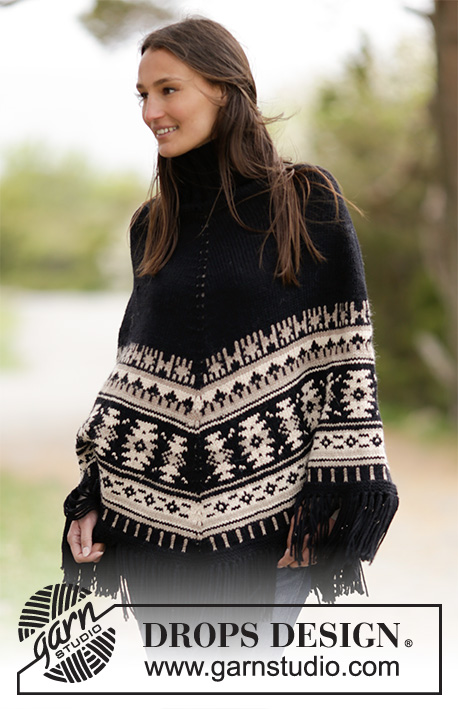
Knitted DROPS poncho with graphic pattern, fringes, high collar in rib, worked top down in ”Nepal”. Size: S - XXXL.
DROPS 165-20 |
||||||||||||||||
|
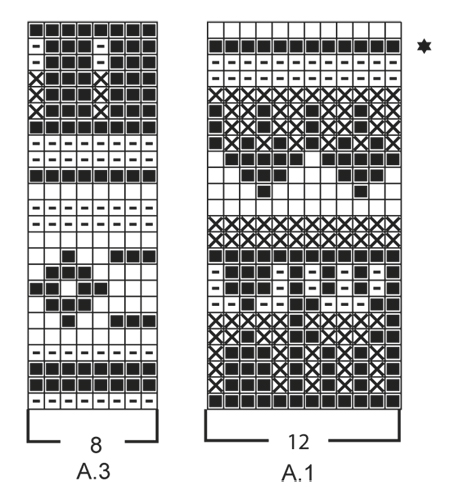
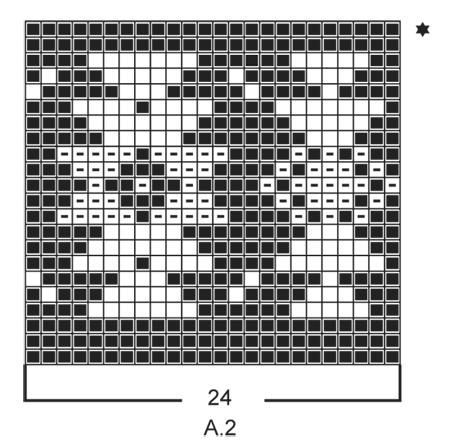
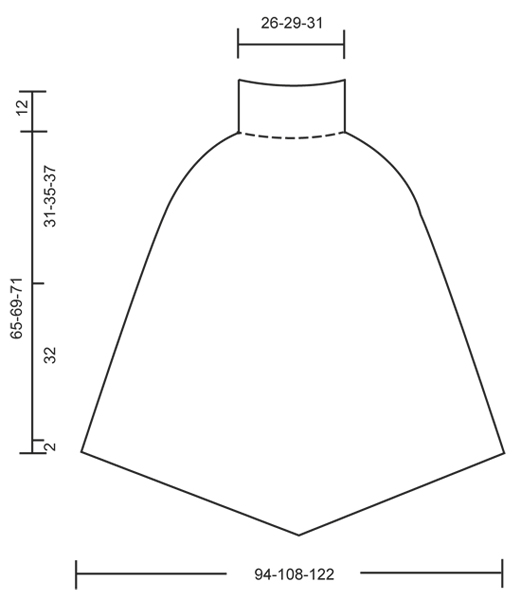
GARTER ST (worked in the round): * K 1 round and P 1 round *, repeat from *-*. 1 ridge = 2 rounds. PATTERN: See diagrams A.1 to A.3. All sts in pattern are worked in stockinette st. KNITTING TIP: To avoid the knitting gauge to tighten when working pattern, it is important not to tighten the strands on back side of piece. Switch to a higher needle no when working pattern if the pattern is somewhat tight. INCREASE TIP: Inc 1 st on each side of every marker by making a YO. On next round K YOs mid front and mid back to make holes. K YOs on each side of marker on shoulders twisted (i.e. work in back loop of st instead of front) to avoid holes. DECREASE TIP: Dec 1 st by K 2 sts tog. ---------------------------------------------------------- PONCHO: Worked in the round on circular needle, top down in stockinette st. Work neck in rib. Rounds start mid back. Cast on 120-132-144 sts on circular needle size 4.5 mm / US 7 with black. Work rib = K 3/P 3 for 12 cm / 4¾". Switch to circular needle size 5 mm / US 8. Work 2 rounds in stockinette st while on 1st round dec 32-36-40 sts evenly - READ DECREASE TIP = 88-96-104 sts. Insert a marker here. NOW MEASURE THE PIECE FROM HERE. Now insert 4 markers in the piece as follows: Insert a marker in first st (= mid back), work 21-23-25 sts, insert a marker in next st (= right shoulder), work 21-23-25 sts, insert a marker in next st, (= mid front), work 21-23-25 sts, insert a marker in next st (= left shoulder), work the remaining 21-23-25 sts. REMEMBER THE KNITTING GAUGE On next round beg inc. NOTE: Inc is different towards mid front/mid back and on each shoulder - READ INCREASE TIP. INCREASE MID FRONT AND MID BACK: Repeat inc on each side of st with marker every 4th round 16-18-19 more times. INCREASE ON EACH SHOULDER: Repeat inc on each side of st with marker every other round 18-25-34 more times. When inc are done, there are 232-276-324 sts on round and piece measures approx. 31-35-37 cm / 12¼"-13¾"-14½" from marker on neck (measured along inc mid back) as follows: Work 1 round in stockinette st while inc 0-4-4 sts (i.e. 0-2-2 sts on each side between marker mid front and mid back) = 232-280-328 sts. Then continue inc mid front and mid back every 4th round as before until finished measurements, AT THE SAME TIME work pattern - READ KNITTING TIP. NOTE: Work YOs and st with marker mid front and mid back in base color in pattern on every round until finished measurements. K 1 (= mid back), work A.1 (= 12 sts) 9-11-13 times in width, work the first 7 sts in A.1, K next st (= mid front), work A.1 9-11-13 times in width, work the first 7 sts in A.1. Continue like this in the round. Work the new inc sts in pattern, i.e. work st before st with marker in pattern from 8th st in A.1. Work st after st with marker so that the pattern is reversed on each side of st with marker. On next to last round in A.1 inc 4 sts evenly in all sizes (i.e. 2 sts in every section between st with marker front and back). When entire A.1 has been worked vertically, there are 260-308-356 sts on round. Now work as follows: K 1 (= mid back), work A.2 (= 24 sts) 5-6-7 times in width, work the first 9 sts in A.2, K 1 (= mid front), work A.2 5-6-7 times in width, work the first 9 sts in A.2. Continue like this in the round. Work the new inc sts in pattern, i.e. work st before st with marker in pattern from 10th st in A.2. Work st after st with marker so that pattern is reversed on each side of st with marker. On last round in A.2 inc 16 sts evenly in all sizes (i.e. 8 sts in every section between st with marker front and back). When entire A.2 has been worked vertically, there are 296-344-392 sts on round. Now continue with pattern as follows: K 1 (= mid back), work A.3 (= 8 sts) 18-21-24 times in width, work the first 3 sts in A.3, K next st (= mid front), work A.3 18-21-24 times in width, work the first 3 sts in A.3. Continue like this in the round. Work the new inc sts in pattern, i.e. work st before st with marker in pattern from 4th st in A.3. Work st after st with marker so that pattern is reversed on each side of st with marker. When entire A.3 has been worked vertically, there are 320-368-416 sts on round. Switch to circular needle size 4.5 mm / US 7 (or use 2 circular needles) and work 3 ridges in GARTER ST - see explanation above, with black, AT THE SAME TIME on first ridge inc 18-21-23 sts evenly = 338-389-439 sts. Bind off. Fasten off. FRINGES: Fasten fringes along the entire edge at the bottom as follows: 1 fringe = cut 2 lengths of 35 cm / 13¾" black. Place them double and thread loop through st in bind-off edge, pull the yarn ends through the loop. Repeat approx. every 4th st around the entire round - adjust to get a fringe in mid st front and back. Cut fringes to a length of approx. 13 cm / 5". ---------------------------------------------------------- Hat and bag: See DROPS 165-21 or "Related patterns" in pattern on website. ---------------------------------------------------------- |
||||||||||||||||
Diagram explanations |
||||||||||||||||
|
||||||||||||||||
 |
||||||||||||||||
 |
||||||||||||||||
 |
||||||||||||||||
Have you finished this pattern?Tag your pictures with #dropspattern #southwestponcho or submit them to the #dropsfan gallery. Do you need help with this pattern?You'll find 18 tutorial videos, a Comments/Questions area and more by visiting the pattern on garnstudio.com. © 1982-2026 DROPS Design A/S. We reserve all rights. This document, including all its sub-sections, has copyrights. Read more about what you can do with our patterns at the bottom of each pattern on our site. |
||||||||||||||||


With over 40 years in knitting and crochet design, DROPS Design offers one of the most extensive collections of free patterns on the internet - translated to 17 languages. As of today we count 324 catalogs and 12290 patterns - 12280 of which are translated into English (US/in).
We work hard to bring you the best knitting and crochet have to offer, inspiration and advice as well as great quality yarns at incredible prices! Would you like to use our patterns for other than personal use? You can read what you are allowed to do in the Copyright text at the bottom of all our patterns. Happy crafting!
Post a comment to pattern DROPS 165-20
We would love to hear what you have to say about this pattern!
If you want to leave a question, please make sure you select the correct category in the form below, to speed up the answering process. Required fields are marked *.