
Popular categories
Looking for a yarn?


Comments / Questions (41)
![]() Sonja wrote:
Sonja wrote:
Hej den 17 april stillede jeg et spørgsmål, mon jeg får et svar? Mvh Sonja
27.04.2017 - 13:14DROPS Design answered:
Hej Sonja, nu har vi svaret, se dit spørgsmål nedenfor. Og der vil blive lagt en rettelse ud på selve opskriften. God fornøjelse!
27.04.2017 - 16:07
![]() Sonja Mortensen-Dissing wrote:
Sonja Mortensen-Dissing wrote:
Hej, jeg har læst kommentarerne og flere steder står der, at der er fejl i denne opskrift. Er den blevet rettet, så jeg kan strikke efter den der ligger her eller skal jeg have tilsendt en ny opskrift? Kh Sonja
17.04.2017 - 16:06DROPS Design answered:
Hej Sonja, Der hvor der i opskriften står: På næste omgang starter alle udtagninger: her starter du med at tage 1 m ud på hver side af alle mærketråde (8 udtagninger) nu kan du følge udtagningerne ifølge opskriften og da vil antallet masker stemme efter udtagningerne. Vi skal lægge en rettelse ud så hurtigt som muligt. Tak for info!
27.04.2017 - 16:06
![]() Comte wrote:
Comte wrote:
Je ne comprends pas comment vous calculez le nombre de mailles avec les augmentations. 16*4ça fait64 18*4 ça fait 72 64 +72+88 ça fait 224
16.12.2016 - 20:10DROPS Design answered:
Bonjour Mme Comte, après la 1ère augmentation, on a 96 m, puis on augmente encore 16x 4 + 18x4 m soit 96 + 64+72 = 232 m. C'est-à-dire que l'on augmente au total 17x4 + 18x4. Bon tricot!
19.12.2016 - 09:03
![]() Prevel wrote:
Prevel wrote:
Je ne comprend pas les augmentations au milieu dos et devant au niveau du jacquard. car cela me deccale le dessin.,
04.03.2016 - 18:21DROPS Design answered:
Bonjour Mme Prevel, tricotez les diagrammes en effet miroir (en sens inverse) aux pointes et continuez chaque "moitié" en suivant le diagramme. Le motif ne se suivra pas en rond, au niveau des pointes (comme on le voit sur la photo). Bon tricot!
05.03.2016 - 17:54
![]() Winnepenninckx wrote:
Winnepenninckx wrote:
Comment savoir quelle taille commencer, je mesure 1.76m et je m habille en general en M / 40/44 j ai peur de d avoir une encolure trop large avec le modele taille L/XL et une longueur trop courte si je fais le modele taille S/M merci de votre aide
27.01.2016 - 18:29DROPS Design answered:
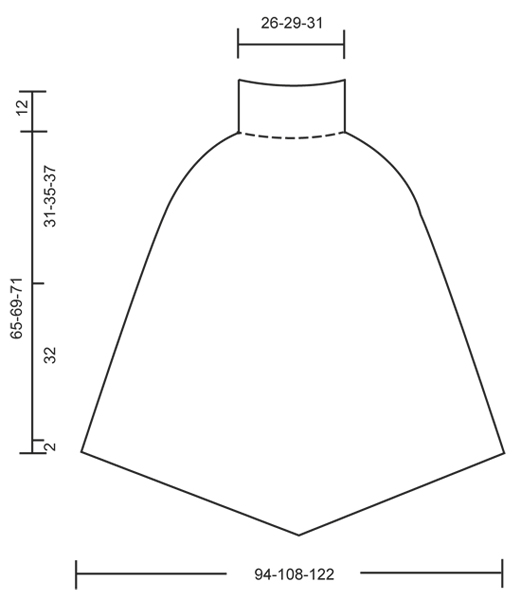
Bonjour Mme Winnepenninckx, vous pouvez vous aider des mesures du schéma en bas de page (prises à plat, d'un côté à l'autre) pour trouver la taille idéale et ajuster la longueur en fonction de ce que vous préférez. Bon tricot!
28.01.2016 - 13:05
![]() Rebecca wrote:
Rebecca wrote:
Nicht undenkbar. ... sondern und. 😉
23.01.2016 - 21:00
![]() Rebecca wrote:
Rebecca wrote:
Hi, ich bin jetzt am Ende von A2 undenkbar soll nun 16M gleichmäßig verteilt zunehmen (8M zwischen den Markierern an der vorderen undenkbar hinteren Mitte). Da ist doch dann auf jeder Seite ein Loch von 4 Maschen? ! Ist das tatsächlich so gemeint?Lieben Dank für eine Antwort.
23.01.2016 - 20:58DROPS Design answered:
Sie nehmen pro Hälfte des Ponchos 8 M zu. Sie haben ja, bevor Sie die letzte Rd von A.2 stricken, 280 M auf der Nadel, pro Hälfte also 140 M. Bei diesen jeweils 140 M nehmen Sie nun 8 M gleichmäßig verteilt zu, indem Sie je 1 Umschlag machen. Diesen stricken Sie dann in der nächsten Rd re verschränkt, damit kein Loch sichtbar wird.
02.02.2016 - 11:08
![]() Alice wrote:
Alice wrote:
Hallo, deze poncho wil ik voor mijn schoondochter breien in maat M een kleur, zonder inbreipatroon. Kunt u mij vertellen hoeveel materiaal er dan nodig is? En wat voor steekvariant ik dan als alternatief kan gebruiken? Groetjes Alice
04.01.2016 - 10:43DROPS Design answered:
Hoi Alice. Dat weet ik helaas niet, maar ik gok rond 750-800 gr op basis van andere patronen van één kleur en ongeveer dezelfde maat.
04.01.2016 - 14:18
![]() Eva Malling wrote:
Eva Malling wrote:
Strikker str. L/XL og maskeantallet passer ikke med de udtagninger der står. Irriterende
23.12.2015 - 16:15
![]() Bettina Weiler wrote:
Bettina Weiler wrote:
Hallo, würde gerne diesen tollen Poncho nachstricken. Da ich Anfänger bin möchte ich ihn gerne in uni stricken. Wie viel Wolle benötige ich gesamt? Die Anleitung bis zum Muster ist mir verständlich, da ich aber kein Muster stricken möchte weiss ich nicht wie ich in diesem Bereich zunehmen soll. Es werden doch hier nochmal zusätzlich Maschen zugenommen nach wie viel Reihen wie viel Maschen? Vielen Dank für Ihre Hilfe
02.12.2015 - 13:14DROPS Design answered:
Es wird zwar etwas weniger Wolle benötigt, wenn Sie nur einfarbig stricken, allerdings lässt sich schwer berechnen, wie viel weniger. Nehmen Sie also am besten die angebene Menge und stricken Sie aus dem Rest vielleicht ein paar Stulpen o.Ä. Für die Zun. müssen Sie ab der Stelle, ab der eig. im Muster gestrickt wird, die Rd mitzählen, bringen Sie am besten einen Markierer an. In der folgenden 23. Rd nehmen Sie gleichmäßig verteilt (zusätzlich zu den Zun. vorne und hinten) 4 M zu, dann in der darauf folgenden 22. Rd zusätzlich 16 M. Dann stricken Sie 24 Rd nur mit den "normalen" Zun., dann kommen die 6 Rd kraus re, hier nehmen Sie in der 1. Rd die genannte Anzahl an M zu.
05.12.2015 - 18:42
|
||||||||||||||||
Southwest#southwestponcho |
||||||||||||||||
 |
 |
|||||||||||||||
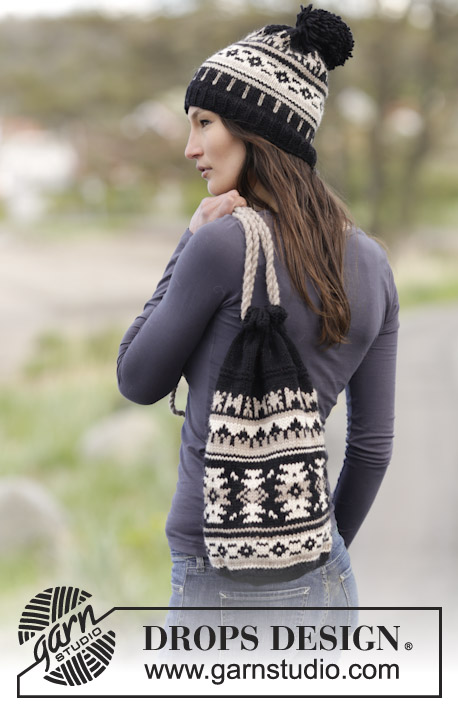
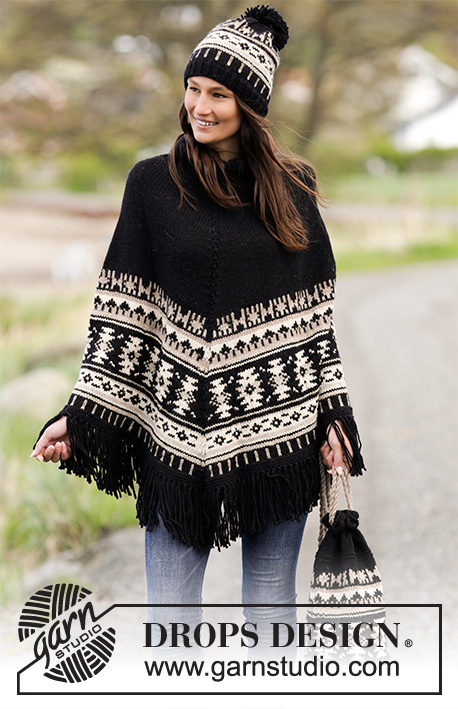
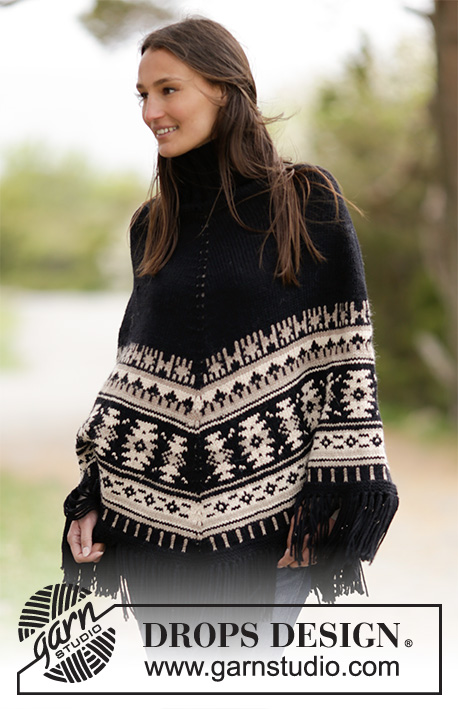
Knitted DROPS poncho with graphic pattern, fringes, high collar in rib, worked top down in ”Nepal”. Size: S - XXXL.
DROPS 165-20 |
||||||||||||||||
|
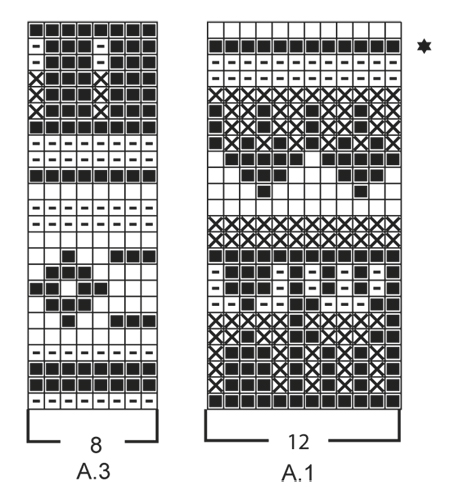
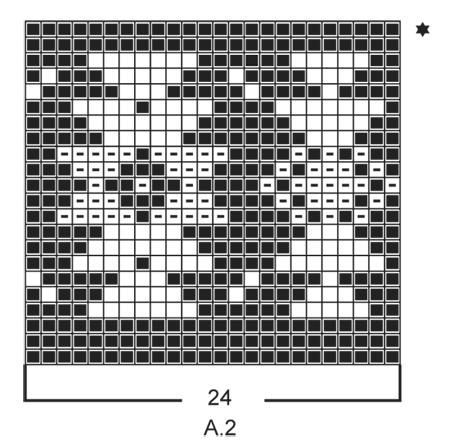
GARTER ST (worked in the round): * K 1 round and P 1 round *, repeat from *-*. 1 ridge = 2 rounds. PATTERN: See diagrams A.1 to A.3. All sts in pattern are worked in stockinette st. KNITTING TIP: To avoid the knitting gauge to tighten when working pattern, it is important not to tighten the strands on back side of piece. Switch to a higher needle no when working pattern if the pattern is somewhat tight. INCREASE TIP: Inc 1 st on each side of every marker by making a YO. On next round K YOs mid front and mid back to make holes. K YOs on each side of marker on shoulders twisted (i.e. work in back loop of st instead of front) to avoid holes. DECREASE TIP: Dec 1 st by K 2 sts tog. ---------------------------------------------------------- PONCHO: Worked in the round on circular needle, top down in stockinette st. Work neck in rib. Rounds start mid back. Cast on 120-132-144 sts on circular needle size 4.5 mm / US 7 with black. Work rib = K 3/P 3 for 12 cm / 4¾". Switch to circular needle size 5 mm / US 8. Work 2 rounds in stockinette st while on 1st round dec 32-36-40 sts evenly - READ DECREASE TIP = 88-96-104 sts. Insert a marker here. NOW MEASURE THE PIECE FROM HERE. Now insert 4 markers in the piece as follows: Insert a marker in first st (= mid back), work 21-23-25 sts, insert a marker in next st (= right shoulder), work 21-23-25 sts, insert a marker in next st, (= mid front), work 21-23-25 sts, insert a marker in next st (= left shoulder), work the remaining 21-23-25 sts. REMEMBER THE KNITTING GAUGE On next round beg inc. NOTE: Inc is different towards mid front/mid back and on each shoulder - READ INCREASE TIP. INCREASE MID FRONT AND MID BACK: Repeat inc on each side of st with marker every 4th round 16-18-19 more times. INCREASE ON EACH SHOULDER: Repeat inc on each side of st with marker every other round 18-25-34 more times. When inc are done, there are 232-276-324 sts on round and piece measures approx. 31-35-37 cm / 12¼"-13¾"-14½" from marker on neck (measured along inc mid back) as follows: Work 1 round in stockinette st while inc 0-4-4 sts (i.e. 0-2-2 sts on each side between marker mid front and mid back) = 232-280-328 sts. Then continue inc mid front and mid back every 4th round as before until finished measurements, AT THE SAME TIME work pattern - READ KNITTING TIP. NOTE: Work YOs and st with marker mid front and mid back in base color in pattern on every round until finished measurements. K 1 (= mid back), work A.1 (= 12 sts) 9-11-13 times in width, work the first 7 sts in A.1, K next st (= mid front), work A.1 9-11-13 times in width, work the first 7 sts in A.1. Continue like this in the round. Work the new inc sts in pattern, i.e. work st before st with marker in pattern from 8th st in A.1. Work st after st with marker so that the pattern is reversed on each side of st with marker. On next to last round in A.1 inc 4 sts evenly in all sizes (i.e. 2 sts in every section between st with marker front and back). When entire A.1 has been worked vertically, there are 260-308-356 sts on round. Now work as follows: K 1 (= mid back), work A.2 (= 24 sts) 5-6-7 times in width, work the first 9 sts in A.2, K 1 (= mid front), work A.2 5-6-7 times in width, work the first 9 sts in A.2. Continue like this in the round. Work the new inc sts in pattern, i.e. work st before st with marker in pattern from 10th st in A.2. Work st after st with marker so that pattern is reversed on each side of st with marker. On last round in A.2 inc 16 sts evenly in all sizes (i.e. 8 sts in every section between st with marker front and back). When entire A.2 has been worked vertically, there are 296-344-392 sts on round. Now continue with pattern as follows: K 1 (= mid back), work A.3 (= 8 sts) 18-21-24 times in width, work the first 3 sts in A.3, K next st (= mid front), work A.3 18-21-24 times in width, work the first 3 sts in A.3. Continue like this in the round. Work the new inc sts in pattern, i.e. work st before st with marker in pattern from 4th st in A.3. Work st after st with marker so that pattern is reversed on each side of st with marker. When entire A.3 has been worked vertically, there are 320-368-416 sts on round. Switch to circular needle size 4.5 mm / US 7 (or use 2 circular needles) and work 3 ridges in GARTER ST - see explanation above, with black, AT THE SAME TIME on first ridge inc 18-21-23 sts evenly = 338-389-439 sts. Bind off. Fasten off. FRINGES: Fasten fringes along the entire edge at the bottom as follows: 1 fringe = cut 2 lengths of 35 cm / 13¾" black. Place them double and thread loop through st in bind-off edge, pull the yarn ends through the loop. Repeat approx. every 4th st around the entire round - adjust to get a fringe in mid st front and back. Cut fringes to a length of approx. 13 cm / 5". ---------------------------------------------------------- Hat and bag: See DROPS 165-21 or "Related patterns" in pattern on website. ---------------------------------------------------------- |
||||||||||||||||
Diagram explanations |
||||||||||||||||
|
||||||||||||||||
 |
||||||||||||||||
 |
||||||||||||||||
 |
||||||||||||||||
Have you finished this pattern?Tag your pictures with #dropspattern #southwestponcho or submit them to the #dropsfan gallery. Do you need help with this pattern?You'll find 18 tutorial videos, a Comments/Questions area and more by visiting the pattern on garnstudio.com. © 1982-2026 DROPS Design A/S. We reserve all rights. This document, including all its sub-sections, has copyrights. Read more about what you can do with our patterns at the bottom of each pattern on our site. |
||||||||||||||||


With over 40 years in knitting and crochet design, DROPS Design offers one of the most extensive collections of free patterns on the internet - translated to 17 languages. As of today we count 324 catalogs and 12290 patterns - 12280 of which are translated into English (US/in).
We work hard to bring you the best knitting and crochet have to offer, inspiration and advice as well as great quality yarns at incredible prices! Would you like to use our patterns for other than personal use? You can read what you are allowed to do in the Copyright text at the bottom of all our patterns. Happy crafting!
Post a comment to pattern DROPS 165-20
We would love to hear what you have to say about this pattern!
If you want to leave a question, please make sure you select the correct category in the form below, to speed up the answering process. Required fields are marked *.