
Popular categories
Looking for a yarn?


Comments / Questions (19)
![]() Berit wrote:
Berit wrote:
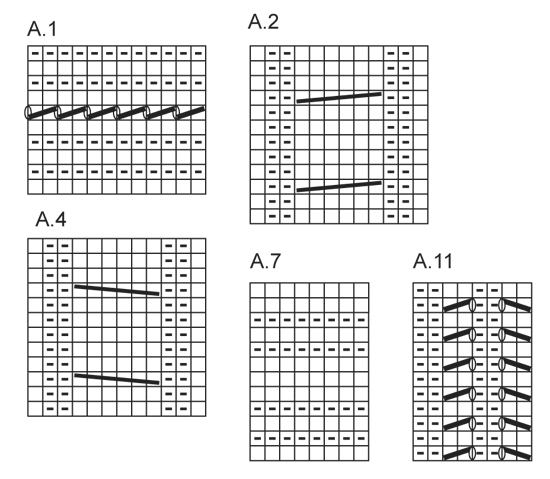
Hallo, kann es sein, dass ein Fehler in Diagramm A10 ist? In der 19 Reihe müssten meines Erachtens die 1+2 Masche '1 M abheben, 1 M re, die abgehobene M überziehen' gestrickt werden. Damit ergibt sich in Reihe 20 auch 7 restliche Maschen. Vielen Dank fürs Prüfen und ggfs korrigieren des Diagramms. Viele Grüße Berit
11.09.2025 - 10:34DROPS Design answered:
Liebe Berit, Sie haben Recht, das muss wie zuvor weitergestrickt werden, d.h. die 1. und 2. Masche werden überzogen zusammengestrickt. Vielen Dank für den Hinweis, es wird an die Designer weitergeleitet und dann korrigiert!
25.10.2025 - 00:20
![]() Nadège wrote:
Nadège wrote:
Bonjour je commence la section A8. Quand on diminue A2 avec A8 et A8 avec A4 doit-on le faire sur les deux sections du premier tour ou seulement sur le premier panneau ?
21.03.2020 - 10:59DROPS Design answered:
Bonjour Nadège, la première diminution de A.8A et A.8C se fait sur le devant et sur le dos de la même façon. Vous diminuez ensuite comme indiqué dans les diagrammes (et augmentez comme indiqué dans le texte). Bon tricot!
23.03.2020 - 09:17
![]() Nadège wrote:
Nadège wrote:
Bonsoir je viens de terminer a2-a3-a4 (premier paragraphe). Mais maintenant que A2 et A4 sont terminés, comment dois-je faire ? A3 n'est pas terminé pour que je passe au deuxième paragraphe. merci
12.03.2020 - 21:24DROPS Design answered:
Bonjour Nadège, répétez A.2 et A.4 en hauteur tout en continuant A.3 jusqu'à ce que A.3 soit terminé. Veillez bien à avoir toujours le même nombre de tours entre chaque torsade de A.2 et A.4. Continuez également les augmentations des manches comme avant. Bon tricot!
13.03.2020 - 08:38
![]() Nadège wrote:
Nadège wrote:
Je relis votre explication mais je ne comprends pas comment on peut avoir 16m au 3e rang. On a déjà 14m au 1er rang +2 jetés donc au 2e rang on arrive déjà à 16m +2 jetés. Donc au 3e rang je serai à 18m + 2 jetés.
11.03.2020 - 13:25DROPS Design answered:
au 1er rang vous avez pour les manches: 1 jeté, 14 m end, 1 jeté - ces jetés sont les augmentations des manches (= au 2ème rang, vous tricotez 16 m end pour la manche (= on n'augmente que tous les 2 tours)); au 3ème rang (= 2ème rang d'augmentations vous avez donc: 1 jeté, 16 m end, 1 jeté soit 18 m au total). Bon tricot!
11.03.2020 - 14:03
![]() Nadege wrote:
Nadege wrote:
Re moi, donc en fait les explication de l'empiècement on a déjà les 4 jetés d'augmentation des manches ? je suis désolée car je ne m'y retrouve pas...
11.03.2020 - 13:09DROPS Design answered:
Bonjour Nadège, oui tout à fait, autrement dit: A.2 (= 12 m), A.3 (= 1 jeté = augmentation ; 5 m end, 1 jeté = augmentation), A.4 (= 12 m), (= dos), 1 jeté, tricoter 14 m jersey, 1 jeté (= 16 m pour la manche), A.2, A.3 (= 1 jeté = augmentation ; 5 m end, 1 jeté = augmentation, A.4 (= devant), 1 jeté, 14 m jersey, 1 jeté (= 16 m pour la manche). Les jetés au début et à la fin de A.3 vont augmenter le devant/dos et on augmente pour les manches au début/à la fin de la manche. Est-ce plus clair ainsi?
11.03.2020 - 14:01
![]() Nadège wrote:
Nadège wrote:
Bonjour je commence le modèle et j'ai un problème pour le raglan. Premier tour avec motif ok mais le deuxième tour on doit augmenter une maille de chaque côté de l'ensemble a2-a4. Ça veut dire qu'on fait 4 jetés en plus des 4 déjà mentionnés dans l'explication ? Merci d'avance
11.03.2020 - 08:33DROPS Design answered:
Bonjour Nadège, vous augmentez dans A.3 (puis A.5) et pour le dos et le devant, et, pour les manches, vous augmentez de part et d'autre des mailles des manches = après A.4 du dos + avant A.2 du devant pour la 1ère manche et après A.4 du devant + avant A.2 du dos pour la 2ème manche. Autrement dit, au 3ème tour vous avez 1 jeté, 16 m, 1 jeté, au 5ème tour 1 jeté, 18 m, 1 jeté et ainsi de suite. Bon tricot!
11.03.2020 - 08:51
![]() Sandrine wrote:
Sandrine wrote:
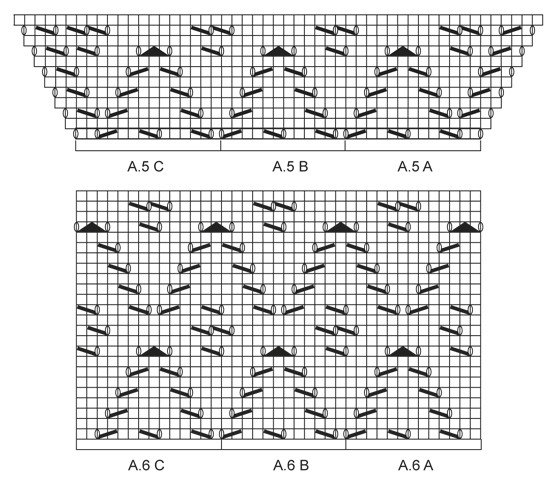
Bonjour, J'aurais souhaité avoir une précision sur ce modèle, lorsque vous dites "À chaque fois que l'on répète A.5 en hauteur, on tricote A.5 B encore 1 fois entre A.5 A et A.5 C". Je tricote la taille L/XL. Je dois répéter A.5 2 fois en hauteur. Est-ce que cela veut dire que je tricote A.5 A à A.5 C, une première fois comme indiqué sur le diagramme et une deuxième fois en tricotant A.5 A, A.5 B, A.5 B, A.5 C ? Merci pour votre réponse
23.01.2020 - 08:38DROPS Design answered:
Bonjour Sandrine, quand on a tricoté 1 fois A.5 en hauteur, on a suffisamment de mailles entre A.5A et A.5C pour tricoter 1 motif de A.5B en plus entre le A et le C. Autrement dit, quand vous avez tricoté 1 fois les diagrammes en hauteur vous avez fait 1 x A.5B, vous les recommencez de la même façon, mais cette fois, vous aurez 2 x A.5B entre A.5A et A.5C. Bon tricot!
23.01.2020 - 10:06
![]() Carla M Zamperetti wrote:
Carla M Zamperetti wrote:
Salve,vorrei una conferma se ho capito bene: dopo aver lavorato il diagramma 1 si iniziano gli aumenti per i raglan,vorrei sapere quante m si aumentano ogni due ferri:4 oppure 8? e il diagramma 1 è su 12 m,e dice di montare 86 m,ma non dovrebbero essere 84?
12.01.2017 - 09:30DROPS Design answered:
Buongiorno Carla. Gli aumenti sulle maniche sono in tutto 4 ad ogni giro. Gli aumenti sul davanti/dietro sono compresi nella lavorazione del diagramma A3. Le chiediamo di leggere con attenzione il paragrafo RAGLAN: a seconda della taglia su alcuni giri si inseriscono i gettati, ma si lavorano due maglie insieme a diritto. Il numero delle maglie iniziale è corretto. Buon lavoro!
12.01.2017 - 09:49
![]() Carla M Zamperetti wrote:
Carla M Zamperetti wrote:
La spiegazione dice di cominciare montando 86 m,poi di lavorare il diagramma 1 che è di 12 m,quindi le m dovrebbero essere 84...
12.01.2017 - 09:20DROPS Design answered:
Buongiorno Carla. Il numero di maglie indicato è corretto. Il diagramma A1 di fatto si lavora su un numero di maglie multiplo di 2. Inoltre con 86 maglie, si imposta correttamente la successiva lavorazione dei diagrammi A.2, A.3 e A.4. Buon lavoro!
12.01.2017 - 09:29
![]() Dana Denney wrote:
Dana Denney wrote:
Are the charts worked from the bottom up or top down? Thanks! Dana
04.01.2016 - 23:57DROPS Design answered:
Dear Mrs Denney, start reading diagrams at the bottom corner on the right side towards the left from RS and from the left towards the right from WS. Read more about diagrams here. Happy knitting!
05.01.2016 - 09:15
|
||||||||||||||||||||||||||||
Irish Dove#irishdovesweater |
||||||||||||||||||||||||||||
 |
 |
|||||||||||||||||||||||||||
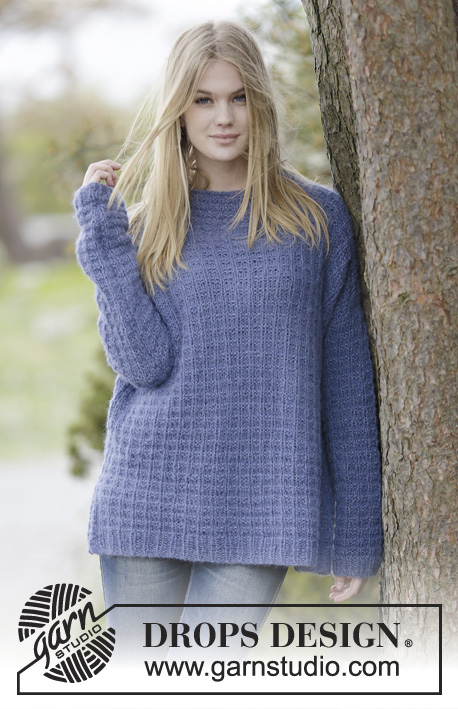
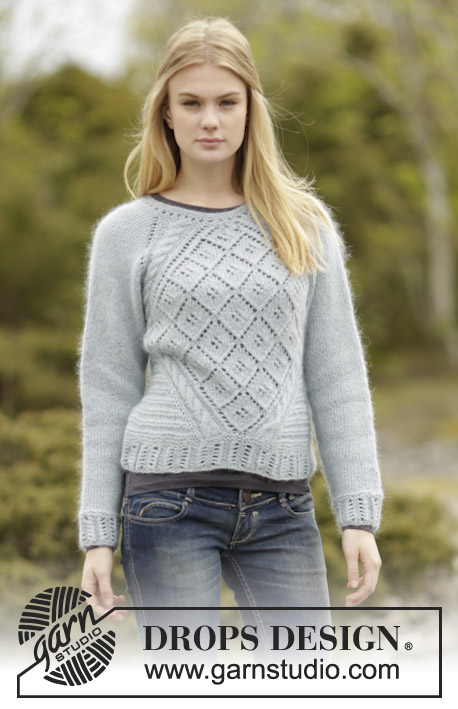
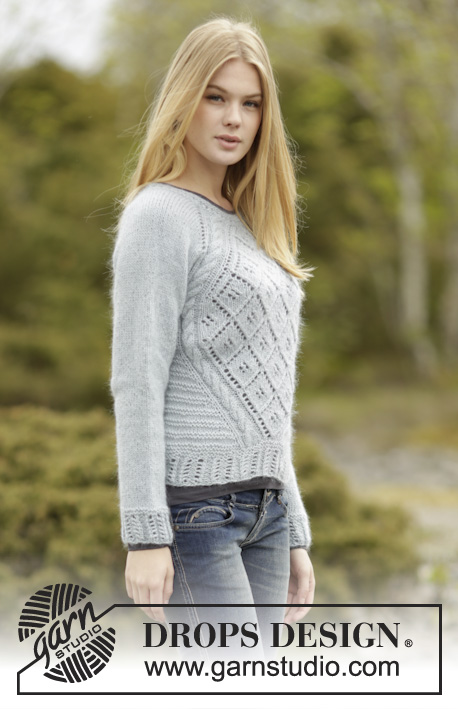
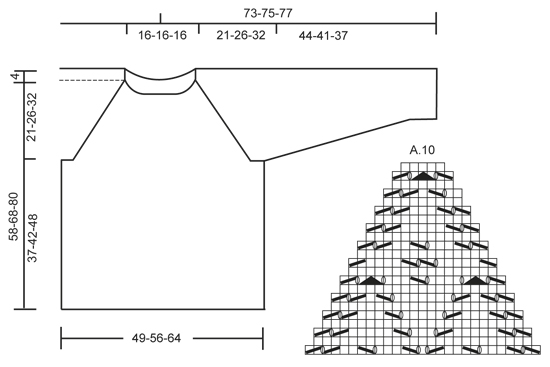
Knitted DROPS jumper with lace pattern, raglan and cables, worked top down in ”Alpaca” and ”Kid-Silk”. Size: S - XXXL.
DROPS 166-41 |
||||||||||||||||||||||||||||
|
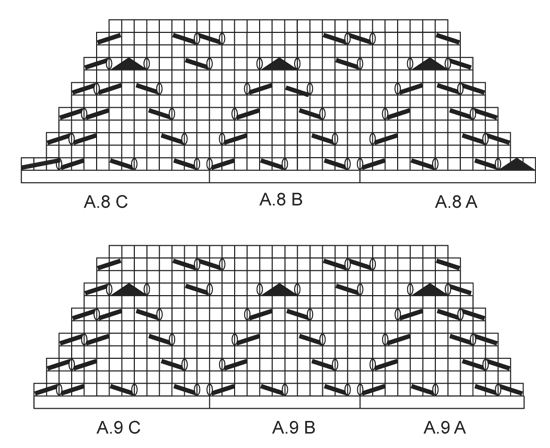
PATTERN: See diagrams A.1 to A.11. RAGLAN: Inc for raglan on each side of A.2/A.4. On body inc are shown in pattern A.3 and A.5. Inc on sleeves as follows: Inc with a YO, K YO on next round - to make holes. Inc every other round 23-29-35 times, but K 2 tog after YO at beg of sleeve and before YO at end of sleeve 0-3-7 times (approx. on every 0-10th-5th inc). On this round there are no inc on sleeve but continue eyelet row as before. Inc 23-26-28 sts in total in each side of each sleeve. GARTER ST (worked in the round): * K 1 round and P 1 round *, repeat from *-*. 1 ridge = 2 rounds. ---------------------------------------------------------- JUMPER: Worked in the round on circular needle, top down. YOKE: READ THE FIRST SECTION BEFORE CONTINUING! Cast on 86-86-86 sts on a short circular needle size 5 mm / US 8 with one strand Alpaca and one strand Kid-Silk (= 2 strands). Work A.1. When A.1 has been worked one time vertically, work as follows - from left raglan on back piece: Work A.2 (= 12 sts), A.3 (= 5 sts), A.4 (= 12 sts), (= back piece), 1 YO, work 14 sts in stockinette st, 1 YO (= sleeve), A.2, A.3, A.4 (= front piece), 1 YO, work 14 sts in stockinette st, 1 YO (= sleeve). Continue pattern like this AT THE SAME TIME continuing inc for RAGLAN on sleeve on every other round - see explanation above. Sleeve is worked in stockinette st. REMEMBER THE KNITTING GAUGE When A.3 has been worked 1 time vertically, continue as follows: Work A.2, A.5 A (= 13 sts), A.5 B (= 12 sts) and A.5 C (= 14 sts) A.4, (= back piece), work sleeve, A.2, A.5 A, A.5 B. A.5 C, A.4, (= front piece), work sleeve. Work A.5 1-2-3 times vertically in total. Every time A.5 is worked vertically, work 1 A.5 B more between A.5 A and A.5 C. Work until 1 round remains in A.5 (= 75-87-99 sts on front/back piece and 60-66-70 sts on each sleeve). Work next round as follows (this is last round of A.5): Work 75-87-99 sts (= back piece), slip the next 60-66-70 sts on a stitch holder for sleeve, cast on 8-8-10 new sts, insert 1 marker in the middle of the new sts, work 75-87-99 sts (= front piece), slip the next 60-66-70 sts on 1 stitch holder for sleeve, cast on 8-8-10 new sts, insert 1 marker in the middle of the new sts = 166-190-218 sts. Yoke measures approx. 21-26-32 cm / 8¼"-10¼"-12½". BODY: READ ALL OF THE FOLLOWING SECTION BEFORE CONTINUING! Work as follows: A.2, A.6 A (= 13 sts), A.6 B over the next 24-36-48 sts, A.6 C (= 14 sts), A.4, work A.7 over the new 8-8-10 sts under sleeve, A.2, A.6 A, A.6 B over the next 24-36-48 sts, A.6 C, A.4, work A.7 over the new 8-8-10 sts under sleeve. When A.6 has been worked 1 time vertically, continue as follows: A.2, A.8 A (= 14 sts), A.8 B over the next 24-36-38 sts, A.8 C (= 15 sts), A.4, 1 YO, work A.7 over the next 8-8-10 sts, 1 YO, A.2, A.8 A, A.8 B over the next 24-36-48 sts, A.8 C (= 15 sts), A.4, 1 YO, work A.7 over the next 8-8-10 sts, 1 YO. NOTE: On first dec in A.8 beg 1 st before A.8, dec as follow: Slip last st in A.2, K tog the first 2 sts in A.8 A, psso. At the end of A.8 dec as follows: K 3 tog (the last 2 sts from A.8 and the first st from A.4). Last st in A.2 and first st in A.4 are now dec, continue with 11 sts as before in A.2/ A.4 = 162-186-214 sts. On every other round inc 1 st on each side of A.7 with 1 YO, work the inc sts in A.7 – AT THE SAME TIME dec in A.8 (dec are shown in diagram). No of sts is the same the entire time, but no of sts in A.7 inc and no of sts in A.8 dec. When A.8 has been worked 1 time vertically, continue as follows: A.2 (= 11 sts), A.9 A (13 sts), A.9 B over the next 12-24-36 sts, A.9 C (= 14 sts), A.4 (= 11 sts), 1 YO, work A.7 over the next 20-20-22 sts, 1 YO, A.2, A.9 A, A.9 B over the next 12-24-36 sts, A.9 C, A.4, 1 YO, work A.7 over the next 20-20-22 sts, 1 YO. Work A.9 1-2-3 times vertically, then work as follows: A.2 (= 11 sts), A.10 (= 27 sts), A.4 (= 11 sts), 1 YO, work A.7 over the next 32-44-58 sts, 1 YO, A.2, A.10, A.4, 1 YO, work A.7 over the next 32-44-58 sts, 1 YO. When A.10 has been worked, 5 sts remain in A.10 and 54-66-80 sts in every A.7. Work 2 ridges in GARTER ST - see explanation above, AT THE SAME TIME dec 4 sts over every A.2/A.4, and dec 2-2-6 sts evenly on round = 144-168-192 sts. Work A.11 over all sts 1 time vertically. Bind off sts with K over K and P over P. Piece measures approx. 58-68-80 cm / 22¾"-26¾"-31½" from shoulder. SLEEVE: Work sleeves in the round on double pointed needles. Slip the 60-66-70 sts from stitch holder back on double pointed needles size 5 mm / US 8. Insert 1 marker in piece, NOW MEASURE PIECE FROM HERE. Cast on 8-8-10 new sts under sleeve, insert 1 marker in the middle of these 8-8-10 sts = 68-74-80 sts. Work in stockinette st. When piece measures 3 cm / 1", dec 1 st on each side of marker. Repeat dec every 2-1½-1½ cm / ¾"-½"-½" 15-16-17 more times = 36-40-44 sts. Continue until piece measures 38-35-31 cm / 152-13¾"-12¼". Work 2 ridges, AT THE SAME TIME on first round inc 4-0-4 sts evenly = 40-40-48 sts. Work A.11 over all sts 1 time vertically. Bind off. Piece measures approx. 44-41-37 cm / 17¼"-16"-14½". Work the other sleeve the same way. ASSEMBLY: Sew the openings under the sleeves tog. |
||||||||||||||||||||||||||||
Diagram explanations |
||||||||||||||||||||||||||||
|
||||||||||||||||||||||||||||
 |
||||||||||||||||||||||||||||
 |
||||||||||||||||||||||||||||
 |
||||||||||||||||||||||||||||
 |
||||||||||||||||||||||||||||
 |
||||||||||||||||||||||||||||
Have you finished this pattern?Tag your pictures with #dropspattern #irishdovesweater or submit them to the #dropsfan gallery. Do you need help with this pattern?You'll find 22 tutorial videos, a Comments/Questions area and more by visiting the pattern on garnstudio.com. © 1982-2026 DROPS Design A/S. We reserve all rights. This document, including all its sub-sections, has copyrights. Read more about what you can do with our patterns at the bottom of each pattern on our site. |
||||||||||||||||||||||||||||


With over 40 years in knitting and crochet design, DROPS Design offers one of the most extensive collections of free patterns on the internet - translated to 17 languages. As of today we count 324 catalogs and 12290 patterns - 12280 of which are translated into English (US/in).
We work hard to bring you the best knitting and crochet have to offer, inspiration and advice as well as great quality yarns at incredible prices! Would you like to use our patterns for other than personal use? You can read what you are allowed to do in the Copyright text at the bottom of all our patterns. Happy crafting!
Post a comment to pattern DROPS 166-41
We would love to hear what you have to say about this pattern!
If you want to leave a question, please make sure you select the correct category in the form below, to speed up the answering process. Required fields are marked *.