
Popular categories
Looking for a yarn?


Comments / Questions (65)
![]() Patricia wrote:
Patricia wrote:
Thank you for your reply. As the bolero is knit from cuff to cuff I am having trouble making the cuffs look the same. First cuff, long tail cast on, purl one row then rib etc. .. second cuff rib … purl 1 row bind off. What bind off do you recommend that matches the long tail cast on? Many thanks!
27.03.2024 - 03:12DROPS Design answered:
Dear Patricia, the truth to be told, there is no cast off, especially knitted ones that gives you the exact looks as a cast on. However, you can try the italian cast off , which is a sewn cast off, that looks the most similar (and gives you the most similar flexibility) to a cast on. there is a tutorial video HERE, that can help you to see how to do that. Happy Knitting!
27.03.2024 - 10:09
![]() Patricia wrote:
Patricia wrote:
What cast on and bind off did you use on the cuffs of the Mom and Me shrug that match? Thank you!
26.03.2024 - 12:42DROPS Design answered:
Dear Patricia, it is actually up to you, you can use the cast on you prefer, but we generally suggest using the long tail cast on, and the edge of the bolero should be cast off according to the ribbing, knit stitches with knit, purl stitches with purl. Happy Knitting!
26.03.2024 - 22:01
![]() Dorthe Sonne wrote:
Dorthe Sonne wrote:
Findes der en video som viser hvordan I gør i afsnit 4. Altså der hvor 8 masker 3 gange sættes på tråd. Når de skal tilbage foreslås at der samles en maske op imellem p og tråd for at undgå huller. Jeg får kæmpe huller? Videoer jeg kan finde viser den metode man bruger ved feks hæl.
21.03.2024 - 12:48
![]() Anegret wrote:
Anegret wrote:
Ja genau das war meine Frage: Der 2. Maschenmarkierer ist die Mitte des Boleros. Zwischen der Mitte und den Zunahmen auf der rechten Seite sind ca 12 cm. Jetzt sollen auf der linken Seite die Zunahmen (10 M usw) bereits 3 cm nach dem Maschenmarkierer beginnen. Das kann nicht symmetrisch sein?
29.08.2023 - 19:14DROPS Design answered:
Liebe Frau Angret, die Zunahmen bei der 1. Hälfte (Rückenteil) sind fertig vor den Abketten für das Vorderteil, deshalb beginnen die Abnahmen für das Rückenteil 3 cm nach der Markierung bzw nach den Zunahmen für das Vorderteil. So werden beide Hälfte symmetrisch. Viel Spaß beim stricken!
30.08.2023 - 09:44
![]() Anegret wrote:
Anegret wrote:
Ich stricke die Kinder Version für 9/10 Jahre: vom Ärmelende bis zur Mitte sind es 16 cm. Dann wird ein Maschenmarkierer gesetzt und Maschen stillgelegt, dann wieder gestrickt usw. Nachher ist angeführt, dass man nach 6 cm nach Maschenmarkierer gegengleich arbeitet: oben 10 Maschen aufnimmt usw. Warum nach 6 cm ab Maschenmarkerer und nicht wieder nach 16 cm? Ich versteh das leider nicht. Danke
26.08.2023 - 23:03DROPS Design answered:
Liebe Anegret, die Zunahmen beim Vorderteil beginnen nach 3 cm und die Abketten für das Rückenteil nach 6 cm damit beide Seiten symmetrisch sind. Viel Spaß beim stricken!
28.08.2023 - 14:13
![]() Anneleen De Broeck wrote:
Anneleen De Broeck wrote:
Can the part about the short rows be rephrased as: Knit 3 short rows along the lower 28 stitches (in girls size 7-8)?
21.06.2022 - 13:12DROPS Design answered:
Dear Mrs De Broeck, do you mean when piece measures 15 cm? Then it's not right, you have to work short rows working from bottom/back piece towards top/front piece leaving 10 sts unworked (= towards top/front), turn and work row back, and work next row leaving 10 more sts unworked, repeat these 2 rows until you have worked 2 rows over the remaining 11 sts at the bottom/back side, now work the short rows reversed, ie work 10 more sts on every row from bottom towards top until all stitches are worked. Happy knitting!
21.06.2022 - 14:03
![]() Sylvia Moritz wrote:
Sylvia Moritz wrote:
I am making the girls shrug. Size 11/12. I am up to the part of the pattern where I am increasing on one row and decreasing on another. It says skip a row where exactly are the decreases and increases. It seems that the increases or decreases happen on right side or wrong side. This pattern is so confusing. Please help.
03.10.2021 - 00:46DROPS Design answered:
Dear Mrs Moritz, in 11/12, when piece measures 48 cm, cast off/decrease on right side of piece (= seen from RS = beg of row from RS) for the front piece and at the same time cast on new sts/increase on the left side of piece (seen from RS = end of row from RS) for the back piece. From WS work all sts as before. When dec/inc on every 4th row, dec/inc on every other row from WS (= 3 row without inc/dec, inc/dec on next row). Hope this will help!
04.10.2021 - 08:20
![]() Linda wrote:
Linda wrote:
Thank you for suggesting using a stitch holder when working short rows. I'd never thought of this, such a simple suggestion but so very, very helpful. I like your way of increasing too. Here in the UK we're told to knit into the back of the loop below but not to make a yarn over on the row before, this makes life so much easier.
07.05.2021 - 16:09
![]() Nanna wrote:
Nanna wrote:
Jeg synes kun at det er under montering at der står at man skal skifte pind i ribben, kan det være rigtigt? I starten af opskriften, skal man så slå op på pind 5 samt fortsætte rib på samme pind, eller skifte? Jeg glæder mig til at komme igang med den!
26.08.2020 - 21:52
![]() Caroline wrote:
Caroline wrote:
Flicka STL 7/8: «Efter att de sista 8-9-10-11-11 m är satta på tråden stickas det 1 v slätst innan m på tråden sätts tillbaka igen.» Klipper jag tråden efter att ha stickat det ena varvet? Och börjar med ny tråd när jag plockar upp de andra 9m som jag satt på tråd tidigare..?
12.04.2020 - 10:13DROPS Design answered:
Hej Caroline, nej det skal ikke være nødvendigt, du sætter maskerne tilbage efterhånden som du strikker dig frem til dem. God fornøjelse!
29.04.2020 - 09:54
|
|
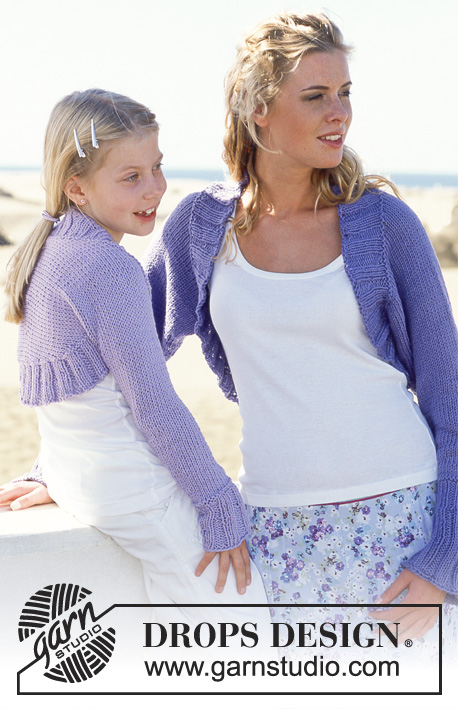
Mom and Me |
|
 |
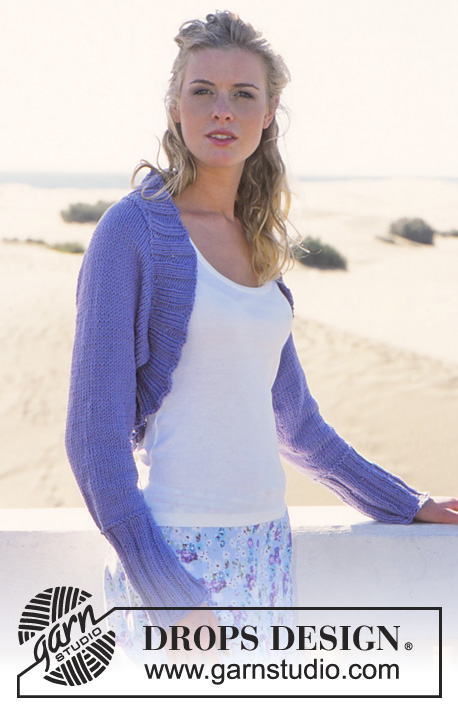 |
DROPS Shrug in Paris for Women and Girls
DROPS 89-13 |
|
|
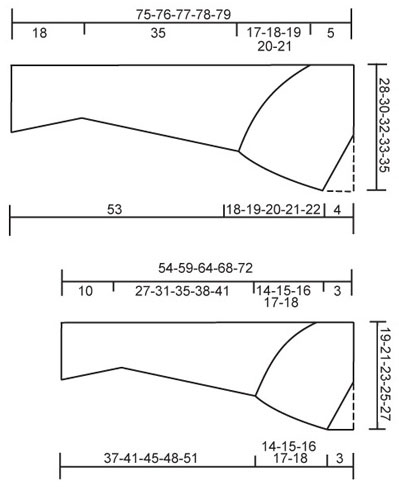
WOMEN’S SIZES: Gauge: 17 sts x 22 rows on larger needles in stockinette st = 10 x 10 cm. Rib: * K 3, P 3 *, repeat * - *. Note on the diagram: The shrug is knit from cuff to cuff. The diagram shows the shrug after assembly – that is, with the sleeve seam sewn. The dotted line indicates the center back – the sloping line indicates the front edge. Right side: Loosely cast on 50-50-56-56-56 sts on larger needles. P 1 row (wrong side), then knit rib, keeping 1 edge st at each side in garter st. When the piece measures 12 cm dec all P 3 to P 2 = 42-42-47-47-47 sts. Continue the rib with K 3/P 2. When the piece measures 18 cm K 1 row (right side row), then K 1 row (wrong side), adjusting (inc/dec as needed) to 42-42-46-48-48 sts, then continue in stockinette st. When the piece measures 20-20-20-25-21 cm inc 1 st at each side every 3-2.5-2.5-2-2 cm a total of 12-14-14-15-17 times = 66-70-74-78-82 sts. After last inc the piece measures 53 cm, put 1 marker at each side – measure the piece from here. Now dec at one side of piece (= front) at the same time cast on new sts at the other side of piece (= back) as follows: At front edge: on 1st row bind off 3 sts, then bind off every other row: 3 sts 3 times and 2 sts 9-10-11-12-13 times, then every 4 rows: 1 st 3 times. At back edge: inc every other row: 2 sts 3 times and 1 st 5-6-7-6-9 times, then every 4 rows: 1 st 4-4-4-5-4 times. After all incs and decs there are 48-51-54-56-60 sts. When the piece measures 18-19-20-21-22 cm put 10 sts on a st holder from lower edge of back up toward the neck every other row 4 times = 8-11-14-16-20 sts remain on needles. The shrug is now knit to the center back (halfway). Place a new marker at center back of neck. Knit 1 row stockinette st over all sts on needles, then knit the other half, reversing shaping as follows: put 10 sts back on needles every other row 4 times = 48-51-54-56-60 sts. When sts are put back on needles pick up 1 st between the last st on needles the first st on st holder, K tog this st with the first st on st holder. This prevents a hole where the sts are returned to the needles. When the piece measures 5 cm from the marker in back of the neck inc/cast on for front (= the side of piece you previously bound off) every 4 rows: 1 st 3 times, then every other row: 2 sts 9-10-11-12-13 times and 3 sts 4 times. At the same time, when the piece measures 8 cm from the marker in back of the neck dec for back (= the side you previously increased) every 4 rows: 1 st 4-4-4-5-4 times, then every other row: 1 st 5-6-7-6-9 times and 2 sts 3 times. After all incs and decs are complete there are 66-70-74-78-82 sts. Put a marker at each side – measure the work from here. Now dec 1 st at each side every 3-2.5-2.5-2-2 cm a total of 12-14-14-15-17 times = 42-42-46-48-48 sts. When the piece measures 34 cm P 1 row (right side) and P 1 row (wrong side), adjusting (inc/dec as needed) to 42-42-47-47-47 sts. Now knit rib (= K 3/P 2) keeping 1 edge st at each side in garter st. When cuff measures 6 cm from the P rows inc all P 2 to P 3 = 50-50-56-56-56 sts. When cuff measures 18 cm from the P rows K 1 row (right side) and then bind off loosely. Assembly: Sew sleeve seams using edge sts as seam allowance, up to markers. Pick up sts around opening = 180-195-210-225-225 sts (divisible by 15) on smaller circular needles. If you pick up more or less sts, adjust on the 2nd row evenly distributed. Join and knit in the round as follows (seen from the right side): P 1 row and K 1 row, then knit rib (= K 3/P 2). When edge measures 2 cm inc every 3rd P 2 to P 3 = 192-208-224-240-240 sts. Repeat inc when edge measures 5 and 8 cm, so that each P 2 is now P 3 = 216-234-252-270-270 sts. Bind off loosely in rib. GIRLS’ SIZES: Sizes: 5/6 years - 7/8 years - 9/10 years - 11/12 years -13/14 years Finished measurements: Wrist to center back: 54-59-64-68-72 cm [21.25" - 23.25" - 25.25" - 26.75" - 28.25"] Underarm to center back: 17-18-19-20-21 cm [6.75" - 7" - 7.5" - 7-⅞" - 8.25"] Materials: DROPS PARIS from Garnstudio 250-250-250-300-300 gr nr 05, light lilac DROPS 5 mm [US 8] needles, or sizes needed to obtain correct gauge. DROPS 4.5 mm [US 7] circular needles (for rib edge), or sizes needed to obtain correct gauge. Gauge: 17 sts x 22 rows on larger needles in stockinette st = 10 x 10 cm. Rib: * K 3, P 3 *, repeat * - *. Note on the diagram: The shrug is knit from cuff to cuff. The diagram shows the shrug after assembly – that is, with the sleeve seam sewn. The dotted line indicates the center back – the sloping line indicates the front edge. Right side: Loosely cast on 38-44-44-50-50 sts on larger needles. P 1 row (wrong side), then continue in rib, keeping 1 edge st at each side in garter st. When the piece measures 6 cm dec all P 3 to P 2 = 32-37-37-42-42 sts. Continue the rib with K 3/P 2. When the piece measures 10 cm K 1 row (right side) and K 1 row (wrong side), decreasing evenly distributed to 28-30-32-32-34 sts, then continue in stockinette st. When the piece measures 13-14-13-15-15 cm inc 1 st at each side every 3-3-3.5-3-3 cm a total of 9-10-10-12-13 times = 46-50-52-56-60 sts. After last inc the piece measures approx. 37-41-45-48-51 cm, put 1 marker at each side – measure the piece from here. Now dec at one side of piece (= front) at the same time cast on new sts at the other side of piece (= back) as follows: At front edge: on 1st row bind off 3 sts, then bind off every other row: 2 sts 5-6-6-7-8 times and 1 st 10-10-11-11-11 times. At back edge: inc every other row: 2 sts 2-3-4-5-5 times and then every 4 rows: 1 st 5-5-5-5-6 times. After all decs and incs are complete there are 32-36-39-43-46 sts. When the piece measures 14-15-16-17-18 cm put sts onto a st holder from lower edge of back up toward the neck every other row: 8-9-10-11-11 sts 3 times = 8-9-9-10-13 sts remain on needles. The shrug is now knit to the center back (halfway). Place a new marker at center back of neck. Knit 1 row stockinette st over all sts on needles, then knit the other half, reversing shaping as follows: Put 8-9-10-11-11 sts back on needles every other row 3 times = 32-36-39-43-46 sts. When sts are put back on needles pick up 1 st between the last st on needles the first st on st holder, K tog this st with the first st on st holder. This prevents a hole where the sts are returned to the needles. When the piece measures 3 cm from the marker in back of the neck inc for front (= the side you previously bound off) every other row: 1 st 10-10-11-11-11 times, 2 sts 5-6-6-7-8 times and 3 sts 1 time. At the same time when the piece measures 6 cm from the marker in back of the neck dec for back (= the side you previously increased) every 4 rows: 1 st 5-5-5-5-6 times and then every other row: 2 sts 2-3-4-5-5 times. After all incs and decs are complete 46-50-52-56-60 sts. Put 1 marker at each side – measure the piece from here. Now dec 1 st at each side every 3-3-3.5-3-3 cm a total of 9-10-10-12-13 times = 28-30-32-32-34 sts. When the piece measures 26-30-34-37-40 cm, P 1 row (right side), then P 1 row (wrong side), increasing to 32-37-37-42-42 sts. Now knit rib (= K 3/ P 2), keeping 1 edge st at each side in garter st. When cuff measures 4 cm from the P rows inc all P 2 to P 3 = 38-44-44-50-50 sts. When cuff measures 10 cm from the P rows P 1 row (wrong side) and then bind off loosely. Assembly: Sew sleeve seams using edge sts as seam allowance, up to markers. Pick up sts around opening = 135-150-165-180-180 sts (divisible by 15) on smaller circular needles. If you pick up more or less sts, adjust on the 2nd row evenly distributed. Join and knit in the round as follows (seen from the right side): P 1 row and K 1 row, then knit rib (= K 3/P 2). When edge measures 2 cm inc every 3rd P 2 to P 3 = 144-160-176-192-192 sts. Repeat inc when edge measures 5 and 8 cm, so that each P 2 is now P 3 = 162-180-198-216-216 sts. Bind off loosely in rib. |
|
 |
|
Have you finished this pattern?Tag your pictures with #dropspattern or submit them to the #dropsfan gallery. Do you need help with this pattern?You'll find 21 tutorial videos, a Comments/Questions area and more by visiting the pattern on garnstudio.com. © 1982-2026 DROPS Design A/S. We reserve all rights. This document, including all its sub-sections, has copyrights. Read more about what you can do with our patterns at the bottom of each pattern on our site. |
|


With over 40 years in knitting and crochet design, DROPS Design offers one of the most extensive collections of free patterns on the internet - translated to 17 languages. As of today we count 324 catalogs and 12285 patterns - 12275 of which are translated into English (US/in).
We work hard to bring you the best knitting and crochet have to offer, inspiration and advice as well as great quality yarns at incredible prices! Would you like to use our patterns for other than personal use? You can read what you are allowed to do in the Copyright text at the bottom of all our patterns. Happy crafting!
Post a comment to pattern DROPS 89-13
We would love to hear what you have to say about this pattern!
If you want to leave a question, please make sure you select the correct category in the form below, to speed up the answering process. Required fields are marked *.