
Popular categories
Looking for a yarn?


Comments / Questions (107)
![]() Aline wrote:
Aline wrote:
Another question: as we continue the crochet to rows 14 and 22, we will be very far from the marker. What then determines what "on either side of" or "before every" marker really means?
13.10.2016 - 23:04DROPS Design answered:
Dear Aline, the 12 markers should follow work so that you keep them on place when increasing on each side of them or then before each of them. Happy crocheting!
14.10.2016 - 09:17
![]() Aline wrote:
Aline wrote:
Good afteernoon. Lovely patterns. I am making your Lady Ascot top in XL and have 2 questions: When indicating: "repeat increase on every row from RS 7 times..." This means increasing by 24 tr - or 12as the case may be- every second row? When counting the increases, given we start with160, add 24tr 7 times and 12tr 4 times, should I not be ending with 396 stitches vs the indicated 376? Thank you, aline
13.10.2016 - 22:17DROPS Design answered:
Dear Aline, you are inc 1 st on each side of each of the 12 markers a total of 7 times in size XL: 7x24 = 168 inc - then inc 1 st before each marker a total of 4 times: 4x12=48. There were 160 sts + 168+48=376sts. Happy crocheting!
14.10.2016 - 09:12
![]() Fay Powell wrote:
Fay Powell wrote:
First of all, I love your patterns! I seldom have real difficulty following or adapting them. They are versatile, current, and gorgeous. I get many compliments on garments made from your patterns. On this particular Lady Ascot pattern, I was wondering if the single increases at the stitch markers need to be inside the markers or can they be right before the marker? Thank you so much for all you do. Fay
02.09.2016 - 00:28DROPS Design answered:
Dear Mrs Powell, inc have to be done either on each side of markers (= inc in the st before marker + in the st after marker = 2 inc x 12 markers = 24 sts inc) then before each marker: work until 1 st remain before marker, inc 1 st, slip marker and continue until 1 st remain before next marker, etc - Markers are between sts, not in a st. Happy crocheting!
02.09.2016 - 08:28
![]() Maria wrote:
Maria wrote:
Solfjädersmönster är otydligt Hur ska man virka mönster A1???? Flera kommentatorer har antagit att man virkar varv1 i mönster A1 och sen varv2 i mönster A1. Därefter virkas varv3 i mönster A1 tills arb mäter ca 33cm. Detta torde vara det rätta Vänligen svara så att det går att begripa svaret Såsom det står i mönstret är inte tillräckligt
16.07.2016 - 13:48DROPS Design answered:
Hej Maria, Ja du virkar varv 1+2+3 i A1 totalt 31-34-37-40-45-49 ggr och sedan varv 4 tills arb mäter ca 40-42-43-45-45-45 cm. Lycka till!
29.03.2017 - 09:09
![]() Ducros Raymonde wrote:
Ducros Raymonde wrote:
Que signifie *-* après la pause des marqueurs faut'il augmenter de 2 brides ou 3 exemple après 17 brides du dos 2 brides dans la meme bride on a donc 3 brides ensemble merci de votre reponse
15.07.2016 - 10:49DROPS Design answered:
Bonjour Mme Ducros, une fois que vous avez posé vos marqueurs, au tour suivant, vous augmentez 24 B au total, soit 2B de chaque côté de chaque marqueur (= crochetez 2 B dans la même B avant le marqueur et 2 B dans la même B après le marqueur), au dos par ex, on aura 17 + 2 augm = 19 B pour le dos après ce tour. Bon crochet!
15.07.2016 - 13:33
![]() Sixtine wrote:
Sixtine wrote:
Bonjour, que veut dire "répéter ces augmentations 1-4-5-7-8-10 fois au total tous les rangs sur l'endroit, puis augmenter avant chaque marqueur (= 12 B augmentées) "? en taille M je dois le faire 4 fois, donc au total je doit avoir crocheté 8 rangs, n'est ce pas?
12.06.2016 - 19:27DROPS Design answered:
Bonjour Sixtine, c'est tout à fait exact, vous augmentez 4 fois au total tous les rangs sur l'endroit (= tous les 2 rangs), soit 8 rangs au total quand les 24 augmentations sont faites 4 fois. Bon crochet!
13.06.2016 - 09:29
![]() Sixtine wrote:
Sixtine wrote:
Bonjour, lorsque vous dites "Monter une chaînette de 133-137.......... Continuer ensuite en allers et retours, en terminant chaque rang par 1 mc dans la 1ère ml du début du rang" combien d'aller retour doit on faire, rien n'est précisé? merci
07.06.2016 - 19:02DROPS Design answered:
Bonjour Sixtine, à ce niveau, vous avez crocheté 1 rang seulement: le 1er qui vous donne 112-116 B - vous continuez maintenant à crocheter comme indiqué (augmentations, marqueurs, etc), mais le top se crochète en rangs en terminant chaque rang par 1mc et en travaillant alternativement sur l'endroit et sur l'envers. Bon crochet!
08.06.2016 - 08:37
![]() Mc Carlier wrote:
Mc Carlier wrote:
La partie où je positionne les marqueurs et où si je comprends bien dois faire des augmentations est absolument incompréhensible pouvez vous m'aider? merci
31.05.2016 - 16:19DROPS Design answered:
Bonjour Mme Carlier, quand vous avez 140-160B, vous crochetez le tour suivant en plaçant les marqueurs comme indiqué, en même temps, vous augmentez des mailles entre certains des marqueurs - pour plus de précisions, n'hésitez pas à indiquer la taille réalisée. Bon crochet!
31.05.2016 - 17:03
![]() Da Silva wrote:
Da Silva wrote:
Bonjour, Quand vous écrivez " Au rang suivant sur l'endroit, augmenter 1 B de chaque côté de chaque marqueur (= 24 B augmentées), répéter ces augmentations 1-4-5-7-8-10 fois au total tous les rangs sur l'endroit, " cela signifie t il qu'il faut faire un deuxieme rang sans augmentation, puis augmentation puis non augmentation... Merci de votre réponse
24.05.2016 - 16:56DROPS Design answered:
Bonjour Madame Da Silva, effectivement on va augmenter uniquement sur les rangs sur l'endroit, sur l'envers, crochetez sans augmenter. Bon crochet!
24.05.2016 - 17:50Sara wrote:
Just to be clear. In order to get the 276 stitches. I need to add 9 RS rows with 12 stitches incr every time. So at the end of this stage i should have 23 rows approximately, right? Because otherwise there is no way of getting 276 stitches if i'm only adding on the RS.
23.05.2016 - 13:09DROPS Design answered:
Dear Sara, it looks correct, you will have worked 23 rows in total when you get 276 sts. Happy crocheting!
23.05.2016 - 14:20
|
||||||||||||||||||||||||||||
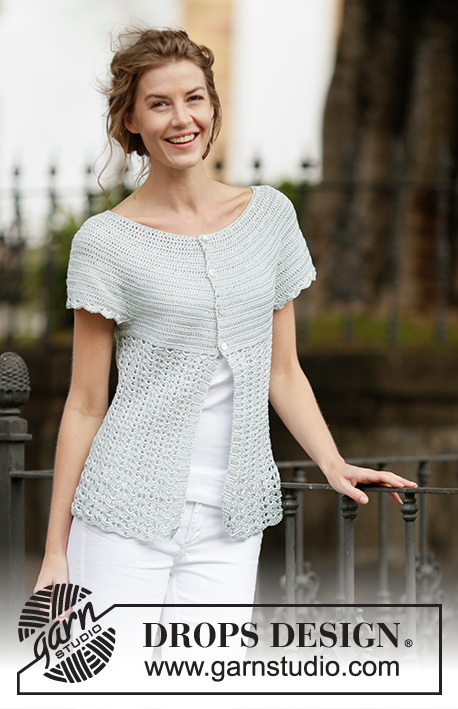
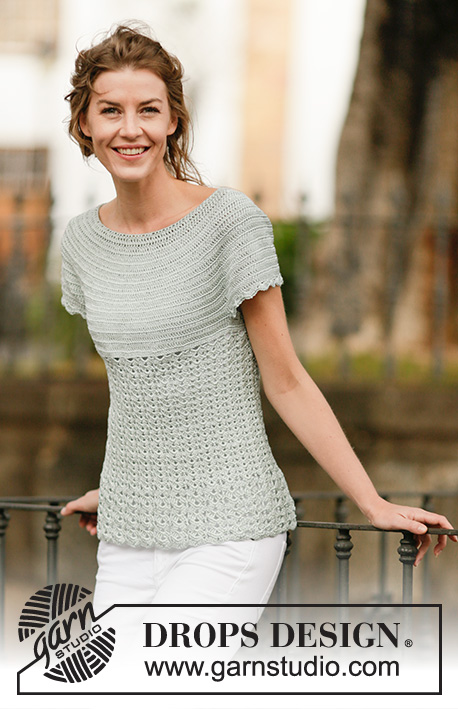
Lady Ascot#ladyascottop |
||||||||||||||||||||||||||||
 |
 |
|||||||||||||||||||||||||||
Crochet DROPS top with fan pattern and round yoke, worked top down in ”Cotton Viscose”. Size: S - XXXL.
DROPS 162-26 |
||||||||||||||||||||||||||||
|
PATTERN: See diagrams A.1-A.2. CROCHET INFO-1: Replace first dc on every row with dc with ch 3, finish row with 1 sl st in 3rd ch. CROCHET INFO-2: Beg every round with 3 ch and finish round with 1 sl st in 3rd ch. INCREASE TIP: Inc 1 dc by working 2 dc in 1 dc. ---------------------------------------------------------- TOP: Worked top down from mid back. Work 133-137-142-147-152-157 ch on hook size 3.5 mm/E/4 with Cotton Viscose and form a ring with 1 sl st in first ch. Work next round as follows: 3 ch (= 1 dc), 1 dc in first ch from ch-ring, * skip ch 1, 1 dc in each of the next 5 ch *, repeat from *-* until 0-4-3-2-1-0 ch remain, 1 dc in each of the last 0-4-3-2-1-0 ch = 112-116-120-124-128-132 dc. Then work piece back and forth. Work every row tog at the end of row with 1 sl st in first ch on row - READ CROCHET INFO-1. Turn piece. Work 1 row with 1 dc in every dc AT THE SAME TIME inc 28 dc evenly (i.e. inc 1 dc after approx. every 4th dc) – READ INCREASE TIP = 140-144-148-152-156-160 dc. Insert 12 markers in the piece as follows: Work 17-18-19-20-21-22 dc (= half back piece) AT THE SAME TIME inc 1-0-0-2-2-1 dc evenly, insert first marker, * work 4 dc, insert next marker *, repeat from *-* 1 more time, work 20 dc, insert next marker, * work 4 dc, insert next marker *, repeat from *-* 1 more time, work 34-36-38-40-42-44 dc (= front piece) AT THE SAME TIME inc 2-0-0-4-4-2 dc evenly, insert next marker, * work 4 dc, insert next marker *, repeat from *-* 1 more time, work 20 dc, insert next marker, * work 4 dc, insert next marker *, repeat from *-* 1 more time, work 17-18-19-20-21-22 dc (= half back piece) AT THE SAME TIME inc 1-0-0-2-2-1 dc evenly = 144-144-148-160-164-164 dc. REMEMBER THE CROCHET GAUGE! On next row from RS, inc as follows: Inc 1 dc on each side of every marker (= 24 dc inc), repeat inc on every row from RS 1-4-5-7-8-10 times in total, then inc before every marker (= 12 dc inc), repeat inc on every row from RS 9-6-6-4-4-3 times in total = 276-312-340-376-404-440 dc. Piece measures approx. 18-18-20-20-22-23 cm / 7"-7"-8"-8"-8¾"-9". Work next row as follows: 36-43-48-54-59-66 dc (= half back piece), work 12 ch (insert a marker in the middle of these new sts = under sleeve), skip 66-70-74-80-84-88 dc from previous row (= sleeve), work 72-86-96-108-118-132 dc (= front piece), work 12 ch (insert a marker in the middle of these new sts = under sleeve), skip 66-70-74-80-84-88 dc from previous row and work 36-43-48-54-59-66 dc (= half back piece) = 168-196-216-240-260-288 dc/ch (= 84-98-108-120-130-144 dc/ch on back piece and front piece). Insert 1 marker in piece. NOW MEASURE PIECE FROM HERE! Work 1 row with 1 dc in every dc and 1 dc in every ch under sleeve while AT THE SAME TIME inc 18-8-6-0-10-6 dc evenly = 186-204-222-240-270-294 dc. Work 1 row with 1 dc in every dc. Now work piece in the round without turning. FAN PATTERN: Work 1st-3rd round in A.1 31-34-37-40-45-49 times - READ CROCHET INFO-2. Then repeat 3rd round until piece measures approx. 29-31-31-33-31-31 cm / 11½"-12¼"-12¼"-13"-12¼"-12¼". Now work 4th round until piece measures approx. 40-42-43-45-45-45 cm / 15¾"-16½"-17"-17¾"-17¾"-17¾". Fasten off. SLEEVE EDGE: Beg by working mid under sleeve as follows: Work 1 sc in 6th ch of the 12 ch worked in armhole on body. Work 3 ch (= 1 dc). Then work 1 dc in each of the next ch 6, work 1 dc in dc-row where ch for sleeve were worked, 1 dc in the next 66-70-74-80-84-88 dc (= over sleeve) AT THE SAME TIME inc 0-4-0-2-6-2 dc evenly, work 1 dc in dc-row where ch for sleeve were worked, work 1 dc in each of the remaining 5 ch under sleeve = 80-88-88-96-104-104 dc. Then work A.2 10-11-11-12-13-13 times in total. Fasten off when A.2 has been worked 1 time vertically. Work the other sleeve edge the same way. |
||||||||||||||||||||||||||||
Diagram explanations |
||||||||||||||||||||||||||||
|
||||||||||||||||||||||||||||
 |
||||||||||||||||||||||||||||
 |
||||||||||||||||||||||||||||
Have you finished this pattern?Tag your pictures with #dropspattern #ladyascottop or submit them to the #dropsfan gallery. Do you need help with this pattern?You'll find 14 tutorial videos, a Comments/Questions area and more by visiting the pattern on garnstudio.com. © 1982-2026 DROPS Design A/S. We reserve all rights. This document, including all its sub-sections, has copyrights. Read more about what you can do with our patterns at the bottom of each pattern on our site. |
||||||||||||||||||||||||||||


With over 40 years in knitting and crochet design, DROPS Design offers one of the most extensive collections of free patterns on the internet - translated to 17 languages. As of today we count 325 catalogs and 12298 patterns - 12288 of which are translated into English (US/in).
We work hard to bring you the best knitting and crochet have to offer, inspiration and advice as well as great quality yarns at incredible prices! Would you like to use our patterns for other than personal use? You can read what you are allowed to do in the Copyright text at the bottom of all our patterns. Happy crafting!
Post a comment to pattern DROPS 162-26
We would love to hear what you have to say about this pattern!
If you want to leave a question, please make sure you select the correct category in the form below, to speed up the answering process. Required fields are marked *.