
Popular categories
Looking for a yarn?


Comments / Questions (96)
![]() Rossella wrote:
Rossella wrote:
Salve. Sono proprio all'inizio dello scialle, nel punto in cui si fanno gli aumenti per avere 49 m. sul ferro e non capisco una cosa: "un gettato all'interno di 3 maglie di vivagno a ogni lato". Ma i vivagni non sono 1 per lato? Io ho lavorato così ma non sono sicura che vada bene: 1m. diritto (vivagno), 1 gettato, diritto fino alla m. centrale, 1 m. diritto ( maglia centrale),1 gettato, diritto fino all'ultima maglia, 1 gettato,1 m. diritto ( vivagno)Grazie a chi mi risponderà!!!
18.12.2015 - 17:13DROPS Design answered:
Buonasera Rossella, sul 1° ferro di aumenti si lavora il gettato dopo 1 m dir e prima dell'ultima m dir, a partire dal 2° ferro di aumenti le m di vivagno ai lati diventano 3, quindi il gettato viene fatto dopo 3 m di vivagno a dir all'inizio del f e prima delle 3 m dir alla fine del f. Questi sono gli aumenti laterali, poi su ogni f di aumenti viene fatto 1 gettato a ogni lato della m centrale. Buon lavoro!
18.12.2015 - 21:14
![]() Sabine wrote:
Sabine wrote:
Je ne comprends pas la fin du chale ,n'y a t'il pas plus de rang sur le diag a18 et a19 ?
06.12.2015 - 12:09DROPS Design answered:
Bonjour Sabine, sauf erreur, je compte le même nombre de rangs pour les diagrammes A.13, A.18 et A.19. Bon tricot!
07.12.2015 - 10:43
![]() Patteet wrote:
Patteet wrote:
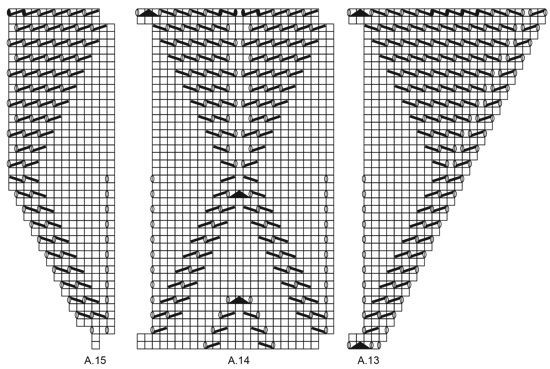
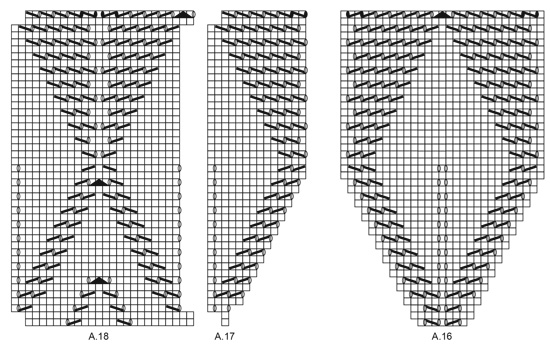
Zou het kunnen dat er een fout is in het diagram A16 (3de rij)? Het begint met 2 rechts omslag 2 rechts samenbreien omslag en middelste steek rechts dan spiegelbeeld. Alleen zie ik een omslag extra en dit is volgens mij een fout. Groetjes Marita
22.11.2015 - 15:51DROPS Design answered:
Beste Patteet. Ik denk dat je gelijk hebt. Ik zou die omslag niet breien. Ik heb gevraagd voor een correctie. Bedankt voor het opmerken.
23.11.2015 - 13:40
![]() Marie wrote:
Marie wrote:
Ich auch. Danke .
22.11.2015 - 05:48
![]() Susanne wrote:
Susanne wrote:
Dürfen wir noch hoffen, dass die Anleitung bezüglich der im Mustersatz gezeigten vier - statt wie im Bild zwei - Lochreihen (Umschläge) zwischen A.15 und A. 16 sowie A.16 und A.17 demnächst noch korrigiert wird?
15.11.2015 - 22:52DROPS Design answered:
Liebe Susanne, am 8.12. wurde eine Korrektur aufgeschaltet und dieses Modell ist nochmals zum Überprüfung bei unserem Designteam.
02.03.2016 - 10:05
![]() Benedetta L wrote:
Benedetta L wrote:
Buongiorno e grazie!ma allora devo intrecciare sul rovescio? Il diagramma termina sul diritto.Mi dice di lavorare i gettati a dir e poi a dir ritorto e le altre m le lavoro come? Grazie!
15.11.2015 - 08:51DROPS Design answered:
Buonasera Benedetta, deve intrecciare sul rovescio del lavoro, lavorando le maglie come preferisce, qui viene dato un suggerimento solo per i gettati, le altre maglie può lavorarle a suo piacimento. Buon lavoro!
16.11.2015 - 18:13
![]() Benedetta wrote:
Benedetta wrote:
Buona sera, sono arrivata all'ultimo ferro sul dir del lavoro:lavorare i doppi gett sull'ultimo ferro del lavoro come segue durante gli intrecci:lav a dir il primo gett etc.....Ma questo ferro è esguito sul rov e poi sul diritto intreccio? Grazie mille per l'aiuto
13.11.2015 - 23:28DROPS Design answered:
Buonasera Benedetta, deve arrivare all'ultimo ferro dei diagrammi A.13-A.19 come indicato e sul ferro successivo deve intrecciare tutte le maglie lavorando i gettati come indicato nelle istruzioni. Ci riscriva se è ancora in difficoltà. Buon lavoro!
14.11.2015 - 22:16
![]() Benedetta wrote:
Benedetta wrote:
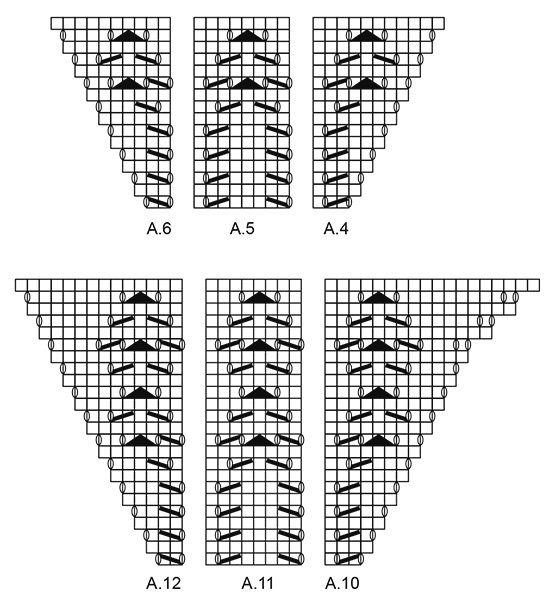
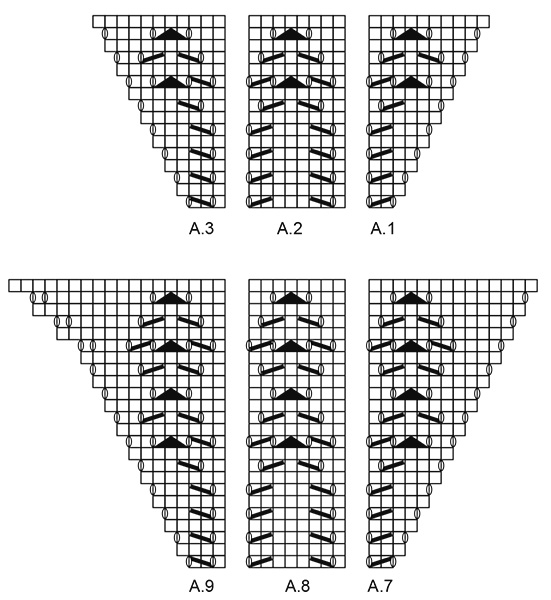
Buonasera,ho iniziato questo scialle ma ho difficoltà nell'esecuzione del primo ferro dello schema(dopo aver fatto il lavoro fino a avere 49 m)."Lavorare secondo il diagramma A.1-A.6:3 m di vivagno ,A1 su 2 m,rip.A2 fino a quando rimangono 3 m prima della m.centrale"E' a questo punto che non mi trovo con 3 m.mi potete aiutare?.grazie
26.10.2015 - 18:37DROPS Design answered:
Buonasera Benedetta. Sui ferri ha 49 m: quindi 24 m, m centrale, altre 24 m. Lavora le prime 24 m in questo modo: 3 m a legaccio, A.1 (2 m), ripete A.2 due volte (= 16 m), A.3 (3 m). Lavora la m centrale a dir. Poi lavora le ultime 24 m: A.4 (3 m), ripete A.5 due volte (= 16 m), A.6 (2 m) e le 3 m a legaccio. Buon lavoro!
26.10.2015 - 22:03
![]() Marie Pytlová wrote:
Marie Pytlová wrote:
Dobrý den, prosím o opravu, část A 16 - 2.řada. Čekám jako Susanne dva měsíce, abych mohla šátek dokončit. Děkuji.
06.10.2015 - 09:53DROPS Design answered:
Dobrý den, 2. řada schématu A.16 se pouze přeplétá lícovým žerzejem (tj. 2. řada = rubová, pleteme ji tedy obrace). Ve schématu byla chyba ve 3. řadě, kde bylo omylem zakresleno nahození navíc - schéma jsme již opravili a vzor by nyní měl vycházet bez problémů. Hodně zdaru!
03.03.2016 - 13:10
![]() Susanne wrote:
Susanne wrote:
Könnten Sie bei den Designerinnen noch einmal nachhaken? Danke!
04.10.2015 - 10:27DROPS Design answered:
Ja, das wird noch einmal geprüft.
13.10.2015 - 18:08
|
|||||||||||||||||||
Le Marais#lemaraisshawl |
|||||||||||||||||||
 |
 |
||||||||||||||||||
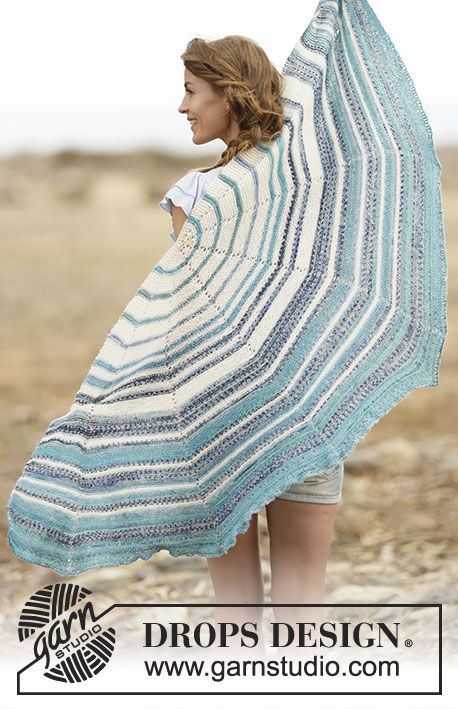
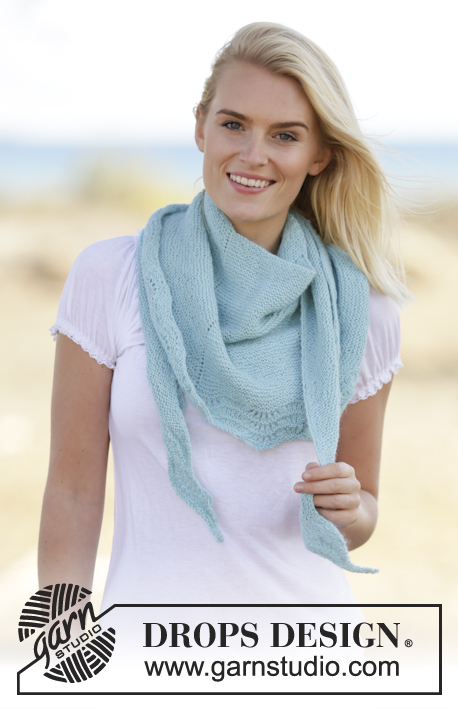
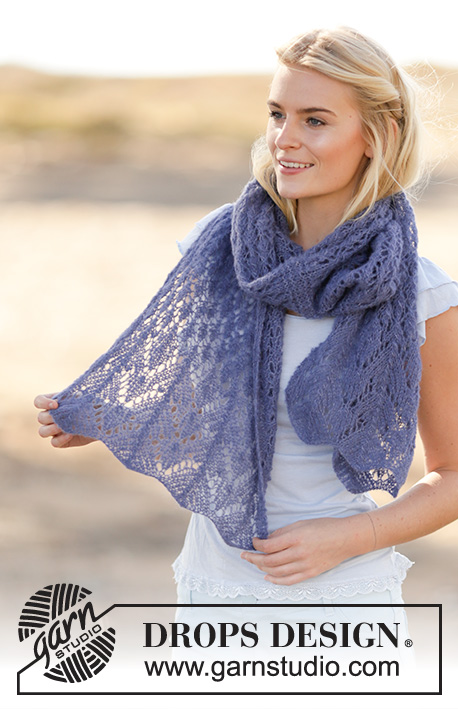
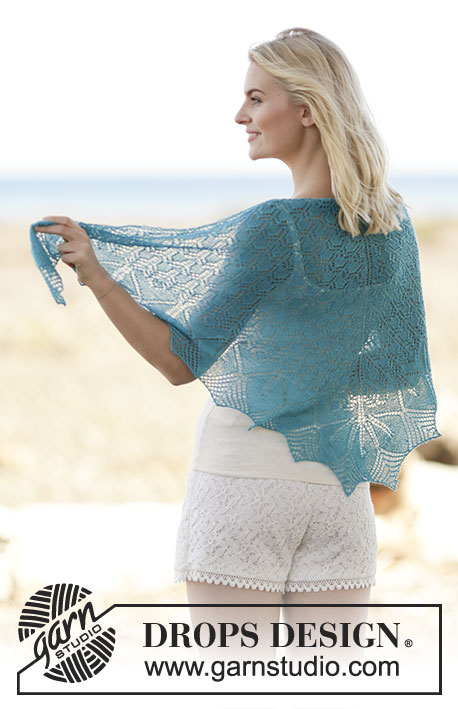
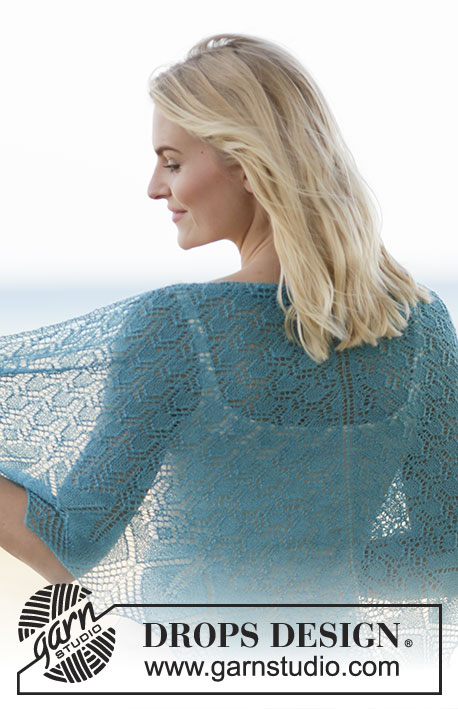
Knitted DROPS shawl with lace and leaf pattern in "Lace" or "Alpaca".
DROPS 161-12 |
|||||||||||||||||||
|
GARTER ST (back and forth): K all rows. 1 ridge = K2 rows. PATTERN: See diagrams A.1-A.19. The diagrams show all rows in pattern seen from RS. SHAPING: When using another yarn than Lace from yarn group A, there is no need to stretch to measurements, but place it gently out in shape. Leave to dry. Repeat the process when the garment has been washed. ---------------------------------------------------------- SHAWL: The shawl is worked back and forth on circular needle from the neck to make room for all the sts. Cast on 5 sts on circular needle size 3.5 mm / US 4 with Lace and work 2 ridges in GARTER ST - see explanation above. Work in garter st and inc as follows: K 1, 1 YO, K 1, 1 YO, K 1 (= mid st), 1 YO, K 1, 1 YO and K 1 = 9 sts. K, K YOs to make holes. Continue in garter st and inc with 1 YO inside 3 edge sts in each side and 1 YO on each side of mid st = 4 sts inc on every row from RS. Inc like this until there are 49 sts on needle (i.e. there are 24 sts on each side of mid st). Work according to diagram A.1-A.6 as follows: 3 edge sts in garter st, A.1 over 2 sts, repeat A.2 until 3 sts remain before mid st, A.3 over 3 sts, K 1 (= mid st), A.4 over 3 sts, A.5 until 5 sts remain, A.6 over 2 sts and 3 edge sts in garter st. Work mid st in stockinette st and edge sts in garter st. When A.1-A.6 have been worked 1 time vertically there is room for 2 repetitions more of A.2/A.5 on each side of shawl. When diagram A.1-A.6 has been worked 8 times in total vertically, there are 305 sts on needle (i.e. 152 sts on each side of mid st). Work according to diagram A.7-A.12 as follows: 3 edge sts in garter st, A.7 over 2 sts, repeat A.8 until 3 sts remain before mid st, A.9 over 3 sts, K 1 (= mid st), A.10 over 3 sts, repeat A.11 until 5 sts remain, A.12 over 2 sts and 3 edge sts in garter st. When diagram A.7-A.12 have been worked 1 time vertically, there are 359 sts on needle (i.e. 179 sts on each side of mid st). Work according to diagram A.13-A.19 as follows: 3 edge sts in garter st, A.13 over 4 sts, repeat A.14 until 4 sts remain before mid st, A.15 over 1 st, A.16 over 7 sts (= mid st is in the middle of these sts), A.17 over 1 st, repeat A.18 until 7 sts remain, A.19 over 4 sts and 3 edge sts in garter st. When diagrams have been worked 1 time vertically, loosely bind off. NOTE! Work double YOs on last row in diagram as follows when binding off: K 1st YO, K 2nd YO twisted. BLOCKING: Place the shawl in lukewarm water until it is soaking wet. Carefully squeeze the water out of the shawl - do not twist the shawl - then roll the shawl in a towel and squeeze to remove more water - the shawl will now only be moist. When using Alpaca – READ SHAPING! Place the shawl on a carpet or mattress - carefully stretch it out to size and fasten it with pins, pull the middle of lace repetitions in A.13-A.19 out to form tips. Leave to dry. Repeat the process when the shawl has been washed. |
|||||||||||||||||||
Diagram explanations |
|||||||||||||||||||
|
|||||||||||||||||||
 |
|||||||||||||||||||
 |
|||||||||||||||||||
 |
|||||||||||||||||||
 |
|||||||||||||||||||
 |
|||||||||||||||||||
Have you finished this pattern?Tag your pictures with #dropspattern #lemaraisshawl or submit them to the #dropsfan gallery. Do you need help with this pattern?You'll find 16 tutorial videos, a Comments/Questions area and more by visiting the pattern on garnstudio.com. © 1982-2026 DROPS Design A/S. We reserve all rights. This document, including all its sub-sections, has copyrights. Read more about what you can do with our patterns at the bottom of each pattern on our site. |
|||||||||||||||||||


With over 40 years in knitting and crochet design, DROPS Design offers one of the most extensive collections of free patterns on the internet - translated to 17 languages. As of today we count 324 catalogs and 12290 patterns - 12280 of which are translated into English (US/in).
We work hard to bring you the best knitting and crochet have to offer, inspiration and advice as well as great quality yarns at incredible prices! Would you like to use our patterns for other than personal use? You can read what you are allowed to do in the Copyright text at the bottom of all our patterns. Happy crafting!
Post a comment to pattern DROPS 161-12
We would love to hear what you have to say about this pattern!
If you want to leave a question, please make sure you select the correct category in the form below, to speed up the answering process. Required fields are marked *.