
Popular categories
Looking for a yarn?


Comments / Questions (23)
![]() Patricia Olivia Fuchs wrote:
Patricia Olivia Fuchs wrote:
Alles klar, vielen Dank!!!
11.07.2019 - 09:22
![]() Patricia Olivia Fuchs wrote:
Patricia Olivia Fuchs wrote:
Guten Tag, "Die Krausrippenkante unten nach innen umschlagen und in der letzten Runde mit glatt re anheften." Was meinen Sie mit "glatt rechts anheften"? Gibt es dazu ein Video?
09.07.2019 - 21:34DROPS Design answered:
Liebe Frau Fuchs, die Krausrippenkante falten Sie in der Innenseite (Rückseite) wie z.B. mit so einer gefaltete Kante - dh die Krausrippen werden dann nach innen gefaltet und an der letzten Runde glatt rechts angenäht. Viel Spaß beim fertigstellen!
10.07.2019 - 09:15
![]() Antoine wrote:
Antoine wrote:
Pouvez vous m expliquer plus clairement : "terminer après un tour 3 des côtes anglaises" merci
29.01.2019 - 15:17DROPS Design answered:
Bonjour Antoine, le dernier tour tricoté doit être le tour 3 des côtes anglaises. Bon tricot!
29.01.2019 - 16:41
![]() Ginette Martiné wrote:
Ginette Martiné wrote:
Bonjour dans quel sens faut il tricoter ?ne faut il pas tricoter d'abord commencer par les cotes anglaises merci pour votre réponse
08.01.2018 - 11:11DROPS Design answered:
Bonjour Mme Martiné, le châle se tricote de haut en bas en commençant par la partie point mousse, et en augmentant 2 m tous les rangs sur l'envers et 4 m tous les rangs sur l'endroit (= en répétant les rangs 2 et 3) jusqu'à 31 cm, on termine ensuite par la bordure en côtes anglaises. Bon tricot!
08.01.2018 - 14:08
![]() Domi wrote:
Domi wrote:
Posso usare il filato Nepal con aghi 5.5 mm per lo scialle anche se vengono suggeriti quelli del n.5 ? Grazie per la risposta.
19.11.2016 - 11:52DROPS Design answered:
Buongiorno Domi. Sì, verifichi anche che il.suo campione coincide con quello indicato nel modello per avere un risultato simile. Buon lavoro!
19.11.2016 - 12:13
![]() Paola wrote:
Paola wrote:
Buongiorno, avrei bisogno di una vostra delucidazione. Sto eseguendo la sciarpa, ma non capisco il bordo a coste inglesi, cioè dopo aver eseguito i 31 cm misurati luno la m centrale, ho proseguito a lavorare le coste inglesi, ma quest'ultime non vengono sui bordi dello scialle come da foto, bensì in alto. Forse bisogna chiudere le m e riprendere le m lungo il bordo a V dello scialle? Spero di essermi spiegata bene. Grazie mille
04.02.2016 - 09:46DROPS Design answered:
Buonasera Paola, lo scialle è lavorato dal bordo superiore verso la punta, per cui quando inizia le coste inglesi sta iniziando a lavorare il bordo inferiore. Con il bloccaggio potrà mettere in forma meglio il suo scialle. Buon lavoro!
05.02.2016 - 21:35
![]() JL wrote:
JL wrote:
Oh merciiiii bcp je vais étudier tout sa!!!B-)!!merci pour votre gentillesse bnuit et à bientot!!':-*'!
03.02.2016 - 21:49
![]() Giulia wrote:
Giulia wrote:
Buonasera.. Lavorati i primi 3 ferri delle coste del berretto devo continuare fino alla fine del lavoro ripetendo solo il 2 e 3 ferro senza quindi lavorare piu il primo? Sempre per il berretto misura L/XL potete spiegarmi come potrei sistemare dei segnapunti e come diminuire alla dx o alla sx di essi in modo da fare diminuzioni precise fino alla fine del lavoro?
20.09.2015 - 03:48DROPS Design answered:
Buongiorno Giulia. È corretto: deve ripetere i ferri 2 e 3 delle coste.Per i segnapunti, può p.es inserirli come segue (iniziando a contare dall'inizio del giro): dopo 8, 9, 9, 8, 9, 9, 8, 9, 9, 8 m. Per diminuire lavora 2 m insieme a dir, una volta sempre alla destra dei segni, la volta successiva sempre alla sinistra dei segni e così via. Buon lavoro!
20.09.2015 - 12:10
![]() Monique Morini wrote:
Monique Morini wrote:
Faut il continuer les augmentations en début et fin de rang et au centre dans les rangs en mailles anglaises
23.11.2014 - 23:41DROPS Design answered:
Bonjour Mme Morini, quand on continue en côtes anglaises, on continue sans augmenter. Bon tricot!
24.11.2014 - 11:49
![]() Loreta wrote:
Loreta wrote:
Scusate ancora ma stavo riflettendo, la tensione del filo non c'entra niente perché le spiegazioni parlano di lunghezza in centimetri non in giri di conseguenza io sarei a posto. Magari quella lunghezza vale per la taglia S.
23.07.2014 - 16:54
|
|
Mathilde#mathildeset |
|
 |
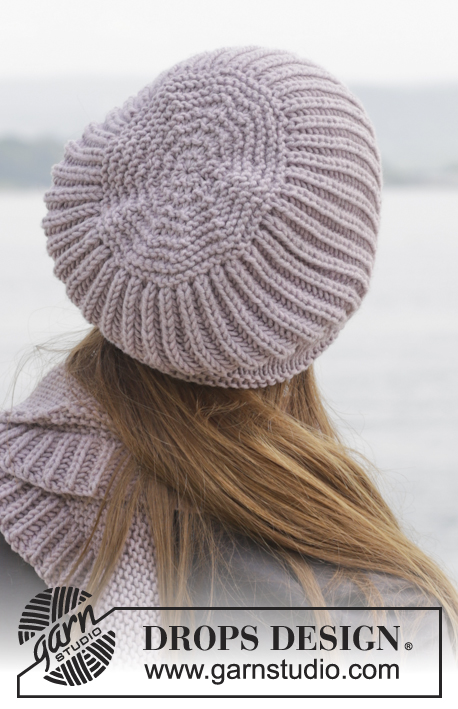 |
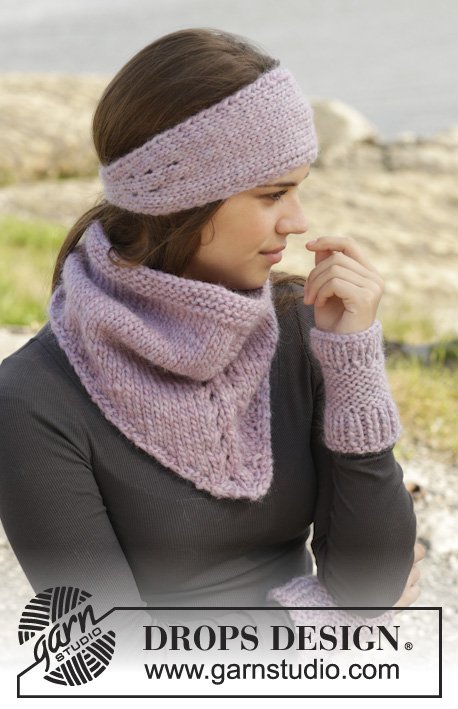
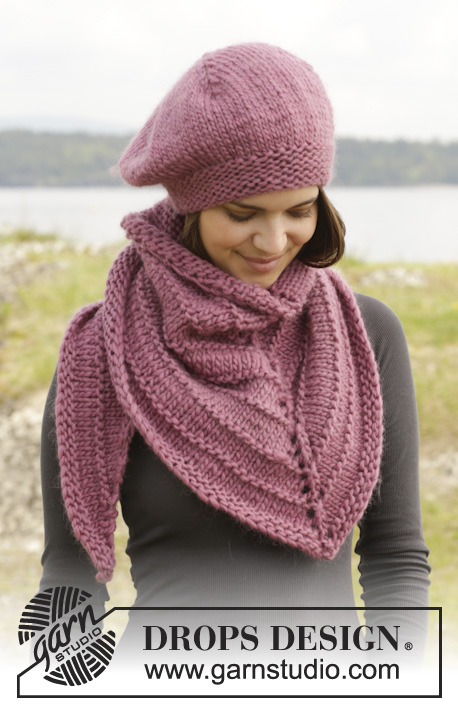
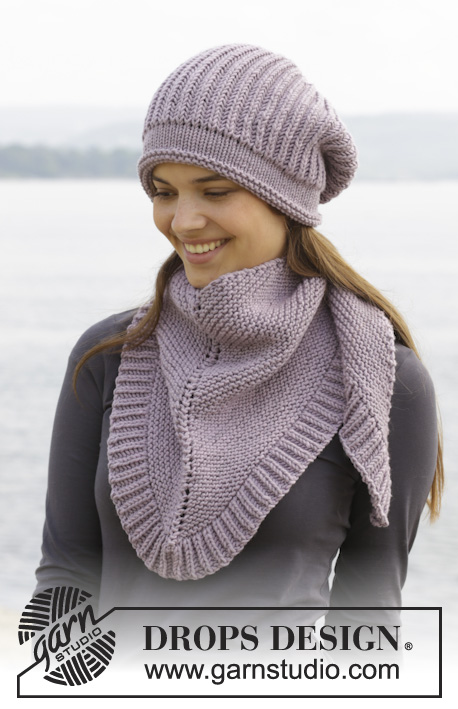
Knitted DROPS hat and scarf in garter st with English rib in ”Big Merino”.
DROPS 156-47 |
|
|
GARTER ST (back and forth on needle): K all rows. 1 ridge = K2 rows. GARTER ST (in the round on circular needle): * K 1 round and P 1 round *, repeat from *-*. 1 ridge = 2 rounds. ENGLISH RIB (in the round on needle - applies to hat): ROUND 1: * 1 YO, slip 1 st as if to P, K 1 *, repeat from *-*. ROUND 2: * P tog YO and slipped st, 1 YO, slip 1 st as if to P *, repeat from *-*. ROUND 3: * 1 YO, slip 1 st as if to P, K tog YO and slipped st *, repeat from *-*. Repeat 2nd and 3rd round upwards. ENGLISH RIB (back and forth - applies to shawl): Row 1: 1 st in GARTER ST - see explanation above, * K 1, 1 YO, slip 1 st as if to P *, repeat from *-* until 2 sts remain, finish with K 1 and 1 st in garter st. Row 2: 1 st in garter st, * 1 YO, slip 1 st as if to P, K tog YO and slipped st *, repeat from *-* until 2 sts remain, finish with 1 YO, slip 1 st as if to P, 1 st in garter st. Row 3: 1 st in garter st, * K tog YO and slipped st, 1 YO, slip 1 st as if to P *, repeat from *-* until 3 sts remain, K tog YO and slipped st, 1 st in garter st. Repeat 2nd and 3rd row upwards. DECREASE TIP: Dec on 1 round with K. Dec 1 st by K 2 sts tog. ---------------------------------------------------------- HAT: Worked in the round on circular needle/double pointed needles. Cast on 78-82-86 sts on circular needle size 5 mm / US 8 with Big Merino. Work in GARTER ST - see explanation above. When piece measures 5 cm / 2'', work in stockinette st for 3 cm / 1''. Then switch to circular needle size 5.5 mm / US 9 and work ENGLISH RIB in the round - see explanation above, until piece measures 23 cm / 9'' in total – finish after 3rd round in English rib. REMEMBER THE GAUGE! Then work in garter st and dec as follows: Dec 10 sts evenly on next K round – READ DECREASE TIP! Repeat dec after 4th round = 58-62-66 sts. Then dec 10 sts evenly every other round 3 times = 28-32-36 sts. Then K all sts tog 2 by 2 until 10-10-12 sts remain. Cut the yarn and pull it through the remaining sts, tighten tog and fasten. ASSEMBLY: Fold in edge in garter st at the bottom of hat and sew cast-on edge to last round in stockinette st. Make sure that to avoid a tight seam. Cut and fasten the yarn. Hat measures approx. 26-27-28 cm / 10 1/4''-10½''-11''. ---------------------------------------------------------- SHAWL: Worked back and forth on circular needle. K all sts and YOs. Cast on 9 sts on circular needle size 5.5 mm / US 9 with Big Merino. Work as follows: Row 1 (= RS): K 1, 1 YO, K 3, 1 YO, K 1 (= mid st), 1 YO, K 3, 1 YO and K 1 = 13 sts (= 4 sts inc). Insert a marker in the middle st. Row 2 (= WS): K 1, 1 YO, K until 1 st remains, 1 YO and K 1 = 2 sts inc. Row 3: K 1, 1 YO, K until mid st, 1 YO, K 1 (= mid st), 1 YO, K until 1 st remains, 1 YO and K 1 = 4 sts inc. Repeat row 2 and 3 until piece measures 31 cm / 12 1/4'' over mid st. REMEMBER THE GAUGE! Now work back and forth in ENGLISH RIB - see explanation above. When 4 cm / 1½'' have been worked - adjust so that last row is 2nd row in English rib - bind off with K over K and P over P. NOTE! bind off YOs with P. Cut the yarn and fasten. |
|
Have you finished this pattern?Tag your pictures with #dropspattern #mathildeset or submit them to the #dropsfan gallery. Do you need help with this pattern?You'll find 18 tutorial videos, a Comments/Questions area and more by visiting the pattern on garnstudio.com. © 1982-2026 DROPS Design A/S. We reserve all rights. This document, including all its sub-sections, has copyrights. Read more about what you can do with our patterns at the bottom of each pattern on our site. |
|


With over 40 years in knitting and crochet design, DROPS Design offers one of the most extensive collections of free patterns on the internet - translated to 17 languages. As of today we count 324 catalogs and 12272 patterns - 12262 of which are translated into English (US/in).
We work hard to bring you the best knitting and crochet have to offer, inspiration and advice as well as great quality yarns at incredible prices! Would you like to use our patterns for other than personal use? You can read what you are allowed to do in the Copyright text at the bottom of all our patterns. Happy crafting!
Post a comment to pattern DROPS 156-47
We would love to hear what you have to say about this pattern!
If you want to leave a question, please make sure you select the correct category in the form below, to speed up the answering process. Required fields are marked *.