
Popular categories
Looking for a yarn?


Comments / Questions (23)
![]() Francesca wrote:
Francesca wrote:
Alla fine del berretto, quando ho 28 maglie (taglia S/M) se le lavoro a due a due non potrò mai arrivare a 10 come indicato. Arriverò a 7. Anche per le altre taglie il conteggio è errato. Sarebbe inoltre utile spiegare come cucire il bordo a legaccio all'interno del risvolto, considerando che dietro ho i rovesci. Grazie
28.12.2025 - 10:44DROPS Design answered:
Buongiorno Francesca, nelle spiegazioni viene indicato di lavorare le maglie insieme 2 a 2 fino a quando rimangono 10 maglie. Buon lavoro!
28.12.2025 - 13:54
![]() Catherine Ruskin wrote:
Catherine Ruskin wrote:
I found the scarf disappointingly short. The ‘arms’ don’t reach around far enough to actually hold the front in place as shown in the photograph. It can be carefully placed but it does not last. I think the pattern should be amended to include a suggested width to ensure that it sits comfortably.
06.12.2024 - 18:46
![]() Angelika wrote:
Angelika wrote:
Die Umschläge werden nicht rechts verschränkt gestrickt oder?
19.12.2020 - 15:27DROPS Design answered:
Liebe Angelika, beim Tuch werden die Umschläge rechts gestrickt, damit Löcher enstehen - aber möchten Sie keine Löcher, dann stricken Sie diese Umschläge rechts verschränkt. Viel Spaß beim stricken!
21.12.2020 - 07:27
![]() Chantal Rollinger wrote:
Chantal Rollinger wrote:
Vielen Dank für die schnelle Antwort, jetzt ist es klar.
23.10.2020 - 20:08
![]() Chantal Rollinger wrote:
Chantal Rollinger wrote:
Hallo, bei der Mütze sollte man nach 23 cm English Rib, dann 3 Reihen English Rib stricken, ich verstehe nicht richtig was diese Erklärung beeutet, da eh schon 23 cm English Rib gestrickt woren sind ? Danke im voraus für die Erklärung, Beste Grüsse,
23.10.2020 - 15:08DROPS Design answered:
Liebe Frau Rollinger, es wird gestrickt, bis die Mütze 23 cm von der Anschlagskante misst, die letzte gestrickt Runde muss eine 3. Reihe vom Patent sein (= die letzte Runde wird so gestrickt: * 1 Umschlag, 1 M wie zum links stricken abheben, den Umschlag und die abgehobene M re zusammenstricken *) - dann stricken Sie kraus rechts mit Abnahmen. Viel spaß beim stricken!
23.10.2020 - 15:54
![]() Ulla Siburg wrote:
Ulla Siburg wrote:
Auf der Abbildung hat das Tuch einen Rand. Wie wird dieser gestrickt. Kann ich die Anleitung dazu bekommen? Dankeschön.
28.02.2020 - 10:42DROPS Design answered:
Liebe Frau Siburg, das Tuch endet mit 4 cm Vollpatent - die Anleitung dafür finden Sie unter VOLLPATENT (in Hin- und Rück-R gestrickt - gilt für das Tuch): am Anfang der Anleitung. Viel Spaß beim stricken!
28.02.2020 - 13:17
![]() Alessia Laudo wrote:
Alessia Laudo wrote:
O forse sono io che mentre lavoro non capisco come sarà una volta finito?e' quello che intendete per bloccaggio? Ancora grazie
20.12.2019 - 14:29DROPS Design answered:
Buonasera Alessia, il bloccaggio serve a portare in forma il lavoro una volta finito e a mettere in risalto la lavorazione. Buon lavoro!
20.12.2019 - 20:51
![]() Alessia Laudo wrote:
Alessia Laudo wrote:
Sopra rispondete "Buonasera Paola, lo scialle è lavorato dal bordo superiore verso la punta, per cui quando inizia le coste inglesi sta iniziando a lavorare il bordo inferiore". Ma deve essere sbagliato.si parte dalla punta/poche maglie al lato lungo dopo aumenti.le coste sarebbero lungo lato lungo...no sui bordia V. Come si fa qs modello?graziee
20.12.2019 - 14:11DROPS Design answered:
Buonasera Alessia, la risposta precedente è corretta, lo scialle si lavora dall'alto in basso. Quando si arriva ad un'altezza di 31 cm , misurati lungo la maglia centrale, si lavora il bordo a coste inglesi. Buon lavoro!
20.12.2019 - 20:51
![]() Patricia Olivia Fuchs wrote:
Patricia Olivia Fuchs wrote:
Vielen Dank für die superschnelle Antwort, ich bin dann in diesem Fall nämlich bereits bei 21 cm :-)
28.07.2019 - 01:07
![]() Patricia Olivia Fuchs wrote:
Patricia Olivia Fuchs wrote:
Noch eine Frage zu der Mütze, bitte: "bis zu einer Gesamthöhe von 23 cm im VOLLPATENT in Runden str". Von wo aus gemessen? Ab Anschlagkante oder meinen Sie 23 cm für den patentgestrickten Teil? Oder von dort, wo glatt rechts gestrickt wurde? Vielen Dank für Ihre rasche Antwort! Tolles Design!!!
27.07.2019 - 22:48DROPS Design answered:
Liebe Frau Fuchs, "Gesamthöhe" meint wirklich die gesamte Höhe :-), also 23 cm ab der Anschlagkante. Viel Spaß beim Weiterstricken!
28.07.2019 - 00:12
|
|
Mathilde#mathildeset |
|
 |
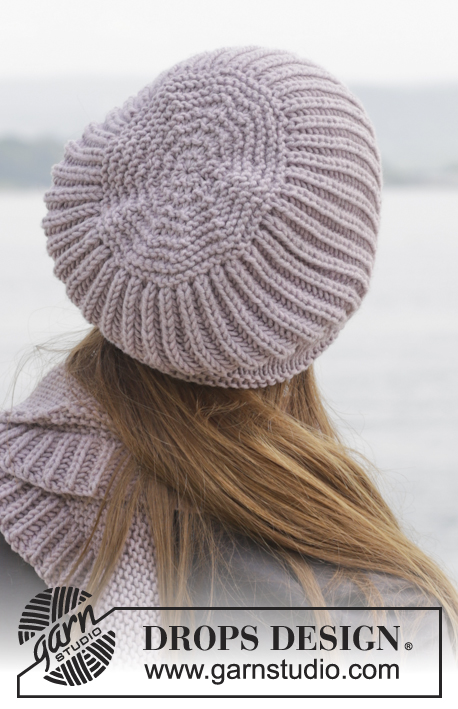 |
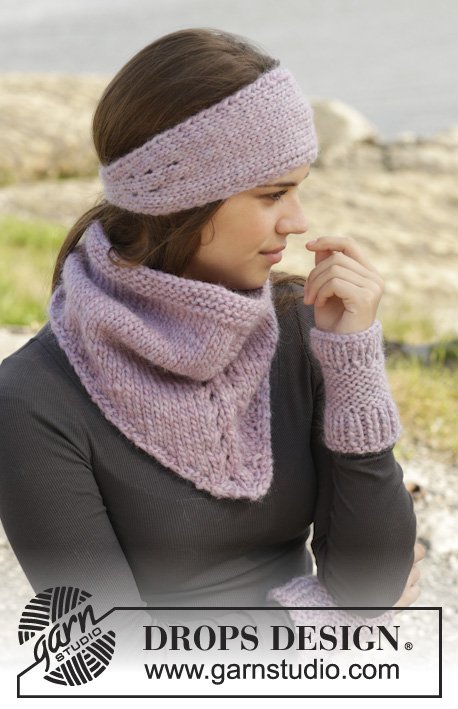
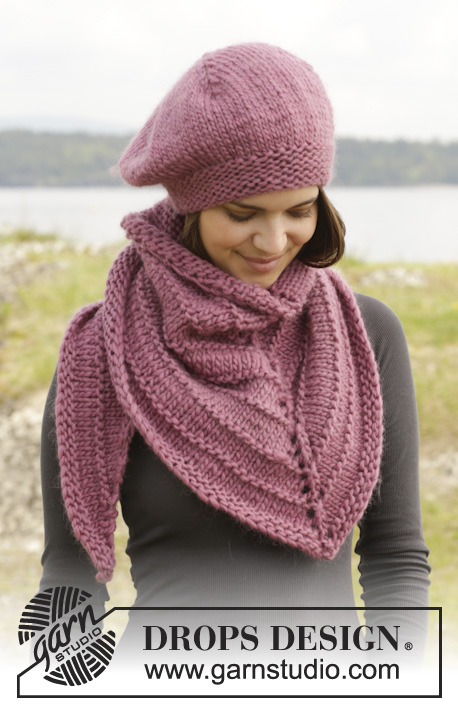
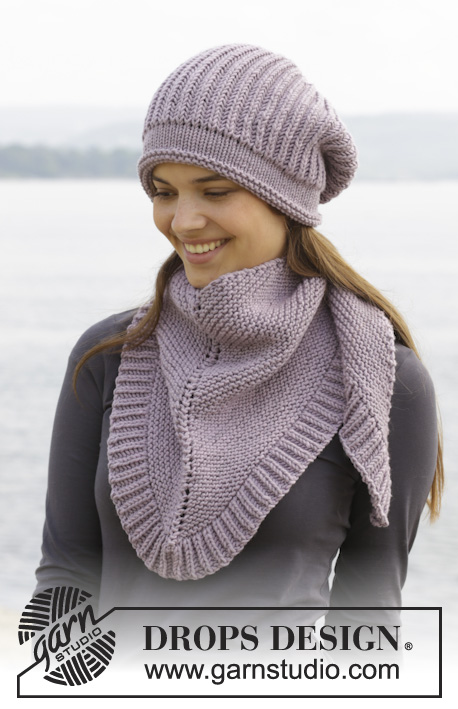
Knitted DROPS hat and scarf in garter st with English rib in ”Big Merino”.
DROPS 156-47 |
|
|
GARTER ST (back and forth on needle): K all rows. 1 ridge = K2 rows. GARTER ST (in the round on circular needle): * K 1 round and P 1 round *, repeat from *-*. 1 ridge = 2 rounds. ENGLISH RIB (in the round on needle - applies to hat): ROUND 1: * 1 YO, slip 1 st as if to P, K 1 *, repeat from *-*. ROUND 2: * P tog YO and slipped st, 1 YO, slip 1 st as if to P *, repeat from *-*. ROUND 3: * 1 YO, slip 1 st as if to P, K tog YO and slipped st *, repeat from *-*. Repeat 2nd and 3rd round upwards. ENGLISH RIB (back and forth - applies to shawl): Row 1: 1 st in GARTER ST - see explanation above, * K 1, 1 YO, slip 1 st as if to P *, repeat from *-* until 2 sts remain, finish with K 1 and 1 st in garter st. Row 2: 1 st in garter st, * 1 YO, slip 1 st as if to P, K tog YO and slipped st *, repeat from *-* until 2 sts remain, finish with 1 YO, slip 1 st as if to P, 1 st in garter st. Row 3: 1 st in garter st, * K tog YO and slipped st, 1 YO, slip 1 st as if to P *, repeat from *-* until 3 sts remain, K tog YO and slipped st, 1 st in garter st. Repeat 2nd and 3rd row upwards. DECREASE TIP: Dec on 1 round with K. Dec 1 st by K 2 sts tog. ---------------------------------------------------------- HAT: Worked in the round on circular needle/double pointed needles. Cast on 78-82-86 sts on circular needle size 5 mm / US 8 with Big Merino. Work in GARTER ST - see explanation above. When piece measures 5 cm / 2'', work in stockinette st for 3 cm / 1''. Then switch to circular needle size 5.5 mm / US 9 and work ENGLISH RIB in the round - see explanation above, until piece measures 23 cm / 9'' in total – finish after 3rd round in English rib. REMEMBER THE GAUGE! Then work in garter st and dec as follows: Dec 10 sts evenly on next K round – READ DECREASE TIP! Repeat dec after 4th round = 58-62-66 sts. Then dec 10 sts evenly every other round 3 times = 28-32-36 sts. Then K all sts tog 2 by 2 until 10-10-12 sts remain. Cut the yarn and pull it through the remaining sts, tighten tog and fasten. ASSEMBLY: Fold in edge in garter st at the bottom of hat and sew cast-on edge to last round in stockinette st. Make sure that to avoid a tight seam. Cut and fasten the yarn. Hat measures approx. 26-27-28 cm / 10 1/4''-10½''-11''. ---------------------------------------------------------- SHAWL: Worked back and forth on circular needle. K all sts and YOs. Cast on 9 sts on circular needle size 5.5 mm / US 9 with Big Merino. Work as follows: Row 1 (= RS): K 1, 1 YO, K 3, 1 YO, K 1 (= mid st), 1 YO, K 3, 1 YO and K 1 = 13 sts (= 4 sts inc). Insert a marker in the middle st. Row 2 (= WS): K 1, 1 YO, K until 1 st remains, 1 YO and K 1 = 2 sts inc. Row 3: K 1, 1 YO, K until mid st, 1 YO, K 1 (= mid st), 1 YO, K until 1 st remains, 1 YO and K 1 = 4 sts inc. Repeat row 2 and 3 until piece measures 31 cm / 12 1/4'' over mid st. REMEMBER THE GAUGE! Now work back and forth in ENGLISH RIB - see explanation above. When 4 cm / 1½'' have been worked - adjust so that last row is 2nd row in English rib - bind off with K over K and P over P. NOTE! bind off YOs with P. Cut the yarn and fasten. |
|
Have you finished this pattern?Tag your pictures with #dropspattern #mathildeset or submit them to the #dropsfan gallery. Do you need help with this pattern?You'll find 18 tutorial videos, a Comments/Questions area and more by visiting the pattern on garnstudio.com. © 1982-2026 DROPS Design A/S. We reserve all rights. This document, including all its sub-sections, has copyrights. Read more about what you can do with our patterns at the bottom of each pattern on our site. |
|


With over 40 years in knitting and crochet design, DROPS Design offers one of the most extensive collections of free patterns on the internet - translated to 17 languages. As of today we count 324 catalogs and 12272 patterns - 12262 of which are translated into English (US/in).
We work hard to bring you the best knitting and crochet have to offer, inspiration and advice as well as great quality yarns at incredible prices! Would you like to use our patterns for other than personal use? You can read what you are allowed to do in the Copyright text at the bottom of all our patterns. Happy crafting!
Post a comment to pattern DROPS 156-47
We would love to hear what you have to say about this pattern!
If you want to leave a question, please make sure you select the correct category in the form below, to speed up the answering process. Required fields are marked *.