
Popular categories
Looking for a yarn?


Comments / Questions (60)
![]() Lea wrote:
Lea wrote:
Fejl i opskriften: Venstre rygstykke, efter Afsnit 1 skal man strikke et antal riller. I teksten står der "på hver 2.stribe tages 1 m ud i starten af p fra retsiden, og tages 1 m ind i slutningen af p fra retsiden". Det betyder at man tager ud mod sidesømmen og ind mod rygsømmen. Det skal være modsat. De tre andre steder på rygstykkerne (under "rhomben" på venstre bagstykke og over og under "rhomben" på højre bagstykke) er opskriften korrekt.
16.03.2016 - 17:13
![]() Jolanda wrote:
Jolanda wrote:
Guten Tag Bin beim linken Rückenteil und verstehe das anschlagen nicht. Muss man in der 2. Hinrunde zuerst 1M 1x und dann in jeder folgenden 2. Hin-R 7x 1 M aufnehmen oder in der ersten 2 Hin-R alle 8 M anschlagen? Vielen Dank für ihre Hilfe.
10.02.2016 - 23:12DROPS Design answered:
Sie nehmen am End der ersten Hin-R 1 M zu (dirch Anschlagen) und schlagen dann am Ende der nächsten Hin-R 8 M auf einmal an. Sie haben also insgesamt 2 Zunahme-R.
15.02.2016 - 11:09
![]() Cathy Macia wrote:
Cathy Macia wrote:
J'ai acheté d'autres laines que celles indiquées pour ce modèle. Je suis sensée faire un échantillon de 13 m x 24 rangs (10 x 10 cm), mais pour obtenir ce même échantillon, avec mes laines je n'ai besoin que de 9 m x 10 rangs, soit une différence avec le modèle de 4 m et 14 rangs. Me suffit-il de prévoir systématiquement 4 m en moins ou faut-il faire une proportion entre ce que dit le modèle (par ex. aug x ou dim. y) et mes 4 mailles en moins? Merci. Cathy
31.01.2016 - 18:52DROPS Design answered:
Bonjour Mme Macia, nous ne sommes malheureusement pas en mesure de pouvoir adapter chacun de nos modèles à chaque demande individuelle et tension différente - merci de bien vouloir demander de l'aide auprès du magasin où vous avez acheté votre laine. Bon tricot!
01.02.2016 - 10:39
![]() Marion wrote:
Marion wrote:
Bin erst am Anfang der Arbeit, d. h. ich habe die 10 cm ab Markierung gestrickt. Hier folgt aber ein Abschnitt in der Anleitung, den ich nicht verstehe: Man soll "neben der 1 Rand-M am vorderen Rand" einige Abnahmen machen. Was bedeutet hier "abnehmen"? Etwa 2 Maschen zusammenstricken oder abketten? Und warum am vorderen Rand abnehmen? Im Diagramm sieht es so aus, als sei weiter vorn ein gerader Rand gestrickt. Kann mir da wohl jemand weiterhelfen?
16.01.2016 - 16:58DROPS Design answered:
Die Abnahmen sind für den Halsausschnitt, Sie stricken das Vorderteil ja von oben nach unten. Die Abnahmen machen Sie, indem Sie 2 M re zusstr, d.h. die beiden M neben der Rand-M.
30.01.2016 - 10:51
![]() Julie McBride wrote:
Julie McBride wrote:
Knitting left back piece, have worked section 1, then 4 stripes inc & dec then section 9. I have four stripes in middle which is not how the back is on photo, there is no proper triangle to this can you offer any help Disappointed as this is a different style to one printed
02.01.2016 - 12:54DROPS Design answered:
Dear Mrs McBride, after section1 you have to work 4 stripes with inc/dec to get correct angle, then work section 9 with dec. For any further personnal assistance, you are welcome to contact your DROPS Store, they will help you with tips & advices. Happy knitting!
04.01.2016 - 14:53
![]() Else wrote:
Else wrote:
Hvor finder jeg en video til jakke drops design 158-17. Strikkes i Nepal og bigdelight hilsen Else
23.12.2015 - 13:26DROPS Design answered:
Hej Else. Vi har ikke en video til praecis denne model, men de forkortede pinde med mönstret har vi lavet til denne model, som er det samme princip.
06.01.2016 - 17:07
![]() Sue Johnson wrote:
Sue Johnson wrote:
Hi there Thanks for your reply. Looking forward to knitting this pattern up...the yarn and colours are great. Sue
30.11.2015 - 16:30
![]() Sue Johnson wrote:
Sue Johnson wrote:
Thanks for your help. The colours are great and the feel of the knitting beautiful Sue
30.11.2015 - 15:44
![]() Sue Johnson wrote:
Sue Johnson wrote:
I am knitting the right hand piece of the coat. I have knitted the collar, added the stitches for the sleeve and knitted 10centimetres. The pattern then says 'dec from the WS inside 1 edge stitch towards mid front'. Does this mean decrease one stitch on the front edge?....the front edge looks straight on the diagram. I am confused! I think the meaning is lost in the translation! Best wishes Sue
27.11.2015 - 17:05DROPS Design answered:
Dear Mrs Johnson, that's correct, you dec 1 st towards front edge (from WS for right front piece) to shape the neckline - diagram is standard, there is a slightly dec. Happy knitting!
30.11.2015 - 09:40
![]() COUSIN wrote:
COUSIN wrote:
Je tricote ce modèle mais ne souhaite pas faire les diminutions et augmentations dans les rangs raccourcis. Est-ce que cela aura une incidence sur les rayures qui doivent correspondre entre le dos et le devant ? Vu que le dos est légèrement mois large que le devant, Je ne comprends pas bien comment les rayures arrivent à correspondre. Merci pour votre aide.
23.06.2015 - 08:32DROPS Design answered:
Bonjour Mme Cousin, les diminutions et augmentations créent l'effet cintré de la veste. Le dos est moins large que les 2 devants réunis pour les devants puissent se chevaucher. Bon tricot!
23.06.2015 - 10:13
|
|||||||
Northern Lights#northernlightsjacket |
|||||||
 |
 |
||||||
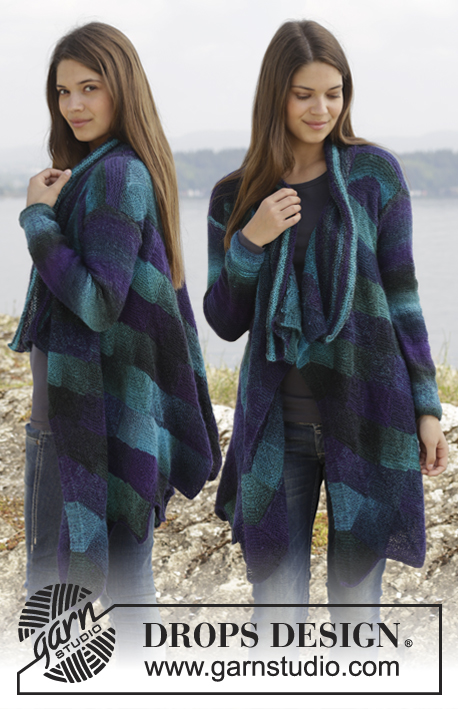
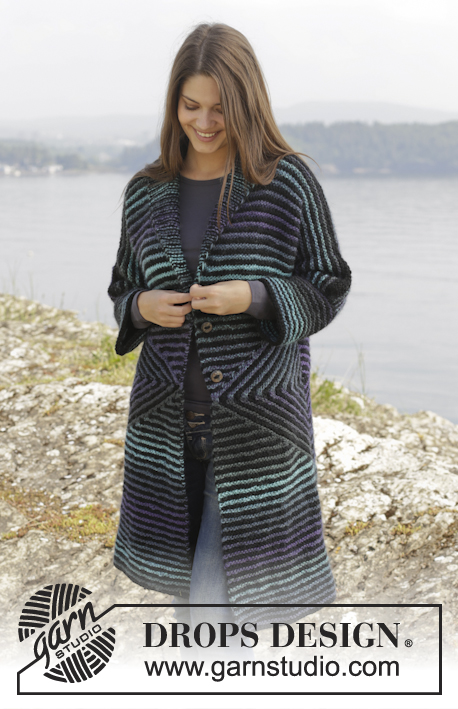
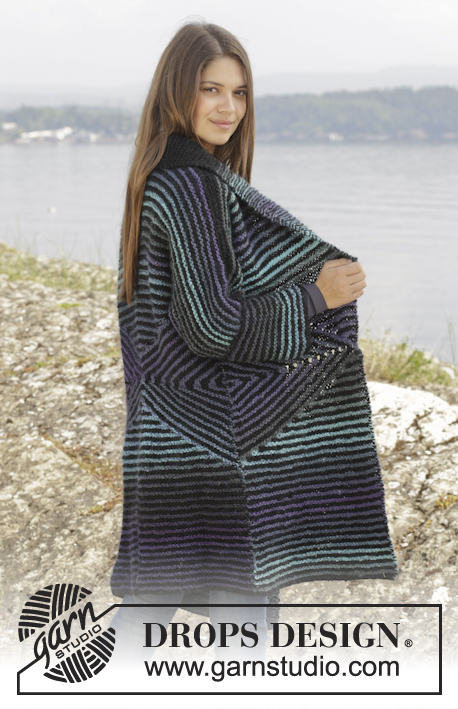
Knitted DROPS jacket in garter st with short rows and stripes, worked top down in ”Big Delight” and ”Nepal”. Size: S - XXXL.
DROPS 158-17 |
|||||||
|
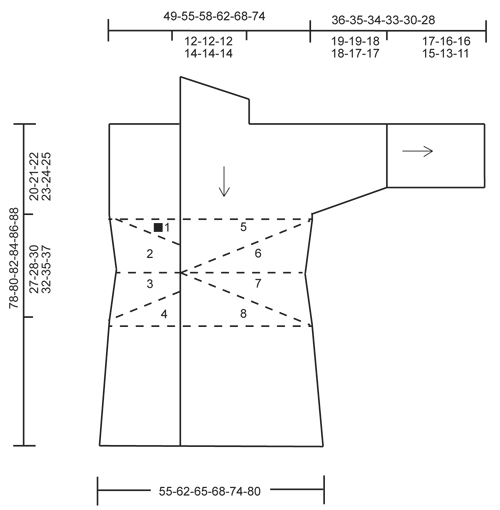
GARTER ST (back and forth on needle): K all rows. 1 ridge = K2 rows. PATTERN: * K 2 rows with Big Delight (= 1 stripe), K 2 rows with Nepal (= 1 stripe) *, repeat from *-*. TIP 1: When changing color in stripes, the strands must always be on WS of piece. TIP 2: To make the color transitions in Big Delight pretty when switching ball, it is important to find a ball that starts with the same color last ball ended with. COLLAR: * K 1 row over all sts, turn piece, K 1 row over all sts, turn piece, K 1 row over the first 17-17-17-18-18-18 sts, turn piece, K 1 row, turn piece *, repeat from *-*. BUTTONHOLES: Dec for buttonholes on right front piece. 1 buttonhole = K tog fourth and fifth st from mid front and make 1 YO. Dec for buttonholes (measured from shoulder) when piece measures: SIZE S: 29 and 37 cm / 11½" and 14½" SIZE M: 30 and 38 cm / 11¾" and 15" SIZE L: 31 and 39 cm / 12¼" and 15¼" SIZE XL: 32 and 40 cm / 12½" and 15¾" SIZE XXL: 33 and 41 cm / 13" and 16" SIZE XXXL: 34 and 42 cm / 13½" and 16½" ---------------------------------------------------------- JACKET: Worked in 4 parts, left and right back piece are sewn tog mid back when finished. Pick up sts around the sleeves and work a cuff from elbow and down. Work back and forth on circular needle so that piece can be moved to the opposite side and worked from each side of needle. READ TIP 2! RIGHT FRONT PIECE: Work back and forth on circular needle size 8 mm / US 11 in GARTER ST - see explanation above, work from collar and down. Cast on 22-22-22-24-24-24 sts with Nepal and work COLLAR - see explanation above (1st row = WS). When collar measures 8-8-8-9-9-9 cm / 3"-3"-3"-3½"-3½"-3½" on the shortest side, cast on 49-53-53-55-57-61 new sts for sleeve from the shortest side on collar = 71-75-75-79-81-85 sts. Insert 1 marker on this row – now measure piece from here. REMEMBER THE GAUGE! Now work piece in PATTERN - see explanation above, yarn change for stripes is done in the side of piece. When piece measures 10 cm / 4", dec from WS inside 1 edge st towards mid front as follows: 1 st every 6th row 2 times in total, 1 st every 4th row 4-4-4-5-5-5 times in total. AT THE SAME TIME when piece measures 16-17-18-19-20-21 cm / 6¼"-6¾"-7"-7½"-8"-8¼", bind off sts for sleeve as follows: bind off 0-0-3-4-2-2 sts 1 time, then bind off 5 sts every other row 5-5-4-4-4-4 times in total = 40-44-46-48-52-56 sts after all bind offs. Remember BUTTONHOLES - see explanation above. Work pattern until piece measures 20-21-22-23-24-25 cm / 8"-8¼"-8¾"-9"-9½"-9¾", adjust so that next row is worked from RS with Nepal. Section 1 Row 1: Slip the first 2 sts loosely over on to right needle, pull yarn behind the 2 sts - READ TIP 1 - see explanation above, work the remaining sts on row, turn piece. Row 2: Work back but do not work the last 2 sts slipped, turn piece. Row 3: Slip the first 2 sts loosely over on to right needle, pull yarn behind the 2 sts, work the remaining sts on row, turn piece. Row 4: Work back but do not work the last 4 sts slipped, turn piece. Continue like this by working 2 sts less for every other row until 2 rows have been worked over the last 2 sts. Cut the yarn. Then work 1 stripe over all sts with 1st row from RS. Section 2 READ ALL OF THE FOLLOWING SECTION BEFORE CONTINUING – WORK SHORT ROWS AND DEC AT THE SAME TIME. SHORT ROWS: Row 1: Work until 2 sts remain, turn piece. Row 2: Work back. Row 3: Work until 4 sts remain, turn piece. Row 4: Work back. Continue like this with 2 sts less for every other row until 2 sts remain on right needle. DECREASE: Work 3-3-3-2-2-2 stripes. Then dec at beg of next stripe as follows: K 2 tog, repeat dec every other stripe (= every 4th row) 6-7-8-8-8-10 times in total, then dec 0-1-0-0-0-0 times on next stripes = 34-36-38-40-44-46 sts. Section 3 READ ALL OF THE FOLLOWING SECTION BEFORE CONTINUING – WORK SHORT ROWS AND INC AT THE SAME TIME. SHORT ROWS: Row 1: Work the first 4 sts, turn piece. Row 2: Work back over these 4 sts, turn piece. Row 3: Work the first 6 sts, turn piece. Row 4: Work back over these 6 sts, turn piece. Continue like this with 2 sts more for every other row - repeat until 1 stripe has been worked over all sts. INCREASE: Work 2 stripes. Then inc at beg of next stripe as follows: Work 2 sts in first st, repeat inc every other stripe (= every 4th row) 6-8-8-8-8-10 times in total = 40-44-46-48-52-56 sts. Cut the yarn. Section 4 Slip the first 38-42-44-46-50-54 sts on to right needle. Then work as follows: Row 1 (= RS): Work 2 sts, turn piece. Row 2: Work back over the 2 sts, turn piece. Row 3: Slip 2 sts from right needle on to left needle, work the 4 sts, turn piece. Row 4: Work back over the 4 sts. Continue like this with 2 sts more for every other row until all sts have been slipped on to same needle and 1 stripe has been worked over all sts. Bottom part of jacket: Now work pattern. When piece measures 60-62-64-66-68-70 cm / 23⅝"-24⅜"-25¼"-26"-26¾"-27½", inc in the side as follows: Work 2 sts in first st from RS 4 times in total every 4 cm / 1½" = 44-48-50-52-56-60 sts. Work until piece measures 78-80-82-84-86-88 cm / 30¾"-31½"-32¼"-33"-33⅞"-34⅝", adjust so that last stripe is with Nepal and loosely bind off with Nepal. LEFT FRONT PIECE: Cast on and work as right front piece but reversed, collar beg from RS, do not dec for buttonholes - yarn change in stripes is done mid front. Work until piece measures 20-21-22-23-24-25 cm / 8"-8¼"-8¾"-9"-9½"-9¾", adjust so that next row is worked from RS with Nepal. Section 5 SHORT ROWS: Row 1: Work until 2 sts remain, turn piece. Row 2: Work back. Row 3: Work until 4 sts remain, turn piece. Row 4: Work back. Continue like this by working 2 sts less for every other row until the last 2 sts have been worked back and forth. Work one stripe over all sts. Section 6 READ ALL OF THE FOLLOWING SECTION BEFORE CONTINUING – WORK SHORT ROWS AND DEC AT THE SAME TIME. Row 1: Slip the first 2 sts loosely on to right needle, pull yarn behind the 2 sts - REMEMBER TIP 1 - see explanation above, work the remaining sts on row, turn piece. Row 2: Work back but do not work the last 2 sts slipped, turn piece. Row 3: Slip the first 2 sts loosely over on to right needle, pull yarn behind the 2 sts, work the remaining sts on row, turn piece. Row 4: Work back but do not work the last 4 sts, turn piece. Continue like this with 2 sts less for every other row until 2 sts remain on left needle. Cut the yarn. DECREASE: Work 3-3-3-2-2-2 stripes. Then dec at the end of next stripe as follows: K 2 tog, repeat dec every other stripe (= every 4th row) 6-7-8-8-8-10 times in total, then dec 0-1-0-0-0-0 times on next stripes = 34-36-38-40-44-46 sts. Section 7 READ ALL OF THE FOLLOWING SECTION BEFORE CONTINUING – WORK SHORT ROWS AND INC AT THE SAME TIME. The first 32-34-36-38-42-44 sts are on the right needle. Then work as follows: Row 1: Slip 2 sts from right needle on to left needle, work the 4 sts, turn piece. Row 2: Work back over the 4 sts. Row 3: Slip 2 sts from right needle on to left needle, work the 6 sts, turn piece. Row 4: Work back over the 6 sts. Continue like this with 2 sts more for every other row until all sts have been slipped on to same needle and 1 stripe has been worked over all sts. INCREASE: Work 2 stripes. Then inc at the end of next stripe as follows: Work 2 sts in last st, repeat inc every other stripe (= every 4th row) 6-8-8-8-8-10 times in total = 40-44-46-48-52-56 sts. Section 8 Row 1: Work the first 2 sts, turn piece. Row 2: Work back over these 2 sts, turn piece. Row 3: Work the first 4 sts, turn piece. Row 4: Work back over these 4 sts, turn piece. Continue like this with 2 sts more for every other row - repeat until 1 stripe has been worked over all sts. Bottom part of jacket: Now work pattern. When piece measures 60-62-64-66-68-70 cm / 23⅝"-24⅜"-25¼"-26"-26¾"-27½", inc in the side as follows: Work 2 sts in last st from RS 4 times in total every 4 cm / 1½" = 44-48-50-52-56-60 sts. Work until piece measures 78-80-82-84-86-88 cm / 30¾"-31½"-32¼"-33"-33⅞"-34⅝", adjust so that last stripe is with Nepal and loosely bind off with Nepal. LEFT BACK PIECE: Work back and forth on circular needle size 8 mm / US 11 in pattern, change yarn in the side, worked top down. Cast on 49-53-53-55-57-61 sts with Nepal. Work 2 rows (1st row = RS). Then cast on at the end of the next 2 rows from RS for neck as follows: 1 st 1 time and 7-7-7-8-8-8 sts 1 time = 57-61-61-64-66-70 sts. When piece measures 16-17-18-19-20-21 cm / 6¼"-6¾"-7"-7½"-8"-8¼", bind off sts for sleeve as follows: bind off 0-0-3-4-2-2 sts 1 time, then bind off 5 sts every other row 5-5-4-4-4-4 times in total = 32-36-38-40-44-48 sts. Work pattern until piece measures 20-21-22-23-24-25 cm / 8"-8¼"-8¾"-9"-9½"-9¾", adjust so that next row is worked from RS with Nepal. Work Section 1 – see RIGHT FRONT PIECE. Then work 4-3-4-3-4-3 stripes over all sts. AT THE SAME TIME inc 1 st every other stripe at beg of row from RS, and dec 1 st at the end of row from RS. This is done to get the correct angle on piece. Section 9 READ ALL OF THE FOLLOWING SECTION BEFORE CONTINUING – WORK SHORT ROWS AND DEC AT THE SAME TIME. SHORT ROWS: Row 1: Work until 2 sts remain, turn piece. Row 2: Work back. Row 3: Work until 4 sts remain, turn piece. Row 4: Work back. Continue like this with 2 sts less for every other row until 2 sts remain on right needle. DECREASE: Work 1-0-0-2-0-0 stripes. Then dec at beg of next stripe as follows: K 2 tog, repeat dec every other stripe (= every 4th row) 4-6-6-6-6-8 times in total = 28-30-32-34-38-40 sts. Section 10 READ ALL OF THE FOLLOWING SECTION BEFORE CONTINUING – WORK SHORT ROWS AND INC AT THE SAME TIME. SHORT ROWS: Row 1: Work the first 4 sts, turn piece. Row 2: Work back over these 4 sts, turn piece. Row 3: Work the first 6 sts, turn piece. Row 4: Work back over these 6 sts, turn piece. Continue like this with 2 sts more for every other row - repeat until 1 stripe has been worked over all sts. INCREASE: Work 2 stripes. Then inc at beg of next stripe as follows: Work 2 sts in first st, repeat inc every other stripe (= every 4th row) 4-6-6-6-6-8 times in total = 32-36-38-40-44-48 sts. Cut the yarn. Then work 4 stripes over all sts. AT THE SAME TIME inc 1 st every other stripe at beg of row from RS, and dec 1 st at the end of row from RS. This is done to get the correct angle on piece. Cut the yarn. Work Section 4 – see RIGHT FRONT PIECE. Bottom part of jacket: Now work pattern. When piece measures 60-62-64-66-68-70 cm / 23⅝"-24⅜"-25¼"-26"-26¾"-27½", inc in the side as follows: Work 2 sts in first st from RS 4 times in total every 4 cm / 1½" = 36-40-42-44-48-52 sts. Work until piece measures 78-80-82-84-86-88 cm / 30¾"-31½"-32¼"-33"-33⅞"-34⅝", adjust so that last stripe is with Nepal and loosely bind off with Nepal. RIGHT BACK PIECE: Cast on and work as left back piece but reversed - change yarn for stripes mid back. Work until piece measures 20-21-22-23-24-25 cm / 8"-8¼"-8¾"-9"-9½"-9¾", adjust so that next row is worked from RS with Nepal. Work Section 5 – see LEFT FRONT PIECE. Then work 4-3-4-3-4-3 stripes over all sts. AT THE SAME TIME dec 1 st every other stripe at beg of row from RS, and inc 1 st at the end of row from RS. This is done to get the correct angle on piece. Section 11 READ ALL OF THE FOLLOWING SECTION BEFORE CONTINUING – WORK SHORT ROWS AND DEC AT THE SAME TIME. Row 1: Slip the first 2 sts loosely on to right needle, pull yarn behind the 2 sts - REMEMBER TIP 1, work the remaining sts on row, turn piece. Row 2: Work back but do not work the last 2 sts slipped, turn piece. Row 3: Slip the first 2 sts loosely on to right needle, pull yarn behind the 2 sts, work the remaining sts on row, turn piece. Row 4: Work back but do not work the last 4 sts, turn piece. Continue like this with 2 sts less for every other row until 2 sts remain on right needle. Cut the yarn. DECREASE: Work 1-0-0-2-0-0 stripes. Then dec at the end of next stripe as follows: K 2 tog, repeat dec every other stripe (= every 4th row) 4-6-6-6-6-8 times in total = 28-30-32-34-38-40 sts. Section 12 READ ALL OF THE FOLLOWING SECTION BEFORE CONTINUING – WORK SHORT ROWS AND INC AT THE SAME TIME. The first 26-28-30-32-36-38 sts are on the right needle. Then work as follows: Row 1 (= RS): Slip 2 sts from right needle on to left needle, work the 4 sts, turn piece. Row 2: Work back over the 4 sts. Row 3: Slip 2 sts from right needle on to left needle, work the 6 sts, turn piece. Row 4: Work back over the 6 sts. Continue like this with 2 sts more for every other row until all sts have been slipped on to same needle and 1 stripe has been worked over all sts. INCREASE: Work 2 stripes. Then inc at the end of next stripe as follows: Work 2 sts in last st, repeat inc every other stripe (= every 4th row) 4-6-6-6-6-8 times in total = 32-36-38-40-44-48 sts. Then work 4 stripes over all sts. AT THE SAME TIME dec 1 st every other stripe at beg of row from RS, and inc 1 st at the end of row from RS. This is done to get the correct angle on piece. Work Section 8 – see LEFT FRONT PIECE. Bottom part of jacket: Now work pattern. When piece measures 60-62-64-66-68-70 cm / 23⅝"-24⅜"-25¼"-26"-26¾"-27½", inc in the side as follows: Work 2 sts in last st 4 times in total every 4 cm / 1½" = 36-40-42-44-48-52 sts. Work until piece measures 78-80-82-84-86-88 cm / 30¾"-31½"-32¼"-33"-33⅞"-34⅝", adjust so that last stripe is with Nepal and loosely bind off with Nepal. ASSEMBLY: Sew right back piece to left back piece mid back. Sew shoulder and side seams. Sew the collar tog mid back and sew it to the neckline at the back. RIGHT CUFF: Worked back and forth on circular needle. Pick up 42-44-46-50-52-54 sts on circular needle size 8 mm / US 11 around the sleeve with Nepal. Piece is worked in pattern. Bind off when piece measures 17-16-16-15-13-11 cm / 6¾"-6¼"-6¼"-6"-5"-4½", adjust to bind off with Nepal. LEFT CUFF: Pick up and work as right cuff. ASSEMBLY: Sew cuff seams tog. Sew the buttons on to left front piece. |
|||||||
Diagram explanations |
|||||||
|
|||||||
 |
|||||||
Have you finished this pattern?Tag your pictures with #dropspattern #northernlightsjacket or submit them to the #dropsfan gallery. Do you need help with this pattern?You'll find 19 tutorial videos, a Comments/Questions area and more by visiting the pattern on garnstudio.com. © 1982-2026 DROPS Design A/S. We reserve all rights. This document, including all its sub-sections, has copyrights. Read more about what you can do with our patterns at the bottom of each pattern on our site. |
|||||||


With over 40 years in knitting and crochet design, DROPS Design offers one of the most extensive collections of free patterns on the internet - translated to 17 languages. As of today we count 325 catalogs and 12298 patterns - 12288 of which are translated into English (US/in).
We work hard to bring you the best knitting and crochet have to offer, inspiration and advice as well as great quality yarns at incredible prices! Would you like to use our patterns for other than personal use? You can read what you are allowed to do in the Copyright text at the bottom of all our patterns. Happy crafting!
Post a comment to pattern DROPS 158-17
We would love to hear what you have to say about this pattern!
If you want to leave a question, please make sure you select the correct category in the form below, to speed up the answering process. Required fields are marked *.