
Popular categories
Looking for a yarn?


Comments / Questions (43)
![]() Hanne wrote:
Hanne wrote:
3. Tilføjelse i mit spørgsmål. Skal de omslagene masker ikke strikkes spejlvendt på ærmet i forhold til på forstykket/ bagstykket? Altså de huller der bliver på hver sider af rabatten mellem ærme og for/bagstykker?
04.08.2016 - 13:33
![]() Hanne wrote:
Hanne wrote:
Og er det korrekt at omslagene skal strikkes ret og drejet ret; næste pind er jo fra vrangsiden?
04.08.2016 - 13:09
![]() Hanne wrote:
Hanne wrote:
Der tages ind på ret siden. "På næste pind strikkes 1. Omslag ret og 2. Omslag drejet ret." Men næste pind er jo fra fra vrangen og maskerne strikkes i modsat rækkefølge, så bliver lidt forvirret, hvilken maske er 1 omslag?
04.08.2016 - 12:52
![]() Verla Ringenberg wrote:
Verla Ringenberg wrote:
This pattern instructed me to use Decrease Tip 1 and states that the decrease for the sleeve is different from the decrease for the front/back piece. However, it is not clear to me which section of the Decrease tip 1 is used for the sleeve and which for the front/back piece. Both say to decrease 1 st on front/back piece and 1 st on each side o the sleeve. I'm not visualizing this clearly. Which part of Decrease tip 1 is for the sleeve and which is for the front/back piece.
23.07.2016 - 02:57DROPS Design answered:
Dear Mrs Ringerberg, the decreases are different in terms of number of decreases: you've to follow the decrease tip 1 on how to decrease and the instructions stated in the pattern which says how many decrease you should do. Happy knitting!
23.07.2016 - 07:45
![]() Rosi wrote:
Rosi wrote:
Hi :) Ich hab nun endgültig dieses Muster aufgegeben, ist eine Nummer zu groß für mich. Allein schon 3 oder 4 Maschen zusammenstricken dauert bei mir länger als eine ganze Reihe ;) Hab das Werk nun aufgerubbelt bis zu den Armausschnitten. Gibt es ein ähnliches Muster ohne Raglan? Das ist meine wirklich dringliche Frage, da ich die Wolle sehr gern mag und meine bisherige Arbeit nicht ganz umsonst sein soll. Vielen Dank für eine Antwort!
15.06.2016 - 20:40DROPS Design answered:
Liebe Rosi, Sie könnten einfach Maschen für den Ärmel anschlagen (bitte suchen Sie sich in unserer Musterdatenbank ein entsprechendes Modell) und den Armel ohne Raglan anstricken. Den Halsausschnitt müssten Sie aber trotzdem arbeiten, sonst hat das Teil keine Passform.
16.06.2016 - 07:48
![]() Frida wrote:
Frida wrote:
Ja selvfølgelig er det felt èn maske. Men jeg har nå felt 17 ggr på forstykket og 17 ggr på bakstykket og der skal felles 22 ggr på hvert stykke, og der er ikke mulig å felle flere m på forstykket ! Hva gjør jeg feil ?
03.03.2016 - 14:28DROPS Design answered:
Hej Frida, det er svært at sige hvor det går galt, men har du det rigtig mål og det antal masker tilbage som der står i opskriften?
03.03.2016 - 15:27
![]() Frida wrote:
Frida wrote:
Ja selvfølgelig er det felt èn maske. Men jeg har nå felt 17 ggr på forstykket og 17 ggr på bakstykket og der skal felles 22 ggr på hvert stykke, og der er ikke mulig å felle flere m på forstykket !
03.03.2016 - 14:16
![]() Frida wrote:
Frida wrote:
Hei, ved felletips -1- skal det felles 1 m på forstk/bakst og 1 m på hver side av ermet. Men det står ; 3 m rett sammen, 2 kast og 2 m vridd sammen - dete blir da felt 2 masker på for- og bakstykke. Det samme på armene. 2 masker rett sammen , så 2 kast og så 3 masker rett sammen, som blir 2 felte masker isteden for 1 som beskrevet. Jeg har nå felt 17 ggr på forstykket og der er ingen masker igjen å felle, og der skal felles 22 ggr. Hva er galt ??
02.03.2016 - 12:37DROPS Design answered:
Hej, når du strikker 3 rett sammen (feller du 2), 2 kast (2 nye m) 2 vridd sammen (feller du 1) = i alt feller du 1 m. God fornøjelse!
02.03.2016 - 13:52
![]() Caterina wrote:
Caterina wrote:
Salve,chiedo conferma:i ferri accorciati in corrispondenza del bordo per lo scollo a V vanno lavorati una sola volta oppure vanno ripetuti per lo stesso numero di diminuzioni verso il centro davanti? Grazie
16.08.2014 - 09:26DROPS Design answered:
Buongiorno Caterina, i ferri accorciati vanno lavorati una volta soltanto come indicato nelle istruzioni, poi prosegue a lavorare su tutte le m. Buon lavoro!!
16.08.2014 - 11:54Stella Marisd wrote:
Quisiera saber si los numeros que figuran en el patrón de cada modelo corresponde a cm o puntos? Gracias! Muy lindos modelos y lanas!
29.07.2014 - 21:39DROPS Design answered:
Hola Stella! Los números en el diagrama son cm.
30.07.2014 - 11:53
|
|
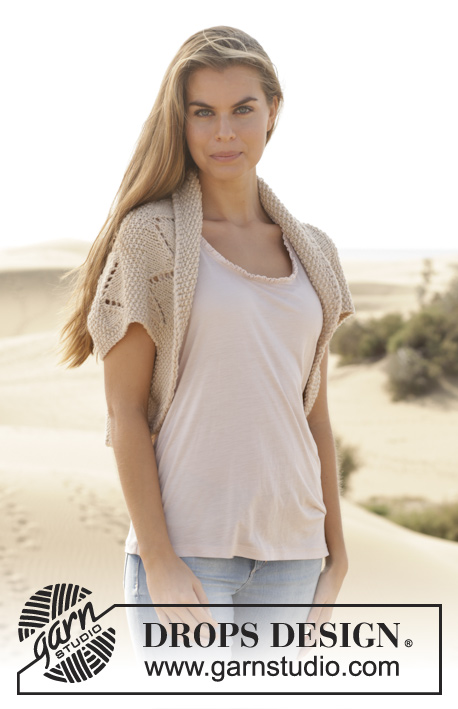
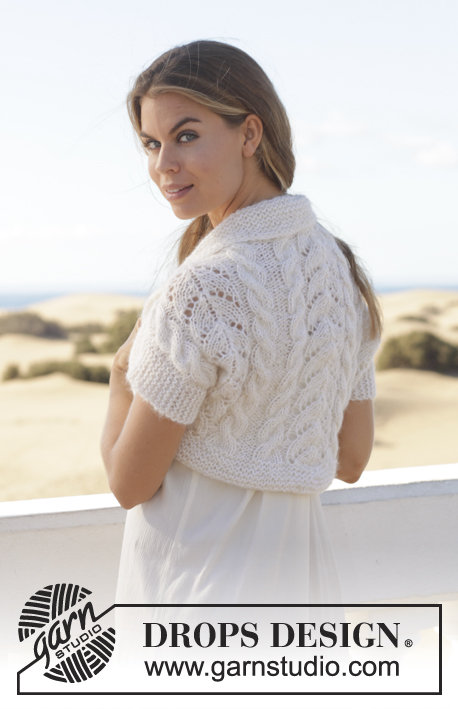
Amanda Cardigan#amandacardigan |
|
|
|
|
Knitted DROPS jacket with lace pattern and raglan in "Bomull-Lin" or "Paris". Size: S - XXXL.
DROPS 153-35 |
|
|
TEXTURE: * K 1, P 1 *, repeat from *-*. GARTER ST (back and forth on needle): K all rows. 1 ridge = K2 rows. GARTER ST (in the round on circular needle): * K 1 round and P 1 round *, repeat from *-*. 1 ridge = 2 rounds. DECREASE TIP 1: Dec 1 st on front/back piece and 1 st on each side of sleeve as follows: Beg 5 sts before 1st, 3rd, 5th and 7th marker: K 3 tog, 2 YO, 2 sts twisted tog, (1st, 3rd, 5th and 7th marker), K 1, (2nd, 4th, 6th and 8th marker), K 2 tog, 2 YO, K 3 tog. On next row work yo's like this: K 1st yo and K 2nd yo twisted (i.e work in back loop). Dec 1 st on front/back piece and 2 sts on each side of sleeve as follows: Beg 5 sts before 1st and 5th marker: K 3 tog, 2 YO, 2 sts twisted tog, (1st and 5th marker), K 1, (2nd and 6th marker), K 2 tog, 2 YO, K 4 tog, then work as before until 6 sts remain before 3rd and 7th marker: K 4 tog, 2 YO, 2 sts twisted tog, (3rd and 7th marker), K 1, (4th and 8th marker), K 2 tog, 2 YO, K 3 tog. On next row work yo's like this: K 1st yo and K 2nd yo twisted (i.e work in back loop). DECREASE TIP 2: Dec inside 5 band sts in each side. All dec are done from RS! Dec after 5 band sts as follows: Slip 1 st as if to K, K 1, psso. Dec as follows before 5 band sts: K 2 tog. BUTTONHOLES: Dec for buttonholes on right band. 1 buttonhole = K tog second and third st from edge and make 1 YO. Dec for buttonholes when piece measures: SIZE S: 3, 12, 21, 30 and 39 cm / 1⅛",4¾",8¼",11¾",15¼". SIZE M: 5, 14, 23, 32 and 41 cm / 2",5½",9",12½",16⅛". SIZE L: 7, 14, 21, 28, 35 and 42 cm / 2¾",5½",8¼",11",13¾",16½". SIZE XL: 9, 16, 23, 30, 37 and 44 cm / 3½",6¼",9",11¾",14½",17¼". SIZE XXL: 5, 13, 21, 29, 37 and 45 cm / 2",5⅛",8¼",11⅜",14½",17¾". SIZE XXXL: 7, 15, 23, 31, 39 and 47 cm / 2¾",6",9",12¼",15¼",18½". ---------------------------------------------------------- BODY: Worked back and forth on needle. Cast on 138-150-162-178-194-214 sts (includes 5 band sts in each side) on circular needle size 4.5 mm / US 7 with Bomull-Lin. Work in GARTER ST - see explanation above - for 3 cm / 1". Switch to circular needle size 5.5 mm / US 9. Then work in stockinette st with 5 sts in garter st (= band sts) in each side of piece. REMEMBER BUTTONHOLES! When piece measures 38-37-37-38-39-40 cm / 15"-14½"-14½"-15"-15¼"-15¾", bind off for armhole from RS as follows: Work 5 band sts in garter st, 28-31-34-37-41-46 sts in stockinette st, bind off the next 8-8-8-10-10-10 sts, stockinette st over the next 56-62-68-74-82-92 sts, bind off the next 8-8-8-10-10-10 sts, stockinette st over the next 28-31-34-37-41-46 sts, finish with 5 sts in garter st (= band) = 122-134-146-158-174-194 sts remain on needle. Put piece aside and knit the sleeves. SLEEVE: Worked in the round on circular needle. Cast on 85-87-91-93-97-101 sts on circular needle size 4.5 mm / US 7 with Bomull-Lin. Work 2 ridges in GARTER ST - see explanation above. Switch to circular needle size 5.5 mm / US 9. Then continue to work until finished measurements as follows: 1 round in stockinette st, 1 round TEXTURE – see explanation above, repeat these 2 rounds until finished measurements. When piece measures 4 cm / 1½", insert 1 marker at the beg of round = mid under sleeve. On next round bind off 8-8-8-10-10-10 sts mid under sleeve (i.e. 4-4-4-5-5-5 sts on each side of marker) = 77-79-83-83-87-91 sts. Put piece aside and Make another sleeve. YOKE: Slip sleeves on to same circular needle as body where armholes were bind off = 276-292-312-324-348-376 sts. Now insert 8 markers in the piece from RS as follows: Work 5 sts in garter st (= band), K 27-30-33-36-40-45, insert 1st marker, K 1, insert 2nd marker, 77-79-83-83-87-91 sts texture as before (= sleeve), insert 3rd marker, K 1, insert 4th marker, K 54-60-66-72-80-90, insert 5th marker, K 1, insert 6th marker, 77-79-83-83-87-91 sts texture as before (= sleeve), insert 7th marker, K 1, insert 8th marker, K 27-30-33-36-40-45 and finish with 5 sts in garter st (= band). Continue as before with garter st, stockinette st and texture AT THE SAME TIME dec for raglan – read DECREASE TIP 1. Dec is different on sleeves and front/back piece. ON SLEEVE: Dec in each side of sleeve on every row from RS 1 st 7-12-13-15-16-16 times, then 2 sts 11-9-9-8-8-9 times. ON FRONT/BACK PIECE: Dec on every row from RS 1 st 18-21-22-23-24-25 times. REMEMBER BUTTONHOLES! AT THE SAME TIME when piece measures 40-42-43-45-46-48 cm / 15¾"-16½"-17"-17¾"-18"-19" (adjust so that approx. 2 rows have been worked after last buttonhole on right band), work short rows over bands as follows (beg from RS): K 5 band sts, turn piece, tighten yarn and K back, turn piece and work as before over all sts, turn piece, K 5 band sts, turn and work back, turn piece. Then work back and forth over all sts as before, AT THE SAME TIME on 1st row from RS dec 1 st in each side towards mid front for V-neck – READ DECREASE TIP 2. Repeat dec on every row from RS 12-12-14-14-15-15 times (it is ok if neck dec overlap raglan dec on front piece). After all dec, approx. 64-64-72-80-94-110 sts remain on needle. AT THE SAME TIME after last row with dec for raglan work the next 2 rows as follows (beg from WS): Work 5 band sts as before, slip them on 1 stitch holder and work the rest of row, turn piece, work 5 band sts as before, slip them on 1 stitch holder and work the rest of row = approx. 54-54-62-70-84-100 sts on needle. P 1 row from WS while AT THE SAME TIME dec 6-6-10-18-30-46 sts evenly = approx. 48-48-52-52-54-54 sts remain on needle. Bind off. BAND + NECK EDGE: Slip the 5 band sts from stitch holder on right band back on needle size 5.5 mm / US 9. Continue in garter st back and forth over these 5 sts. Work until neck edge measures approx. 9-11 cm / 3½"-4½" from where sts were slipped back on needle (place neck edge towards neckline on garment mid back, lightly pull it and make sure that it fits the measurements), then bind off. Repeat along left band. Sew seam mid back inside bind-off edge (seam should be in towards WS on garment). Sew neck edge to neck line inside 1 edge st on back piece so that neck edge lies nicely against neck line. Sew the opening under the sleeves. Sew on buttons. |
|
 |
|
Have you finished this pattern?Tag your pictures with #dropspattern #amandacardigan or submit them to the #dropsfan gallery. Do you need help with this pattern?You'll find 25 tutorial videos, a Comments/Questions area and more by visiting the pattern on garnstudio.com. © 1982-2026 DROPS Design A/S. We reserve all rights. This document, including all its sub-sections, has copyrights. Read more about what you can do with our patterns at the bottom of each pattern on our site. |


With over 40 years in knitting and crochet design, DROPS Design offers one of the most extensive collections of free patterns on the internet - translated to 17 languages. As of today we count 324 catalogs and 12290 patterns - 12280 of which are translated into English (US/in).
We work hard to bring you the best knitting and crochet have to offer, inspiration and advice as well as great quality yarns at incredible prices! Would you like to use our patterns for other than personal use? You can read what you are allowed to do in the Copyright text at the bottom of all our patterns. Happy crafting!
Post a comment to pattern DROPS 153-35
We would love to hear what you have to say about this pattern!
If you want to leave a question, please make sure you select the correct category in the form below, to speed up the answering process. Required fields are marked *.