DROPS Bomull-Lin
DROPS Bomull-Lin
53% Cotton, 47% Linen
from 2.50 £ /50g
Get the yarn to make this pattern from 17.50£.

The yarn cost is calculated from the pattern’s smallest size and the yarn’s cheapest product type. Looking for an even better price? You might find it on the DROPS Deals!

DROPS SS24

Amanda Cardigan

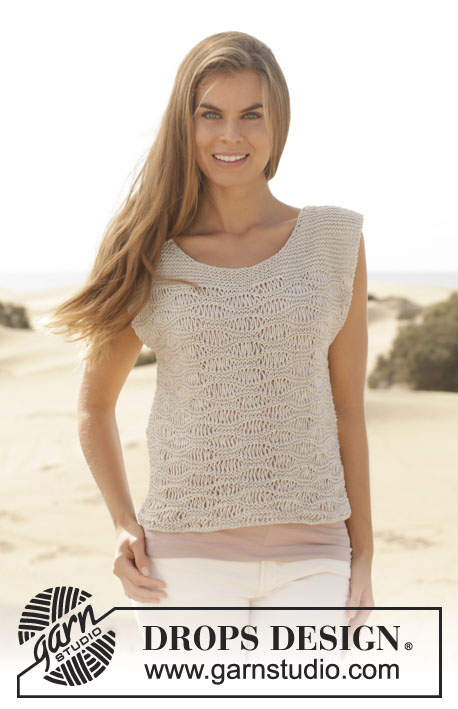
Knitted DROPS jacket with lace pattern and raglan in "Bomull-Lin" or "Paris". Size: S - XXXL.

DROPS 153-35
DROPS design: Pattern no l-127
Yarn group C
-----------------------------------------------------------
Size: S - M - L - XL - XXL - XXXL
Materials:
DROPS BOMULL-LIN from Garnstudio
350-400-450-500-550-600 g colour no 03, light beige
Or: DROPS PARIS from Garnstudio
350-400-450-500-550-600 g colour no 26, dark beige

DROPS DOUBLE POINTED NEEDLES AND CIRCULAR NEEDLE (40 and 80 cm) SIZE 5.5 mm - or size needed to get 16 sts x 20 rows in stocking st = 10 x 10 cm.
DROPS DOUBLE POINTED NEEDLES and CIRCULAR NEEDLE (60 cm) SIZE 4.5 mm - for edge in garter st.
DROPS WOOD BUTTON COCONUT, NO 516: 5-5-6-6-6-6 pieces

-------------------------------------------------------

Alternative Yarn – See how to change yarns here
Yarn Groups A to F – Use the same pattern and change the yarn here
Yarn usage using an alternative yarn – Use our yarn converter here

-------------------------------------------------------

DROPS Bomull-Lin
DROPS Bomull-Lin
53% Cotton, 47% Linen
from 2.50 £ /50g
Get the yarn to make this pattern from 17.50£.

The yarn cost is calculated from the pattern’s smallest size and the yarn’s cheapest product type. Looking for an even better price? You might find it on the DROPS Deals!

Pattern instructions

NOTE: This pattern is written in British English. All measurements in charts are in cm. For conversion from cm to inches - click here. There are different terms for crocheting in British and American English. If this pattern includes crochet, click for "crochet terms" here. For this pattern in American English, please click here.
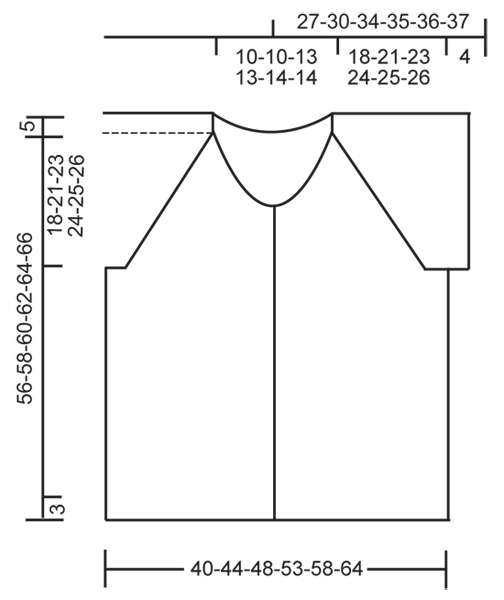
TEXTURE:
* K 1, P 1 *, repeat from *-*.

GARTER ST (back and forth on needle):
K all rows. 1 ridge = 2 rows K.

GARTER ST (in the round on circular needle):
* K 1 round and P 1 round *, repeat from *-*. 1 ridge = 2 rounds.

DECREASE TIP 1:
Dec 1 st on front/back piece and 1 st on each side of sleeve as follows:
Beg 5 sts before 1st, 3rd, 5th and 7th marker: K 3 tog, 2 YO, 2 sts twisted tog, (1st, 3rd, 5th and 7th marker), K 1, (2nd, 4th, 6th and 8th marker), K 2 tog, 2 YO, K 3 tog.
On next row work yo's like this: K 1st yo and K 2nd yo twisted (i.e work in back loop).

Dec 1 st on front/back piece and 2 sts on each side of sleeve as follows:
Beg 5 sts before 1st and 5th marker: K 3 tog, 2 YO, 2 sts twisted tog, (1st and 5th marker), K 1, (2nd and 6th marker), K 2 tog, 2 YO, K 4 tog, then work as before until 6 sts remain before 3rd and 7th marker: K 4 tog, 2 YO, 2 sts twisted tog, (3rd and 7th marker), K 1, (4th and 8th marker), K 2 tog, 2 YO, K 3 tog.
On next row work yo's like this: K 1st yo and K 2nd yo twisted (i.e work in back loop).

DECREASE TIP 2:
Dec inside 5 band sts in each side. All dec are done from RS!
Dec after 5 band sts as follows: Slip 1 st as if to K, K 1, psso.
Dec as follows before 5 band sts: K 2 tog.

BUTTONHOLES:
Dec for buttonholes on right band. 1 buttonhole = K tog second and third st from edge and make 1 YO.
Dec for buttonholes when piece measures:
SIZE S: 3, 12, 21, 30 and 39 cm
SIZE M: 5, 14, 23, 32 and 41 cm
SIZE L: 7, 14, 21, 28, 35 and 42 cm.
SIZE XL: 9, 16, 23, 30, 37 and 44 cm.
SIZE XXL: 5, 13, 21, 29, 37 and 45 cm.
SIZE XXXL: 7, 15, 23, 31, 39 and 47 cm.
----------------------------------------------------------

BODY:
Worked back and forth on needle.
Cast on 138-150-162-178-194-214 sts (incl 5 band sts in each side) on circular needle size 4.5 mm with Bomull-Lin. Work in GARTER ST - see explanation above - for 3 cm. Switch to circular needle size 5.5 mm. Then work in stocking st with 5 sts in garter st (= band sts) in each side of piece. REMEMBER BUTTONHOLES! When piece measures 38-37-37-38-39-40 cm, cast off for armhole from RS as follows: Work 5 band sts in garter st, 28-31-34-37-41-46 sts in stocking st, cast off the next 8-8-8-10-10-10 sts, stocking st over the next 56-62-68-74-82-92 sts, cast off the next 8-8-8-10-10-10 sts, stocking st over the next 28-31-34-37-41-46 sts, finish with 5 sts in garter st (= band) = 122-134-146-158-174-194 sts remain on needle. Put piece aside and knit the sleeves.

SLEEVE:
Worked in the round on circular needle. Cast on 85-87-91-93-97-101 sts on circular needle size 4.5 mm with Bomull-Lin. Work 2 ridges in GARTER ST - see explanation above. Switch to circular needle size 5.5 mm. Then continue to work until finished measurements as follows: 1 round in stocking st, 1 round TEXTURE – see explanation above, repeat these 2 rounds until finished measurements. When piece measures 4 cm, insert 1 marker at the beg of round = mid under sleeve. On next round cast off 8-8-8-10-10-10 sts mid under sleeve (i.e. 4-4-4-5-5-5 sts on each side of marker) = 77-79-83-83-87-91 sts. Put piece aside and knit another sleeve.

YOKE:
Slip sleeves on to same circular needle as body where armholes were cast off = 276-292-312-324-348-376 sts. Now insert 8 markers in the piece from RS as follows: Work 5 sts in garter st (= band), K 27-30-33-36-40-45, insert 1st marker, K 1, insert 2nd marker, 77-79-83-83-87-91 sts texture as before (= sleeve), insert 3rd marker, K 1, insert 4th marker, K 54-60-66-72-80-90, insert 5th marker, K 1, insert 6th marker, 77-79-83-83-87-91 sts texture as before (= sleeve), insert 7th marker, K 1, insert 8th marker, K 27-30-33-36-40-45 and finish with 5 sts in garter st (= band). Continue as before with garter st, stocking st and texture AT THE SAME TIME dec for raglan – read DECREASE TIP 1. Dec is different on sleeves and front/back piece.
ON SLEEVE: Dec in each side of sleeve on every row from RS 1 st 7-12-13-15-16-16 times, then 2 sts 11-9-9-8-8-9 times.
ON FRONT/BACK PIECE: Dec on every row from RS 1 st 18-21-22-23-24-25 times. REMEMBER BUTTONHOLES!
AT THE SAME TIME when piece measures 40-42-43-45-46-48 cm (adjust so that approx. 2 rows have been worked after last buttonhole on right band), work short rows over bands as follows (beg from RS): K 5 band sts, turn piece, tighten yarn and K back, turn piece and work as before over all sts, turn piece, K 5 band sts, turn and work back, turn piece. Then work back and forth over all sts as before, AT THE SAME TIME on 1st row from RS dec 1 st in each side towards mid front for V-neck – READ DECREASE TIP 2. Repeat dec on every row from RS 12-12-14-14-15-15 times (it is ok if neck dec overlap raglan dec on front piece). After all dec, approx. 64-64-72-80-94-110 sts remain on needle. AT THE SAME TIME after last row with dec for raglan work the next 2 rows as follows (beg from WS): Work 5 band sts as before, slip them on 1 stitch holder and work the rest of row, turn piece, work 5 band sts as before, slip them on 1 stitch holder and work the rest of row = approx. 54-54-62-70-84-100 sts on needle.
P 1 row from WS while AT THE SAME TIME dec 6-6-10-18-30-46 sts evenly = approx. 48-48-52-52-54-54 sts remain on needle. Cast off.

BAND + NECK EDGE:
Slip the 5 band sts from stitch holder on right band back on needle size 5.5 mm. Continue in garter st back and forth over these 5 sts. Work until neck edge measures approx. 9-11 cm from where sts were slipped back on needle (place neck edge towards neckline on garment mid back, lightly pull it and make sure that it fits the measurements), then cast off. Repeat along left band. Sew seam mid back inside cast-off edge (seam should be in towards WS on garment).
Sew neck edge to neck line inside 1 edge st on back piece so that neck edge lies nicely against neck line.
Sew the opening under the sleeves. Sew on buttons.

Diagram

diagram measurements

Each of our patterns has specific tutorial videos to help you.

Do you have a question? See a list of frequently asked questions (FAQ)

Knitting tension is what determines the final measurements of your work, and is usually measured per 10 x 10 cm. It is provided like so: number of stitches in width x number of rows in height - eg: 19 stitches x 26 rows = 10 x 10 cm.

The knitting tension is very individual; some people knit/crochet loosely while others work tightly. You adjust the knitting tension with the needle size, which is why the suggested needle size is only meant as a guide! You need to adjust this (up or down) to ensure that YOUR knitting tension matches the knitting tension provided in the pattern. If you work with a different knitting tension than provided you will have a different yarn consumption, and your work will have different measurements than what the pattern suggests.

The knitting tension also determines which yarns can replace each other. As long as you achieve the same knitting tension you can replace one yarn with another.

See DROPS lesson: How to measure your tension/gauge

See DROPS video: How to make a gauge tension swatch

The required amount of yarn is provided in grams, eg: 450 g. To calculate how many balls you’ll need you first need to know how many grams are in 1 ball (25g, 50g or 100g). This information is available if you click on the individual yarn quality on our pages. Divide the amount required with the amount of each ball. For example, if each ball is 50g (the most common amount), the calculation will be as follows: 450 / 50 = 9 balls.

The important thing when changing from one yarn to another is that the knitting/crochet tension remains the same. This is so that the measurements of the finished piece will be the same as on the sketch provided. It is easier to achieve the same knitting tension using yarns from the same yarn group. It is also possible to work with multiple strands of a thinner yarn to achieve the knitting tension of a thicker one. Please try our yarn converter. We recommend you to always work a test swatch.

Please NOTE: when changing yarn the garment might have a different look and feel to the garment in the photo, due to individual properties and qualities of each yarn.

See DROPS lesson: Can I use a different yarn than the one mentioned in the pattern?

All our yarns are categorised into yarn groups (from A to F) according to thickness and knitting tension – group A contains the thinnest yarns and group F the thickest. This makes it easier for you to find alternative yarns to our patterns, should you wish to switch yarn. All yarns within the same group have a similar knitting tension and can easily replace each other. However, different yarn qualities have different structures and properties which will give the finished work a unique look and feel.

Click here for an overview of the yarns in each yarn group

At the top of all our patterns you’ll find a link to our yarn calculator, which is a helpful tool should you wish to use a different yarn than suggested. By filling in the yarn quality you wish to replace, the amount (in your size) and number of strands, the calculator will present good alternative yarns with the same knitting tension. Additionally it will tell you how much you’ll require in the new qualities and whether you’ll need to work with multiple strands. Most skeins are 50g (some are 25g or 100g).

If the pattern is worked with multiple colours, every colour will have to be calculated separately. Similarly, if the pattern is worked with several strands of different yarns (for example 1 strand Alpaca and 1 strand Kid-Silk) you will have to find alternatives for each, individually.

Click here to see our yarn calculator

Since different yarns have different qualities and textures we have chosen to keep the original yarn in our patterns. However, you can easily find options among our available qualities by using our yarn calculator, or simply pick a yarn from the same yarn group.

It is possible that some retailers still have discontinued yarns in stock, or that someone has a few skeins at home that they would like to find patterns for.

The yarn calculator will provide both alternative yarn as well as required amount in the new quality.

If you think it's hard to decide what size to make, it can be a good idea to measure a garment you own already and like the size of. Then you can pick the size by comparing those measures with the ones available in the pattern's size chart.

You'll find the size chart at the bottom of the pattern.

See DROPS lesson: How to read size chart

The needle size provided in the pattern serves only as a guide, the important thing is to follow the knitting tension. And since knitting tension is very individual, you will have to adjust the needle size to ensure that YOUR tension is the same as in the pattern – maybe you’ll have to adjust 1, or even 2 needle sizes, up or down to achieve the correct tension. For this, we recommend that you work test swatches.

Should you work with a different knitting tension than the one provided, the measurements of the finished garment might deviate from the measurement sketch.

See DROPS lesson: How to measure your tension/gauge

See DROPS video: How to make a tension/gauge swatch

Working a garment top-down provides more flexibility and room for personal adjustment. For example it is easier to try the garment on while working, as well as making adjustments to length of yoke and shoulder caps.

The instructions are carefully explaining every step, in the correct order. Diagrams are adjusted to the knitting direction and are worked as usual.

The diagram depicts all rows/rounds, and every stitch seen from the right side. It is read from bottom to top, from right to left. 1 square = 1 stitch.

When working back and forth, every other row is worked from the right side and every other row is worked from the wrong side. When working from the wrong side, the diagram will have to be worked reversed: from left to right, knit stitches are purled, purl stitches are knit etc.

When working in the round every round is worked from the right side and the diagram are worked from right to left on all rounds.

See DROPS lesson: How to read knitting diagrams

The diagram depicts all rows/rounds, and every stitch seen from the right side. It is worked from bottom to top, from right to left.

When working back and forth every other row is worked from the right side: from right to left and every other row is worked from the wrong side: from left to right.

When working in the round, every row in the diagram are worked from the right side, from right to left.

When working a circular diagram you start in the middle and work your way outwards, counter clockwise, row by row.

The rows usually start with a given number of chain stitches (equivalent to the height of the following stitch), this will either be depicted in the diagram or explained in the pattern.

See DROPS lesson: How to read crochet diagrams

Instructions for working several diagrams after each other on the same row/round, will often be written like so: “work A.1, A.2, A.3 a total of 0-0-2-3-4 times". This means you work A.1 once, then A.2 is worked once, and A.3 is repeated (in width) the number of times provided for your size – in this case like so: S = 0 times, M = 0 times, L=2 times, XL= 3 times and XXL = 4 times.

The diagrams are worked as usual: begin with the first row in A.1, then work the first row in A.2 etc.

See DROPS lesson: How to read knitting diagrams

See DROPS lesson: How to read crochet diagrams

The total width of the garment (from wrist-to-wrist) will be larger in the larger sizes, despite the actual sleeves being shorter. The larger sizes have longer sleeve caps and wider shoulders, so there will be a good fit in all sizes.

The measurement sketch/schematic drawing provides information regarding the full length of the garment. If it’s a jumper or a jacket the length is measured from the highest point on the shoulder closest to the neckline, and straight down to the bottom of the garment. It is NOT measured from the tip of shoulder. Similarly, the length of yoke is measured from the highest point on the shoulder and down to where yoke is split into body and sleeves.

On a jacket measures are never taken along bands, unless specifically stated. Always measure inside band stitches when measuring the length.

See DROPS lesson: How to read a schematic drawing

Diagrams are often repeated on the round or in height. 1 repeat is the diagram the way it appears in the pattern. If it says to work 5 repeats of A.1 in the round, then you work A.1 a total of 5 times after/next to each other in the round. If it says to work 2 repeats of A.1 vertically/in height you work the entire diagram once, then begin again at the start and work the entire diagram one more time.

Chain stitches are slightly narrower than other stitches and to avoid working the cast-on edge too tight, we simply chain more stitches to begin with. The stitch count will be adjusted on the following row to fit the pattern and measurement sketch.

The rib edge is more elastic and will contract slightly compared to, for example, stocking stitch. By increasing before the rib edge, you avoid a visible difference in width between the rib edge and the rest of the body.

It’s very easy to cast off too tightly, and by making yarn overs while casting off (and simultaneously casting these off) you avoid a too tight cast off edge.

See DROPS video: How to bind off with yarn overs (yo)

To achieve an even increase (or decrease) you can increase on, for example: every 3rd and 4th row alternately, like so: work 2 rows and increase on the 3rd row, work 3 rows and increase on the 4th. Repeat this until the increase is complete.

See DROPS lesson: Increase or decrease 1 st on every 3rd and 4th row alternately

Should you prefer to work in the round instead of back and forth, you may of course adjust the pattern. You’ll need to add steeks mid-front (usually 5 stitches), and follow the instructions. When you would normally turn and work from the wrong side, simply work across the steek and continue in the round. At the end you’ll cut the piece open, pick up stitches to work bands, and cover the cut edges.

See DROPS video: How to knit steeks and cut open

Should you prefer to work back and forth instead of in the round, you may of course adjust the pattern so you work the pieces separately and then assemble them at the end. Divide the stitches for the body in 2, add 1 edge stitch in each side (for sewing) and work the front and back pieces separately.

See DROPS lesson: Can I adapt a pattern for circular needles into straight needles?

Pattern repeats can vary slightly in the different sizes, in order to get the correct proportions. If you’re not working the exact same size as the garment in the photo, yours might deviate slightly. This has been carefully developed and adjusted so that the complete impression of the garment is the same in all sizes.

Make sure to follow instructions and diagrams for your size!

If you have found a pattern you like which is available in women’s size it’s not very difficult to convert it to men’s size. The biggest difference will be the length of sleeves and body. Start working on the women size that you think would fit across the chest. The additional length will be worked right before you cast off for the armhole/sleeve cap. If the pattern is worked top-down you can add the length right after the armhole or before the first decrease on sleeve.

Regarding additional yarn amount, this will depend on how much length you add, but it is better with a skein too many than too few.

All yarns will have excess fibres (from production) that might come off as lint or shedding. Brushed yarns (ie hairier yarns) have more of these loose, excess fibres, causing more shedding.

Shedding also depends on what is worn under or over the garment, and whether this pulls at the yarn fibres. It’s therefore not possible to guarantee that there will be no shedding

Below are some tips on how to get the best result when working with hairier yarns:

1. When the garment is finished (before you wash it) shake it vigorously so the looser hairs come off. NOTE: do NOT use a lint roller, brush or any method that pulls at the yarn.

2. Place the garment in a plastic bag and put it in your freezer - the temperature will cause the fibres to become less attached to each other, and excess fibres will come off easier.

3. Leave in the freezer for a few hours before taking it out and shaking it again.

4. Wash the garment according to the instructions on the yarn label.

Pilling is a natural process that happens to even the most exclusive of fibers. It's a natural sign of wear and tear that is hard to avoid, and that is most visible in high friction areas of your garment like a sweater's arms and cuffs.

You can make your garment look as new by removing the pilling, using a fabric comb or a pill/lint remover.

Still can't find the answer you need? Then scroll down and leave your question so one of our experts can try to help you. This will be done normally within 5 to 10 working days.
In the meantime, you can read the questions and answers that others have left to this pattern or join the DROPS Workshop on Facebook to get help from fellow knitters/crocheters!

You might also like...

Post a comment to pattern DROPS 153-35

We would love to hear what you have to say about this pattern!

If you want to leave a question, please make sure you select the correct category in the form below, to speed up the answering process. Required fields are marked *.

Comments / Questions (41)

country flag Ewa Johansson wrote:

Förstår inte Minskningstips 1. Det finns ju två varianter. Hur ska man använda de? Kommer inte vidare.

14.04.2024 - 09:26

DROPS Design answered:

Hei Ewa. Det er forklart i oppskriften når og hvor Minskningstips skal brukes. Det andre under Minskningstips-1 finner du midt i avsnittet under OK (PÅ ÄRMEN: Minska i varje sida av ärmen på varje v från rätsidan 1 m 7-12-13-15-16-16 ggr, sedan 2 m 11-9-9-8-8-9 ggr.). mvh DROPS Design

15.04.2024 - 13:55

country flag Lieve Verbeeck wrote:

Kan ik de mouwen apart breien? en ze niet samen op de rondbreinaald zetten van het lijf? Dat lijkt me makkelijker?

11.04.2024 - 14:31

DROPS Design answered:

Dag Lieve,

Dan zou je de mouwen en de panden bij de raglanlijn aan elkaar moeten zetten en achteraf de biezen eraan moeten breien. Het is denk ik makkelijker om ze in een keer te breien, dan heb je ook geen naden bij de raglanlijnen.

11.04.2024 - 20:24

country flag Inés Arenas wrote:

Me estoy encontrando con problemas para saber como debo hacer el canes y el menguado. No entiendo la explicación, creo que no está bien explicado y además como no hay foto de la espalda no se si también tengo que menguar. Sería muy aclaratorio tener la foto de la espalda y especificar más el inicio de los menguado. Me resulta bast1nte incomprensible. Me pueden ayudar en todo esto?. Muchas gracias por su atención. Soy una asidua de su web que me encanta.

01.06.2023 - 12:27

DROPS Design answered:

Hola Inés, no tenemos más fotos que las que están online. Para las disminuciones del canesú, ten en cuenta el TIP-1 PARA LAS DISMINUCIONES. Las disminuciones se trabajan tanto en la espalda como en el delantero a no ser que se indique que sólo se trabaja en el centro del delantero. El TIP-1 te indica dónde se sitúan las disminuciones, tanto cuando disminuyes 1 pt en cada pieza como cuando disminuyes 1 pt en la espalda y el delantero y 2 pts en las mangas. Posteriormente usarás el TIP-2 PARA LAS DISMINUCIONES para disminuir en el escote del delantero.

04.06.2023 - 19:35

country flag Marguerite wrote:

After the last buttonhole plus two rows, the pattern calls for knitting short rows. Instructions for the next two rows: first row (RS) work short row and then work to end of piece then turn piece and on this row (WS) work second short row then work to end of row. Is this a correct interpretation of how to work the short rows and is this the end of doing short rows? Thank you.

13.06.2022 - 05:14

DROPS Design answered:

Dear Marguerite, correct, the short rows will be worked that way on both sides of the jacket, and this will be worked only one time, ie don't repeat these short rows. Happy knitting!

13.06.2022 - 11:33

country flag Paola wrote:

Non riesco a capire le spiegazioni riguardanti il SUGGERIMENTO PER LE DIMINUZIONI 1: quando devo seguire le indicazioni: “Diminuire 1 m sul davanti/dietro e 1 m a ogni lato della manica come segue: Iniziare 5 m prima del 1°, 3°, 5° e 7° segnapunti: ..... e quando devo seguire le indicazioni: “Diminuire 1 m sul davanti/dietro e 2 m a ogni lato della manica come segue: Iniziare 5 m prima del 1° e 5° segnapunti: …. Non riesco a capire questa differenza

07.09.2021 - 15:59

DROPS Design answered:

Buonasera Paola, nel testo è indicato quando diminuire 1 maglia a ogni lato della manica e quando diminuire 2 maglie. Buon lavoro!

11.09.2021 - 00:30

country flag Suzy wrote:

Bonjour et merci pour ce modèle sympathique pour l'été. Par contre je ne comprends pas l'explication du point structuré, 1m endroit 1m envers ça donne des côtes et ce n'est pas ce que montre le modèle. J'ai oublié une boutonnière, l'avant dernière, avez-vous une astuce pour ne pas défaire plusieurs rangs ?

08.07.2021 - 10:07

DROPS Design answered:

Bonjour Suzy, vous pouvez essayer de défaire juste ces quelques mailles sur le nombre de rangs concernés et ne retricoter ainsi que les mailles de la bordure devant. Le point texturé consiste en des côtes 1 maille jersey, 1 maille point mousse (tricoté en rond, au début des manches, vous allez tricoter: 1 tour endroit (= jersey), 1 tour en alternant 1 m end/1 m env.). Bon tricot!

08.07.2021 - 13:33

country flag Lena wrote:

Jag har börjat på oket och läser att jag följa Minskningstips 1. Där är det två stycken med två olika minskninstips. Hur gör jag här? Följer jag det första stycket och sen det andra...och sen? Eller hur gör jag? Sen funderar jag på varvet efter minskningen. Jag gör miskningar på rätsidan och sen stickas omslagen i rätstickning på avigsidan. Har jag förstått det rätt.

18.02.2021 - 18:18

country flag Gail Gomez wrote:

I'm getting ready to knit the Yoke. The body finished on the RS. Should I just P to bound off region and slip the sleeve on that area? Then?? Do I K(in pattern) around the sleeve at this time and then on the next row across insert the markers? I've already taken this apart once. Thanks in advance.

21.01.2021 - 23:10

DROPS Design answered:

Hi Gail, You place the sleeves on the same needle as the body, without working the stitches - where you cast off stitches for the armholes. Then you begin the first row from the right side and insert the markers, in the transitions between the sleeves and the body as you go. You are working both stocking stitch and textured pattern as before on this row. Hope this helps and happy knitting!

22.01.2021 - 07:58

country flag Bibiana Benvenuto wrote:

I would like to knit this pattern, instead of short sleeve I like to finish it with long sleeves . Could you help me? I’m using Bomuli yarn. Thank you.

20.01.2021 - 23:48

DROPS Design answered:

Dear Mrs Benvenuto, you can take inspiration from our pattern for raglan and long sleeves with the same tension. Happy knitting!

21.01.2021 - 08:07

country flag Christine wrote:

Hej! Jag kan inte lista ut hur jag ska sätta markeringarna på oket:\r\nSticka 5rm och sedan 27m markera och sticka 1r\r\nVilken ska markeras och vilken ska stickas rät varvet ut?

16.08.2018 - 15:44

DROPS Design answered:

Hej, du ska sticka så här: 5 maskor rätstickning, 27 maskor slätstickning, sedan sätter du märket mellan 2 maskor, stickar 1 rät maska och sätter följande märke mellan 2 maskor, osv.

20.08.2018 - 17:53