
Popular categories
Looking for a yarn?


Comments / Questions (90)
![]() Sarah wrote:
Sarah wrote:
Hi, ich noch mal. Danke für die letzte Antwort... eine Frage hätte ich noch. Strickt man A5 wirklich 6x in der Höhe? Auf der Abbildung sieht es anders aus... als wären es nur 4x.. dann käme ich natürlich auch nicht auf die Maschenzahl von 325... PS. Die Angabe der Spitzen passt glaube ich nicht. Sind 45
23.10.2025 - 09:35DROPS Design answered:
Liebe Sarah, stricken Sie auf jeden Fall die benötigten Rapporte, um die Maschenzahl zu erreichen, auch wenn es auf dem Foto anders wirkt. Was die Zahl der Spitzen ergibt, müssten es rechnerisch tatsächlich 45 sein, das wird dann noch mal geprüft und ggf. geändert. Viel Spaß beim Weiterstricken!
23.10.2025 - 09:48
![]() Sarah wrote:
Sarah wrote:
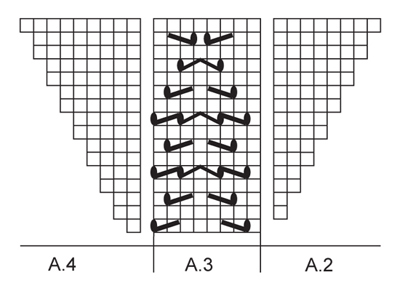
Hey, ich hab das Diagramm A1 fertig und komme auch auf die angegebene M Zahl... Nun A2/A3/A4/ Meine Frage: stricke ich nach A4, Umschlag, Mittel-M, Umschlag, A4 ... wieder bin rechts nach links nach A3? Weil es dann doch nicht symmetrisch ist oder?
13.10.2025 - 20:13DROPS Design answered:
Liebe Sarah, Sie stricken A2, A3 bis noch 1 M vor der Mittel-Masche übrig ist, über diese Masche stricken Sie A.4. Dann kommt der Umschlag, Mittel-M, Umschlag, dann beginnen Sie wieder mit A.2 (in der ersten Reihe hat A.2 keine Masche, daher kommt direkt A.3), stricken A.3 und ganz am Ende A.4. Das Muster wird insgesamt symmetrisch. Gutes Gelingen weiterhin!
21.10.2025 - 21:53
![]() Wanda Burns wrote:
Wanda Burns wrote:
I am ready to start the border on 153-2. The pattern instructions say to add 14 stitches from the wrong side. Would you recommend the "cast on with loops" that is shown in the video provided? In order to do the cable cast on wouldn't we need to turn the work? Thanks so much for the clarification.
16.12.2022 - 00:59DROPS Design answered:
Dear Mrs Burns, you can use any technique to cast on these new 14 sts as long as they are on the correct place on the piece so that you can work together at the end of every row from right side the last stitch of edge with the next stitch of the shawl. Happy knitting!
16.12.2022 - 08:36
![]() Inge wrote:
Inge wrote:
Hi, I have got to the part where you have 197 stiches and have to do A2-A3-A4. It says repeat on the other side of the mid stitch. Does this imply that you do A4-A3 repeats-A2? or A2-A3 repeats? I did the latter. Somehow neither option appears to be symmetrical
06.09.2022 - 15:13DROPS Design answered:
Dear Inge, you will work on each side of the middle stitch the same way: A.2 x 1 time, repeat A.3 and work A.4 x 1 time (A.2 and A.4 are both stocking stitches) so that you will increase as before on each side of shawl + on each side of the middle stitch and work the new sts in stocking stitch (= as shown in A.2 and A.4). Happy knitting!
06.09.2022 - 16:25
![]() Sandra wrote:
Sandra wrote:
Danke, aber nein. Ich meine die beiden Absätze vor "BORDÜRE:". Es soll zuletzt eine Rück-R re gestrickt werden und somit ist die nächste R eine Hin-R wenn mit der Bordüre begonnen wird. So kann man die Bordüre nicht richtig anstricken. Egal, ich habe es für mich angepasst und bin sonst mit der Anleitung sehr zufrieden. Danke für die vielen Anleitungen und schöne Grüße.
06.10.2021 - 23:02DROPS Design answered:
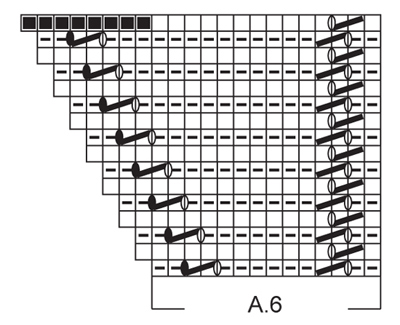
Liebe Sandra, die letzte Reihe über die 360 Maschen ist ja eine Rückreihe, am Ende dieser Reihe schlagen Sie 14 neuen Maschen (= Bordüre = A.6), wenden Sie und stricken Sie die 14 M rechts = Hinreihe, wenden Sie und jetzt stricken Sie bei der nächsten Rückreihe die 1. Reihe in A.6 (lesen Sie von links nach rechts), und so weiter stricken, bei der nächsten Reihe = Hinreihe stricken sie die letzten Masche von A.6 zs mit der nächsten M vom Tuch, usw. Kan es Ihnen helfen?
07.10.2021 - 08:40
![]() Sandra wrote:
Sandra wrote:
Danke, aber irgendwie stimmt in der Anleitung etwas nicht. Nach 6 x A.5 soll eine Hinreihe mit Umschlägen und dann eine Rück-R re gestickt werden. Also bin ich dann am re Rand am Beginn einer neuen Hin-R. Wie soll ich dann am Ende der Reihe nach 14 M Neuanschlag mit der Rück-R von A.6 anfangen. Ich habe jetzt noch eine Hin-R re gestrickt und komme so hin. Es sieht jetzt auch richtig und gut aus. Zum Glück bin ich eine erfahrene Strickerin. Die Anleitung verwirrt etwas.
06.10.2021 - 07:34DROPS Design answered:
Liebe Sandra, meinen Sie A.6 anstatt A.5? A.6 wird jedesmal wie zuvor gestrickt: es sind 360 M am Ende vom Tuch und 8 Hin-Reihen in A.6 wo Sie A.6 und Tuch zusammen stricken = 45 Spitzen insgesamt. Kan das Ihnen helfen?
06.10.2021 - 07:48
![]() Sandra wrote:
Sandra wrote:
Hallo, nun bin ich bei der Bordüre. Beginnen soll ich die Bordüre an der rechten Ecke des Tuches. Auf der Abbildung ist die Bordüre aber zweifelsfrei ab dem linken Rand gestickt, da das Lochmuster der Spitze entsprechend verläuft. Was passt nun? Mit dem Stricken ab der rechten Ecke wird auch die Abnahmelinie nach den Umschlägen in jeder Reihe (Lochreihe) sehr unschön, da die linke Seite zu sehen ist. Vielen Dank
05.10.2021 - 09:11DROPS Design answered:
Liebe Sandra, die 1. Reihe von A.6 ist eine Rückreihe, die Bordüre wird zusammen mit dem Tuch am Ende den Hinreihen gestrickt, vielleicht kann Ihnen dieses Video helfen?
06.10.2021 - 07:16
![]() Sandra Witte wrote:
Sandra Witte wrote:
Negeer mijn vorige vraag maar, ik heb het al ontdekt! De omslagdoek wordt van boven naar beneden gebreid en ik dacht van onder naar boven. Foutje van mij :-)
24.10.2020 - 13:52DROPS Design answered:
Dag Sandra,
Mooi dat het opgelost is en dat je nu verder kan. Dankjewel voor de terugkoppeling en veel breiplezier!
25.10.2020 - 19:10
![]() Sandra Witte wrote:
Sandra Witte wrote:
Als het eerste deel van het patroon is gebreid, moet je toch eerst dit aflaten en dan de steken langs de zijkanten opnemen? Dit staat niet in de beschrijving.
24.10.2020 - 13:25
![]() Carolyn Bremner wrote:
Carolyn Bremner wrote:
Butterfly Dance Shawl: Under the section titled "INC REPETITION" it says Every time inc repetition has been worked, piece inc 8 sts. Should that not be 4 stitches as you drop the second loop off when knitting from the wrong side?
01.04.2019 - 20:22DROPS Design answered:
Dear Mrs Brenner, on row 1 and 3 you are increasing 4 stitches with a double yarn over: make 1 double yarn over after the first stitch, 1 double yarn over before the middle stitch, 1 double yarn over after the middle stitch, and 1 double yarn over before the last stitch = 4 double yarn overs = 4 stitches increased on row 1 + 4 stitches increased on row 3 = 8 stitches have been increased after these 4 rows have been worked. Happy knitting!
02.04.2019 - 09:55
|
|||||||||||||||||||||||||
Butterfly Dance#butterflydanceshawl |
|||||||||||||||||||||||||
|
|
|||||||||||||||||||||||||
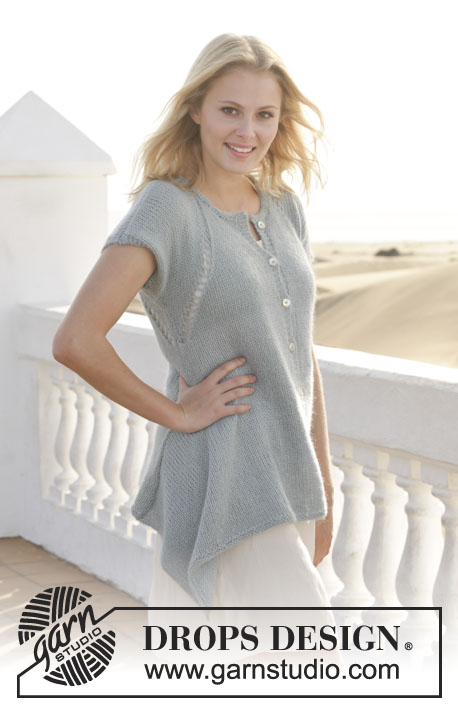
Knitted DROPS shawl in garter st with lace pattern in ”Alpaca”.
DROPS 153-2 |
|||||||||||||||||||||||||
|
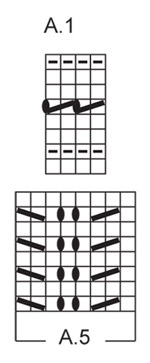
GARTER ST (back and forth on needle): K all rows. 1 ridge = K2 rows. PATTERN: See diagrams A.1 to A.6. The diagrams show all rows in pattern seen from RS. INC REPETITION: Inc on every row from RS as follows with double YO: Row 1: Inc with double YO inside 1 edge st in each side of shawl and on each side of mid st. Row 2: K all sts, K first YO to make a hole, drop the second off the needle. Row 3: Inc with double YO inside 1 edge st in each side of shawl and on each side of mid st. Row 4: K all sts, K first YO to make a hole, drop the second off the needle. Every time inc repetition has been worked, piece inc 8 sts. ---------------------------------------------------------- SHAWL: Cast on 3 sts on circular needle size 3.5 mm / US 4 with Alpaca. Insert a marker in the 2nd st = mid st. Work first row as follows: K 1, 1 YO, K 1, 1 YO, and K 1, turn and K = 5 sts on needle. Continue in GARTER ST - see explanation above AT THE SAME TIME work INC REPETITION (work this the entire shawl) – see explanation above, until inc repetition has been worked 22 times and there are 44 holes upwards on each side of mid st = 181 sts on needle. No of sts can now be divided by 8 + 5. Then work diagram A.1 (work inc as before and edge and mid st in garter st). On row in diagram with K 2 tog and YO work until 1 st remains before mid st, K 1, mid st and inc as before on each side of this, K 1 and continue with diagram A.1. Then work according to diagram A.2, A.3 and A.4 as follows: Work edge st and YO as before, work A.2 (NOTE! No sts to work in A.2 on first row of diagram), repeat A.3 until 1 st remains before mid st, work A.4 over this st, YO and mid st as before. Repeat on the other side of shawl. Continue working according to A.2, A.3 and A.4 this way. When diagram has been worked 1 time vertically, there are 197 sts on needle. Now replace diagram A.3 with diagram A.5, inc have been made to fit 2 extra repetitions of A.5 on each side of shawl. Work according to diagram A.2, A.5 and A.4 and work more repetitions of A.5 when they fit. Continue like this until A.5 has been worked 6 times in total vertically. There are now 325 sts on needle and no of sts is still divisible by 8 + 5. On next row from RS work without inc repetition as follows: K 2 in first st, then * K 4, 1 yo *, repeat *-* 8 times, K 97, repeat *-* 8 times. K 2 in middle st, repeat *-* 8 times, K 97, repeat *-* 8 times and end with K 2 in last st = 360 sts on needle, st no can be divided by 8. K 1 row from WS, K YOs from previous row twisted to avoid holes. Then work the edge on shawl. EDGE: Do not turn piece, but cast on 14 new sts for shawl edge from WS. Turn piece, K 1 row over the 14 new sts. Turn piece. Then work according to diagram A.6 over these sts from WS (1st row in diagram = WS). NOTE! On every row from RS work last st tog with next free st from shawl – this way the shawl edge is worked tog and fastened on shawl. On next row slip 1st st as if to P. Continue working A.6 along the entire edge of shawl = 43 tips along edge. Cut and fasten the yarn. |
|||||||||||||||||||||||||
Diagram explanations |
|||||||||||||||||||||||||
|
|||||||||||||||||||||||||
 |
|||||||||||||||||||||||||
 |
|||||||||||||||||||||||||
 |
|||||||||||||||||||||||||
Have you finished this pattern?Tag your pictures with #dropspattern #butterflydanceshawl or submit them to the #dropsfan gallery. Do you need help with this pattern?You'll find 17 tutorial videos, a Comments/Questions area and more by visiting the pattern on garnstudio.com. © 1982-2026 DROPS Design A/S. We reserve all rights. This document, including all its sub-sections, has copyrights. Read more about what you can do with our patterns at the bottom of each pattern on our site. |
|||||||||||||||||||||||||


With over 40 years in knitting and crochet design, DROPS Design offers one of the most extensive collections of free patterns on the internet - translated to 17 languages. As of today we count 324 catalogs and 12290 patterns - 12280 of which are translated into English (US/in).
We work hard to bring you the best knitting and crochet have to offer, inspiration and advice as well as great quality yarns at incredible prices! Would you like to use our patterns for other than personal use? You can read what you are allowed to do in the Copyright text at the bottom of all our patterns. Happy crafting!
Post a comment to pattern DROPS 153-2
We would love to hear what you have to say about this pattern!
If you want to leave a question, please make sure you select the correct category in the form below, to speed up the answering process. Required fields are marked *.