
Popular categories
Looking for a yarn?


Comments / Questions (20)
![]() Lene Steenberg Nielsen wrote:
Lene Steenberg Nielsen wrote:
Jeg strikker str. L, og der er da slet ingen logik i mønster A2, og den måde det jf beskrivelsen strikkes... Nu sidder jeg her og kan enten fortsætte med et mønster der ikke er ens på de to forstykker - uacceptabelt! - eller trævle hele molevitten op, og selv regne på tingene, for at få det til at passe. Heller ikke acceptabelt!
23.04.2021 - 20:59DROPS Design answered:
Hej Lene, jo A.2 stemmer hele vejen rundt, på første pind i A.2 tager du ind fra 10 til 8 masker for hver gang du strikker diagrammet. Husk den første retmaske inden du strikker diagrammet, så bliver selve hulmønsteret ens i begge sider mod midt foran. God fornøjelse!
28.04.2021 - 16:03
![]() Inger Boel Johansen wrote:
Inger Boel Johansen wrote:
Tusen takk for mønster på den flott jakken. Akkurat ferdig med en versjon i marineblå. Veldig fornøyd med både garn og mønster. Hilsen Inger
09.08.2020 - 21:29
![]() Eva wrote:
Eva wrote:
Tror det er feil i mønsteret. Jeg strikker str XL og når jeg skal begynne på mønster A8 får jeg det ikke til å stemme at jeg skal begynne der det er markert. Det stemmer hvis jeg begynner ved merket for de to større størrelsene. Det står at nest siste knapphull skal strikkes når arb måler 59 cm, samtidig står det at når A7/A8 er ferdig måler arb 62 cm og det mangler 2 knapphull, men det skal bare være ett når arb måler 67 cm. Hva er riktig?
02.11.2018 - 13:43
![]() Francine wrote:
Francine wrote:
I am try to make sense of the yoke. I did a grid to follow the row (a3,5,7,9 with a4,6,8,10), as I did with all pattern, and it do not work. Worse with the correction nothing fit. I am knitting size M. May be the correction are for an other size. Help!
22.04.2017 - 23:33DROPS Design answered:
Dear Francine, you first work A.3(= 19 sts), 13 sts in st st (=10 rows), then A.5 (= 19 sts), A.4 (= 13 sts) (= 10 rows), then work A.5 (= 19 sts), A.6 (= 12 sts) as follows: Work A.5 a total of 2 times in height = 20 rows while A.6 is 8 rows only, ie when A.6 has been worked 1 time in height, repeat from 1st row, and when A.6 has been worked 2 times in height, work the first 4 rows = 20 rows in A.6. Happy knitting!
24.04.2017 - 09:46
![]() Rosa wrote:
Rosa wrote:
Den ser dejlig ud, jeg har købt garn og skal snart i gang med at strikke den.
25.04.2014 - 16:14
![]() Lucy Lupusella wrote:
Lucy Lupusella wrote:
I want to use straight needles for this pattern NOT circular.Can you please adj pattern for straight needles.thankyou
04.04.2014 - 19:12DROPS Design answered:
Dear Mrs Lupusella, body is worked back and forth on circular needle to get enough room for all sts - so that you can work on straight needle - your sts may be tighter, take care to keep tension. For sleeves, cast on 2 sts more for seam and work back and forth as stated (inc each side instead of marker). Happy knitting!
05.04.2014 - 09:39
![]() Diana wrote:
Diana wrote:
Meget elegant
23.06.2013 - 12:49
![]() Anita wrote:
Anita wrote:
Mooi model maar ik zou de hals iets lager/wijder maken
20.06.2013 - 09:05
![]() Alvhild wrote:
Alvhild wrote:
Kjempefin jakke. Denne har jeg lyst til å strikke
18.06.2013 - 22:15
![]() Atty Van Nifterik wrote:
Atty Van Nifterik wrote:
Mooi model wil ik voor de winter wel maken
18.06.2013 - 14:53
|
|||||||||||||||||||||||||
Lady Feather Jacket#ladyfeatherjacket |
|||||||||||||||||||||||||
|
|
|||||||||||||||||||||||||
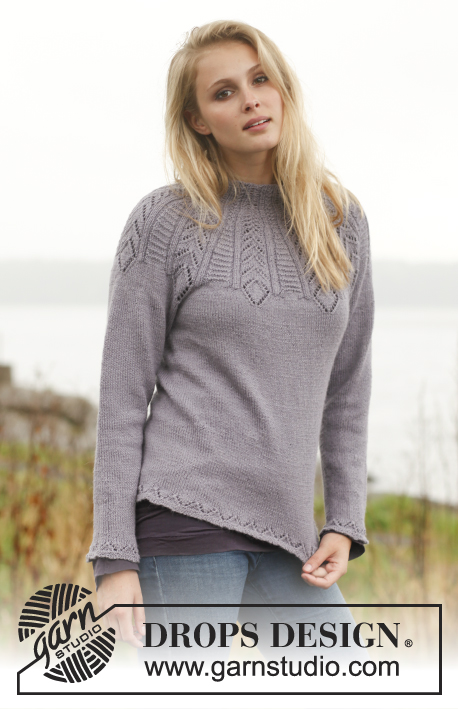
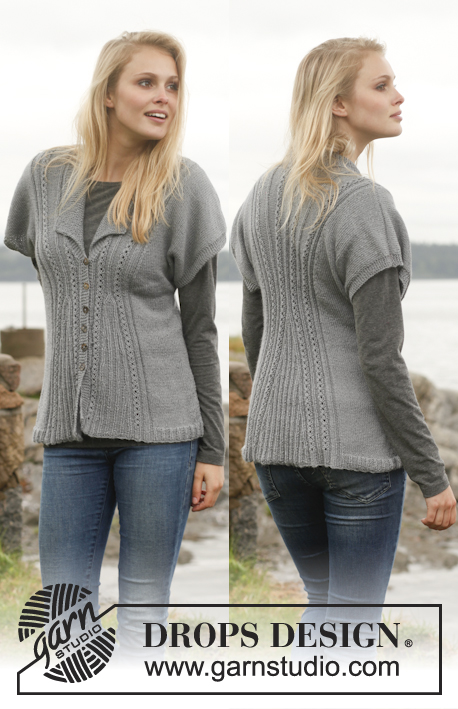
Knitted DROPS jacket with lace pattern and round yoke in ”BabyAlpaca Silk”. Size S - XXXL
DROPS 149-30 |
|||||||||||||||||||||||||
|
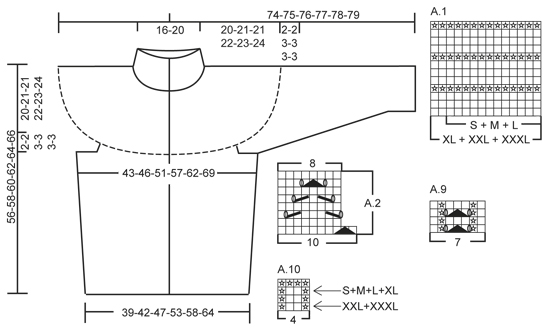
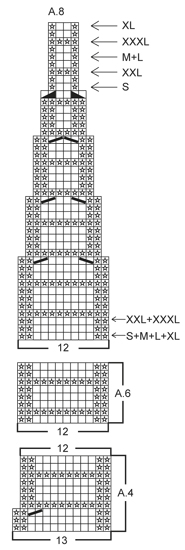
GARTER ST (back and forth on circular needle): K all rows. 1 ridge = K 2 rows. GARTER ST (in the round on double pointed needles): * K 1 round and P 1 round *, repeat from *-*. 1 ridge = 2 rounds. PATTERN: See diagrams A.1 to A.10. The diagrams show all rows in pattern seen from RS. BUTTONHOLES: Dec for buttonholes on right band. 1 buttonhole = K tog second and third st from edge and make 1 YO. Dec for buttonholes when piece measures: SIZE S: 3, 11, 19, 27, 35, 43, 51, 56 and 61 cm / 1⅛", 4⅜", 7½", 10⅝", 13 ¾", 17", 20", 22" and 24" SIZE M: 3, 11, 19, 27, 35, 43, 51, 57 and 63 cm / 1⅛", 4⅜", 7½", 10⅝", 13 ¾", 17", 20", 22½" and 24¾". SIZE L: 3, 11, 19, 27, 35, 43, 51, 58 and 65 cm / 1⅛", 4⅜", 7½", 10⅝", 13 ¾", 17", 20", 22¾" and 25½". SIZE XL: 3, 11, 19, 27, 35, 43, 51, 59 and 67 cm / 1⅛", 4⅜", 7½", 10⅝", 13 ¾", 17", 20", 23¼" and 26⅜". SIZE XXL: 3, 11, 19, 27, 35, 43, 51, 59, 64 and 69 cm / 1⅛", 4⅜", 7½", 10⅝", 13 ¾", 17", 20", 23¼", 25 ¼" and 27⅛". SIZE XXXL: 3, 11, 19, 27, 35, 43, 51, 59, 65 and 71 cm / 1⅛", 4⅜", 7½", 10⅝", 13 ¾", 17", 20", 23¼", 25½" and 28". DECREASE TIP: Dec for raglan in every transition between sleeves and body. All dec are done from RS. Beg 3 sts before marker and dec as follows: K 2 tog, K 2 (marker is between these 2 sts), slip 1 st as if to K, K 1, psso. ---------------------------------------------------------- JACKET: Worked back and forth on circular needle from mid front. Cast on 235-255-285-319-349-389 sts (includes 5 band sts in each side towards mid front) on 2 circular needles size 3 mm / US 2.5 with BabyAlpaca Silk. Pull out one circular needle and then work 2 ridges in GARTER ST – see explanation above (this is done to avoid a tight edge in garter st when working pattern later). Work next row as follows from RS: 5 band sts in garter st, work A.1 (= 12-12-12-14-14-14 sts), 1 st in stockinette st, work A.2 until 17-17-17-19-19-19 sts remain on row, finish with A.1 (= 12-12-12-14-14-14 sts) and 5 band sts in garter st. Continue the pattern like this. When A.2 has been worked 1 time vertically, there are 195-211-235-263-287-319 sts on needle. Then work in stockinette st but work the outermost 17-17-17-19-19-19 sts in each side as before (i.e. 5 band sts in garter st + A.1). REMEMBER THE KNITTING GAUGE and REMEMBER BUTTONHOLES on right band - see explanation above. When piece measures 8 cm / 3", insert 1 marker 51-55-61-68-74-83 sts in from each side = 93-101-113-127-139-153 sts between markers on back piece. Now inc 1 st on each side of both markers (= 4 sts inc). Repeat inc every 6-6-6-6-7-7 cm / 2⅜"-2⅜"-2⅜"-2⅜"-2¾"-2¾" 4 more times (= 5 inc in total in each side) = 215-231-255-283-307-339 sts on row. When piece measures 34-35-36-37-38-39 cm / 13⅜"-13¾"-14¼"-14½"-15"-15¼", work next row from WS as follows: 5 band sts in garter st, A.1 as before, P 33-37-43-47-53-62 (= left front piece), bind off 12-12-12-14-14-14 sts for armhole (i.e. 6-6-6-7-7-7 sts on each side of marker), P 91-99-111-123-135-149 (= back piece), bind off 12-12-12-14-14-14 sts for armhole, P 33-37-43-47-53-62, A.1 as before and 5 band sts in garter st (= right front piece). Put piece aside and knit the sleeves. SLEEVE: Work in the round on double pointed needles, switch to circular needle when needed. Cast on 70-70-70-80-80-80 sts on 2 circular needles size 3 mm / US 2.5 with Baby Alpaca Silk. Pull out one circular needle, divide sts on double pointed needles size 3 mm / US 2.5 and work 2 ridges in GARTER ST in the round on needles – see explanation above. Then work pattern according to diagram A.2. When A.2 has been worked 1 time vertically, there are 56-56-56-64-64-64 sts on needle. Then work in stockinette st in the round. Insert 1 marker at the beg of round. When piece measures 10-10-8-8-10-8 cm / 4"-4"-3"-3"-4"-3", inc 2 sts mid under sleeve (i.e. 1 st on each side of marker). Repeat inc every 6th-5th-5th-5th-4th-4th round 17-19-21-20-22-25 more times (= 18-20-22-21-23-26 inc in total) = 92-96-100-106-110-116 sts. When piece measures 44-44-43-43-42-42 cm / 17¼"-17¼"-17"-17"-16½"-16½", bind off 12-12-12-14-14-14 sts mid under sleeve (i.e. 6-6-6-7-7-7 sts on each side of marker) = 80-84-88-92-96-102 sts remain on needle. Put piece aside and knit another sleeve. YOKE: Slip sleeves on to same circular needle as body where armholes were bound off (without working them first) = 351-375-407-439-471-515 sts. READ ALL OF THE FOLLOWING SECTION BEFORE CONTINUING! Insert 1 marker in all transitions between sleeves and body piece = 4 markers. Work in stockinette st but work the outermost 17-17-17-19-19-19 sts in each side as before. AT THE SAME TIME on first row (= RS), dec for raglan on each side of the 4 markers - READ DECREASE TIP (= 8 sts dec). Repeat dec every other row (i.e. on every row from RS), 2-2-3-3-3-3 more times (= 3-3-4-4-4-4 dec in total) = 327-351-375-407-439-483 sts. On next row from WS dec 18-10-2-30-30-10 sts evenly (do not dec over the outermost 17-17-17-19-19-19 sts in each side) = 309-341-373-377-409-473 sts remain on row. Work next row as follows from RS: 5 band sts in garter st, A.1 as before (= 12-12-12-14-14-14 sts), * work A.3 (= 19 sts), 13 sts in stockinette st *, repeat from *-* 8-9-10-10-11-13 times in total, work A.3 (= 19 sts), A.1 (= 12-12-12-14-14-14 sts) and finish with 5 band sts in garter st. Continue the pattern like this. When pattern has been worked for approx. 1 cm / ½" – make sure that next row is a row from RS in A.1, dec 1 st in A.1 so that A.1 becomes smaller. Dec 1 st in A.1 by working the last 2 sts in A.1 on right front piece (seen from RS) K tog, work the first 2 sts in A.1 on left front piece (seen from RS) as follows: Slip 1 st as if to K, K 1, psso (= 2 sts dec). Repeat dec every 8th row 6-6-6-5-5-5 more times and then every 4th row 3-3-3-6-6-6 times in total (= 10-10-10-12-12-12 dec in total on each side of mid front). AT THE SAME TIME when A.3 has been worked 1 time vertically, work next row as follows from RS: 5 band sts as before, A.1 (with dec) as before, * work A.5 (= 19 sts), A.4 (= 13 sts) *, repeat from *-* 8-9-10-10-11-13 times in total, work A.5 (= 19 sts), A.1 (with dec) as before and finish with 5 band sts as before. When A.5/A.4 has been worked 1 time vertically, work next row as follows from RS: 5 band sts, A.1, * A.5 (= 19 sts), A.6 (= 12 sts) *, repeat from *-* 8-9-10-10-11-13 times in total, A.5, A.1 and 5 band sts. When A.5 has been worked 2-2-2-2-3-3 times in total vertically (2-2-2-2-3-3 full repeats of A.6 have been worked plus 4-4-4-4-6-6 more rounds of A.6 in height), work A.7 instead of A.5 and A.8 instead of A.6 (beg A.8 at arrow at the bottom in diagram for correct size – NOTE: Work the other sts as before). Continue pattern like this while AT THE SAME TIME dec as shown in diagram. When A.7/A.8 has been worked 1 time vertically (finish after row marked with arrow at the top in diagram for correct size) and dec in A.1 has been done, 145-160-175-175-190-220 sts remain on row. Insert 1 marker on row – now measure piece from here (yoke measures approx. 22-23-24-25-26-27 cm / 8¾"-9"-9½"-9¾"-10¼"-10½" from armhole, the entire jacket measures approx. 56-58-60-62-64-66 cm / 22"-22¾"-23⅝"-24⅜"-25¼"-26" from bottom and up and 2 buttonholes remain on right band). Work next row as follows from RS: 5 band sts as before, A.1 (= 2 sts), * K 1, P 2 tog, K 1, slip 1 st as if to K, K 2 tog, psso, K 1, P 2 tog, K 1, A.10 (= 4 sts – beg at arrow in diagram for correct size) *, repeat from *-* 8-9-10-10-11-13 times in total, K 1, P 2 tog, K 1, slip 1 st as if to K, K 2 tog, psso, K 1, P 2 tog, K 1, A.1 (= 2 sts) and 5 band sts as before = 109-120-131-131-142-164 sts. Work back from WS with K over K and P over P. Then work high collar as follows (1st row = RS - remember the last 2 buttonholes on band): 5 band sts, A.1 (= 2 sts), * A.9 (= 7 sts), A.10 (= 4 sts) *, repeat from *-* 8-9-10-10-11-13 times in total, A.9 (= 7 sts), A.1 (= 2 sts) and 5 band sts as before. Continue pattern like this back and forth until piece measures approx. 6 cm / 2½" from marker (approx. 1 cm / ½" should be worked after last buttonhole). Then loosely bind off with K over K and P over P ASSEMBLY: Sew the opening under the sleeves. Sew on buttons. |
|||||||||||||||||||||||||
Diagram explanations |
|||||||||||||||||||||||||
|
|||||||||||||||||||||||||
 |
|||||||||||||||||||||||||
 |
|||||||||||||||||||||||||
 |
|||||||||||||||||||||||||
Have you finished this pattern?Tag your pictures with #dropspattern #ladyfeatherjacket or submit them to the #dropsfan gallery. Do you need help with this pattern?You'll find 22 tutorial videos, a Comments/Questions area and more by visiting the pattern on garnstudio.com. © 1982-2026 DROPS Design A/S. We reserve all rights. This document, including all its sub-sections, has copyrights. Read more about what you can do with our patterns at the bottom of each pattern on our site. |
|||||||||||||||||||||||||


With over 40 years in knitting and crochet design, DROPS Design offers one of the most extensive collections of free patterns on the internet - translated to 17 languages. As of today we count 324 catalogs and 12290 patterns - 12280 of which are translated into English (US/in).
We work hard to bring you the best knitting and crochet have to offer, inspiration and advice as well as great quality yarns at incredible prices! Would you like to use our patterns for other than personal use? You can read what you are allowed to do in the Copyright text at the bottom of all our patterns. Happy crafting!
Post a comment to pattern DROPS 149-30
We would love to hear what you have to say about this pattern!
If you want to leave a question, please make sure you select the correct category in the form below, to speed up the answering process. Required fields are marked *.