
Popular categories
Looking for a yarn?


Comments / Questions (40)
Christel Zondagh wrote:
Thanks for the previous answer. I am still battling with the lace edge. Do I have to attach the last stitch of the wrong side row to the edge as well or only the first stitch of the RS row?
15.12.2017 - 10:46DROPS Design answered:
Dear Mrs Zondagh, when working lace edge together with shawl, at the beginning of RS rows worked on lace edge, pick up 1 st from shawl with right needle, work the first st on left needle (= 1st st in A.4 for the lace edge) and pass the picked up st from shawl over the worked stitch, work remaining sts on row, turn and work WS row. Along right side of shawl, from WS: pick up a stitch from shawl, work 1st st on lace edge (= 1st st in A.5) and pass the picked up st over the worked st, work remaining st on row, turn and work next row from RS. Happy knitting!
15.12.2017 - 11:06Christel wrote:
Hi, regarding the lace edge: 1.How many "leaves on one side of the shawl? 2. Are there 154 stitches on each side of the shawl? 3. Do you have to attach every row to the edge of the shawl? 4. Is there a tutorial on something similar?
29.10.2017 - 21:01DROPS Design answered:
Dear Christel, according to the pattern, after the last row of the body of the shawl, you should have 301 stitch on the row, that makes 150 stitch on both side and the middle stitch. Yes, you have to attach the edge to the body by knitting the first stitch of every RS row together a stitch from teh body. I hope this helps. Happy knitting!
26.11.2017 - 17:21
![]() Hilde wrote:
Hilde wrote:
Er staat: Ga verder en brei volgens A.1/A.2/A.3 tot de telpatronen in totaal 4 keer in de hoogte zijn gebreid. houden we nog rekening met de middenste steek? wordt daar nog een omslag gebreid?
29.08.2017 - 09:45DROPS Design answered:
Hallo Hilde, Jazeker, de middensteek brei je daarnaast ook gewoon verder zoals in de tekst staat.
04.11.2017 - 16:07Christel wrote:
Hi! 1. I understand that there is an increase of 8 stitches after every A1, A2, A3 repetition. So after 4 times in total, I would have increased it by 32 stitches. And then 8 more before I start the lace edge. But where do the rest come from to get to 301 stitches? 2. When doing A1, A2, A3, must I start every row with 3 sts in garter stitch? Even the pearl rows? Thanks!
25.05.2017 - 21:55DROPS Design answered:
Dear Christel, you are working A.1, A.2 and A.3 on both sides of the middle st, ie you will inc 8 sts in diagrams on each side = 16 sts inc for every repeat in height. You work diagrams 4times in height x 16 sts inc = 64 sts inc + 229 sts + 8 sts inc evenly on last row from WS = 301 sts. Happy knitting!
26.05.2017 - 11:03
![]() Jacqueline Caillot wrote:
Jacqueline Caillot wrote:
Je comprends que ma question à déjà été posée mais je ne sais pas traduire...mon problème concerne le point fantaisie et le rang 8 car je n' ai pas un nombre pair: 3 mousse + 7m +1 m centrale +7m + 3 mousse Merci pour votre aide
29.05.2016 - 09:31DROPS Design answered:
Bonjour Mme Caillot, vous augmentez 4 m tous les 2 rangs (= tous les rangs sur l'endroit), au rang 8, vous avez augmentez 4 x (rangs 1,3,5 et 7) et vous avez 25 m, tricotez: 3 m end, (*2 m ens à l'end, 1 jeté* répétez de *-* et terminez par 1 m end)), la m centrale, répétez de (à) et 3 m end. Bon tricot!
30.05.2016 - 09:44
![]() Reidun Pettersen wrote:
Reidun Pettersen wrote:
I sjal nr150-38 skal blonden strikkes sammen meb sjalet. Det står at det skal plukke opp 1m fra høyre og så strikke det sammen med 1 maske fra venstre. Jeg fårstår det, men hva gjør jeg videre??
14.08.2015 - 16:46DROPS Design answered:
Hej, Jo men så vender du bare og strikker tilbage over blonden. Således strikker du frem og tilbage over blonden og strikker den sammen med kanten på andenhver p. God fornøjelse!
01.10.2015 - 16:51
![]() Eva wrote:
Eva wrote:
Ich komme mit dem Lochmuster nicht klar. Ich habe 3 M kraus rechts als Rand, dann eine ungerade Zahl M, dann 1 Mittelmasche, wieder eine ungerade Zahl M und dann die 3 M Rand. Wie kann ich da Lochmuster *2 M re zusammen, 1 Umschlag* stricken? Dafür brauche ich doch eine gerade Anzahl M.
05.07.2015 - 14:07DROPS Design answered:
Sie stricken die M, die übrig bleibt, einfach re. Auf diese Weise erscheint das Muster dann auch jeweils beidseitig symmetrisch.
06.07.2015 - 11:11
![]() Monique Hannay wrote:
Monique Hannay wrote:
I am confused about the Lace Edge: are we talking about the left side looking from the top down towards the tip or the other way around? It looks to me like pattern A4 should come down the right side if holding the shawl with the RS facing me and the tip pointing down? (working A4 upside down)
19.05.2015 - 18:15DROPS Design answered:
Dear Mrs Hannay, you work A.4 along the left side of shawl, seen from RS starting on top edge of shawl towards the tip, cast on 8 sts and work A.4 starting from bottom corner on the right side, and every row from RS pick up 1 st from shawl, work 1st st in A.4 and pass the st picked up from shawl over the 1st st in A.4, work remaining sts in A.4. Happy knitting!
20.05.2015 - 09:48
![]() Hilde wrote:
Hilde wrote:
Sliter med å forstå pinne nr 8. Jeg har nå 25 masker på pinnen etter pinne 7. Hvis jeg leser øketips riktig skal jeg strikke kastene rett. Dermed blir det på pinne 8 (som er fra vrangen) slik: 4 rette, 2 rett sammen, kast, 2 rett sammen, kast, 2 rett sammen, kast, men så har jeg bare en maske før neste kast fra forrige pinne før midtmasken og det virker rart. Det er åpenbart at jeg gjør noe galt, men hva?
17.04.2015 - 21:43DROPS Design answered:
Hej Hilde, Nej men det gør ikke noget, den strikker du bare ret. God fornøjelse!
15.05.2015 - 11:06
![]() Anne Marie Olsen wrote:
Anne Marie Olsen wrote:
På 8. Pinne med hullmønster skal det strikkes 2 rette sammen + kast , ut pinnen. Skal jeg starte etter de tre rillemasker? Skal midtmaske strikkes rett også på denne pinnen? Altså holdes utenom sammenstrikkinga?
06.04.2015 - 19:40DROPS Design answered:
Hej Anne Marie, Det stemmer, du holder de 3 rillemasker og midtmaskerne udenfor mønsteret. God fornøjelse!
15.05.2015 - 10:18
|
|||||||||||||||||||
Silver Mist#silvermistshawl |
|||||||||||||||||||
 |
 |
||||||||||||||||||
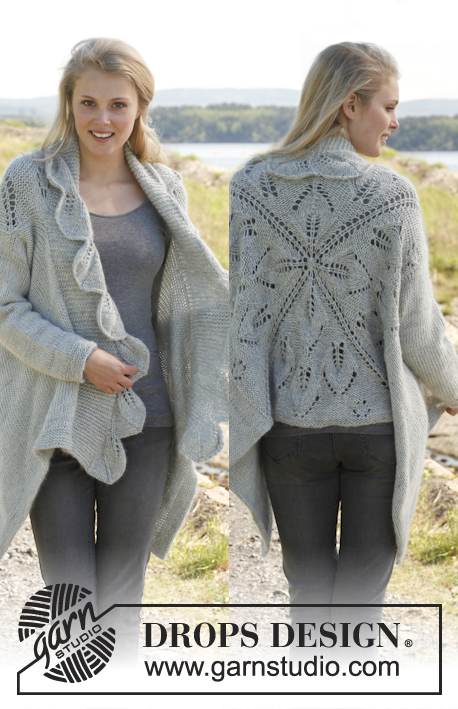
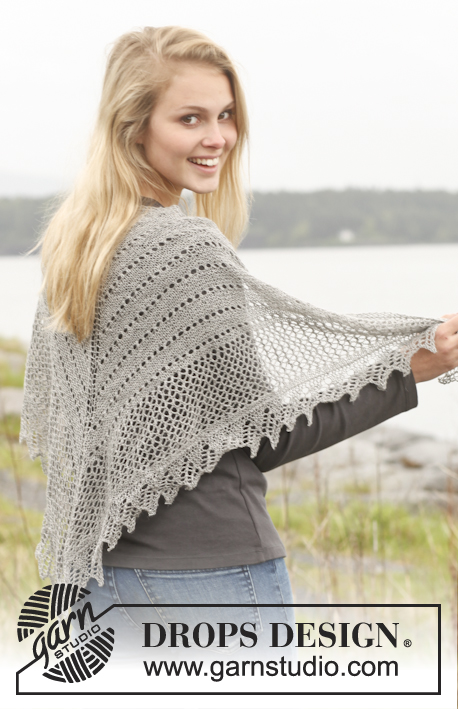
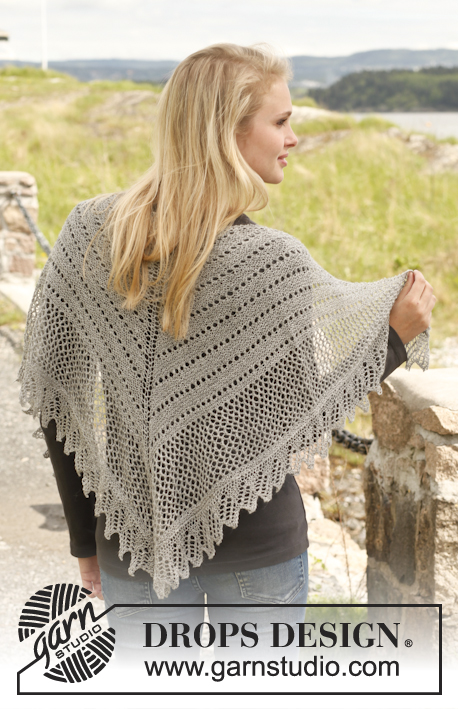
Knitted DROPS shawl in garter st with lace pattern in ”Lace”.
DROPS 150-38 |
|||||||||||||||||||
|
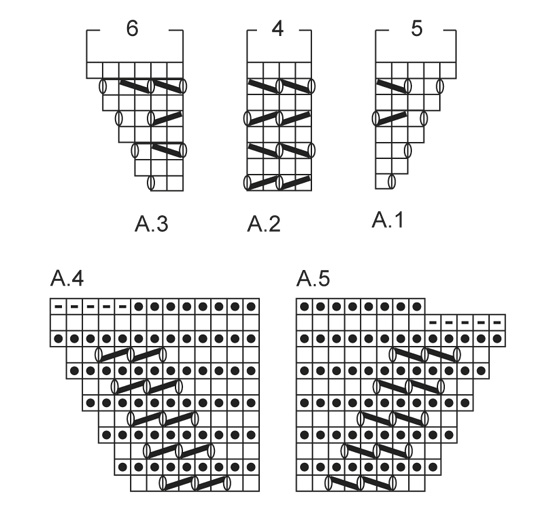
GARTER ST (back and forth on needle): K all rows. LACE PATTERN: Row 1-7: K from RS, K from WS Row 8 (from WS): * K 2 tog, 1 YO *, repeat from *-*. Row 9-12: K from RS, K from WS Repeat these 12 rows upwards. INCREASE TIP: All inc are done from RS. Inc 4 sts (1 st in each side, 2 sts in the middle) on every row from RS as follows: 3 sts in garter st, 1 YO, work until st with marker (= mid st), 1 YO, K 1 (= mid st), 1 YO, work until 3 sts remain on row, 1 YO, 3 sts in garter st. On next row (from WS) K all sts incl YOs. ---------------------------------------------------------- SHAWL: Worked back and forth on circular needle to make room for all the sts. The shawl is worked from mid back and down. Cast on 7 sts on circular needle size 3.5 mm / US 4 with Lace. Insert 1 marker in 4th st (= mid st) and move it upwards in mid st when working. Work 1st row as follows (= RS): 3 sts in GARTER ST - read explanation above, 1 YO, K 1 (= mid st with marker), 1 YO, 3 sts in garter st = 9 sts. Then work LACE PATTERN with 3 sts in garter st each side while AT THE SAME TIME inc 4 sts on every row from RS - Read INCREASE TIP! Continue inc until there are 229 sts on the needle. Piece measures approx. 37 cm / 14½" measured in knitting direction from cast-on edge to needle. Now work as follows: 3 sts in garter st, A.1, A.2 over the next 108 sts, work until 2 sts remain before mid st, work A.3, 1 st in garter st (= mid st), A.1, A.2 over the next 108 sts until 5 sts remain, work A.3 and 3 sts in garter st. Continue to work according to A.1/A.2/A.3 until diagrams have been worked 4 times in total vertically. Every time A.1/A.2/A.3 have been worked 1 time vertically, there is room for 2 more repetitions of A.2 between A.1 and A.3 on each side of mid st - AT THE SAME TIME on last row of last repetition (= WS) inc 8 sts evenly by working 2 sts in 1 st = 301 sts. Work 2 ridges in garter st over all sts (remember inc as before in each side and in the middle), there are 309 sts on the needle, bind off. LACE EDGE: Cast on 8 sts on circular needle size 3.5 mm / US 4 with Lace. Work back and forth according to A.4, AT THE SAME TIME work edge tog with shawl – beg at the top of shawl and fasten edge along left diagonal side down to tip. Knit edge to shawl as follows - on every row from RS: Pick up the outermost st in front loop from shawl with right needle, work first st from left needle (1st st in A.4), pass the new st over, work the rest of row. When lace edge has been worked all the way down to tip of shawl, work in garter st over all sts, AT THE SAME TIME bind off 1 st at beg of every row from WS, continue in garter st until all sts have been bound off. Repeat along the right side of shawl but now work according to A.5. Knit edge to shawl as follows - on every row from WS: Pick up the outermost st in front loop from shawl with right needle, work first st from left needle (1st st in A.5), pass the new st over, work the rest of row. Sew tog bind off edge on A.4 and A.5 at the bottom of tip. BLOCKING: Place the shawl in lukewarm water until it is soaking wet. Carefully squeeze the water out of the shawl - do not twist the shawl - then roll the shawl in a towel and squeeze to remove more water - the shawl will now only be moist. Place the shawl on a carpet or mattress - carefully stretch it out to size and fasten it with pins. NOTE: 1 pin in the outer st in each side of shawl, along the 2 diagonal sides, insert 1 pin in the middle of every repetition and 1 pin in mid st (= bottom of tip on shawl), lightly pull at every needle so that the edge is shaped into small tips. Leave shawl to dry like this. Repeat the process when the shawl has been washed. |
|||||||||||||||||||
Diagram explanations |
|||||||||||||||||||
|
|||||||||||||||||||
 |
|||||||||||||||||||
Have you finished this pattern?Tag your pictures with #dropspattern #silvermistshawl or submit them to the #dropsfan gallery. Do you need help with this pattern?You'll find 14 tutorial videos, a Comments/Questions area and more by visiting the pattern on garnstudio.com. © 1982-2026 DROPS Design A/S. We reserve all rights. This document, including all its sub-sections, has copyrights. Read more about what you can do with our patterns at the bottom of each pattern on our site. |
|||||||||||||||||||


With over 40 years in knitting and crochet design, DROPS Design offers one of the most extensive collections of free patterns on the internet - translated to 17 languages. As of today we count 325 catalogs and 12298 patterns - 12288 of which are translated into English (US/in).
We work hard to bring you the best knitting and crochet have to offer, inspiration and advice as well as great quality yarns at incredible prices! Would you like to use our patterns for other than personal use? You can read what you are allowed to do in the Copyright text at the bottom of all our patterns. Happy crafting!
Post a comment to pattern DROPS 150-38
We would love to hear what you have to say about this pattern!
If you want to leave a question, please make sure you select the correct category in the form below, to speed up the answering process. Required fields are marked *.