
Popular categories
Looking for a yarn?


Comments / Questions (35)
![]() Christine Pettersson wrote:
Christine Pettersson wrote:
SAMTIDIGT läggs det upp nya m mot mitt fram i slutet på varje v från avigsidan så här: Lägg upp 4 m 3 ggr, 2 m 2 ggr - de ökade m stickas fortlöpande i moss-st. SAMTIDIGT när arb mäter 3 cm stickas det så här från rätsidan: Sticka de första 11 m på v i moss-st (= framkant mot mitt fram), sticka rm v ut. Sedan stickas det slätst - men de yttersta 11 m mot mitt fram stickas i moss-st - dvs framkanten med 11 m i moss-st förskjuts allt efter som det läggs upp nya m mot mitt fram.
16.11.2018 - 17:07
![]() Christine Petterssson wrote:
Christine Petterssson wrote:
Frågar än en gång! Framstycket stämmer inte med beskrivningen. Det måste vara fel på mönstret .
16.11.2018 - 13:34DROPS Design answered:
Hej Christine, Stickar du i DROPS Nepal och har du 17m x 22varv på 10x10 cm? Om du bara vill kolla först så du följer vår stickfasthet :) Sedan beskriva vad som inte stämmer, så skall vi titta på det :)
16.11.2018 - 15:28
![]() Klaudia wrote:
Klaudia wrote:
Dzien dobry, chcialabym zapytac o wskazowki jak mozna dorobic rekawy do bolerka? Moze moglabym skorzystac z innego wzoru? Pozdrawiam serdecznie
13.11.2018 - 19:38DROPS Design answered:
Witaj Klaudio! Tego rodzaju rękawy są w starszych sweterkach, niestety rzadko są przetłumaczone na język polski. Musisz szukać wzorów wykonanych z włóczek z grupy C, tak samo jak Nepal i na drutach nr 5-6. Ja proponuję wzór numer 0-62, przetłumaczę ci sam rękaw, a ty dopasujesz go sobie wg uznania. Wyślę ci tłumaczenie na email jeszcze dzisiaj. Powodzenia!
14.11.2018 - 19:56
![]() Pohlmann wrote:
Pohlmann wrote:
Liebes Drops Team, ich bin auf der suche nach der Anleitung für dieses Modell-Drops Design Strick Bolero Weste Shrug. leider habe ich es nicht gefunden könnten sie mir bitte weiterhelfen. Liebe Grüße Liane Pohlmann
20.01.2015 - 21:51DROPS Design answered:
Liebe Frau Pohlmann, was genau meinen Sie? Suchen Sie ein bestimmtes Modell? Dann suchen Sie am besten mit den entsprechenden Suchbegriffen in unserer Suche.
27.01.2015 - 22:21
![]() Pohlmann wrote:
Pohlmann wrote:
Liebes Drops Team, ich bin auf der suche nach der Anleitung für dieses Modell-Drops Design Strick Bolero Weste Shrug. leider habe ich es nicht gefunden könnten sie mir bitte weiterhelfen. Liebe Grüße Liane Pohlmann
20.01.2015 - 21:50
![]() Michaela wrote:
Michaela wrote:
Hallo, ich habe auch ein Problem mit dem Vorderteil. Ich komme nicht auf 15 Maschen am Ende sondern auf 20. Nur leider hilft mir der Kommentar bei Judith vom 21.6. nicht weiter. Von welchen Abnahmen für die Rundung ist da die Rede?
20.10.2013 - 22:07DROPS Design answered:
Liebe Michaela, unter "Rückenteil" finden Sie die weiteren Abnahmen für den Armausschnitt beschrieben (jeweils neben den 3 M im Perlmuster).
21.10.2013 - 12:38
![]() Marianne wrote:
Marianne wrote:
I have started on the righthand piece a couple of times now, also as I thought the instructions to be a bit vague. But now I have untangled it again, as it seems that the front piece becomes way too big to fit on the backpiece.IE. Pattern seems to be incorrect. I am using the Drops Yarn and the test was correct. I really find that frustrating...this should be an easy, small project. I guess I will re-arrange the pattern myself.
25.09.2013 - 15:32DROPS Design answered:
Dear Marianne, for any individual help, we kindly recommand you to contact the store where you bought your yarn. They will help you if required. Happy knitting!
26.09.2013 - 09:24
![]() Judith wrote:
Judith wrote:
Liebes Garnstudio-Team, ich hänge gerade am rechten Vorderteil dieser Weste. Ich lese immer vorher den Text und male es mir dann auf zum besseren Verständnis. Ich komme zum Schluß aber immer auf 20 verbleibende Maschen und nicht wie in der Anleitung auf 15 M. 21 M anschlagen,3x4 M und 2x2 M neu anschlagen= 37 M,3x1 M wie beim Rückenteil zunehmen= 40 M,8x1 M abnehmen= 32 M,6x1 M abnehmen= 26 M,6 M für Arm-abschnitt abketten= 20 M
20.06.2013 - 07:52DROPS Design answered:
Liebe Judith, wenn ich es richtig sehe, haben Sie beim Armausschnitt nur mit den ersten 6 M gerechnet und die weiteren Abnahmen für die Rundung vergessen.
21.06.2013 - 09:20
![]() Noora wrote:
Noora wrote:
Ohjeessa on mielestäni virhe. Etukappaleen mukaan kavennusten jälkeen olalle jää 15 silmukkaa, kun niitä oikeasti jää 18 (koossa S). Silmukkamäärä ei siis täsmää takakappaleen kanssa.
06.02.2013 - 10:21
![]() Anna wrote:
Anna wrote:
Kan det passe, at opskriften til forstykket ikke passer med billedet og tegningen? Umiddelbart kan jeg ikke se, hvordan jeg skal få buen til at blive så stor, når jeg er færdig med at tage ud efter de første 12 pinde og med det samme har 11 masker perlestrik i stedet for en overgang med 3 masker perlestrik, som det ser ud som om der er på billedet.
31.12.2012 - 10:17
|
|
Tennessee#tennesseevest |
|
 |
 |
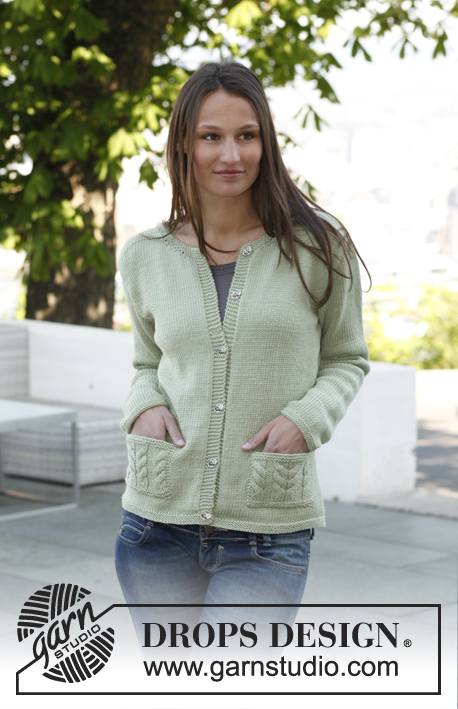
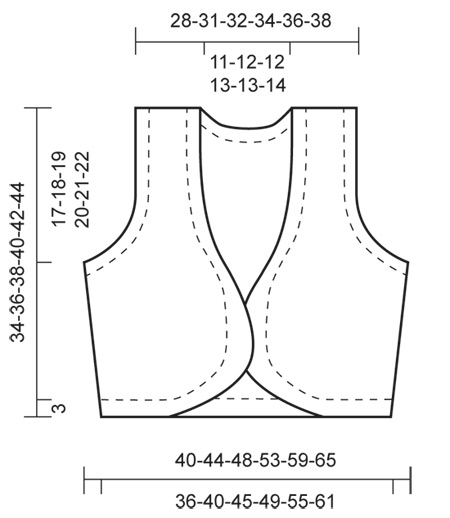
Knitted DROPS vest in ”Nepal”. Size: S - XXXL
DROPS 143-39 |
|
|
GARTER ST: K sts on all rows. SEED ST: K over P and P over K. INCREASE TIP: Inc 1 st inside 1 edge st in each side as follows: 1 edge st in garter st, make 1 YO, work until 1 st remains on needle, make 1 YO, 1 edge st in garter st. On next row work YOs twisted (i.e. work in back loop of st instead of front to avoid holes). DECREASE TIP 1 (applies to armholes): Dec for armholes inside the outermost 3 sts in seed st in each side. Dec from RS at beg of row as follows: Work 3 sts in seed st, slip next st as if to K, K 1, psso. Dec from RS at end of row as follows: Work until 5 sts remain on needle, K the next 2 sts tog, 3 sts in seed st. Dec from WS at beg of row as follows: Work 3 sts in seed st, P the next 2 sts twisted tog. Dec from WS at end of row as follows: Work until 5 sts remain on needle, P the next 2 sts tog, 3 sts in seed st. DECREASE TIP 2 (applies to front piece): Dec 1 st for neck on every row from RS by working tog the outermost 2 sts in seed st towards mid front (K if next st is P, P if next st is K) - a total of 8 times = 3 sts in seed st remain towards mid front. Then dec 1 st inside the outermost 3 sts in seed st every 4th row as follows: Dec from RS on right front piece as follows: Work 3 sts in seed st, slip next st as if to K, K 1, psso, work the rest of row. Dec from RS on left front piece as follows: Work until 5 sts remain on needle, K the next 2 sts tog, 3 sts in seed st. BUTTONHOLES: Dec for 1 buttonholes from RS on right front piece. 1 buttonhole = K tog 3rd and 4th st from mid front, then make 1 YO. ----------------------------------------------------------- BACK PIECE: Worked back and forth on needle. Cast on 64-70-78-86-96-106 sts (includes 1 edge st in each side) on needle size 5 mm / US 8 with Nepal. Work 1st row (= from RS) as follows: 1 edge st in GARTER ST - see explanation above, * K 1, P 1 *, repeat from *-*, finish with 1 edge st in garter st. Then work in SEED ST - see explanation above - with 1 edge st in garter st in each side. REMEMBER THE GAUGE! When piece measures 3 cm / 1⅛", work in stockinette st with 1 edge st in garter st in each side. When piece measures 4-4-4-5-5-5 cm / 1½"-1½"-1½"-2"-2"-2", inc 1 st in each side - Read INCREASE TIP. Repeat inc 2 more times every 4½-5-5-5-5-5½ cm / 1¾"-2"-2"-2"-2"-2¼" (a total of 3 times) = 70-76-84-92-102-112 sts. Continue until piece measures 17-18-19-20-21-22 cm / 6¾"-7"-7½"-8"-8¼"-8¾" (last row = WS). At beg of the next 2 rows work in seed st over the outermost 9-9-9-10-11-12 sts in each side. At beg of the 2 following rows, bind off the first 6-6-6-7-8-9 sts for armholes in each side = 3 sts in seed st remain in each side. Then continue the outermost 3 sts in each side in seed st - AT THE SAME TIME dec 1 st inside the 3 sts - READ DECREASE TIP 1 - as follows: Dec 1 st in each side on every row (i.e. from RS and WS) a total of 4-4-6-6-8-10 times, every other row (i.e. every row from RS) a total of 1-2-3-4-4-5 times = 48-52-54-58-62-64 sts. When dec are done, continue in seed st over the outermost 3 sts until finished measurements (= band towards armhole). When piece measures 30-32-34-36-38-40 cm / 11¾"-12½"-13⅜"-14¼"-15"-15¾, work in seed st over the middle 24-26-26-28-28-30 sts until finished measurements. When piece measures 32-34-36-38-40-42 cm / 12½"-13⅜"-14¼"-15"-15¾"-16½", bind off the middle 18-20-20-22-22-24 sts for neck = 15-16-17-18-20-20 sts remain for shoulder (3 sts in seed st remain towards neck in each side) and finish each shoulder separately. Continue in stockinette st with 3 sts in seed st in each side (armhole and neck) until piece measures 34-36-38-40-42-44 cm / 13⅜"-14¼"-15"-15¾"-16½"-17 ¼", loosely bind off all sts. RIGHT FRONT PIECE: Worked back and forth on needle. Cast on 21-24-28-32-37-42 sts (includes 1 edge st in side) on needle size 5 mm / US 8 with Nepal. Work 1st row (= from RS) as follows: * K 1, P 1 *, repeat from *-*, finish with 1 edge st in garter st. READ ALL OF THE FOLLOWING SECTIONS BEFORE CONTINUING! Work in seed st with 1 edge st in garter st in the side - AT THE SAME TIME cast on new sts towards mid front at the end of every row from WS as follows: Cast on 4 sts 3 times, 2 sts 2 times - work the inc sts in seed st. AT THE SAME TIME when piece measures 3 cm / 1⅛", work from RS as follows: Work the first 11 sts on row in seed st (= band towards mid front), K the rest of row. Then work in stockinette st - but work the outermost 11 sts towards mid front in seed st - i.e. band with 11 sts in seed st is displaced when casting on new sts towards mid front. When piece measures 4-4-4-5-5-5 cm / 1½"-1½"-1½"-2"-2"-2", inc 1 st in the side as on back piece. AT THE SAME TIME when piece measures 10-10-11-11-12-12 cm / 4"-4"-4⅜"-4⅜"-4¾"-4¾" from cast on edge, work BUTTONHOLE - read explanation above. When piece measures 12-12-13-13-14-14 cm / 4¾"-4¾"-5⅛"-5⅛"-5½"-5½", dec from RS 1 st for neck - READ DECREASE TIP 2. Repeat dec every other row a total of 8 times (on band), then every 4th row a total of 6-7-7-8-8-9 times (inside the outermost 3 sts in seed st). When dec for neck are done, continue in seed st over the outermost 3 sts until finished measurements (= band towards mid front). AT THE SAME TIME when piece measures 17-18-19-20-21-22 cm / 6¾"-7"-7½"-8"-8¼"-8¾", work in seed st over the 9-9-9-10-11-12 sts towards armhole as on back piece and bind off for armhole as on back piece. After all dec are done, 15-16-17-18-20-20 sts remain on shoulder. Continue with 3 sts in seed st in each side (armhole and neck) until piece measures 34-36-38-40-42-44 cm / 13⅜"-14¼"-15"-15¾"-16½"-17 ¼" / 13⅜"-14¼"-15"-15¾"-16½"-17 ¼". Loosely bind off all sts. LEFT FRONT PIECE: Cast on and work as right front piece but reversed and without buttonholes. ASSEMBLY: Sew the shoulder seams. Sew the side seams inside 1 edge st. Sew the button on to left band. |
|
 |
|
Have you finished this pattern?Tag your pictures with #dropspattern #tennesseevest or submit them to the #dropsfan gallery. Do you need help with this pattern?You'll find 11 tutorial videos, a Comments/Questions area and more by visiting the pattern on garnstudio.com. © 1982-2026 DROPS Design A/S. We reserve all rights. This document, including all its sub-sections, has copyrights. Read more about what you can do with our patterns at the bottom of each pattern on our site. |
|


With over 40 years in knitting and crochet design, DROPS Design offers one of the most extensive collections of free patterns on the internet - translated to 17 languages. As of today we count 325 catalogs and 12298 patterns - 12288 of which are translated into English (US/in).
We work hard to bring you the best knitting and crochet have to offer, inspiration and advice as well as great quality yarns at incredible prices! Would you like to use our patterns for other than personal use? You can read what you are allowed to do in the Copyright text at the bottom of all our patterns. Happy crafting!
Post a comment to pattern DROPS 143-39
We would love to hear what you have to say about this pattern!
If you want to leave a question, please make sure you select the correct category in the form below, to speed up the answering process. Required fields are marked *.