
Popular categories
Looking for a yarn?


|
|
Tennessee |
|
 |
 |
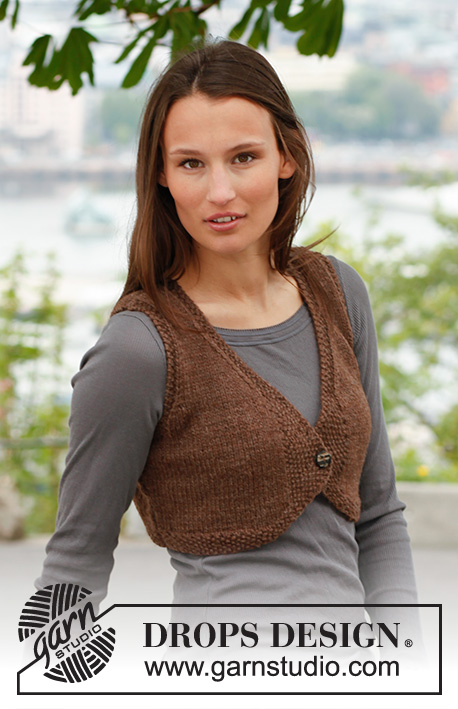
Knitted DROPS vest in ”Nepal”. Size: S - XXXL
DROPS 143-39 |
|
|
GARTER ST: K sts on all rows. SEED ST: K over P and P over K. INCREASE TIP: Inc 1 st inside 1 edge st in each side as follows: 1 edge st in garter st, make 1 YO, work until 1 st remains on needle, make 1 YO, 1 edge st in garter st. On next row work YOs twisted (i.e. work in back loop of st instead of front to avoid holes). DECREASE TIP 1 (applies to armholes): Dec for armholes inside the outermost 3 sts in seed st in each side. Dec from RS at beg of row as follows: Work 3 sts in seed st, slip next st as if to K, K 1, psso. Dec from RS at end of row as follows: Work until 5 sts remain on needle, K the next 2 sts tog, 3 sts in seed st. Dec from WS at beg of row as follows: Work 3 sts in seed st, P the next 2 sts twisted tog. Dec from WS at end of row as follows: Work until 5 sts remain on needle, P the next 2 sts tog, 3 sts in seed st. DECREASE TIP 2 (applies to front piece): Dec 1 st for neck on every row from RS by working tog the outermost 2 sts in seed st towards mid front (K if next st is P, P if next st is K) - a total of 8 times = 3 sts in seed st remain towards mid front. Then dec 1 st inside the outermost 3 sts in seed st every 4th row as follows: Dec from RS on right front piece as follows: Work 3 sts in seed st, slip next st as if to K, K 1, psso, work the rest of row. Dec from RS on left front piece as follows: Work until 5 sts remain on needle, K the next 2 sts tog, 3 sts in seed st. BUTTONHOLES: Dec for 1 buttonholes from RS on right front piece. 1 buttonhole = K tog 3rd and 4th st from mid front, then make 1 YO. ----------------------------------------------------------- BACK PIECE: Worked back and forth on needle. Cast on 64-70-78-86-96-106 sts (includes 1 edge st in each side) on needle size 5 mm / US 8 with Nepal. Work 1st row (= from RS) as follows: 1 edge st in GARTER ST - see explanation above, * K 1, P 1 *, repeat from *-*, finish with 1 edge st in garter st. Then work in SEED ST - see explanation above - with 1 edge st in garter st in each side. REMEMBER THE GAUGE! When piece measures 3 cm / 1⅛", work in stockinette st with 1 edge st in garter st in each side. When piece measures 4-4-4-5-5-5 cm / 1½"-1½"-1½"-2"-2"-2", inc 1 st in each side - Read INCREASE TIP. Repeat inc 2 more times every 4½-5-5-5-5-5½ cm / 1¾"-2"-2"-2"-2"-2¼" (a total of 3 times) = 70-76-84-92-102-112 sts. Continue until piece measures 17-18-19-20-21-22 cm / 6¾"-7"-7½"-8"-8¼"-8¾" (last row = WS). At beg of the next 2 rows work in seed st over the outermost 9-9-9-10-11-12 sts in each side. At beg of the 2 following rows, bind off the first 6-6-6-7-8-9 sts for armholes in each side = 3 sts in seed st remain in each side. Then continue the outermost 3 sts in each side in seed st - AT THE SAME TIME dec 1 st inside the 3 sts - READ DECREASE TIP 1 - as follows: Dec 1 st in each side on every row (i.e. from RS and WS) a total of 4-4-6-6-8-10 times, every other row (i.e. every row from RS) a total of 1-2-3-4-4-5 times = 48-52-54-58-62-64 sts. When dec are done, continue in seed st over the outermost 3 sts until finished measurements (= band towards armhole). When piece measures 30-32-34-36-38-40 cm / 11¾"-12½"-13⅜"-14¼"-15"-15¾, work in seed st over the middle 24-26-26-28-28-30 sts until finished measurements. When piece measures 32-34-36-38-40-42 cm / 12½"-13⅜"-14¼"-15"-15¾"-16½", bind off the middle 18-20-20-22-22-24 sts for neck = 15-16-17-18-20-20 sts remain for shoulder (3 sts in seed st remain towards neck in each side) and finish each shoulder separately. Continue in stockinette st with 3 sts in seed st in each side (armhole and neck) until piece measures 34-36-38-40-42-44 cm / 13⅜"-14¼"-15"-15¾"-16½"-17 ¼", loosely bind off all sts. RIGHT FRONT PIECE: Worked back and forth on needle. Cast on 21-24-28-32-37-42 sts (includes 1 edge st in side) on needle size 5 mm / US 8 with Nepal. Work 1st row (= from RS) as follows: * K 1, P 1 *, repeat from *-*, finish with 1 edge st in garter st. READ ALL OF THE FOLLOWING SECTIONS BEFORE CONTINUING! Work in seed st with 1 edge st in garter st in the side - AT THE SAME TIME cast on new sts towards mid front at the end of every row from WS as follows: Cast on 4 sts 3 times, 2 sts 2 times - work the inc sts in seed st. AT THE SAME TIME when piece measures 3 cm / 1⅛", work from RS as follows: Work the first 11 sts on row in seed st (= band towards mid front), K the rest of row. Then work in stockinette st - but work the outermost 11 sts towards mid front in seed st - i.e. band with 11 sts in seed st is displaced when casting on new sts towards mid front. When piece measures 4-4-4-5-5-5 cm / 1½"-1½"-1½"-2"-2"-2", inc 1 st in the side as on back piece. AT THE SAME TIME when piece measures 10-10-11-11-12-12 cm / 4"-4"-4⅜"-4⅜"-4¾"-4¾" from cast on edge, work BUTTONHOLE - read explanation above. When piece measures 12-12-13-13-14-14 cm / 4¾"-4¾"-5⅛"-5⅛"-5½"-5½", dec from RS 1 st for neck - READ DECREASE TIP 2. Repeat dec every other row a total of 8 times (on band), then every 4th row a total of 6-7-7-8-8-9 times (inside the outermost 3 sts in seed st). When dec for neck are done, continue in seed st over the outermost 3 sts until finished measurements (= band towards mid front). AT THE SAME TIME when piece measures 17-18-19-20-21-22 cm / 6¾"-7"-7½"-8"-8¼"-8¾", work in seed st over the 9-9-9-10-11-12 sts towards armhole as on back piece and bind off for armhole as on back piece. After all dec are done, 15-16-17-18-20-20 sts remain on shoulder. Continue with 3 sts in seed st in each side (armhole and neck) until piece measures 34-36-38-40-42-44 cm / 13⅜"-14¼"-15"-15¾"-16½"-17 ¼" / 13⅜"-14¼"-15"-15¾"-16½"-17 ¼". Loosely bind off all sts. LEFT FRONT PIECE: Cast on and work as right front piece but reversed and without buttonholes. ASSEMBLY: Sew the shoulder seams. Sew the side seams inside 1 edge st. Sew the button on to left band. |
|

|
|
|
Have you made this or any other of our designs? Tag your pictures in social media with #dropsdesign so we can see them! Do you need help with this pattern?You'll find tutorial videos, a Comments/Questions area and more by visiting the pattern on garnstudio.com. © 1982-2024 DROPS Design A/S. We reserve all rights. This document, including all its sub-sections, has copyrights. Read more about what you can do with our patterns at the bottom of each pattern on our site. |
|


With over 40 years in knitting and crochet design, DROPS Design offers one of the most extensive collections of free patterns on the internet - translated to 17 languages. As of today we count 304 catalogs and 11422 patterns - 11417 of which are translated into English (US/in).
We work hard to bring you the best knitting and crochet have to offer, inspiration and advice as well as great quality yarns at incredible prices! Would you like to use our patterns for other than personal use? You can read what you are allowed to do in the Copyright text at the bottom of all our patterns. Happy crafting!
Comments / Questions (31)
Hello I want to make the vest longer to reach the waist, how do i do that Thank you.
18.02.2023 - 15:15Der er som om det ikke passer med forstykket, idet der ikke er angivet at der skal lave 3perlestrik +kantmaske med glat strik, og det kan ikke passe at det skal være 11 m perlestri med det sammen det må gradvist blive 11 m
05.02.2023 - 21:22DROPS Design answered:
Hei Ckrage. Kantmasken på forstykkene strikkes kun i siden mot bakstykket. Man legger opp de fleste nye maskene innen man har strikket 3 cm og når man legger opp de siste maskene vil de 11 perlestrikkmaskene i front forskyve seg. På prøvelappen jeg har strikket og på bildet, kan det se ut som om man har strikket en kant med perlestrikk før de 11 perlestrikk maskene i front, men det er bare plagget som trekker seg noe oppover. mvh DROPS Design
06.02.2023 - 14:20Känner mig besvärlig, men...det finns ju ingen kantmaska om man lägger upp nya maskor fem ggr. Instruktionsvideon visar endast uppläggning en gång, inte upprepade ggr som till en sneddad kant. Tusen tack för tips och råd!!
23.12.2022 - 07:27DROPS Design answered:
Hej Sophie, åh du mener de nye masker du tager ud på forstykket. Jo men de bliver mere jævnt når du fortsætter med det perlestrikkede. Det kommer til at se ud som på billedet :)
23.12.2022 - 09:39Det blir verkligen inte snyggt när jag lägger upp nya maskor vartannat varv. Det blir som en trappstege. Kan man få till en jämn kant eller är det oundvikligt att det blir såhär? På bilden ser det ju jämnt och fint ut.
20.12.2022 - 17:06DROPS Design answered:
Hej Sophie, hvis du tager ud indenfor kantmasken, så bliver det jævnt :)
21.12.2022 - 14:43I’m confused by how to proceed on the armholes on the front pieces. The directions say to bind off as on the back piece, but the back decreased for the armholes, not bound off.
06.09.2020 - 22:20DROPS Design answered:
Dear Caitlin,on back piece you first cast off 6-9 sts (see size) then decrease on each side for armhole - on front piece, you will cast off the first 6-9 sts from WS (right front piece) /from RS (left front piece) and decrease on the side for armhole inside 3 sts in seed st as on back piece. Happy knitting!
07.09.2020 - 09:48Det stämmer inte med bilden.
17.11.2018 - 06:47SAMTIDIGT läggs det upp nya m mot mitt fram i slutet på varje v från avigsidan så här: Lägg upp 4 m 3 ggr, 2 m 2 ggr - de ökade m stickas fortlöpande i moss-st. SAMTIDIGT när arb mäter 3 cm stickas det så här från rätsidan: Sticka de första 11 m på v i moss-st (= framkant mot mitt fram), sticka rm v ut. Sedan stickas det slätst - men de yttersta 11 m mot mitt fram stickas i moss-st - dvs framkanten med 11 m i moss-st förskjuts allt efter som det läggs upp nya m mot mitt fram.
16.11.2018 - 17:07Frågar än en gång! Framstycket stämmer inte med beskrivningen. Det måste vara fel på mönstret .
16.11.2018 - 13:34DROPS Design answered:
Hej Christine, Stickar du i DROPS Nepal och har du 17m x 22varv på 10x10 cm? Om du bara vill kolla först så du följer vår stickfasthet :) Sedan beskriva vad som inte stämmer, så skall vi titta på det :)
16.11.2018 - 15:28Dzien dobry, chcialabym zapytac o wskazowki jak mozna dorobic rekawy do bolerka? Moze moglabym skorzystac z innego wzoru? Pozdrawiam serdecznie
13.11.2018 - 19:38DROPS Design answered:
Witaj Klaudio! Tego rodzaju rękawy są w starszych sweterkach, niestety rzadko są przetłumaczone na język polski. Musisz szukać wzorów wykonanych z włóczek z grupy C, tak samo jak Nepal i na drutach nr 5-6. Ja proponuję wzór numer 0-62, przetłumaczę ci sam rękaw, a ty dopasujesz go sobie wg uznania. Wyślę ci tłumaczenie na email jeszcze dzisiaj. Powodzenia!
14.11.2018 - 19:56Liebes Drops Team, ich bin auf der suche nach der Anleitung für dieses Modell-Drops Design Strick Bolero Weste Shrug. leider habe ich es nicht gefunden könnten sie mir bitte weiterhelfen. Liebe Grüße Liane Pohlmann
20.01.2015 - 21:51DROPS Design answered:
Liebe Frau Pohlmann, was genau meinen Sie? Suchen Sie ein bestimmtes Modell? Dann suchen Sie am besten mit den entsprechenden Suchbegriffen in unserer Suche.
27.01.2015 - 22:21