
Popular categories
Looking for a yarn?


Comments / Questions (66)
![]() Kate wrote:
Kate wrote:
I can't see any finished measurements for the sizes. Will a large be the same as a UK size 16? Thanks.
25.06.2013 - 22:26DROPS Design answered:
Dear Kate, you will find at the end of the pattern a measurement chart The measures in the chart is in cm and measured from side to side. So to figure out wich size to make, the best is to measure a garment you already have and like the size of and then compare with the chart. Happy knitting!
26.06.2013 - 09:03
![]() Vanessa Standen wrote:
Vanessa Standen wrote:
I have got as far as dividing for the back and fronts. The back section has 71 stitches for my size. Then cast off middle 11 stitches which leaves 60 stitches. Then cast off 1 stitch at neck edge. This should leave 59 stitches. Yet it says 29 stitches remain. Do I have repeat the decrease or should 59 stitches remain for rest of shoulder.
27.05.2013 - 17:38DROPS Design answered:
Dear Mrs Standen, you have 71 sts for back section, then cast off the middle 11 sts = 60 sts remain, ie 30 sts each side of neck edge. You continue each side separetly on these 30 sts, and cast off 1 st on the neck side = 29 sts remain. Happy knitting!
29.05.2013 - 11:50
![]() Turid Olsen wrote:
Turid Olsen wrote:
Har lagt opp til str.S,men får ikke mønsteret til å gå opp(vr.borden)Ved å telle opp m i mønsteret trenger man 292 m!? Ant m som skal felles stemmer heller ikke(20 m feil) Hjelp!!!
11.03.2013 - 20:29DROPS Design answered:
Mönstret stemmer i str S. Du strikker: 3 rille, 18 m 3r/3vr, 3 r, A.1 (=35 m), 12 m 3r/3vr, 3r, A.1, 18 m 3r/3vr, 3 r, A.1, 12 m 3r/3vr, 3 r, A.1, 18 m 3r/3 vr, 3 r og 3 rille = 239 m.
15.03.2013 - 17:15
![]() Hjørdis Mikkelsen wrote:
Hjørdis Mikkelsen wrote:
Hvordan får jeg opskriften? v.h. hjørdis Mikkelsen
29.10.2012 - 16:29Margaret Nabwire wrote:
I would like to get a written pattern for this jacket.i have tried it severally but i dont seem to get it,especially the stitches just after the hem band
23.10.2012 - 18:44DROPS Design answered:
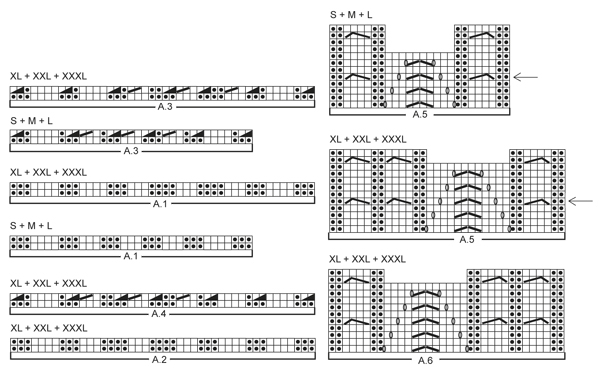
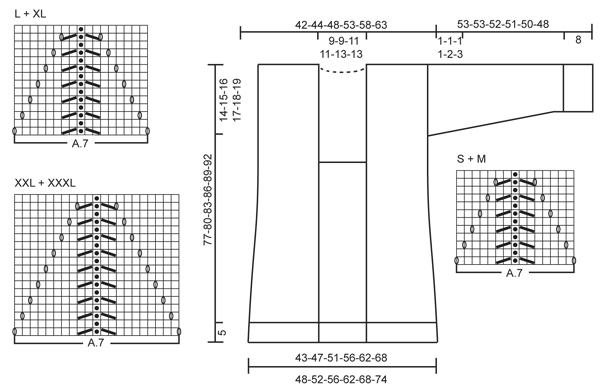
Dear Mrs Nabwire, did you notice that there is a pattern for sizes S,M,L and another for size XL,XXL and XXXL ? in the diagrams, 1 square = 1 st x 1 row. Happy Knitting!
29.11.2012 - 14:43
![]() Arika wrote:
Arika wrote:
Two clarifications regarding A5 (I use S+M+L as an example) Q1: I do rows 1 through 8, then I continue with the cable pattern with rows 9-12 and AT THE SAME TIME restart the middle lace pattern (rows 1-8) is this correct?, but then where will my 3rd cable row be i.e. do I simply repeat the cable row every 6th row? Q2: Should I repeat the short row every time I do the cable row or simply once per the 12 rows of the pattern as shown? Thank you,
22.10.2012 - 03:01DROPS Design answered:
Dear Arika, Q1 : you repeat middle lace pattern (rows 1-8) at the same time repeat cable pattern (rows 1-12), so that there is a cable every6th row. Q2 : A5 has 2 cables, arrow is on the first cable, so everytime you repeat row 5th in A5 you will have short rows. Happy Knitting!
14.11.2012 - 10:36
![]() Nadine wrote:
Nadine wrote:
Ich weiß nicht wie ich anfangen muss und wie viele maschen ich auf nehmen muss kann mir da jemand helfen?? Und ich verstehe auch nicht die Zahlen 239-251-269-305-335-347 sind das die Maschen oder die reihen??bitte helft mir
21.10.2012 - 21:16DROPS Design answered:
Liebe Nadine. Das sind die Maschen, die angeschlagen werden sollen, siehe Anleitung. („239-251-269-305-335-347 M… auf Rundnadel Nr. 5 mit Nepal anschlagen) Sind Sie evtl. Strickanfängerin? Wenn dies so ist, würde ich Ihnen empfehlen mit einem einfacheren Modell zu beginnen, Sie finden dazu bei uns eine spezielle Rubrik.
22.10.2012 - 09:51
![]() Nadine wrote:
Nadine wrote:
Wenn in der Strickschrift auch die Rückreihen enthalten sind, wie sie auf der Vorderseite aussehen, wie stricke ich sie dann in der Rückreihe, damit sie vorne auch so aussehen wie in der Strickschrift? Vielen Dank
07.10.2012 - 23:03DROPS Design answered:
Hallo Nadine, Sie finden diese Information in der Legende zum Diagramm z.B.: 1 M re in Hin-R, 1 M li in Rück-R. Viel Spass beim Stricken.
08.10.2012 - 09:10
![]() Wera wrote:
Wera wrote:
Guten Tag, Bei Muster A5 sind die mittleren 10M der Reihe 9-12 nicht eingezeichnet. Was bedeutet das, wie soll dort gestrickt werden? Vielen Dank
10.09.2012 - 21:25DROPS Design answered:
Der Mustersatz in der Mitte ist weniger hoch als der seitliche. Es wird dann wieder von vorne begonnen.
11.09.2012 - 07:49
![]() Birgit wrote:
Birgit wrote:
Gibt die Strickschrift nur die Hinreihen an und werden demzufolge die Macshen gestrickt, wie sie erscheinen?
30.08.2012 - 22:05DROPS Design answered:
Die Strickschrift zeigt Hin- und Rückreihen, von der Vorderseite aus gesehen.
31.08.2012 - 09:38
|
|||||||||||||||||||||||||
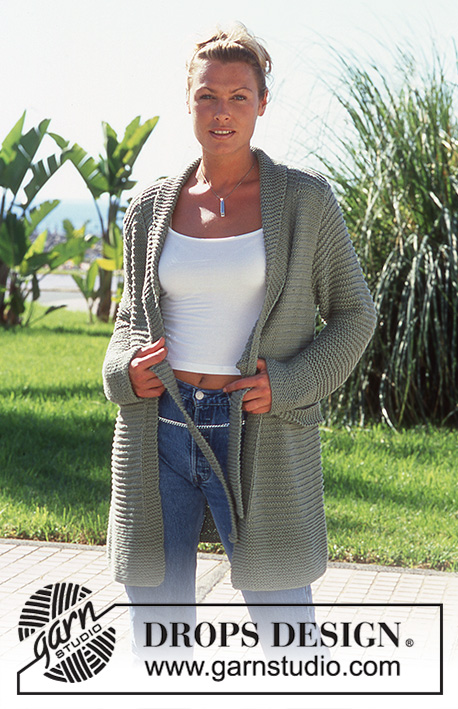
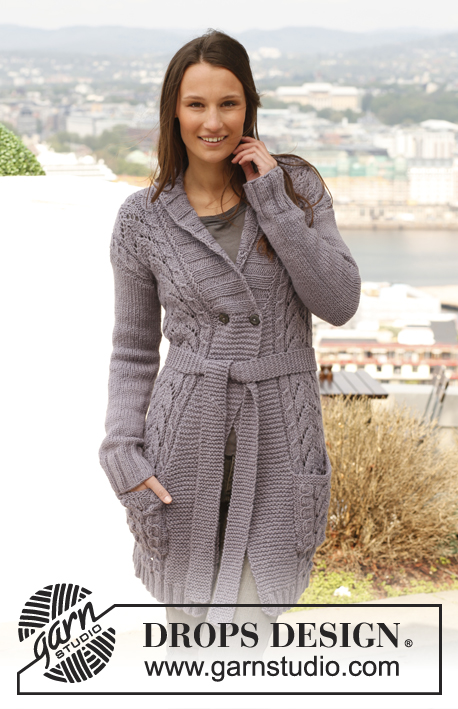
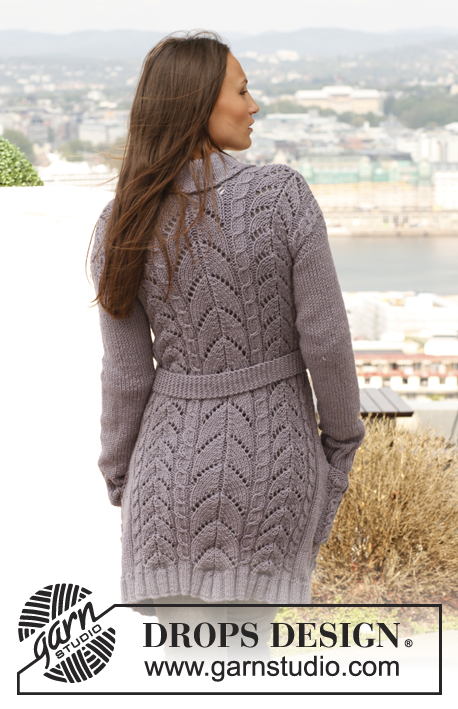
Birch Leaves#birchleavesjacket |
|||||||||||||||||||||||||
 |
 |
||||||||||||||||||||||||
Knitted DROPS jacket with cables, lace pattern and band collar in ”Nepal”. Size: S - XXXL.
DROPS 141-19 |
|||||||||||||||||||||||||
|
GARTER ST (back and forth on needle): K sts on all rows. PATTERN: See diagrams A.1 to A.7. Diagrams show all rows in pattern seen from RS. Choose diagram for your size. DECREASE TIP (applies to sides of body): All dec are done from RS! Dec as follows before marker: K 2 tog. Dec as follows after marker: Slip 1 st as if to K, K 1, psso. KNITTING TIP (applies to band): To avoid the front bands contracting at the front, work short rows over bands on every row marked with arrow in diagram A.5/A.6 as follows: * Beg from RS on right front piece (= mid front) on row marked with arrow in diagram and K 1 row over the outermost 16-16-18-18-22-22 sts (= band – the other sts on row are not worked), turn piece, tighten thread and K the rest of row, turn piece and work 1 row as before (in garter st and with pattern) over all sts, turn piece, K 1 row over the outermost 16-16-18-18-22-22 sts (= band on left front piece – the other sts on row are not worked), turn piece, tighten thread and K the rest of row *, repeat from *-* on every row marked with arrow in diagram. BUTTONHOLES: Bind off for 2 buttonholes on right band as follows: K tog third and fourth st from edge and make 1 YO, work until 5 sts remain on band, K the next 2 tog and make 1 YO. ---------------------------------------------------------- JACKET: Worked back and forth on circular needle from mid front. Cast on 239-251-269-305-335-347 sts (includes 16-16-18-18-22-22 band sts in each side towards mid front) on circular needle size 5 mm / US 8 with Nepal. P 1 row from WS. Work next row as follows from RS: K3 edge sts in GARTER ST – see explanation above , * K 3, P 3 *, repeat from *-* a total of 3-3-4-4-5-5 times, K 3, work diagram A.1 (choose diagram for your size = 35-35-35-44-44-44 sts), * K 3, P 3 *, repeat from *-* a total of 2-3-3-3-4-5 times, K 3, work diagram A.1 in sizes S + M + L (= 35 sts) and diagram A.2 in sizes XL + XXL + XXXL (= 44 sts), * K 3, P 3 *, repeat from *-* a total of 3-3-4-4-5-5 times, K 3, work diagram A.1 (choose diagram for your size = 35-35-35-44-44-44 sts), * K 3, P 3 *, repeat from *-* a total of 2-3-3-3-4-5 times, K 3, work diagram A.1 in sizes S + M + L (= 35 sts) and diagram A.2 in sizes XL + XXL + XXXL (= 44 sts), * K 3, P 3 *, repeat from *-* a total of 3-3-4-4-5-5 times, K 3 and K3 edge sts in GARTER ST. Continue rib like this until piece measures 5 cm / 2". Switch to circular needle size 6 mm / US 10 and work next row from RS as follows: K3 edge sts in garter st, K while AT THE SAME TIME dec 8-7-9-12-12-10 sts evenly over the next 21-21-27-27-33-33 sts, work last row in A.3 over sts from A.1 (choose diagram for your size = 9-9-9-10-10-10 sts dec), K while AT THE SAME TIME dec 5-7-7-7-11-11 sts evenly over the next 15-21-21-21-27-33 sts, work last row in A.3 in sizes S + M + L over sts from A.1 (= 9 sts dec) and work last row in A.4 in sizes XL + XXL + XXXL over sts from A.2 (= 10 sts dec), K while AT THE SAME TIME dec 6-4-4-10-8-4 sts evenly over the next 21-21-27-27-33-33 sts, work last row in A.3 over sts from A.1 (choose diagram for your size = 9-9-9-10-10-10 sts dec), K while AT THE SAME TIME dec 5-7-7-7-11-11 sts evenly over the next 15-21-21-21-27-33 sts, work last row in A.3 in sizes S + M + L over sts from A.1 (= 9 sts dec) and work last row in A.4 in sizes XL + XXL + XXXL over sts from A.2 (= 10 sts dec), K while AT THE SAME TIME dec 8-7-9-12-12-10 sts evenly over the next 21-21-27-27-33-33 sts and finish with K3 edge sts in garter st = 171-183-197-217-241-261 sts. Work 1 row from WS with K over K and P over P but K the outermost 16-16-18-18-22-22 sts in each side (= front bands). Then work pattern as follows, beg from RS - READ KNITTING TIP: 16-16-18-18-22-22 band sts in garter st, 0-1-3-0-2-4 sts in reverse stockinette st, work pattern according to diagram A.5 (choose diagram for your size = 26-26-26-34-34-34 sts), work in stockinette st over the next 10-14-14-14-16-22 sts, work A.5 in sizes S + M + L (= 26 sts) and A.6 in sizes XL + XXL + XXXL (= 34 sts), 0-1-3-0-2-4 sts in reverse stockinette st, work diagram A.7 (choose diagram for your size = 15-15-17-17-21-21 sts), 0-1-3-0-2-4 sts in reverse stockinette st, work A.5 (choose diagram for your size = 26-26-26-34-34-34 sts), work in stockinette st over the next 10-14-14-14-16-22 sts, work A.5 in sizes S + M + L (= 26 sts) and A.6 in sizes XL + XXL + XXXL (= 34 sts) and 0-1-3-0-2-4 sts in reverse stockinette st and 16-16-18-18-22-22 band sts in garter st. Insert 2 markers in the piece; 47-50-54-59-66-71 sts in from each side = 77-83-89-99-109-119 sts between markers on back piece. Continue pattern. REMEMBER THE GAUGE! When piece measures 10 cm / 4", dec 1 st on each side of both markers – READ DECREASE TIP (= 4 sts dec). Repeat dec every 10-10-10-8-9-9 cm / 4"-4"-4"-3⅛"-3½"-3½", 3-3-3-4-4-4 more times = 155-167-181-197-221-241 sts. When piece measures 50-52-54-56-58-60 cm / 19¾"-20½"-21¼"-22"-22¾"-23½", bind off for 2 buttonholes on right band - see explanation above! When piece measures 51-53-55-57-59-61 cm / 20"-21"-21⅝"-22½"-23¼"-24", bind off the first 15-15-17-17-21-21 sts on row, insert 1 marker (shows where to begin pick up for collar), work the rest of row. Turn piece, bind off the first 15-15-17-17-21-21 sts on row, insert 1 marker (this marks where to end the knit up for collar), work the rest of row = 125-137-147-163-179-199 sts. Continue pattern as before with 1 edge st in garter st in each side. When piece measures 63-65-67-69-71-73 cm / 24¾"-25½"-26⅜"-27⅛"-28"-28¾", bind off 2-4-4-4-6-8 sts in each side for armholes (i.e. 1-2-2-2-3-4 sts on each side of both markers) = 67-71-77-85-93-101 sts on back piece and 27-29-31-35-37-41 sts on front piece. Finish each part separately. BACK PIECE: Continue pattern as before with 1 edge st in garter st in each side. When piece measures 75-78-81-84-87-90 cm / 29½"-30¾"-32"-33"-34¼"-35½", bind off the middle 11-11-13-13-17-17 sts for neck and finish each shoulder separately. Then bind off 1 st on next row from neck = 27-29-31-35-37-41 sts remain on needle. Continue until piece measures 77-80-83-86-89-92 cm / 30⅜"-31½"-32¾"-33⅞"-35"-36¼" and bind off. RIGHT FRONT PIECE: Continue pattern as before with 1 edge st in garter st in each side. When piece measures 77-80-83-86-89-92 cm / 30⅜"-31½"-32¾"-33⅞"-35"-36¼" – make sure that same no of rows has been worked as on back piece, bind off. LEFT FRONT PIECE: Work as right front piece. SLEEVE: Worked in the round. Cast on 42-42-42-48-48-48 sts on double pointed needles size 5 mm / US 8 with Nepal. K 1 round, then work rib (= K 3/P 3). When rib measures 8 cm / 3⅛", switch to double pointed needles size 6 mm / US 10. K 1 round while AT THE SAME TIME dec 8-7-6-11-10-9 sts evenly = 34-35-36-37-38-39 sts. Then work in stockinette st. Insert 1 marker at the beg of round. When piece measures 10 cm / 4", inc 1 st on each side of marker mid under sleeve. Repeat inc every 13-10-7½-6-5-4 cm / 5⅛"-4"-2⅞"-2⅜"-2"-1½" 3-4-5-6-7-8 more times = 42-45-48-51-54-57 sts. When piece measures 52-52-51-50-48-45 cm / 20½"-20½"-20"-19¾"-19"-17¾" (shorter measurements in the larger sizes because of longer sleeve cap and wider shoulders), finish the piece back and forth on needle from mid under sleeve as follows: Sizes S + M + L + XL: Cast on 1 new st in each side (= edge st for assembly) and work until piece measures 53-53-52-51 cm / 21"-21"-20½"-20", loosely bind off. Size XXL + XXXL: Cast on 1 new st in each side (= edge st for assembly) and work until 2 rows remain before piece measures 50-48 cm / 19¾"-19". Now bind off 5 sts at beg of the next 2 rows before binding off all sts. ASSEMBLY: Sew the shoulder seams. Sew in sleeves inside 1 edge st (section worked back and forth at the top of sleeve should fit the bind off for armhole). Sew on buttons. COLLAR: Pick up sts from RS (inside 1 edge st) on circular needle size 5 mm / US 8 - start mid front at marker on right front piece: Knit up approx. 38 to 46 sts up to shoulder, then 16 to 22 sts along the neck, and 38 to 46 sts down along left front piece until marker = 92 to 114 sts. K 1 row from WS. Then K 1 row from RS while AT THE SAME TIME inc no of sts evenly to 137-143-149-155-161-167. Then work rib as follows (from WS): 1 edge st in garter st, * P 3, K 3 *, repeat from *-* until 4 sts remain and finish with P 3 and 1 edge st in garter st (from RS there are 3 K sts in each side inside edge st). Continue rib like this until collar measures approx. 5 cm / 2". Now inc 1 st in each of the middle 12 P-sections, seen from RS (= back of neck) = 149-155-161-167-173-179 sts. Continue with K over K and P over P until collar measures approx. 9-9-11-11-13-13 cm / 3½"-3½"-4½"-4½"-5"-5". Now work as follows: Work 1 row as before and slip the first 16 sts worked on a stitch holder, turn piece, work the rest of row and slip the first 16 sts worked at the beg of row on another stitch holder. Turn piece, work the rest of row and slip the first 15-15-15-18-18-18 sts worked at the beg of row on the first stitch holder, turn piece, work the rest of row and slip the first 15-15-15-18-18-18 sts worked at the beg of row on the other stitch holder. Continue like this by slipping the first 15-15-15-18-18-18 sts worked on stitch holder in each side until there are 61-61-61-70-70-70 sts in total on stitch holder in each side. Then slip sts from stitch holders back on needle and work 1 row as before over all the 149-155-161-167-173-179 sts – NOTE: To avoid holes in every transition where piece was turned, slip loop before next st twisted on needle and work tog with first st on needle. On next row bind off with K over K and P over P. Neatly fasten collar with stitches in each side towards band – sew edge to edge to avoid a chunky seam. POCKET: Worked back and forth on circular needle. Cast on 28-28-28-36-36-36 sts on circular needle size 6 mm / US 10 with Nepal. Work pattern according to diagram A.5 (choose diagram for your size) with 1 edge st in garter st in each side. When pocket measures approx. 17-17-17-20-20-20 cm / 6¾"-6¾"-6¾"-8"-8"-8" – stop after one whole repetition of lace pattern in the middle – dec from RS 2 sts over each cable and 3 sts over lace pattern in the middle = 21-21-21-27-27-27 sts. Switch to circular needle size 5 mm / US 8 and K 4 rows and bind off with K from WS. Knit another pocket but in sizes XL + XXL + XXXL work diagram A.6 instead of A.5. Sew 1 pocket on to each front piece with stitches inside 1 edge st - approx. 13-13-13-17-17-17 cm / 5"-5"-5"-6¾"-6¾"-6¾" from bottom edge (try the jacket on for placement) – pattern on pocket should fit pattern repetition on front piece. BELT: Cast on 9 sts on needle size 5 mm / US 8 and work in garter st back and forth until belt measures approx. 150-190 cm / 59"-75", bind off. |
|||||||||||||||||||||||||
Diagram explanations |
|||||||||||||||||||||||||
|
|||||||||||||||||||||||||
 |
|||||||||||||||||||||||||
 |
|||||||||||||||||||||||||
Have you finished this pattern?Tag your pictures with #dropspattern #birchleavesjacket or submit them to the #dropsfan gallery. Do you need help with this pattern?You'll find 19 tutorial videos, a Comments/Questions area and more by visiting the pattern on garnstudio.com. © 1982-2026 DROPS Design A/S. We reserve all rights. This document, including all its sub-sections, has copyrights. Read more about what you can do with our patterns at the bottom of each pattern on our site. |
|||||||||||||||||||||||||


With over 40 years in knitting and crochet design, DROPS Design offers one of the most extensive collections of free patterns on the internet - translated to 17 languages. As of today we count 324 catalogs and 12290 patterns - 12280 of which are translated into English (US/in).
We work hard to bring you the best knitting and crochet have to offer, inspiration and advice as well as great quality yarns at incredible prices! Would you like to use our patterns for other than personal use? You can read what you are allowed to do in the Copyright text at the bottom of all our patterns. Happy crafting!
Post a comment to pattern DROPS 141-19
We would love to hear what you have to say about this pattern!
If you want to leave a question, please make sure you select the correct category in the form below, to speed up the answering process. Required fields are marked *.