
Popular categories
Looking for a yarn?


Comments / Questions (28)
![]() Ida wrote:
Ida wrote:
Stämmer det i mönstret till mössan att " * Sticka 2 cm slätst, sticka alla m räta tills 2 och 2 *, upprepa *-* 1 gång till" efter att man stickat klart a2? Ska jag alltså sticka slätstickning flera varv i 2cm innan jag gör ett varv med alla räta 2 o 2 tillsammans?
27.01.2019 - 00:22DROPS Design answered:
Jo, du stickar 2 cm i slätstickning, sedan minskar du och så upprepar du med 2 cm slätstickning och 1 varv med minskningar en gång till.
28.01.2019 - 19:00
![]() Edna Übel wrote:
Edna Übel wrote:
Hallo, ich möchte den Schal schmaler stricken. Durch wieviel muss die Anzahl der aufzunehmenden Maschen teilbar sein?
12.12.2018 - 21:39DROPS Design answered:
Liebe Frau Übel, leider können wir nicht jede Anleitung nach jeder individuellen Frage anpassen. Nehmen Sie bitte Kontakt mit dem Laden auf, wo Sie die Wolle gekauft haben - auch telefonisch oder per E-Mail. Viel Spaß beim stricken!
13.12.2018 - 09:23
![]() Paola wrote:
Paola wrote:
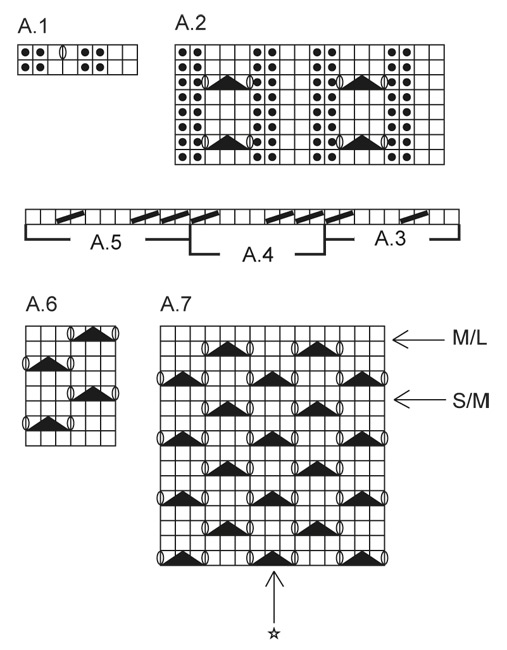
Grazie, ma ho ancora una domanda : il 2^ ferro del diagramma M2 e' lavorato da destra verso sinistra? E le 2 maglie al rovescio dopo le 4 di vivagno ci devono essere sempre? Grazie ancora. Paola
23.11.2015 - 22:34DROPS Design answered:
Buonasera Paola. Al secondo ferro (e in tutti i ferri pari) legge il diagramma da destra verso sinistra e lavora come segue: 4 m vivagno, ripete 5 volte e mezzo il diag. A.2, 2 m dir (sono le 2 m che al ferro precedente ha lavorato a rov), 4 m vivagno. In questo modo il motivo dovrebbe risultare allineato. Buon lavoro!
24.11.2015 - 15:40
![]() Paola wrote:
Paola wrote:
Grazie, ma ho ancora una domanda : il 2^ ferro del diagramma M2 e' lavorato da destra verso sinistra? E le 2 maglie al rovescio dopo le 4 di vivagno ci devono essere sempre? Grazie ancora. Paola
23.11.2015 - 18:25DROPS Design answered:
Buonasera Paola. Al secondo ferro (e in tutti i ferri pari) legge il diagramma da destra verso sinistra e lavora come segue: 4 m vivagno, ripete 5 volte e mezzo il diag. A.2, 2 m dir (sono le 2 m che al ferro precedente ha lavorato a rov), 4 m vivagno. In questo modo il motivo dovrebbe risultare allineato. Buon lavoro!
23.11.2015 - 18:40
![]() Paola wrote:
Paola wrote:
Grazie, ma ho ancora una domanda : il 2^ ferro del diagramma M2 e' lavorato da destra verso sinistra? E le 2 maglie al rovescio dopo le 4 di vivagno ci devono essere sempre? Grazie ancora. Paola
23.11.2015 - 17:52DROPS Design answered:
Buonasera Paola. Al secondo ferro (e in tutti i ferri pari) legge il diagramma da destra verso sinistra e lavora come segue: 4 m vivagno, ripete 5 volte e mezzo il diag. A.2, 2 m dir (sono le 2 m che al ferro precedente ha lavorato a rov), 4 m vivagno. In questo modo il motivo dovrebbe risultare allineato. Buon lavoro!
23.11.2015 - 18:40
![]() Paola wrote:
Paola wrote:
Ho un problema col motivo A2 : sul ferro ci sono 109 maglie, si inizia dal rovescio del lavoro, viene lavorato da destra a sinistra, 2^ ferro da sinistra a destra che è quello col motivo che è formato da 18 maglie, ma 101 (ho tolto le 8 maglie di vivagno) non è un multiplo di 18 quindi i ferri successivi non hanno una sequenza cioè non vedo i buchi in verticale ma sfalsati e neanche con senso logico. Alla fine del ferro rimangono 11 maglie (escluso il vivagno). Non capisco dove sbaglio. Grazie
20.11.2015 - 21:52DROPS Design answered:
Buongiorno Paola. Il motivo inizia sul rovescio del lavoro. La prima riga viene letta da sinistra verso destra. Deve lavorare 4 m vivagno, 2 m rov, ripete il diagramma fino a quando non rimangono 4 m , 4 m vivagno. Il diagramma viene ripetuto 5 volte e mezzo (il motivo è formato da 9 m, nel diagramma sono presentate due ripetizioni) . Ci riscriva se ancora in difficoltà. Buon lavoro!
22.11.2015 - 16:22Shirley wrote:
Hi please help me understand how after i finish A5 which is k2 tog I will end up with 77 stitches. Thank you
29.10.2015 - 19:56DROPS Design answered:
Dear Shirley, when piece measures 22 cm (or after 1st or 5th row), work as follows from RS: 4 sts as before, A.3 (= K2, K2 tog, K3, K2 tog), then repeat A.4 (= *K2 tog, K2 tog, K3, K2 tog*, repeat from *-* until 15 sts remain on left needle, then work A.5 (= K2 tog, K2 tog, K3, K2 tog, K2), and work the last 4 sts as before = 77 sts. Happy knitting!
30.10.2015 - 09:59
![]() Jocelyne wrote:
Jocelyne wrote:
Je ne comprends pas le patron de cette écharpe.on commence avec 258 mailles et on finit avec 77 mailles. Merci!
01.03.2015 - 02:02DROPS Design answered:
Bonjour Jocelyne, on commence effectivement l'écharpe avec 258 m et on diminue comme indiqué pour obtenir 98 m, puis, on augmente 2 m au dernier rang de A.1 (109 m), puis on tricote A.2 et enfin, on tricote A.3, A.4, A.5 (= rang de diminution) pour terminer à 77 m. On tricote une 2ème pièce identique et on les assemble entre elles au niveau des mailles rabattues. Bon tricot!
02.03.2015 - 09:03
![]() Katia wrote:
Katia wrote:
Perfetto ora tutto torna!! Grazie ancora
21.10.2014 - 13:50
![]() Katia wrote:
Katia wrote:
Buonasera, sto cercando di realizzare la sciarpa ma mi sono arenata, non mi sono chiari un paio di passaggi: 1. le maglie di vivagno vanno portate avanti per tutta la lunghezza della sciarpa? 2. se il diagramma A1 rappresenta due giri (ferri) l'ultimo ferro non vedo dove comporti aumenti, lo leggo così (a dritto): primo ferro: 2 rov, 1 dir, 1 gettato, 1 dir, 2 rov, 2 dir ultimo ferro: 2 rov, 2 dir, 2 rov, 2 dir in cosa sto sbagliando? Grazie mille per l'aiuto.
20.10.2014 - 16:52DROPS Design answered:
Buonasera Katia. Sì, bisogna lavorare sempre le 4 m vivagno ai due lati. I diagrammi vengono letti dal basso verso l'alto e da destra verso sinistra. Quindi l'ultimo ferro del diagramma A1 viene lavorato in questo modo, sul diritto: 2 dir, 2 rov, 1 dir, 1 gettato (= aumento), 1 dir, 2 rov. Ci riscriva se ancora in difficoltà. Buon lavoro!
20.10.2014 - 21:46
|
||||||||||||||||
Delilah#delilah |
||||||||||||||||
 |
 |
|||||||||||||||
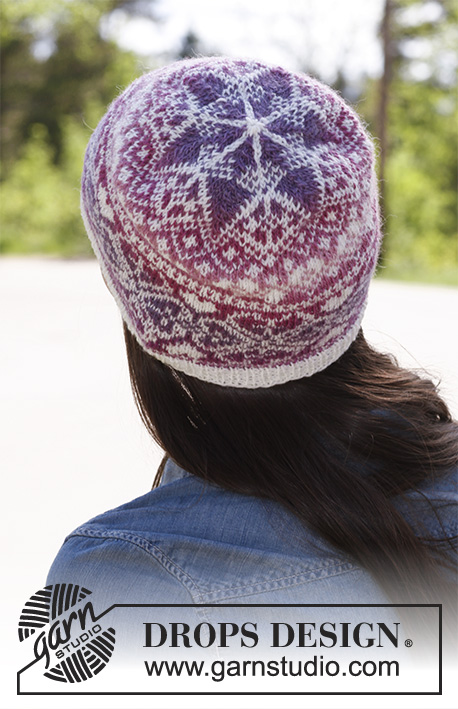
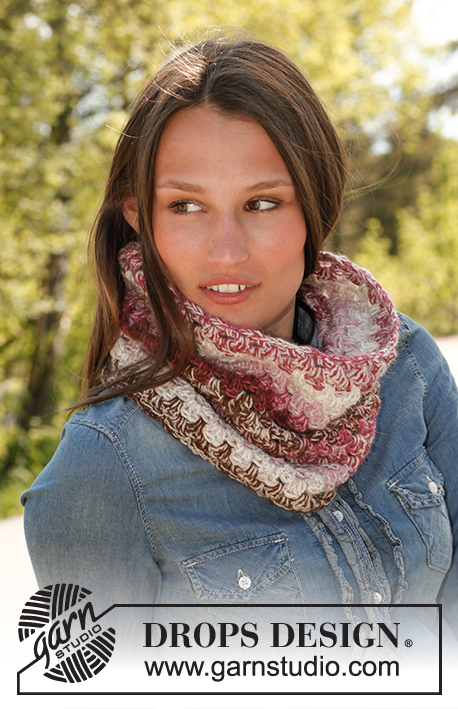
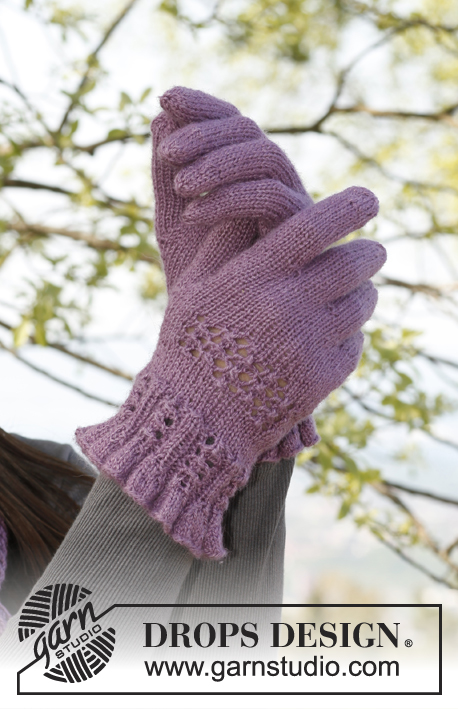
Knitted DROPS hat and scarf and gloves with lace pattern in ”BabyAlpaca Silk”.
DROPS 142-3 |
||||||||||||||||
|
HAT AND SCARF: PATTERN: See diagrams A.1 to A.6. Diagrams show all rows in pattern seen from RS. GARTER ST (back and forth on needle): K sts on all rows. ---------------------------------------------------------- HAT: Worked in the round on circular needle. Cast on 104-112 sts on circular needle size 2.5 mm / US 1.5 with BabyAlpaca Silk. K 1 round, then work rib (= K 2/P 2). When piece measures 4-5 cm / 1½"-2", work next round as last round in diagram A.1 = 117-126 sts on needle. Switch to circular needle size 3 mm / US 2.5 and work PATTERN according to diagram A.2 until piece measures 22-23 cm / 8¾"-9". Work next round as follows: * K 2, P 2 tog, slip 1 st as if to K, K 2 tog, psso, P the next 2 tog *, repeat from *-* the entire round = 65-70 sts remain on needle (switch to double pointed needles when needed). * Work 2 cm / ¾" in stockinette st, next round K2 tog around *, repeat from *-* 1 more time = 17-18 sts remain on needle. Cut the thread and pull it through the remaining sts, tighten tog and fasten. SCARF: The scarf consist of 2 equal pieces that are sewn together in the middle at the end. Cast on 258 sts on needle size 3 mm / US 2.5 with BabyAlpaca Silk. P 1 row from WS. Then work next row as follows from RS: 4 edge sts in GARTER ST - see explanation above - * K 8, P 3 *, repeat from *-* until 12 sts remain and finish with K 8 and 4 edge sts in GARTER ST. Continue rib like this with 4 edge sts in garter st in each side until piece measures 3 cm / 1⅛". On next row from RS dec 1 st on each side of every K-section by working all K 8 sts as follows (P 3 as before): Slip 1 st as if to K, K 1, psso, K until 2 sts remain, K 2 tog. Repeat dec on every row from RS 2 more times = 120 sts (all K 8 sts are now dec to K 2). Continue with K over K and P over P. AT THE SAME TIME on next row from RS dec all 3 P sts to 2 P sts (P tog the first 2 sts) = 98 sts. On next row from RS inc as shown on last row in diagram A.1 = 109 sts. Then work PATTERN according to diagram A.2 - beg from WS as follows: 4 edge sts as before, P 2, work A.2 until 4 sts remain and finish with 4 edge sts as before. When piece measures approx. 22 cm / 8¾" – stop after 1st or 5th row in diagram – work next row as follows from RS: 4 edge sts as before, work A.3 one time, then work A.4 until 15 sts remain on row, finish with A.5 and then 4 edge sts as before = 77 sts remain on needle. Then work A.6 with 4 edge sts in each side as before until piece measures approx. 80 cm / 31½" – make sure that next row is from RS. K 1 row while AT THE SAME TIME dec 5 sts evenly = 72 sts on needle. K 1 row from WS and then loosely bind off with K from RS. Knit another piece the same way. ASSEMBLY: Sew the two pieces tog in outermost sts along bind off edge. Scarf measures approx. 160 cm / 63" in length. ---------------------------------------------------------- GLOVES: PATTERN: See diagrams A.1, A.2 and A.7. INCREASE TIP: Inc 1 st by making 1 YO. To avoid holes K YO twisted on next round. ---------------------------------------------------------- LEFT GLOVE: Worked in the round on double pointed needles. Cast on 110-132 sts on double pointed needles size 2.5 mm / US 1.5 with BabyAlpaca Silk. K 1 round. Work next round as follows: * K 8, P 3 *, repeat from *-* the entire round. Continue rib like this until rib measures 1 cm / ⅜". On next round dec 1 st on each side of every K-section by working all K 8 sts as follows (P 3 as before): Slip 1 st as if to K, K 1, psso, K until 2 sts remain, K 2 tog. Repeat dec on every other round 2 more times = 50-60 sts (all K 8 sts are now dec to K 2). Work 1 round with K over K and P over P. On next round dec all 3 P sts to 2 P sts (P tog the first 2 sts) = 40-48 sts. Work 1 round with K over K and P over P, then inc as shown on last round in diagram A.1 = 45-54 sts. Then work PATTERN according to diagram A.2. When piece measures 6-7 cm / 2⅜"-2¾" – stop after 2nd, 6th, 10th or 14th round in diagram, K 1 round while AT THE SAME TIME inc 3 sts evenly in Size S/M (do not inc in Size M/L) = 48-54 sts. Insert a marker in the 12th-13th st on round - NOW MEASURE PIECE FROM HERE. READ ALL OF THE FOLLOWING SECTION BEFORE CONTINUING! When piece measures 2 cm / ¾", beg inc for thumb gusset. Inc 1 st on each side of next to last st on round (i.e. inside hand) – READ INCREASE TIP. Repeat inc on each side of the inc sts on every 3rd round 4-5 more times = 11-13 thumb sts and 58-66 sts in total. AT THE SAME TIME when piece measures 3 cm / 1⅛", work PATTERN according to diagram A.7 mid on top of hand (st with marker should fit with st marked with arrow and star in diagram). When A.7 has been worked one time vertically (stop at arrow for your size), continue in stockinette st in the round over all sts. AT THE SAME TIME when piece measures 6-7 cm / 2⅜"-2¾", slip thumb sts + 1 st on each side (= 13-15 sts) on a stitch holder. Cast on 3 new sts behind the thumb = 48-54 sts. Continue in stockinette st in the round until piece measures 10-11 cm / 4"-4½". Now slip the first 19-21 sts on top of hand on a stitch holder, keep the next 11-12 sts on needle and slip the last 18-21 sts inside the hand on another stitch holder. LITTLE FINGER: = 11-12 sts, cast on 1 new st towards sts on stitch holders = 12-13 sts. Work in stockinette st in the round for approx. 5½-6½ cm / 2¼"-2½", then K2 tog around. Cut the thread and pull it through the remaining sts, tighten tog and fasten. HAND: Slip sts from stitch holders back on the needles, in addition pick up 2 sts towards the little finger = 39-44 sts. Work 2 rounds in stockinette st. Keep the 2 sts that were picked up towards the little finger + 6-6 sts on top of hand and 5-6 sts inside the hand on the needle. Slip the remaining sts back on the stitch holders (= 13-15 sts on top of hand and 13-15 sts inside the hand). RING FINGER: = 13-14 sts, cast on 1 new st towards sts on stitch holders = 14-15 sts. Work in stockinette st in the round for approx. 7-8 cm / 2¾"-3⅛", then K2 tog around. Cut the thread and pull it through the remaining sts, tighten tog and fasten. MIDDLE FINGER: Slip 6-7 sts from each stitch holder back on needle, in addition pick up 2 sts towards the ring finger and cast on 1 new st towards sts on stitch holders = 15-17 sts. Work in stockinette st in the round for approx. 7½-8½ cm / 2⅞"-3¼", then K2 tog around. Cut the thread and pull it through the remaining sts, tighten tog and fasten. INDEX FINGER: Slip the remaining 14-16 sts from stitch holders back on needles, in addition pick up 2 sts towards the middle finger = 16-18 sts. Work in stockinette st in the round for approx. 6½-7½ cm / 2½"-2⅞", then K2 tog around. Cut the thread and pull it through the remaining sts, tighten tog and fasten. THUMB: Slip the sts over thumb gusset on the needles and in addition pick up 3 sts along the edge behind the thumb sts = 16-18 sts. Work in stockinette st in the round for approx. 5½-6 cm / 2¼"-2½", then K2 tog around. Cut the thread and pull it through the remaining sts, tighten tog and fasten. RIGHT GLOVE: Work as left glove but reversed, i.e. insert a marker in the 37th-42nd st on round (instead of the 12th-13th st) and inc for thumb gusset on each side of second st on round instead of next to last st on round. |
||||||||||||||||
Diagram explanations |
||||||||||||||||
|
||||||||||||||||
 |
||||||||||||||||
Have you finished this pattern?Tag your pictures with #dropspattern #delilah or submit them to the #dropsfan gallery. Do you need help with this pattern?You'll find 12 tutorial videos, a Comments/Questions area and more by visiting the pattern on garnstudio.com. © 1982-2026 DROPS Design A/S. We reserve all rights. This document, including all its sub-sections, has copyrights. Read more about what you can do with our patterns at the bottom of each pattern on our site. |
||||||||||||||||


With over 40 years in knitting and crochet design, DROPS Design offers one of the most extensive collections of free patterns on the internet - translated to 17 languages. As of today we count 325 catalogs and 12298 patterns - 12288 of which are translated into English (US/in).
We work hard to bring you the best knitting and crochet have to offer, inspiration and advice as well as great quality yarns at incredible prices! Would you like to use our patterns for other than personal use? You can read what you are allowed to do in the Copyright text at the bottom of all our patterns. Happy crafting!
Post a comment to pattern DROPS 142-3
We would love to hear what you have to say about this pattern!
If you want to leave a question, please make sure you select the correct category in the form below, to speed up the answering process. Required fields are marked *.