
Popular categories
Looking for a yarn?


Comments / Questions (109)
![]() Angela wrote:
Angela wrote:
Dopo che ho finito le spalline, e messo in un unico ferro il davanti e il dietro,li devo lavorare separatamente o insieme tipo raglan, grazie in anticipo per la risposta
27.05.2015 - 13:21DROPS Design answered:
Buongiorno Angela, una volta finite le spalline, deve mettere le m del davanti e del dietro sullo stesso f circolare e lavorare seguendo esattamente le istruzioni indicate nel paragrafo (davanti&dietro), da qui in avanti si lavora in tondo. Ci riscriva se qualcosa non è chiaro. Buon lavoro!
27.05.2015 - 13:28
![]() Menard Sylvie wrote:
Menard Sylvie wrote:
C'est possible de commencer à tricoter l'encolure en une seule fois avec Les aiguilles circulaires toujours de haut en bas ?
25.02.2015 - 21:21DROPS Design answered:
Bonjour Mme Menard, vous pouvez recalculer les bretelles et l'empiècement pour les tricoter en rond, ou simplement les tricoter en allers et retours comme indiqué, et reprendre ensuite le dos et le devant pour les tricoter en rond jusqu'en bas. Bon tricot!
26.02.2015 - 09:15
![]() Lucia wrote:
Lucia wrote:
Si.. infatti ho visto che mentre il lavoro va avanti le spalline prendono forma..:-)grazie e buona giornata
09.06.2014 - 09:21
![]() Lucia wrote:
Lucia wrote:
Salve , molto bello questo modello,sembra anche facile, ma non capisco le spalline come si devono fare. Grazie
08.06.2014 - 00:40DROPS Design answered:
Buonasera Lucia. Il top viene lavorato dall’alto verso il basso. Le spalline vengono lavorate subito all’inizio unitamente alla parte a legaccio della parte superiore del top. Le m delle spalline corrispondono alle prime e alle ultime m sul ferro (quelle prima del primo segno e dopo il secondo segno). Seguendo attentamente le indicazioni riportate nella sezione DIETRO e in quella DAVANTI , dovrebbe riuscire a realizzare il capo, ma ci riscriva se si trova ancora in difficoltà. Buon lavoro!
08.06.2014 - 16:43
![]() Annamaria wrote:
Annamaria wrote:
Buonasera.Leggendo l'istruzione avviare le maglie con i ferri nr 3.Proseguire con i ferri 2,5,forse ci saràun errore di battitura grazie
17.04.2014 - 19:14DROPS Design answered:
Buonasera Annamaria, non c'è nessun errore nelle spiegazioni, il lavoro viene avviato con mezzo numero di ferri in più per rendere più morbido il bordo. Buon lavoro!!
17.04.2014 - 21:21
![]() Alice wrote:
Alice wrote:
Vorrei segnalare un errore dello schema, all'inzio dice di lavorare a legaccio e fare tutti i ferri a dritto, ma in quel punto la lavorazone è circolare quindi va fatto un giro a dritto e uno rovescio.
13.03.2014 - 13:28DROPS Design answered:
Buongiorno Alice, il davanti e il dietro all'inizio vengono lavorati avanti e indietro, per cui lavorare a legaccio significa lavorare tutti i f a dir; solo in seguito la lavorazione prosegue in tondo. Buon lavoro!!
13.03.2014 - 13:54
![]() Kasdorf wrote:
Kasdorf wrote:
Bonjour, puis-je tricoter ce modèle avec des aiguilles normales? merci pour votre réponse
05.03.2014 - 12:17DROPS Design answered:
Bonjour Mme Kasdorf, le haut du devant et du dos se tricotent d'abord séparément en allers et retours, mais ensuite, on tricote en rond avec le point fantaisie sur les côtés. Il vous faudra tout recalculer pour tomber juste, ou consultez nos vidéos (cf onglet "vidéos" à droite de la photo) pour apprendre à tricoter en rond. Beaucoup ont finalement adopté cette technique après essai. Bon tricot!
05.03.2014 - 14:32
![]() Anja wrote:
Anja wrote:
Bei M1 würde ich anstatt "1 M. re. abheben, 1 re., die abgehobene über die gestrickte ziehen" lieber "2 re. zusammen" stricken und umgekehrt. Ergibt ein schöneres Musterbild.
15.02.2014 - 15:34
![]() Ein Gecko wrote:
Ein Gecko wrote:
Hallo, in der Anleitung (Vorderteil) steht: "Mit Rundnadel 2,5 100 maschen anschlagen und zu Rundnadel 2,5 wechseln" Ist das ein Schreibfehler, und ich soll zu 3,0 wechseln? Von 2,5 brauche ich ja nicht auf 2,5 zu wechseln... Vielen Dank.
23.07.2013 - 14:14DROPS Design answered:
Danke für den Hinweis! Es wird zu Nadel 3 gewechselt, die Anleitung ist nun korrigiert.
24.07.2013 - 08:30
![]() Sabine Beier wrote:
Sabine Beier wrote:
Ups. :-P - DANKE, dass hatte ich übersehen... LG
15.05.2013 - 08:07
|
||||||||||||||||
Simply Summer#simplysummertop |
||||||||||||||||
 |
 |
|||||||||||||||
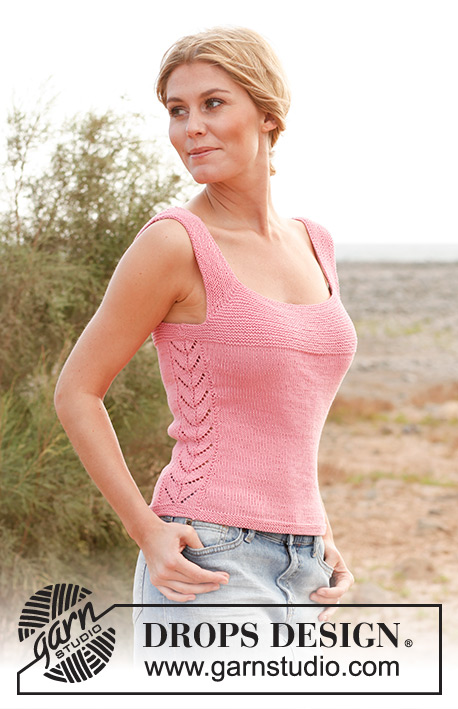
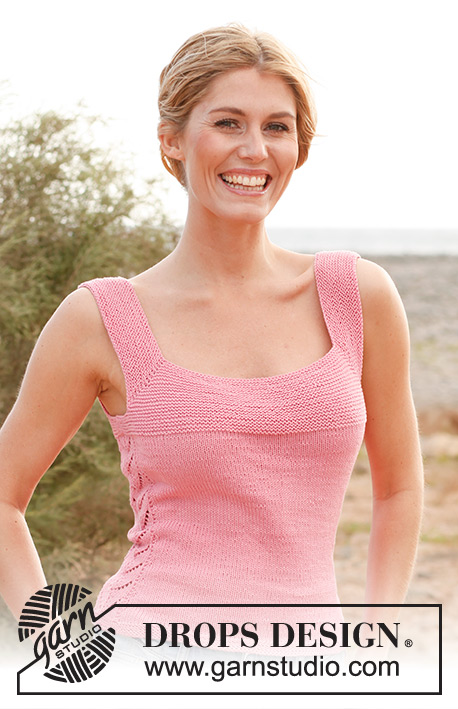
Knitted DROPS top in garter st and with lace pattern, worked top down in ”Safran”. Size: S - XXXL
DROPS 137-2 |
||||||||||||||||
|
GARTER ST (back and forth on needle): K all rows. 1 ridge = K 2 rows. GARTER ST (in the round on circular needle): * K 1 round and P 1 round *, repeat from *-*. PATTERN: See diagram M.1 – the diagram shows 1 repetition of the pattern. DECREASE TIP (applies to side dec): Dec as follows when 2 sts remain BEFORE diagram M.1: K 2 tog. Dec as follows AFTER diagram M.1: Slip 1 st as if to K, K 1, psso. INCREASE TIP (applies to side inc): Work until 1 st in stockinette st remains before diagram M.1, make 1 YO, 1 st in stockinette st, work diagram M.1 and 1 st in stockinette st, make 1 YO. On next round K YOs twisted (i.e. work in back loop of st instead of front) to avoid holes. -------------------------------------------------------- TOP: Worked top down. Front and back piece are worked separately, then put tog and worked in the round. FRONT PIECE: Worked back and forth on circular needle. Cast on 100-100-108-108-115-121 sts on circular needle size 3 mm / US 2or3 with Safran. Switch to circular needle size 2.5 mm / US 1or2. Insert a marker in the 27th-27th-30th-30th-32nd-35th st in from each side (= 46-46-48-48-51-51 sts between sts with markers). K 1 row from WS. Continue with K on all rows (= garter st). AT THE SAME TIME on next row, inc 1 st on each side of the 2 sts with markers – inc by making 1 YO, on next row K YOs twisted (i.e. work in back loop of st instead of front) to avoid holes. Repeat inc every other row a total of 14-17-17-19-19-22 times = 156-168-176-184-191-209 sts. K 1 row from WS after last inc. REMEMBER THE GAUGE! Now piece measures approx. 6-7-7-8-8-9 cm / 2⅜"-2¾"-2¾"-3⅛"-3⅛"-3½". Work next row as follows (from RS): Loosely bind off the first 40-43-46-48-50-56 sts (= strap), K the next 76-82-84-88-91-97 sts (the first of these sts is already on right needle), and loosely bind off the last 40-43-46-48-50-56 sts (= strap), cut the yarn. Work next row from WS as follows: Cast on 7-9-13-16-20-24 new sts at beg of row, work the 76-82-84-88-91-97 sts from needle and cast on 7-9-13-16-20-24 new sts at the end of row = 90-100-110-120-131-145 sts. Work in garter st back and forth for 3-3-3-4-4-4 cm / 1⅛"-1⅛"-1⅛"-1½"-1½"-1½" – AT THE SAME TIME after 2-2-2-3-3-3 cm / ¾"-¾"-¾"-1⅛"-1⅛"-1⅛", dec 1 st in each side by K tog the 2 second outermost sts from RS = 88-98-108-118-129-143 sts. Put piece aside. BACK PIECE: Cast on and work as front piece. BODY: Slip front and back piece on to same circular needle size 3 mm / US 2or3 = 176-196-216-236-258-286 sts. NOW MEASURE PIECE FROM HERE! Then work diagram M.1 over 16 sts in each side (i.e. 8 sts from back piece and 8 sts from front piece = mid under sleeve). Work the other sts in stockinette st. AT THE SAME TIME when piece measures 2 cm / ¾", dec 1 st on each side of diagram M.1 in each side - SEE DECREASE TIP! Repeat dec every 2½ cm / ⅞" a total of 6-6-6-6-5-5 times = 152-172-192-212-238-266 sts. When piece measures 18 cm / 7", inc 1 st on each side of diagram M.1 - SEE INCREASE TIP! Repeat inc every 2 cm / ¾" a total of 6 times = 176-196-216-236-262-290 sts. When piece measures approx. 30-31-32-32-33-33 cm / 11¾"-12¼"-12½"-12½"-13"-13" (50-52-54-56-58-60 cm / 19¾"-20½"-21¼"-22"-22¾"-23⅝" in total) - stop after 1 full repetition of diagram M.1, switch to circular needle size 2.5 mm / US 1or2. Work in GARTER ST in the round over all sts for 2 cm / ¾" - see explanation above! Then loosely bind off with K – use circular needle size 3 mm / US 2or3 when casting/binding off (it is very important that the bind off edge is not too tight). The top measures approx. 52-54-56-58-60-62 cm / 20½"-21¼"-22"-22¾"-23⅝"-24⅜" vertically. ASSEMBLY: Sew shoulder seams and side seams edge to edge in front loop of outermost st to avoid chunky and visible seams. |
||||||||||||||||
Diagram explanations |
||||||||||||||||
|
||||||||||||||||
 |
||||||||||||||||
 |
||||||||||||||||
Have you finished this pattern?Tag your pictures with #dropspattern #simplysummertop or submit them to the #dropsfan gallery. Do you need help with this pattern?You'll find 7 tutorial videos, a Comments/Questions area and more by visiting the pattern on garnstudio.com. © 1982-2026 DROPS Design A/S. We reserve all rights. This document, including all its sub-sections, has copyrights. Read more about what you can do with our patterns at the bottom of each pattern on our site. |
||||||||||||||||


With over 40 years in knitting and crochet design, DROPS Design offers one of the most extensive collections of free patterns on the internet - translated to 17 languages. As of today we count 324 catalogs and 12290 patterns - 12280 of which are translated into English (US/in).
We work hard to bring you the best knitting and crochet have to offer, inspiration and advice as well as great quality yarns at incredible prices! Would you like to use our patterns for other than personal use? You can read what you are allowed to do in the Copyright text at the bottom of all our patterns. Happy crafting!
Post a comment to pattern DROPS 137-2
We would love to hear what you have to say about this pattern!
If you want to leave a question, please make sure you select the correct category in the form below, to speed up the answering process. Required fields are marked *.