
Popular categories
Looking for a yarn?


Comments / Questions (59)
![]() Carina wrote:
Carina wrote:
Syns oppskriften må oppdateres med mer detaljert informasjon og kanskje noen videor som viser feks venstre skulder, halsen og armhulene. Plukk opp rundt hals er jo ok, men hva menes med å strikke 1 p vrang på vrangen? Skal man snu hele kjolen? Må si denne oppskriften er en av de verste dere har.
11.03.2026 - 06:04
![]() Joke wrote:
Joke wrote:
Hallo, ik wilde de filmpjes bekijken, maar ik krijg er geen geluid bij, ik heb wel alle geluiden aangezet (op de pc en op het filmpje) Dank u Joke
12.09.2025 - 10:37DROPS Design answered:
Dag Joke,
Klopt, de filmpjes hebben geen geluid. Op die manier kunnen ze in alle talen gebruiken. Er staat wel een beschrijving bij ieder filmpje.
12.09.2025 - 21:34
![]() Helle Reinhold wrote:
Helle Reinhold wrote:
Kan man ikke hækle dem i stedet , jeg ville nu ønske der var strikket knaphuller i stedet ?
23.05.2025 - 15:29DROPS Design answered:
Hei Helle. Du kan fint hekle en knappesnor istedefor å tvinne 2 tråder. mvh DROPS Design
26.05.2025 - 12:44
![]() Helle Reinhold wrote:
Helle Reinhold wrote:
Hvordan skal jeg lave knaphullet for det er jo ikke lavet ved at lukke masker af ?
22.05.2025 - 14:01DROPS Design answered:
Hej Helle, du laver en strop som sys i kanten, det er beskrevet nede i stykket Montering :)
23.05.2025 - 07:33
![]() Inger Torill Nannestad wrote:
Inger Torill Nannestad wrote:
Hvordan strikker jeg rille i armhulen 🤔
05.03.2025 - 21:12DROPS Design answered:
Hei Inger Torill, Rillemaskene ved ermhullene strikkes rett fra både retten og vrangen. God fornøyelse!
06.03.2025 - 06:25
![]() Inger Lill Raundalen wrote:
Inger Lill Raundalen wrote:
Etter deling til ermer: Skal man følge mønsteret, må man slite tråden svært mange ganger for å få begge fargene på samme side, når man skal strikke med begge fargene
26.07.2024 - 22:05
![]() Maria wrote:
Maria wrote:
Wo kommen die Knöpfe hin? Auf die linke Schulter des Vorderteils?
20.05.2024 - 15:34DROPS Design answered:
Liebe Maria, ja genau, die Knöpfe werden auf die linke Schulter vom Vorderteil angenäht. Viel Spaß beim Stricken!
21.05.2024 - 13:32
![]() Vivian LaColla wrote:
Vivian LaColla wrote:
I just answered my own question about binding off......I should NOT have started with a bindoff.....Now I have the 76th stitch in the middle of the bind off.......ug....I have to rip out!!!
27.02.2024 - 21:36
![]() Vivian LaColla wrote:
Vivian LaColla wrote:
I absolutely love this pattern. I am at row 4 of M5, I have to bind off 4 stitches on each side of the marker. Do I bind off the first four stitches of the beginning of the round then bind off the last four at the end of the round (also binding off on the other marker) Do I start the round with a bind off? Also, I'm nervous about continuing the beautiful pattern while doing a stockinette stitch. Any advice? Any videos? I knit American not Continental. Thank you!!
27.02.2024 - 21:00DROPS Design answered:
Hi Vivian, You bind off 8 stitches for each armhole (4 stitches on each side of both markers). Start the round by binding off 4 stitches, bind off 8 stitches on each side of the second marker and bind off the last 4 stitches on the round. Happy knitting!
28.02.2024 - 06:58
![]() Pascale wrote:
Pascale wrote:
Bonjour. Ce modèle est très beau, merci pour les explications. Cependant je ne comprends pas le système de fermeture de l’épaule gauche… et votre explication en anglais à Juddy ne m’a pas éclairée… s’agit-il d’un système de brides ? Avez-vous une photo pour plus de clarté ? D’avance merci. Pascale
24.01.2024 - 21:22DROPS Design answered:
Bonjour Pascale, les 2 cordelières sont les brides de boutonnage, faites une boucle et enfilez cette boucle dans le rang de cassure de l'ourlet de l'épaule gauche, fixez ces cordelières avec quelques points puis pliez l'ourlet en double et cousez-le sur l'envers. Il suffit maintenant juste de coudre le boutons sur l'autre épaule, et de les attacher à l'aide des cordelières. Bon assemblage!
25.01.2024 - 09:17
|
|||||||
Princess Dream#princessdreamdress |
|||||||
|
|
|||||||
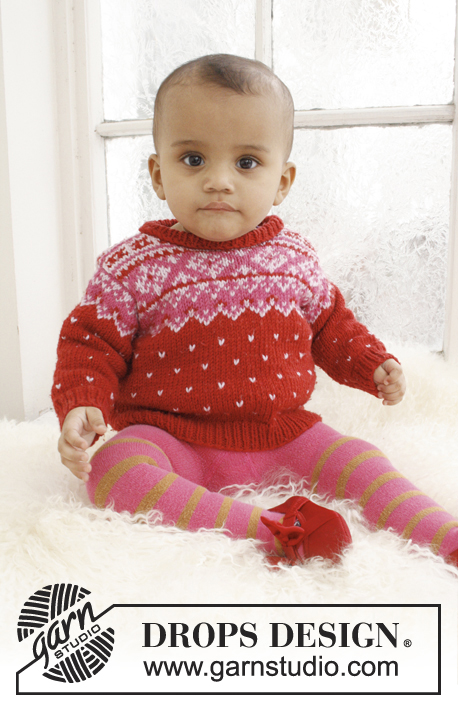
Knitted dress with Nordic pattern for baby and children in DROPS BabyMerino
DROPS Baby 21-17 |
|||||||
|
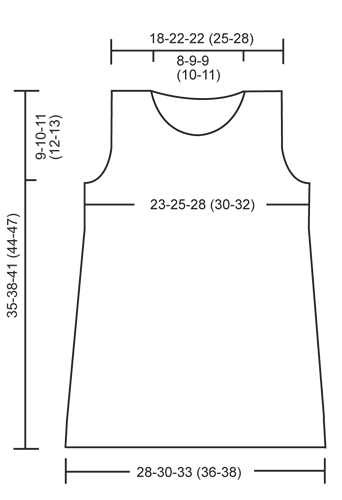
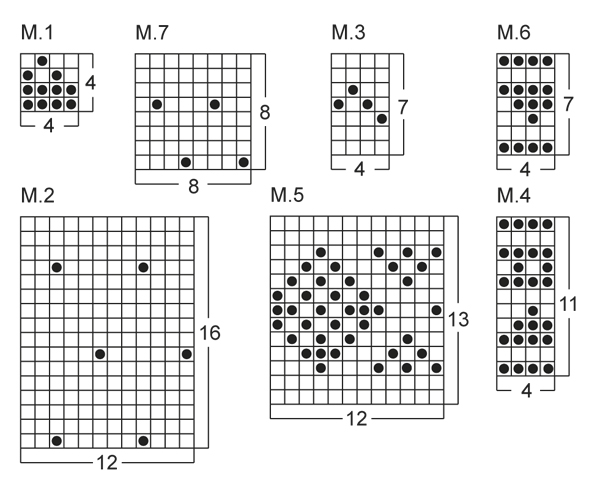
PATTERN: See diagrams M.1 - M.7. DECREASE TIP 1 (applies to body): Dec 1 st on each side of marker as follows: Work until 2 sts remain before marker, slip 1 st as if to K, K 1, psso, (marker), K tog the next 2 sts. DECREASE TIP 2 (applies to armholes): Dec 1 st in each side as follows: Work 4 sts in garter st, slip 1 st as if to K, K 1, psso, work until 6 sts remain, K the next 2 sts tog, work 4 sts in garter st. GARTER ST (back and forth on needle): K all rows. ---------------------------------------------------------- BODY: Worked in the round on circular needle. Cast on 144-156-172 (188-200) sts with cerise on circular needle size 2.5 mm / US 1or2. K for approx. 2.5 cm / ⅞", then P 1 round = folding edge, measure piece from here and work in stockinette st until finished measurements. REMEMBER THE GAUGE! K 1 more round and insert a marker in each side (= 72-78-86 (94-100) sts between markers on front and back piece). Then work diagram M.1 1 time vertically. Continue in stockinette st with cerise until piece measures 3 cm / 1⅛". Now dec 1 st on each side of every marker - Read DECREASE TIP 1 above = 4 sts dec on round. Repeat dec like this every 2-2½-2½ (2-2½) cm / ¾"-⅞"-⅞" (¾"-⅞") a total of 6-6-7 (8-8) times = 120-132-144 (156-168) sts. READ ALL OF THE FOLLOWING SECTION BEFORE CONTINUING. When piece measures 15-17-19 (21-23) cm / 6"-6¾"-7½" (8¼"-9") (all dec are now done), work diagrams M.2, M.3, and then M.4 1 time vertically. Then work rounds 1-3 in diagram M.5 (now piece measures approx. 26-28-30 (32-34) cm / 10¼"-11"-11¾" (12½"-13⅜")). On next round (= 4th round in diagram M.5), bind off 8 sts in each side (i.e. 4 sts on each side of every marker), now divide the piece and finish each part separately. BACK PIECE: = 52-58-64 (70-76) sts. The piece is worked back and forth in stockinette st until finished measurements. Work next row (= RS) as follows: Work 4 sts in garter st (= edge sts), dec 1 st - Read DECREASE TIP 2 above, work 5th row in diagram M.5 until 6 sts remain, dec 1 st - Read DECREASE 2 above, finish with 4 sts in garter st. Repeat dec inside 4 sts in garter st in each side, on each row from RS like this a total of 2-1-4 (3-2) times = 48-56-56 (64-72) sts. After diagram M.5 has been worked 1 time vertically, work diagrams M.6 and M.3 1 time vertically (with 4 sts in garter st in each side). P next row from WS, and then work diagram M.7 with 4 sts in garter st in each side until finished measurements. When piece measures 33-36-39 (42-45) cm / 13"-14¼"-15¼" (16½"-17¾"), bind off the middle 18-20-20 (22-24) sts for neck and finish each part separately. Bind off 2 sts on next row from neck = 13-16-16 (19-22) sts. When piece measures 35-38-41 (44-47) cm / 13¾"-15"-16⅛" (17¼"-18½"), bind off on right shoulder, work as follows on left shoulder: K 1 row from WS (= folding edge), then work in stockinette st for another 2.5 cm / ⅞". Bind off all sts. FRONT PIECE: = 52-58-64 (70-76) sts. The piece is worked back and forth in stockinette st until finished measurements. Then continue with charts as on back piece with 4 sts in garter st in each side and bind off for armhole as on back piece. When piece measures 29-32-35 (37-40) cm / 11⅜"-12½"-13¾" (14½"-15¾"), bind off the middle 12-12-14 (14-16) sts for neck and finish each part separately. Then bind off on next row from neck as follows: bind off 2 sts 1 time, 1 st 3-4-3 (4-4) times = 13-16-16 (19-22) sts remain on shoulder. When piece measures 35-38-41 (44-47) cm / 13 34"-15"-16⅛" (17¼"-18½"), bind off on right shoulder, and work a folding edge on left shoulder as on back piece: ASSEMBLY: Sew right shoulder seam. Make 1 strap as follows: Twine 2 strands of 20 cm / 8" with cerise and fold them double so that they twine. Make another strap the same way. On left back shoulder fold the edge inwards at the P round, and fasten the straps in the outer edge by folding them double and then pulling the ends through the folding edge, fasten the ends and then sew the edge to the back. Fold and sew the edge to the back of left front shoulder. Knit up from RS approx. 60-80 sts along the entire neck edge (through both layers of the folding edge in each side), then P 1 row from WS while at the same time adjusting no of sts to 66-70-74 (78-82). Continue to work rib as follows: * K 2, P 2 *, repeat from *-* the entire row. Loosely bind off all sts when rib measures approx. 1 cm / ½". Sew the buttons on to left front shoulder. Fold the bottom edge on the dress at the P round and fasten on the back. |
|||||||
Diagram explanations |
|||||||
|
|||||||
 |
|||||||
 |
|||||||
Have you finished this pattern?Tag your pictures with #dropspattern #princessdreamdress or submit them to the #dropsfan gallery. Do you need help with this pattern?You'll find 11 tutorial videos, a Comments/Questions area and more by visiting the pattern on garnstudio.com. © 1982-2026 DROPS Design A/S. We reserve all rights. This document, including all its sub-sections, has copyrights. Read more about what you can do with our patterns at the bottom of each pattern on our site. |
|||||||


With over 40 years in knitting and crochet design, DROPS Design offers one of the most extensive collections of free patterns on the internet - translated to 17 languages. As of today we count 325 catalogs and 12298 patterns - 12288 of which are translated into English (US/in).
We work hard to bring you the best knitting and crochet have to offer, inspiration and advice as well as great quality yarns at incredible prices! Would you like to use our patterns for other than personal use? You can read what you are allowed to do in the Copyright text at the bottom of all our patterns. Happy crafting!
Post a comment to pattern DROPS Baby 21-17
We would love to hear what you have to say about this pattern!
If you want to leave a question, please make sure you select the correct category in the form below, to speed up the answering process. Required fields are marked *.