
Popular categories
Looking for a yarn?


Comments / Questions (169)
![]() Drops Design wrote:
Drops Design wrote:
Joanne, yes you are correct. Only count the rows that you actually are working.
29.11.2011 - 03:48
![]() Joanne wrote:
Joanne wrote:
Hello again! I looked at the pattern instructions again, and I think I may have figured it out. If I don't count any of the short rows as being part of the cable pattern chart, it seems to work out. Is this correct? Thank you!
29.11.2011 - 03:15
![]() Joanne wrote:
Joanne wrote:
Hello! Could you please answer a question regarding short rows? When working the short rows in the yoke, on the first instance of "work until 2nd marker, turn, tighten yarn and work back", do I work row 3 of the M.1 cable pattern diagram for the "work until 2nd marker" part and then row 4 of the cable pattern for the "work back" part of the short row? Thank you very much.
25.11.2011 - 06:09
![]() Susan Jensen wrote:
Susan Jensen wrote:
Smuk og elegant
16.11.2011 - 17:26
![]() Drops Design wrote:
Drops Design wrote:
Alle 7x2 pinde skal strikkes i én del! *Strik 2 p over alle m, strik til 2.mærke, vend, stram tråden og strik tilbage, strik til 1.mærke, vend, stram tråden og strik tilbage strik 2 p over alle m, strik til 2.mærke, vend, stram tråden og strik tilbage, strik 2 p over alle m, strik til 1.mærke, vend, stram tråden og strik tilbage* 7x2 = 14 i den ene side 3x2 = 6 gange over alle masker Du kan prøve at tegne vendingerne, så kan du se at det stemmer.
12.10.2011 - 08:08
![]() Jette wrote:
Jette wrote:
Forkortede rækker, 1. del: Strik 2 p over alle m, strik til 2.mærke, vend, stram tråden og strik tilbage, strik til 1.mærke, vend, stram tråden og strik tilbage strik 2 p over alle m. 2. del: strik til 2.mærke, vend, stram tråden og strik tilbage, strik 2 p over alle m, strik til 1.mærke, vend, stram tråden og strik tilbage I 1. halvdel strikker man alle masker på hver tredie række. I 2. halvdel på hveranden række. Det giver IKKE forholdet 6:14 og kraven drejer ikke hurtigt nok.
11.10.2011 - 22:25
![]() Drops Design wrote:
Drops Design wrote:
Du strikker de forkortede pinde ifølge forklaringen for forkortede pinde! Jeg ved ikke hvilken 2.halvdel du mener...
11.10.2011 - 15:58
![]() Jette wrote:
Jette wrote:
Er der nogen der har bemærket, at hvis man følger opskriftens beskrivelse af forkortede rækker, så får man rapporter der giver 4 rækker foroven og 8 forneden og ikke forholdet 6:14. Det sidste får man kun, hvis man nøjes med at strikke til toppen hver tredie gang, som beskrevet i første havdel af beskrivelsen: forkortede pinde. Det får man ikke, hvis man tager 2. halvdel med hvor det står, at man skal strikke til toppen på hver 2. pind. Så hvad er rigtigt?
09.10.2011 - 11:18
![]() Jennie wrote:
Jennie wrote:
Om man samtidigt stickar mönster och vändningar så blir det med jämna mellanrum rapporter där man gör vändningar vid första markeringen på samma varv som man skulle gjort flätor, vilket leder till att på hela den rapporten stickas det inga flätor och istället blir det ett stort slätt parti. Jag ser att det inte ser ut så på bilden och undrar hur ni gjort för att slippa detta?
22.09.2011 - 08:27
![]() DROPS Design NL wrote:
DROPS Design NL wrote:
Bedankt voor de opmerking. U kunt ook altijd een sokkenbreinaald gebruiken ipv een kabelnld. Wij zullen het noteren!
09.09.2011 - 11:15
|
|||||||||||||||||||
Forest Nymph#forestnymphdress |
|||||||||||||||||||
|
|
|||||||||||||||||||
Knitted DROPS dress with yoke worked across with cables, short rows and crochet edge in ”Delight” and ”Kid-Silk”.
DROPS 132-1 |
|||||||||||||||||||
|
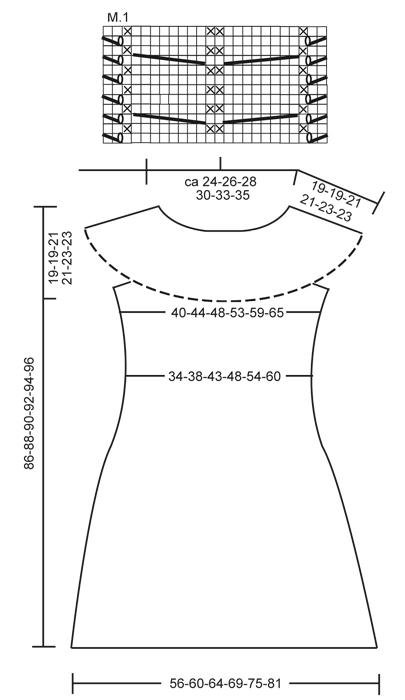
GARTER ST (back and forth on needle): K all rows. GARTER ST (in the round on circular needle): * K 1 round and P 1 round *, repeat from *-*. SHORT ROWS: To make the yoke wider at the bottom, work more rows over the bottom sts than the upper sts. This is done as follows: * Work 2 rows over all sts, work until 2nd marker, turn, tighten yarn and work back, work until 1st marker, turn, tighten yarn and work back, work 2 rows over all sts, work until 2nd marker, turn, tighten yarn and work back, work 2 rows over all sts, work until 1st marker, turn, tighten yarn and work back *, repeat from *-*, i.e. 1 repetition = 6 rows at the top and 14 rows at the bottom. PATTERN: See diagram M.1. Diagram shows 1 repetition of pattern in width (= 24 sts), the diagram shows pattern from RS. MEASURING TIP: Measure when piece is flat, it is important not to stretch the piece when measuring. DECREASE TIP: Work until 2 sts remain before marker, K 2 tog, marker, slip 1 st as if to K, K 1, psso. INCREASE TIP: Work until 1 st remains before marker, make 1 YO, work 2 sts (marker is between these 2 sts), make 1 more YO. On next round K YOs twisted (i.e. work in back loop of st instead of front) to avoid holes . -------------------------------------------------------- -------------------------------------------------------- YOKE: Worked back and forth on circular needle, worked sideways from mid back. LOOSELY cast on 32-32-36-36-40-40 sts on circular needle size 5 mm / US 8 with 1 strand Delight and 1 strand Kid-Silk. K 2 rows over all sts (1st row beg from bottom edge from RS). Work next row as follows (from RS): K 10-10-13-13-16-16, K 2 tog, 1 YO, K 1, K 2 sts in each of the next 4 sts (= K 8), K 2, K 2 in each of the next 4 sts (= K 8), K 1, 1 YO, slip 1 st as if to K, K 1, psso, K 6-6-7-7-8-8 = 40-40-44-44-48-48 sts. Work next row as follows (from WS): K 6-6-7-7-8-8, P 2, K 1, P 8, K 2, P 8, K 1, P 2 and K 10-10-13-13-16-16. Insert 2 markers in the piece as follows (from RS): 1st marker after 13-13-16-16-19-19 sts and 2nd marker after a total of 31-31-34-34-37-37 sts = 9-9-10-10-11-11 sts remain at the top after 2nd marker. Then work SHORT ROWS – see explanation above and PATTERN as follows: 10-10-13-13-16-16 sts in GARTER ST – see explanation above, diagram M.1 over the next 24 sts and 6-6-7-7-8-8 sts in garter st. Work until piece measures approx. 112-120-128-140-152-164 cm / 44"-47"-50½"-55"-60"-64½" measured along the bottom edge – SEE MEASURING TIP – finish after 2 rows have been worked on all sts. Work next row as follows (from RS): K 13-13-16-16-19-19, K the next 8 sts tog 2 by 2, K 2, K the next 8 sts tog 2 by 2, K 9-9-10-10-11-11 = 32-32-36-36-40-40 sts. K 1 row over all sts, then bind off all sts with K from RS. Piece measures approx. 114-122-130-142-154-166 cm / 45"-48"-51"-55¾"-60½"-65¼" at bottom edge. INSERTING MARKERS: Remove the markers in the piece and insert 4 new markers as follows: Place piece flat on a table and measure along the longest side. First find centre of piece – measure 18-20-21½-24-26½-29½ cm / 7"-8"-8½"-9½"-10½"-11½" from centre out to each side – insert a marker in each side (i.e. there are 36-40-43-48-53-59 cm / 14¼"-15¾"-17"-19"-21"-23¼" between markers on front piece), then measure 18-20-21½-24-26½-29½ cm / 7"-8"-8½"-9½"-10½"-11½" in from bind off edge and cast on edge (= back piece) – insert markers here. There are now approx. 21-21-22-23-24-24 cm / 8¼"-8¼"-8¾"-9"-9½"-9½" in each side between markers on front and back piece (= armholes). Sew yoke tog, sew edge to edge mid back to avoid a chunky seam. BODY: Worked in the round on circular needle. Knit up sts along bottom edge of yoke with 1 strand Delight and 1 strand Kid-Silk on circular needle size 5 mm / US 8 – start round at marker in transition between left sleeve and back piece. Knit up 1 st in front loop of st in every ridge (1 ridge = 2 rows in garter st) between markers on back piece (approx. 60 to 98 sts), cast on 6-6-8-8-10-10 new sts (= under sleeve), skip to first marker on front piece and knit up 1 st in front loop of sts in every ridge on front piece (= approx. 60 to 98 sts), cast on 6-6-8-8-10-10 new sts (= under the other sleeve). NOW MEASURE PIECE FROM HERE! P 1 round while at the same time adjusting the no of sts to 136-148-162-180-200-220. Remove markers and insert 4 new markers as follows: K 14-15-16-18-20-22 sts, insert a marker, K 34-38-41-46-50-56 sts, insert a marker (these 2 markers marks where waistline should be worked on back piece), K 34-36-40-44-50-54 sts, insert a marker, K 34-38-41-46-50-56 sts, insert a marker (these 2 markers marks where waistline should be worked on front piece), K rest of round (= 20-21-24-26-30-32 sts). On next round, P 10-10-12-12-14-14 sts under each sleeve, K the remaining sts. Continue in stockinette st over all sts. REMEMBER THE GAUGE! When piece measures 10 cm / 4", dec 1 st on each side of the 4 markers - READ DECREASE TIP! Repeat dec when piece measures 15 cm / 6" = 120-132-146-164-184-204 sts. When piece measures 20-21-21-22-22-23 cm / 8"-8¼"-8¼"-8¾"-8¾"-9", inc 1 st on each side of the 4 markers – see INCREASE TIP. Repeat inc every 8 rounds a total of 9 times = 192-204-218-236-256-276 sts. When piece measures 63-65-65-67-67-69 cm / 24¾"-25½"-25½"-26⅜"-26⅜"-27⅛", K 1 round while at the same time dec 12 sts evenly. Then work 4 cm / 1½" in garter st. LOOSELY bind off. CROCHET LACE EDGE: Crochet an edge in bottom st in garter st along yoke (i.e. in same st that was knit up on body). Hold piece with neck opening towards you, work with 1 strand Kid-Silk on hook size 3.5 mm/E/4 as follows – start mid back as follows: ROUND 1: 1 sc in first ridge (1 ridge = 2 rounds in garter st), * ch 3, 1 sc in next ridge *, repeat from *-* the entire round, finish with ch 3 and 1 sl st in first sc on round (adjust so that there is an even number of ch-spaces). ROUND 2: ch 2, 1 sc in first ch-space, * ch 5, 1 sc in next ch-space, ch 1, 1 sc in next ch-space*, repeat from *-*, finish with 1 sl st (instead of 1 sc) in first sc on round. ROUND 3: Work as follows in each of the large ch-space (= 5 ch): 1 sc, 5 dc, 1 sc and work 1 sc in each of the small ch-spaces (= 1 ch), finish with 1 sl st at beg of round, fasten off. Steam iron the lace edge well to make it fold nicely downwards. |
|||||||||||||||||||
Diagram explanations |
|||||||||||||||||||
|
|||||||||||||||||||
 |
|||||||||||||||||||
Have you finished this pattern?Tag your pictures with #dropspattern #forestnymphdress or submit them to the #dropsfan gallery. Do you need help with this pattern?You'll find 17 tutorial videos, a Comments/Questions area and more by visiting the pattern on garnstudio.com. © 1982-2026 DROPS Design A/S. We reserve all rights. This document, including all its sub-sections, has copyrights. Read more about what you can do with our patterns at the bottom of each pattern on our site. |
|||||||||||||||||||


With over 40 years in knitting and crochet design, DROPS Design offers one of the most extensive collections of free patterns on the internet - translated to 17 languages. As of today we count 324 catalogs and 12290 patterns - 12280 of which are translated into English (US/in).
We work hard to bring you the best knitting and crochet have to offer, inspiration and advice as well as great quality yarns at incredible prices! Would you like to use our patterns for other than personal use? You can read what you are allowed to do in the Copyright text at the bottom of all our patterns. Happy crafting!
Post a comment to pattern DROPS 132-1
We would love to hear what you have to say about this pattern!
If you want to leave a question, please make sure you select the correct category in the form below, to speed up the answering process. Required fields are marked *.