
Popular categories
Looking for a yarn?


Comments / Questions (88)
![]() Stina wrote:
Stina wrote:
Hej! Har börjat sticka denna kofta och har fastnat efter de första inledande varven rätstickning. Jag stickar den i strl L och får från "8 m RÄTST..." inte ihop maskantalet. Hur jag än räknar får jag det till 154 m, inte 156 som det står i mönstret. Var gör jag fel? Mvh, Stina
26.04.2013 - 23:29DROPS Design answered:
8 m RÄTST – se förkl ovan, 3 am, *1 rm, 1 omslag*, upprepa *-* 5-5-5-6-6-6 ggr, 1 rm, 1 am, *-* 5-5-5-6-6-6 ggr, 1 rm, 3 am, 55-60-65-66-71-76 rm SAMTIDIGT som det ökas 14-16-17-16-15-16 m jämnt fördelat (öka 1 m genom att göra 1 omslag), 3 am, *-* 5-5-5-6-6-6 ggr, 1 rm, 1 am, *-* 5-5-5-6-6-6 ggr, 1 rm, 3 am och 8 m RÄTST = 143-150-156-164-168-174 m på st. = 8+3+10+2+10+1+3+65+17+3+10+2+10+1+3+8=156 m
03.05.2013 - 10:09
![]() Elaine wrote:
Elaine wrote:
This is a stunningly beautiful pattern! But no matter how I try the set up row doesn't work out to the correct # of stitches. L Front piece, 8 sts in GARTER ST...I get 140 sts not 143 and the next row I count 142...please help! I can't wait to knit this!! thank you elaine
21.03.2013 - 15:17DROPS Design answered:
Dear Elaine, on first row you will inc 5 sts (K1, YO) a total of 4 times + 14 sts over the 55sts = 20+14 = 34 inc + 109 = 143 sts. Happy knitting!
25.03.2013 - 11:55
![]() Elaine Stokes wrote:
Elaine Stokes wrote:
This pattern claims to be kntted sideways. I interpret this to mean that if knitted in self striping wool the stripes shoul dbe vertical on the front. If this is the case I can't work out how the M1 pattern works at all. All help gratefully received!! Elaine
18.03.2013 - 22:20DROPS Design answered:
Dear Mrs Stokes, you are correct, in that case, the stripes will be vertical on the back piece as well as on the front piece, but front piece are quite long and "hang down" so that it looks as in the picture. See the diagram at the very bottom of the pattern and knitting direction may help you to vizualize how it is. Happy knitting!
19.03.2013 - 09:59
![]() Paula wrote:
Paula wrote:
Bedankt, had het ondertussen ook zo begrepen alvast bedankt voor de uitleg.dacht dat 3recht,2 samen steeds moest herhalen
20.02.2013 - 17:12
![]() Paula wrote:
Paula wrote:
Brei de volgende nld als volgt 8 st in Ribbelst, 3 st recht, 2 st recht samen 5-5-5-6-6-6 keer, 3 st recht, 2 st recht samen 5-5-5-6-6-6 keer, 3 st recht, 69-76-82-82-86-92 st recht en minder TEGELIJKERTIJD 14-16-17-16-15-16 st gelijkmatig, 3 st recht, 2 st recht samen 5-5-5-6-6-6 keer, 3 st recht, 2 st recht samen 5-5-5-6-6-6 keer, 3 st recht en brei 15-16-16-17-17-18 st in Ribbelst = 116-122-127-133-138-144 st. Brei 1 nld recht aan de verkeerde kant over alle st.
19.02.2013 - 15:38DROPS Design answered:
Dus.... als je bijvoorbeeld maat S breit, dan brei je nu: 8 st in ribbelst, 3 recht, 2 st r samen 5 keer (= 10 st worden hier 5 st), 3 r, 2 st r samen 5 keer, 3 r, 69 st r en minder hier tegelijkertijd 14 st, 3 r, 2 st r samen 5 keer, 3 r, 2 st recht samen 5 keer, 3 r en 15 st in ribbelst. Je hebt dan 116 st op de nld. Brei 1 nld r aan de verkeerde kant (terugg naald) over alle st.
20.02.2013 - 09:02
![]() Paula wrote:
Paula wrote:
Ik begrijp het laatste gedeelte van het linkervoorpand niet
19.02.2013 - 13:25DROPS Design answered:
Kan je een beetje duidelijker uitleggen wat je niet begrijpt. Dan kan ik ook beter helpen met uitleggen :-)
19.02.2013 - 14:11
![]() Claudia wrote:
Claudia wrote:
Ich finde diese Jacke wunderschön und stelle mir die Frage, ob man sie nicht einfach durchgehend Stricken könnte, dann würde man sich die Naht hinten sparen?! Ich bin noch nicht so versiert und frage deshalb lieber nach! Danke für diese schöne Seite!! Claudia
06.02.2013 - 16:52DROPS Design answered:
Liebe Claudia, wir empfehlen die Jacke wie beschrieben zu stricken ,nur so wird das Muster symmetrisch und das Strickstück wird beim Stricken auch nicht zu groß.
06.02.2013 - 18:04
![]() Connie wrote:
Connie wrote:
Hvornåe kan jeg forvente svar på mit spørgsmål. kan ikke rigtig komme videre uden? se spørgsmål nedenfor
19.09.2012 - 00:32DROPS Design answered:
Kære Connie. Vi får rigtig mange henvendelser på bloggen. Vi prøver at svare så hurtigt vi kan, men du kan forvente ventetid – du kan også altid henvende dig til din DROPS butik for hurtig hjælp.
19.09.2012 - 10:25
![]() Connie wrote:
Connie wrote:
Er gået helt i stå -på sidste pind. Der står 3 r 2msammen 6 gange- men det står der 2 gange, så er det 12 gange? så får jeg det ikke til at passe med de 82 m hvor jeg skal tage ind16 gange. Og, hvis jeg -som det passer med mønsteret kun strikker 3-2 6 gange i hver side, så passer det ikke med 133 m tilsidst i str. XL. hvad skal jeg rette mig efter+ HJÆLP
16.09.2012 - 16:11DROPS Design answered:
Du skal læse det som følger i str XL: 8 m retstrik, 3 r, 2 m r sammen 6 gange (=12 m bliver 6 m), 3 r, 2 r sammen 6 gange (=12 m bliver 6 m), 3 r, 82 r Samtidig med at der tages 16 m ind jævnt fordelt (=82 m bliver 66 m), 3 r, 2 r sammen 6 gange (=12 m bliver 6 m), 3 r, 2 r sammen 6 gange(=12 m bliver 6 m), 3 r og 17 m Retstrik = 133 m.
19.09.2012 - 10:22
![]() Isabella Lederer wrote:
Isabella Lederer wrote:
Hallo, was kostet den das porto nach deutschland wenn ich wolle bestelle? danke und schöne grüße isabella
06.08.2012 - 21:53DROPS Design answered:
Sie können bei einem der deutschem Läden bestellen, die Sie unter "Händlersuche" - "Deutschland" finden.
08.08.2012 - 17:00
|
||||||||||||||||||||||||||||||||||
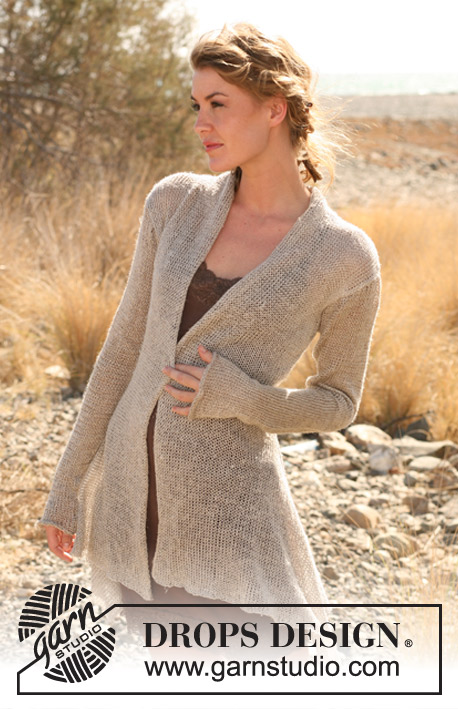
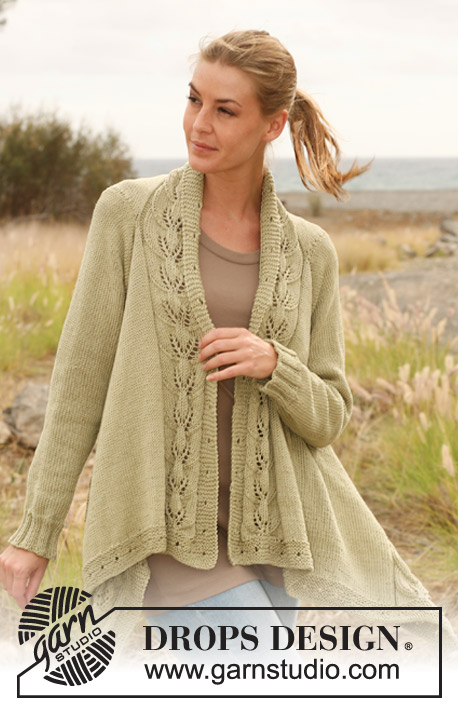
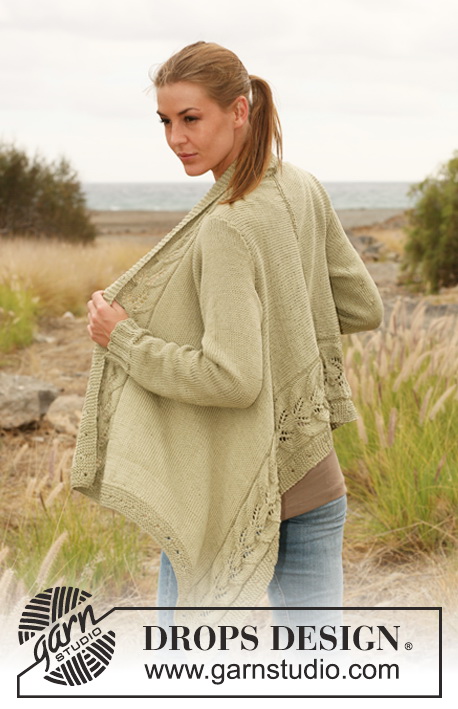
Timeless Grace#timelessgracecardigan |
||||||||||||||||||||||||||||||||||
 |
 |
|||||||||||||||||||||||||||||||||
Knitted DROPS jacket worked sideways with lace pattern in "Muskat". Size: S - XXXL
DROPS 129-1 |
||||||||||||||||||||||||||||||||||
|
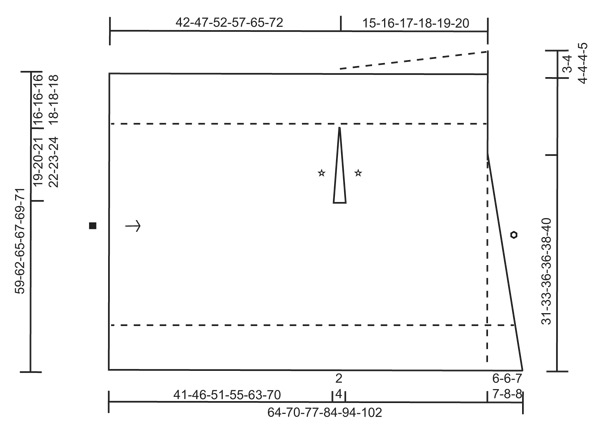
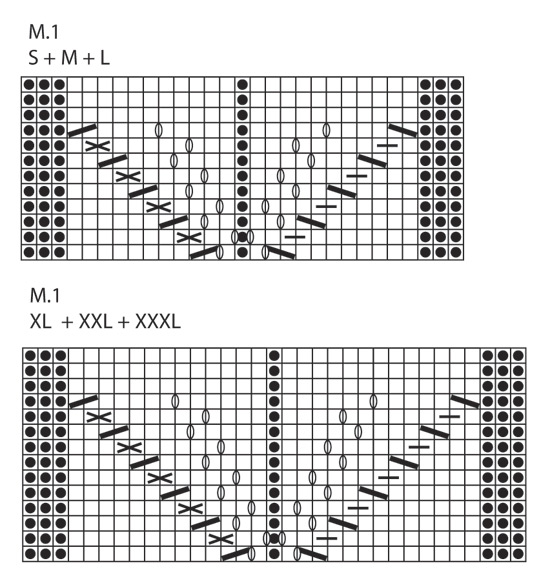
PATTERN: See diagram M.1. The diagram shows the pattern from RS. See diagram for your size! GARTER ST (back and forth on needle): K all rows. GARTER ST (in the round): *K 1 round and P 1 round*, repeat from *-*. --------------------------------------------------------- JACKET: The garment is knitted back and forth on circular needle because of no of sts. Work the jacket from mid front on left front piece and out towards the side, bind off for sleeve and continue until mid back before binding off. Then work right front piece the same way but reversed from mid front before the garment is sewn tog mid back. Finish by knitting and sewing in the sleeves. LEFT FRONT PIECE: Cast on 109-114-119-124-129-134 sts on circular needle size 4 mm / US 6 with Muskat. K 7 rows back and forth over all sts (1st row = from WS). Continue working next row from RS as follows: * K3, K2 tog, 1 dbl YO (= 2 YO) *, repeat from *-* and finish with K4. Then K 7 rows over all sts (K one YO, slip the other YO off the needle). Work next row as follows (from RS): 8 sts in GARTER ST - see explanation above, P3, * K1, 1 YO *, repeat from *-* 5-5-5-6-6-6 times in total, K1, P1, *-* 5-5-5-6-6-6 times in total, K1, P3, K 55-60-65-66-71-76 sts while AT THE SAME TIME inc 14-16-17-16-15-16 sts evenly (inc 1 st by making 1 YO), P3, *-* 5-5-5-6-6-6 times in total, K1, P1, *-* 5-5-5-6-6-6 times in total, K1, P3 and 8 sts in garter st = 143-150-156-164-168-174 sts on needle. Work next row as follows (from WS): 8 sts in garter st, K3, P 11-11-11-13-13-13 sts, K1, P 11-11-11-13-13-13 sts, K3, P 69-76-82-82-86-92 sts, K3, P 11-11-11-13-13-13 sts, K1, P 11-11-11-13-13-13 sts, K3 and 8 sts in garter st (NOTE! P YO twisted, i.e. in back loop of st instead of front to avoid holes). READ ALL OF THE FOLLOWING SECTION BEFORE CONTINUING! Continue to work as follows (from RS): NOTE! See diagram for size! 8 sts in garter st, diagram M.1, K 69-76-82-82-86-92 sts, M.1 and 8 sts in garter st. AT THE SAME TIME make 1 hole in the 8 sts in garter st each side on every 14th row (every 7th ridge) as follows: At beg of row (from RS): K3, K2 tog, 1 dbl YO, K3. At end of row (from RS): K2, K2 tog, 1 dbl YO, K4. On next row work 8 sts in garter st each side as before (K one YO, slip the other YO off the needle). AT THE SAME TIME approx. every 4 cm / 1½" work 2 extra rows back and forth only over the 8 sts in garter st each side (this is done so that the edge in garter st does not tighten the edge of piece). REMEMBER THE GAUGE! When piece measures approx. 41-46-51-55-63-70 cm / 16⅛"-18"-20"-21⅝"-24¾"-27½" - adjust so that next row is knitted from RS - slip the outermost 79-81-83-89-91-93 sts in the left side of piece (seen from RS) on a stitch holder. Work 6-6-6-10-10-10 rows as before (= approx. 2-2-2-4-4-4 cm / ¾"-¾"-¾"-1½"-1½"-1½") over the remaining 64-69-73-75-77-81 sts on needle. Cut the thread. Then slip these sts on a stitch holder. Slip the 79-81-83-89-91-93 sts from the first stitch holder back on circular needle size 4 mm / US 6 and work armholes as follows from RS: Size S + M + L: bind off the first 40-42-44 sts at beg of row, work the remaining 39 sts on needle as before. Now insert a marker in the outermost st in the right side of needle (seen from RS - this marks where the sleeve cap is sewn into the armhole). Turn piece, work the 39 sts as before and then cast on 40-42-44 sts at the end of row. Cut the thread. Size XL + XXL + XXXL: bind off the first 23-24-25 sts at beg of row, work the remaining 66-67-68 sts on needle as before, turn piece. Work the 66-67-68 sts on the needle as before, turn piece. Bind off the first 23-24-25 sts at beg of row, work the remaining 43 sts on needle as before. Now insert a marker in the outermost st in the right side of needle (seen from RS - this marks where the sleeve cap is sewn into the armhole). Turn piece, work the 43 sts on needle as before and cast on 23-24-25 new sts at the end of row, turn piece. Work the 66-67-68 sts on the needle as before, turn piece. Work the 66-67-68 sts on needle as before and cast on 23-24-25 new sts at the end of row. Cut the thread. ALL SIZES: Now slip the 64-69-73-75-77-81 sts from the stitch holder back on needle = 143-150-156-164-168-174 sts. Continue to work as before over all sts (1st row = RS). AT THE SAME TIME increase for collar in the left side seen from RS. Inc 1 st by making 1 YO inside the outermost 2 sts. On next row K YO twisted to avoid holes. Work the inc sts in garter st. The holes in the 8 sts in garter st are made the same way and same place as before. Inc 1 st for collar every 2 cm / ¾" a total of 7-8-8-9-9-10 times (= 15-16-16-17-17-18 sts in garter st) = 150-158-164-173-177-184 sts. When piece measures 56-62-68-74-83-91 cm / 22"-24⅜"-26¾"-29⅛"-32¾"-35¾" (measured in left side of piece seen from RS, piece measures approx. 57-63-69-76-85-93 cm / 22½"-24¾"-27⅛"-30"-33½"-36⅝" in the right side), work 1 row from RS as before. Inc for collar should now be finished. Continue to work with short rows to add extra width mid back as follows (start at beg of row from WS = from neckline): Work the first 68-70-71-76-76-78 sts on needle and then slip these sts on a stitch holder, work the remaining sts on the needle, turn piece and work back over all sts, turn piece, * work the first 7-7-6-7-6-7 sts on the needle, then slip sts on the same stitch holder and work the remaining sts on the needle, turn piece and work back over all sts *, repeat from *-* a total of 7-7-8-8-10-10 times. Then work the first 25-31-37-33-33-28 sts on needle, slip the sts on the same stitch holder and work the remaining 8 sts on needle. Slip all sts back on needle. Work next row as follows (from RS): 8 sts in garter st, K3, K2 tog 5-5-5-6-6-6 times, K3, K2 tog 5-5-5-6-6-6 times, K3, K 69-76-82-82-86-92 sts while AT THE SAME TIME dec 14-16-17-16-15-16 sts evenly, K3, K2 tog 5-5-5-6-6-6 times, K3, K2 tog 5-5-5-6-6-6 times, K3 and work 15-16-16-17-17-18 sts in garter st = 116-122-127-133-138-144 sts. K 1 row from WS over all sts. The piece now measures approx. 57-63-69-75-84-92 cm / 22½"-24¾"-27⅛"-29½"-33"-36¼" in the left side (seen from RS) and 64-70-77-84-94-102 cm / 25¼"-27½"-30⅜"-33"-37"-40" in the right side, measured in knitting direction! bind off LOOSELY. RIGHT FRONT PIECE: Cast on and work as left front piece but reversed, i.e all measurements that were done in the left side of piece (seen from RS) are now done in the right side of piece (seen from RS). When working the 6-6-6-10-10-10 rows under the sleeve adjust so that the first row is worked from WS (instead of RS) and the outermost 79-81-83-89-91-93 sts in the left side of piece (seen from WS, not RS) are slipped on a stitch holder. Continue to follow explanation for sleeve from WS (instead of RS). Finish by working the short rows mid back by starting at beg of row from RS (instead of beg of row from WS). SLEEVE: Cast on 54-54-54-60-60-60 sts on double pointed needles size 3.5 mm / US 4 with Muskat. K 1 round. Continue to work rib K3/P3. When rib measures 6-6-7-7-8-8 cm / 2⅜"-2⅜"-2¾"-2¾"-3⅛"-3⅛", K 1 round while AT THE SAME TIME dec 6-4-2-6-6-4 sts evenly = 48-50-52-54-54-56 sts. Switch to double pointed needles size 4 mm / US 6. Insert a marker at beg of round = mid under sleeve. Continue to work in the round in stockinette st. AT THE SAME TIME when piece measures 9-9-11-11-13-13 cm / 3½"-3½"-4⅜"-4⅜"-5⅛"-5⅛", inc 2 sts mid under sleeve (= 1 st each side of marker). Repeat inc every 4½-3½-2½-2-1½-1½ cm / 1½"-1¼"-⅞"-¾"-½"-½" a total of 9-11-13-15-18-20 times = 66-72-78-84-90-96 sts. Continue to work until piece measures 49-48-47-46-45-44 cm / 19¼"-19"-18½"-18"-17¾"-17¼" (NOTE! Shorter measurements in the larger sizes because of longer sleeve cap and broader shoulder width). Now bind off 10 sts mid under sleeve (5 sts each side of marker) and continue to work back and forth in stockinette st. Continue working while AT THE SAME TIME binding off 1 st at beg of every row a total of 11-12-13-15-16-18 times each side. Then bind off 5 sts at beg of the next 2 rows. The piece now measures approx. 58 cm / 22¾" in all sizes. Bind off the remaining sts. ASSEMBLY: Sew the jacket tog mid back inside the bind off edge so that there are 2 garter st mid back. Sew in the sleeves - NOTE: Sew sleeve cap against the marker on the shoulder and sew the sleeve in each side along the opening of armhole marked with a star in the chart. |
||||||||||||||||||||||||||||||||||
Diagram explanations |
||||||||||||||||||||||||||||||||||
|
||||||||||||||||||||||||||||||||||
 |
||||||||||||||||||||||||||||||||||
 |
||||||||||||||||||||||||||||||||||
Have you finished this pattern?Tag your pictures with #dropspattern #timelessgracecardigan or submit them to the #dropsfan gallery. Do you need help with this pattern?You'll find 26 tutorial videos, a Comments/Questions area and more by visiting the pattern on garnstudio.com. © 1982-2026 DROPS Design A/S. We reserve all rights. This document, including all its sub-sections, has copyrights. Read more about what you can do with our patterns at the bottom of each pattern on our site. |
||||||||||||||||||||||||||||||||||


With over 40 years in knitting and crochet design, DROPS Design offers one of the most extensive collections of free patterns on the internet - translated to 17 languages. As of today we count 325 catalogs and 12298 patterns - 12288 of which are translated into English (US/in).
We work hard to bring you the best knitting and crochet have to offer, inspiration and advice as well as great quality yarns at incredible prices! Would you like to use our patterns for other than personal use? You can read what you are allowed to do in the Copyright text at the bottom of all our patterns. Happy crafting!
Post a comment to pattern DROPS 129-1
We would love to hear what you have to say about this pattern!
If you want to leave a question, please make sure you select the correct category in the form below, to speed up the answering process. Required fields are marked *.